USER MANUAL
Thank you for purchasing the Sharper Image Color Weather Station. Please take a moment to read this guide and store it for future reference.
FEATURES
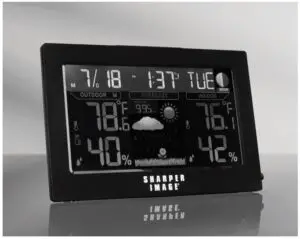
- Compact system displays time, date, temperature and weather forecast
- Six weather forecast graphics (Sunny, Partly Sunny, Cloudy, Rainy, Stormy and Snowy)
- Syncs with U.S. Atomic Clock
- Displays indoor and outdoor temperature in °C or °F
- Barometric pressure display
- Displays indoor and outdoor humidity
- Displays time, date and day
- Digital alarm with snooze
- Automatic Daylight Savings Time update (optional)
- Displays mood phase
- Low battery indicator
- Dimmable LED backlight
- Includes wireless weather sensor (requires 2 AA batteries)
- Battery backup (requires 3 AAA batteries)
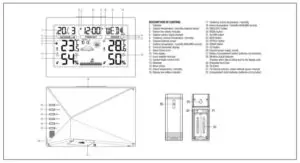
FUNCTION OF BUTTONS

DEFAULT SETTINGS
When the device is first plugged in, the default settings are as follows:
- Default time: 2015 / 12:00 / Thursday
- Default temperature: °F
- Barometer unit: hPa
- Weather forecast: Partly Sunny
GETTING STARTED
- Place 2 AA batteries (not included) into the wireless weather sensor.
- Place or hang the sensor outdoors.
- The range is 150 ft. (50m) unobstructed. The wireless range may be reduced by trees, walls, windows, etc.
- Do not place sensor in direct sunlight as this will give you an inaccurate temperature reading.
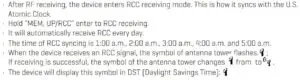
When you first insert batteries or plug in the device, you will hear 1 beep, then the device will go into a self-test mode, then RF receiving mode (for weather sensor), followed by RCC receiving mode (to sync with U.S. Atomic clock). This will take about 3 minutes.
Note: If you would like the clock to set itself, simply leave it alone and it should sync overnight with the U.S. Atomic Clock. Or, you may set it manually with the following steps.
TIME SETTING MODE
- In the time display mode, Press “MODE” for 2 seconds to enter time setting.
The value to be set will start flashing. - Time zone setting: The default is EST. Press “UP” or “DOWN” to select PST, MST, CST, EST, AST or NST.
- NST: Newfoundland Standard Time
AST: Atlantic Standard Time
EST: Eastern Standard Time
CST: Central Standard Time
MST: Mountain Standard Time
PST: Pacific Standard Time - Press “MODE” (or no key for 20 seconds) so exit and save the setting.
- Repeat this process to set the other values.
- Press “UP/RCC, MEM” to advance one step at a time. Or, press and hold it to advance 8 steps per second.
- Press “DOWN/CH” to go back one step at a time. Or, press and hold it to go back 8 steps per second.
- Press “MODE” (or no key for 20 seconds) so exit and save the setting.
ALARM SETTING MODE
- In standard mode, press “ALM” quickly to enter alarm mode.
- In alarm mode, press “ALM” to turn the alarm ON or OFF. The alarm icon will appear to disappear.
- In alarm mode, hold the “ALM” button to enter the alarm setting mode. The hour value will begin to flash.
- The setting order is Hour >>> Minute >>> Exit.
- Press “UP/RCC, MEM” to advance one step at a time. Or, press and hold it to advance 8 steps per second.
- Press “DOWN/CH” to go back one step at a time. Or, press and hold it to go back 8 steps per second.
- Press “MODE” (or no key for 20 seconds) so exit and save the setting.
ALARM AND SNOOZE
The alarm will sound in the following sequence:
- 1 Beep for 1-10 seconds.
- 2 Beeps for 11-20 seconds.
- 3 Beeps for 21-30 seconds.
- Constant beeps for 31-120 seconds
- While the alarm is beeping, the alarm icon will flash.
- While the alarm is beeping, press the “SNZ / LIGHT” to active snooze. The alarm will snooze” for 10 minutes, then resume beeping.
- To turn the alarm off, press any key OTHER THAN “SNZ / LIGHT” to return to normal time mode.
DAYLIGHT SAVINGS TIME (DST) MODE
- Most states observe Daylight Savings Time.
- To turn DST on or off, hold the “MODE” button into setting mode. You will see “EST” flashing. Press “MODE” again. You will see “ON” flashing. The “ON” means DST function is on. Press “UP” or “DOWN” to turn off the DST.
- When DST is on, this unit will update the time automatically to comply with Daylight Savings Time.
SELECTING FAHRENHEIT OR CELSIUS
- The default temperature unit is degrees Fahrenheit (°F).
- To switch to Celsius, press and hold the “MODE” button. You will see “EST” flashing.
- Press the “MODE” button 9 more times to scroll through the other settings. You will see °F flashing.
- Press “UP” or “DOWN” to switch from Fahrenheit to Celsius.
- Press “MODE” to confirm your selection and exit.
INDOOR TEMPERATURE
- The indoor temperature range is 0 °C / 32 °F to 50 °C / 122 °F.
- Testing cycle: 30 seconds
- Temperature resolution +/- 2 °F
- If the current temperature exceeds the maximum temperature, the device will display the maximum temperature.
- If the current temperature is below the minimum temperature, the device will display the minimum temperature.
OUTDOOR TEMPERATURE
- The outdoor temperature range is -30 °C / -32 °F ~ +60 °C / 140 °F
- Temperature resolution +/- 2 °F
- If the current temperature exceeds the maximum temperature, the device will display the maximum temperature.
- If the current temperature is below the minimum temperature, the device will display the minimum temperature.
TEMPERATURE TRENDS
The device checks the temperature for trends every 30 minutes, comparing the current temperature with the temperature from 3 hours ago.
- If the temperature rises 1 °C / 2 °F, the device will display an upward arrow.
- If the temperature drops 1 °C / 2 °F, the device will display a downward arrow.
- If the temperature stays within 1 °C / 2 °F, the device will display a horizontal arrow.
RECEIVING RF AND RCC SIGNALS
The device will register RF signal for 3 minutes automatically when powered by battery, then enter RCC receiving.
In RF registration process, the antenna symbol increases as follows:
- When it registers the RF signal successfully, it will display the maximum signal .
- During the sync process, if receive fails once, then the signal will change to .
- If synchronization continues to fail, the last antenna symbol will be displayed .
- If the RF register fails or loses signal for more than 1 hour, the antenna symbol will flash .
- If RF synchronization failures reach one hour, then automatically open long receiving mode (3 minutes), antenna symbol progressive increase (reserved ID).
- If RF synchronization failure more than 1 hour, and long receiving also fails; then the display is temperature digit 3 seconds, 1 second switch.
- If RF synchronization failure more than 2 hours, automatically open long receiving mode (3 minutes) to clear ID every hour.
- When RF temperature is 15.8°F to 30.2°F, the device will display 28.4°F. When RF temperature is below 14° F, the device will display 10.4°F.
TO CLEAR AND RESET ALL DATA: In standard mode, press “DOWN/CH” to switch channel, hold “DOWN/ CH” button to re-register the RF (clear ID and all RF data). You will then receive new data.
RCC FUNCTION
TIP: If your time display is off by an hour, be sure the time zone and the DST are set correctly.
BACKLIGHT
- When powered by AC adapter, the backlight will always be on.
- Press the “SNZ / LIGHT” button to switch the brightness from High >> Low >> OFF.
- When powered by battery only, the backlight will be off (to conserve power).
Press the “SNZ / LIGHT” button to active the backlight for 10 seconds.
LOW BATTERY INDICATOR
The main unit and sensor will show when the battery is low. Please replace battery
as soon as possible.
WEATHER FORECAST GRAPHICS
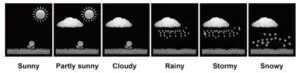
TIP: The Color Weather Station requires approximately 12 hours to become familiar with your elevation and barometric pressure. Please allow at least 12 hours for it to provide its first forecast. Additionally, please keep in mind that this device provides the forecast for the NEXT 12 hours. The graphic icon may not match the current conditions outside.
BAROMETER UNITS
- This device can predict the coming weather by sensing changes in barometric pressure.
- The default barometer unit is hPa (hectopascals)
- To switch the barometer from hPa to inHg (inches of mercury):
- When you are in setting mode, press the “MODE” button to find the setting
barometer units (hPa/inHg). - Press “UP” or “DOWN” to change the unit.
- If the barometer rises or drops 2 hPa within one hour, the unit will display an up or down arrow. If the barometer changes less than 2 hPa, the unit displays a horizontal arrow.
FCC STATEMENT
This device complies with Part 15 of the FCC Rules. Operation is subject to the following two conditions: (1) This device may not cause harmful interference, and (2) this device must accept any interference received, including interference that may cause undesired operation.
WARNING
Do not use this product near water or in wet areas, to avoid fire or injury from electric current. Always turn off the product when it is not in use. Do not open or modify the Color Weather Station. There are no user-serviceable parts.
BATTERY DISPOSAL
This symbol appearing on the product, on the product accessories or on the product packing means that the product must not be disposed as household waste. When the product/ battery durability is over, please, deliver the product or battery (if it is enclosed) to the respective collection point, where the electrical appliances or batteries will be recycled. The places, where the used electrical appliances are collected, exist in the European Union and in other European countries as well. By
proper disposal of the product you can prevent possible negative impact on environment and human health, which might otherwise occur as a consequence of improper manipulation with the product or battery / accumulator. Recycling of materials contributes to protection of natural resources. Therefore, please, do not throw the old electrical appliances and batteries / accumulators in the household waste. Information, where it is possible to leave the old electrical appliances for free, is provided at your local authority, at the store where you have bought the product. Information, where you can leave the batteries and accumulators for free, is provided to you at the store, at your local authority.
WARRANTY AND CUSTOMER SERVICE
Sharper Image branded items purchased from SharperImage.com include a 1-year limited replacement warranty. If you have any questions not covered in this guide, please call our Customer Service department at 1 (877) 210-3449. Customer Service agents are available Monday through Friday, 9:00 a.m. to 6:00 p.m. ET.