Q09
MAGIC SNAPSHOT
![]()
GIMBAL STABILIZER
USER MANUAL
FUNCTION PARAMETERS
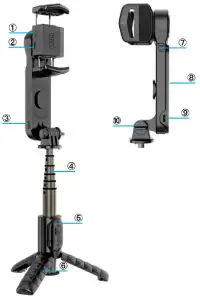
| 1. Stabilizer power switch | 6. Tripod |
| 2. Stabilizer charging port | 7. Gimbal Unlock Key |
| 3. Light power/adjust button | 8. Lamp |
| 4. Aluminum alloy tube | 9. Lamp Charging Port |
| 5. Wireless Remote a | 10. Manually tighten screws |
TAKE OUT/LOAD
Take out the remote control.
REPLACE THE BATTERY
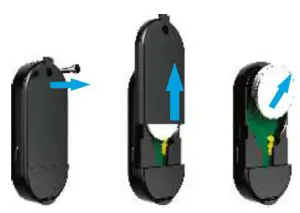
Remove the screw Slide the battery cover up. You can replace the battery.
OPEN THE TRIPOD
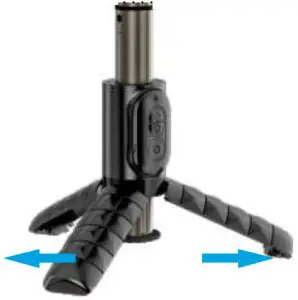
Open outwards at the bottom of the handle, Tripod in seconds.
BLUETOOTH CONNECTION
- Power on: Long press the button of the self-timer for 3 seconds to power on.
- Bluetooth pairing: the indicator flashes for 4 seconds to enter the matching state, and the indicator flashes in the matching state. Use your mobile phone to search for “Gimbal” to match, and the indicator turns off after successful pairing.
- Camera button: Long press: switch machine; Click: take a picture or record (start/stop).
- No pairing: after startup, it will automatically shut down for 5 minutes without operation in the unpaired connection state.
- Pairing: After startup, when the self-timer is connectedto the mobile phone, it will enter the sleep state if thereis no operation for 10 minutes, and it will automatically shut down if there is no operation for another 10 minutes.
- Shutdown: Long press the “Photo” button for 3 seconds under power-on and dormant state, and the light flashes and goes off.
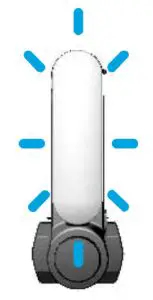
FILL LIGHT
Operation of fill light
Long press: switch machine
Click: adjust the light mode and brightness /Turn of the flash mode
Double press: turn on flash mode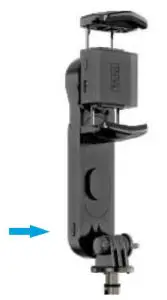
Lighting mode:
White: soft light, medium light, strong light
Warm: soft light, medium light, strong light White + warm: soft light, medium light, strong light.
- Al any lime, icing press the on key, turn ott the light and remember
Number of white lights: 16 Warm lights: 16
White light color temperature: 6500K Lumen: 46LM Power: 0.44W
Warm light color temperature: 3000K Lumen: 44LM Power: 0.44W
Mixed light color temperature: 4413K Lumen:64LM Power: 0.62W
Battery capacity: 600mAh
Power consumption: 0.5W
Operating voltage/output voltage: 3.7V
Operating current/output current: 0.16A
Charging voltage/input voltage: 5V
Charging current/input current: 450mA
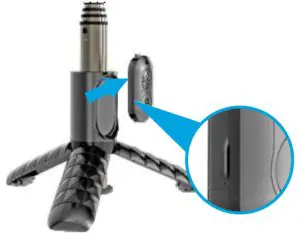
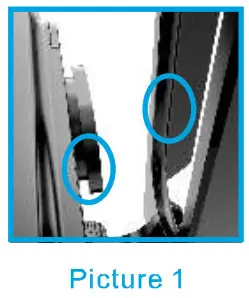
REMOVABLE FILL LIGHT
Take out the backlight from the selfie stick and rotate it 180° horizontal. Rotate 180° vertically and move it to the front of the selfie stick,Align with the hollow concave and convex groove on the selfie stick and install it (Picture 1)
Then move down and fix it.
REMOTE CONTROL
Note: The phone’s camera must be on the same side as the power button in order not to interfere with the shooting.
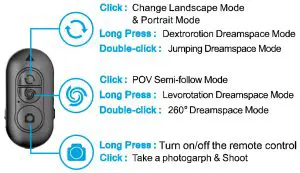 Note: Heine refer to “Bluetooth Connection” for Bluetooth connection method.
REMINDER: if you need to download the app, you can scan the code on the long arm to down:dad and unlock
DREAM SPACE MODE(UPSIDE-DOWN MODE)
Jumping Dreamspace Mode:
When the phone is landscape mode, levorotation 40°, dextrorotation 230°, levorotation 230°, dextrorotation 20° (back to the original position);
When the phone is in portrait mode, dextrorotation 125°, levorotation 125° and 145°, dextrorotion 145° (back to its original position)
260° Dreamspace Mode (Left/Right):
When the phone is landscape mode, dextrorotion 50° to levorotation 310°, start shooting with a delay of 1s;
When the phone is portrait mode, levorotation 310° to dextrorotion 50°, start shooting with a delay of 1s.
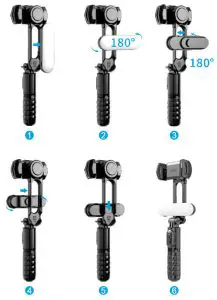
FUNCTION DISPLAY DIAGRAM
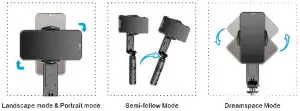
HOW TO USE THE HEAD
 Clamp the phone and keep the natural balance. Long press the power button for 5 seconds to turn it on, and long press 3 seconds to turn it off.
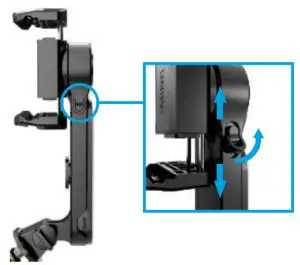 Pull the ring of the manual lock outwards, Slide up to lock the gimbal as a selfie stick; (Note that the lock ring is pressed down and locked) Swipe down to unlock the gimbal as a stabilizer.
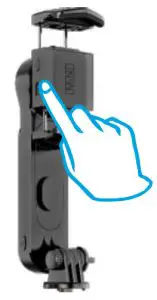
HOW TO CHARGE THE GIMBAL
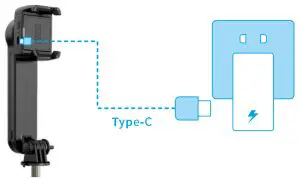
When the battery of the pearly head is too low, there will be a red light flashing reminder. At this time, the Micro USB interface should be used to charge. During the charging process, the red light will be long and the red light will be off after the charging is completed.
SPECIFICATION
- Main Material: Aluminum alloy+ABS
- Mount Holder:37-90mm
- Collapsed Lenght:158.5mm
- Extended Lenght:700mm
- Product reference:158.5x61x75mm
- Weight: 235g
- Remote control battery: CR1632
- Working voltage: 3.7V
- Working current: about 400mA
- Charging voltage: DC5V
- Charging current: 450mA
(Batteries must not be exposed to sunlight, fire or similar overheating)

- Selfie Stick compatible with Android4.4 and above(if you change the system’s “volume button function” under your phone’s camera option, be sure to change it to default, or “take apicture” to make the selfie stick work)
- The clip must be held tightly when the phone is clamped.
1. Gimbal Stabilizer Mode: the best use in the 3 rods
2 Selfie Stick Mode:6 rods are recommended
Thank you for your support!

This device complies with Part 15 of the FCC Rules. Operation is subject to the following two conditions: (1) this device may not cause harmful interference, and (2) this device must accept any interference received, including interference that may cause undesired operation.
Changes or modifications to this unit not expressly approved by the party responsible for compliance could void the user’s authority to operate the equipment.
NOTE: This equipment has been tested and found to comply with the limits for a Class B digital device, pursuant to Part 15 of the FCC Rules. These limits are designed to provide reasonable protection against harmful interference in a residential installation. This equipment generates, uses and can radiate radio frequency energy and, if not installed and used in accordance with the instructions, may cause harmful interference to radio communications. However, there is no guarantee that interference will not occur in a particular installation. If this equipment does cause harmful interference to radio or television reception, which can be determined by turning the equipment off and on, the user is encouraged to try to correct the interference by one or more of the following measures:
- Reorient or relocate the receiving antenna.
- Increase the separation between the equipment and receiver.
- Connect the equipment into an outlet on a circuit different from that to which the receiver is connected.
- Consult the dealer or an experienced radio/TV technician for help.
This device and its antenna(s) must not be co-located or operation in conjunction with any other antenna or transmitter.
Radiation Exposure Statement
The device has been evaluated to meet general RF exposure requirement. in portable exposure condition without restriction.