![]()
User Manual
| the Gebrauchsanleitung | it manual utente |
| fr Manuel d’utilisation | NL User manual |

http://siemens-home.bsh-group.com/welcome
Register your product on My Siemens and discover exclusive services and offers.
siemens-home.bsh-group.com/welcome The future moving in.
Observe the following safety instructions.
1.1 General instructions
Read this manual carefully.
Keep the operating instructions and product information for future reference or for subsequent owners.
Do not connect the device in case of transport damage.
1.2 Destination of the device
Only use the device:
for cooling and freezing food and for preparing ice cubes.
for domestic use and in enclosed spaces within the domestic environment.
to an altitude of 2000 m above sea level.
1.3 Restriction of users
This appliance can be used by children aged 8 years and above and persons with reduced physical, sensory or mental capabilities or lack of experience and/or knowledge if they have been given supervision or instruction concerning the use of the appliance in a Safeway and understand the resulting hazards. understood. Children must not play with the appliance. Cleaning and user maintenance shall not be made by children unless they are supervised.
Children from 3 years old and under 8 years old are allowed to fill and empty the fridge/freezer.
1.4 Safer transport
![]() WARNING ‒ Risk of injury!
WARNING ‒ Risk of injury!
The heavyweight of the device can cause injuries when lifted.
- Do not lift the device alone.
Secure installation
![]() WARNING — Risk of electric shock! Improper installations are dangerous.
WARNING — Risk of electric shock! Improper installations are dangerous.
- Only connect and use the device in accordance with the information on the type plate.
- Only connect the device to a mains supply with an alternating current via a properly installed earthing socket.
- The protective earth system of the electrical house installation must be installed in accordance with the electrical engineering regulations.
- Never power the device via an external switching device, e.g. a time switch or remote control.
- When the device is installed, the mains plug of the mains connection cable must be freely accessible, or if free access is not possible, an all-pole disconnecting device must be installed in the permanently installed electrical system in accordance with the installation instructions.
- When setting up the device, make sure that the power cord is not pinched or damaged.
Damaged power cord insulation is dangerous. - Never bring the connecting cable into contact with heat sources.
![]() WARNING — Risk of explosion!
WARNING — Risk of explosion!
If the ventilation openings of the device are closed, a flammable gas-air mixture can form in the event of a cold circuit leak.
- Do not block ventilation openings in the housing of the device or in the installation housing.
![]() WARNING — Risk of fire!
WARNING — Risk of fire!
Using an extended power cord and unauthorized adapters is dangerous.
- Do not use extension cords or multiple sockets.
- If the power cord is too short, contact customer service.
- Only use adapters approved by the manufacturer.
Portable mobile multiple power outlets or portable power supplies can overheat and cause a fire.
- Do not place portable mobile multiple power outlets or portable power supplies on the back of the devices.
Safe use
![]() WARNING — Risk of electric shock!
WARNING — Risk of electric shock!
Penetrating moisture can cause an electric shock.
- Only use the device in closed rooms.
- Never expose the device to excessive heat and humidity.
- Do not use a steam cleaner or high-pressure cleaner to clean the appliance.
![]() WARNING — Risk of suffocation!
WARNING — Risk of suffocation!
Children can pull packing material over their heads and become entangled and suffocate.
- Keep packaging material away from children.
- Do not let children play with packaging material.
Children can inhale or swallow small parts and choke. - Keep small parts away from children.
- Do not allow children to play with small parts.
![]() WARNING — Risk of explosion!
WARNING — Risk of explosion!
Damage to the refrigerant circuit can cause flammable refrigerants to leak and explode.
- Do not use mechanical devices or means other than those recommended by the manufacturer to accelerate defrosting.
- Loosen frozen food with a blunt object, eg with the handle of a wooden spoon.
Products with flammable propellants and explosive substances can explode, eg aerosol cans. - Do not store products with flammable propellants and explosive substances in the device.
![]() WARNING – Risk of fire!
WARNING – Risk of fire!
Electrical appliances inside the appliance can lead to a fire, e.g. heating appliances or electric ice-cream makers.
- Do not use electrical appliances inside the appliance.
![]() WARNING – Risk of injury!
WARNING – Risk of injury!
Bottles or cans of carbonated drinks may burst.
- Do not keep bottles or cans of carbonated drinks in the freezer compartment.
Injury to the eyes from leaking flammable refrigerant and harmful gases. - Do not damage the pipes of the refrigerant circuit and the
The device can tilt. - Do not stand or lean on the plinth, drawers, or doors.
![]() WARNING – Risk of burns!
WARNING – Risk of burns!
Parts on the back of the appliance become hot during use.
- Never touch the hot parts.
![]() WARNING – Risk of cold burns!
WARNING – Risk of cold burns!
Contact with frozen foods and cold surfaces can cause cold burns.
- Never put frozen food in your mouth after it has been taken out of the freezer compartment.
- Avoid prolonged skin contact with frozen foods, ice, and freezer compartment surfaces.
![]() CAUTION – Risk of health hazard!
CAUTION – Risk of health hazard!
Observe the following instructions to avoid contamination of foodstuffs.
- Opening the door for an extended period of time can lead to a significant increase in temperature in the compartments of the
- Clean surfaces that come into contact with food and accessible drainage systems regularly.
- Store raw meat and fish in suitable containers in the refrigerator in such a way that it does not come into contact with or drip onto other foodstuffs.
- If the refrigerator/freezer is left empty for a long time, switch off the appliance, defrost, clean and leave the door open to prevent mold from forming.
Parts of the device made of metal or with a metallic appearance may contain aluminum. When acidic foods come into contact with aluminum, aluminum ions can transfer to the foods. - Do not consume contaminated food.
Damaged device
![]() WARNING — Risk of electric shock!
WARNING — Risk of electric shock!
A damaged appliance or damaged power cord is dangerous.
- Never use a damaged device.
- Never pull on the power cord to disconnect the device from the power supply. Always pull the plug on the power cord.
- If the appliance or the mains cable is damaged, immediately unplug the mains cable from the socket or switch off the fuse in the fuse box.
- Contact customer service. -Page 111
Improper repairs are dangerous. - Only qualified personnel may carry out repairs on the device.
- Only original spare parts may be used to repair the device.
- If the power cord of this appliance is damaged, it must be replaced by the manufacturer, its service agent, or a similarly qualified person in order to avoid a hazard.
![]() WARNING ‒ Risk of fire!
WARNING ‒ Risk of fire!
If the pipes are damaged, flammable refrigerant and harmful gases can escape and ignite.

- Keep fire and ignition sources away from the device.
- Ventilate the room.
- Turn off the device. →Page 99
- Pull the mains plug out of the socket or switch off the fuse in the fuse box.
- Contact the service department. →Page 111
Preventing material damage
PAY ATTENTION!
Using the plinth, drawers, or appliance doors as a seat or step can damage the appliance.
- Not on the plinth, drawers, or doors standing or leaning.
Contamination with oil or grease can make plastic parts and door seals porous. - Keep plastic parts and doors sealing oil and grease-free.
Parts of the device made of metal or with a metallic appearance may contain aluminum. Aluminum reacts on contact with acidic foods. - No foodstuffs unpackaged in-store the device.
Environmental protection and savings
3.1 Disposing of the packaging
The packaging materials are environmentally friendly and can be reused.
- The individual components are on the kind of separate disposal.
3.2 Saving energy
If you follow these directions, your device will use less power.
Choice of installation location s Does not expose the device to di- direct sunlight.
Preventing material damage NL
Place the appliance as far as possible body from radiators, stove, and other heat sources:
– Keep a distance of 30 mm from electric or gas stoves.
– Keep a distance of 300 mm from oil and coal stoves.
Keep a small distance to the sidewall on.
Never open the external ventilation opening cover or close.
Save energy when using.
Remark: The arrangement of the equipment parts has no influence on the energy consumption of the appliance.
Open the device only briefly and close it carefully.
Never enter the ventilation openings Benin, or cover or close the ventilation grilles on the outside.
Transport refrigerated foodstuffs parts in a cool bag and put them in the appliance quickly.
Warm food and drinks first to cool, then place in the appliance.
To avoid the cold of the deep- to use frozen products, put them in the refrigerator compartment for thawing.
Always leave some space between the legs equipment and the back wall.
4 Set up and connect
4.1 Scope of delivery
After unpacking, check all parts for transport damage and the completeness of the delivery.
In case of complaints, please contact your dealer or our service → Page 111 contact on.
The delivery consists of:
NL Set up and connect
Freestanding device
Equipment and accessories
Assembly instructions
Instructions
Customer service overview
Warranty Supplement2
Energy label
Information about energy consumption and sounds
4.2 Criteria for the installation location
WARNING
Risk of explosion!
If the appliance is located in a room that is too small, a flammable gas-air mixture can form in the event of a leak in the cooling circuit.
- Only set the device to a space, which has a volume of at least 1 m3 per 8 g of refrigerant.
The amount of refrigerant is stated on the rating plate. →fig. 1 / 5
The weight of the device can be up to 120 depending on the model.
The surface must be stable enough to support the weight of the appliance.
Permissible room temperature
The permitted room temperature depends on the climate class of the device.
The climate class can be found on the type plate. →fig. 1 / 5
Climate- Permitted space class temperature SN 10 °C…32 °C
Depending on the device version
Not in all countries
| Climate class | Permitted space temperature |
| N | 16 °C…32 °C |
| ST | 16 °C…38 °C |
| T | 16 °C…43 °C |
The device is fully functional within the permitted indoor temperature.
If you use a device of the climate class SN at lower room temperatures, damage to the device up to a room temperature of 5 °C can be excluded.
4.3 Mounting the device
- The device is in accordance with the install the installation manual.
4.4 Preparing the device for the first use
- Remove the information material.
- Remove the protective film and transport safeguards, eg adhesive strips and cardboard.
- Cleaning the device for the first time. →Page 105
Connecting the appliance electrically
- Insert the mains plug of the appliance’s connecting cable into a socket in the vicinity of the appliance.
The connection data of the device can be found on the type plate. → fig. 1 / 5
2. Check the mains plug for tightness.
The device is now ready for use.
Getting to know your appliance nen
Device
Here you will find an overview of the components of your device. → Fig. 1
| a | Cooling compartment → Page 102 |
| b | Freezer compartment → Page 103 |
| 1 | Relief |
| 2 | Bottle rack → Page 97 |
| 3 | Storage drawer → Page 98 |
| 4 | Fruit and vegetable drawer → Page 98 |
| 5 | Rating plate → Page 112 |
| 6 | freezer drawer → Page 106 |
| 7 | Leveling foot |
| 8 | Control panel → Page 97 |
| 9 | Door rack for large bottles → Page 98 |
Remark: Differences between your device and the images may be based on equipment and size.
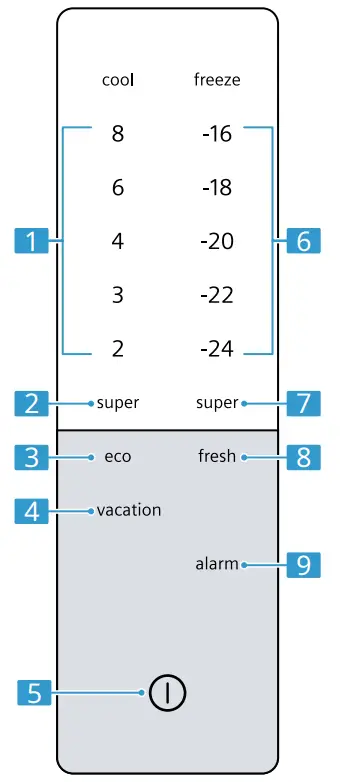
5.2 Control panel
You can set all functions of your device and obtain information about the operating status via the control panel. → Fig. 2
Getting to know your device NL
| 1 | Shows the set temperature of the refrigerator compartment in °C. |
| 2 | super (refrigerator compartment) switches Supercooling in or out. |
| 3 | Turn power saving mode on or off. |
| 4 | switches the holiday mode on or off. |
| 5 | turns on the device or from. |
| 6 | Shows the set temperature of the freezer compartment in °C. |
| 7 | (freezer compartment) switches Super Freeze on or off. |
| 8 | switches the Fresh mode in or out. |
| 9 | switches the warning wings signal off. |
Equipment
The equipment of your appliance depends on the model.
6.1 Shelf
To vary the shelves as desired, you can remove the shelf and put it back in a different position. → “Remove platform”, page 106
6.2 Bottle rack
Store bottles safely on the bottle rack.
To vary the bottle rack as desired, you can remove the bottle rack and put it back in a different location. → “Remove platform”, page 106
NL The Ministry in essence
6.3 Storage drawer
Lower temperatures prevail in the storage drawer than in the refrigerator compartment. Temperatures below 0 °C may occur temporarily.
To achieve temperatures close to 0°C in the storage drawers set the refrigerator compartment temperature to 2°C.
Use the lower temperatures in the drawer to store food that spoils quickly, e.g. fish, meat, and sausage.
6.4 Fruit and vegetable drawer
Store fresh fruit and vegetables packed in the fruit and vegetable drawer. Store sliced fruits and vegetables covered or in an airtight container. Depending on the type of food and the amount, condensation may form in the fruit and vegetable drawer.
Remove the condensation water with a dry cloth. To ensure that the quality and aroma are preserved, you should store cold-sensitive fruit and vegetables outside the appliance at temperatures of approx. 8 °C to 12 °C, e.g. pineapple, bananas, citrus fruits, gherkins, zucchini, peppers, tomatoes, and potatoes.
6.5 Door racks
To vary the door rack as required, you can remove the door rack and place it in a different position.
→ “Remove Door Rack”, Page 106
Accessories
Use only original accessories. These are adapted to the device. The accessories of the device depending on the model.
egg tray Store eggs safely on the egg tray.
ice cube tray
Use the ice cube tray to make ice cubes.
Making ice cubes Use only drinking water to make ice cubes.
- Fill the ice cube tray ¾ full with drinking water and place it in the freezer compartment. Only loosen frozen ice cube trays with a blunt object, e.g. the handle of a spoon.
- To loosen the ice cube tray, twist the ice cube tray slightly or hold it briefly under running water.
The Ministry in essencetie
7.1 Switch on device
- Connect the appliance electrically.
→ Page 96
Remark: If the device was previously turned off via the control panel, 3 seconds keep pressed.
The appliance starts to cool.
A warning beep will sound signal and the temperature display flashes because the freezer compartment is still too warm. - Switch off the warning signal with.
a goes out as soon as the set temperature is reached. - Set the desired temperature.
→ Page 99
Notes on use
When you have set up the device switched on, it takes up to a few hours before the set temperature is reached.
Do not put food in the appliance until the set temperature has been reached.
The front sides of the housing are temporarily heated. This prevents condensation from forming in the area of the door seal.
When you close the door, pressure arises. The door will then be more difficult to open. Wait a moment until the negative pressure is compensated.
Switching off the machine
- Hold for 3 seconds.
Set temperature
Set fridge compartment temperature
- Press the desired temperature now.
The recommended temperature in the refrigerator compartment is 4 °C.
Set freezer temperature - Press the desired temperature.
The recommended temperature in the freezer compartment is −18 °C.
8 Additional Features
8.1 Supercooling
With Supercooling, the refrigerator compartment cools as cold as possible.
Switch on Super Cool before loading large quantities of food.
Remark: If Super Cool is on, there may be more noise.
Enable super cooling
- Press (refrigerator compartment).
a (refrigerator compartment) lights up.
Remark: After approx. 6 hours, the device switches to normal operation.
Switch off super cooling - (refrigerator compartment) press.
Automatic Super Freeze
With automatic Super Freezing, the freezer compartment cools significantly at a lower temperature than in normal operation. As a result, the food freezes faster to the core.
The automatic Super Freeze switches on when you place fresh food in the bottom freezer drawer starting from the right.
Automatic Super Freeze is activated at the factory. You can deactivate the automatic Super Freeze. When the automatic Super Freeze is on, (freezer compartment) lights up and there may be more noises.
The appliance switches to normal operation after the automatic Super Freeze has expired.
Activate Auto Super Freeze
- (freezer compartment) press and hold for 5 seconds. If there are 2 acoustic signals are heard, the automatic Super Freeze is activated.
Deactivate Automatic Super Freeze - (freezer compartment) press and hold for 5 seconds. If there are 3 acoustic signals are heard, the automatic Super Freeze is deactivated.
Auto Cancel Super Freeze - Press (freezer).
Manual Super Freeze
With Super Freezing, the freezer compartment cools as cold as possible.
Switch on Super Freeze 4 to 6 hours before loading a quantity of food from 2 kg into the freezer compartment.
To take advantage of the freezing power, use Super Freeze.
→ “Freezing power conditions gen”, Page 103
Remark: If Super Freeze is on, there may be more noise.
Manual Super Freeze switch
- Press a (freezer) lights up. (freezer).
Remark: After approx. 54 hours, the device switches to normal operation.
Manual Super Freeze
Switch off - Press (freezer).
Vacation mode
If you are away for a longer period of time, you can switch the device into energy-saving holiday mode.
CAREFULLY
Risk of health hazard!
While the holiday mode is switched on, the refrigerator compartment heats up. The increased temperature allows bacteria to multiply and spoil the food.
- When holiday mode is switched on so do not store food in the refrigerator compartment.
The device sets the temperatures automatically.
| refrigerator compartment | 14 °C |
| bottle compartment | the temperature on- altered |
| Freezer | the temperature on- altered |
Enable holiday mode
- impressions. burns.
Switch off holiday mode - impressions.
Energy Saving Mode
Energy-saving mode switches the device to energy-saving mode.
The device automatically changes the temperatures.
| refrigerator compartment | 8 °C |
| bottle compartment | the temperature on- altered |
| Freezer | −16 °C |
Energy Saving Mode switch
- impressions. is lit.
Energy Saving Mode
Switch off - impressions.
Fresh mode
To keep the food fresh for longer, you can switch on the fresh cooling mode of the appliance.
The device automatically changes the temperatures.
| refrigerator compartment | 2°C |
| bottle compartment | the temperature on- altered |
| Freezer | the temperature on- altered |
Enable fresh mode
- impressions. is lit.
Disable fresh mode - impressions.
Sabbath Mode
So that you can also use the device on Sabbaths, Sabbath mode disables all functions that are not absolutely necessary.
The following functions are disabled during Sabbath mode:
Supercooling
Automatic Super Freeze and manual Super Freeze
Alarm
Indoor lighting
Acoustic signals
Messages on the control panel Neel
Remark: During Sabbath mode, the control panel backlight turns off. burns with reduced brightness.
Enable Sabbath Mode pressed for 15 seconds
- until an acoustic signal sounds. burns.
Remark: After approx. 80 hours, the device switches to normal operation.
Disable Sabbath Mode - pressed for 15 seconds until an acoustic signal sounds.
Alarm
Door alarm
If the door of the appliance is left open for a long time, the door alarm is activated.
A warning signal sounds, flashes, and the temperature display of the corresponding compartment flashes.
Disable door alarm
- Close or open the appliance door alarm to press.
a The warning signal is off switched.
Temperature alarm
When it is too hot in the freezer compartment, the temperature alarm is activated.
A warning signal sounds, the set temperature (freezer compartment), and flash alarm
![]() CAREFULLY Risk of health hazard!
CAREFULLY Risk of health hazard!
When defrosting, bacteria can multiply and the frozen food can go bad.
- Half or completely defrosted frozen were not refreezing.
- Do not cook or roast the food until freeze again.
- The maximum retention time no longer take full
The temperature alarm may activate in the following cases:
The appliance is in user names.
Do not put food in the appliance until the set temperature has been reached.
Large amounts are packed food. Switch on Super Freeze before placing large quantities of food in the appliance.
The freezer compartment door is too long opened.
Check whether the frozen product is partially or completely thawed.
Disable temperature alarm
- a The warning signal is off switched.
atelngerar compartment
In the refrigerator compartment, you can store meat, sausage, fish, dairy products, eggs, ready meals, and bread and pastries.
The temperature is adjustable from 2 °C to 8 °C.
The cold storage also allows you to store slightly perishable foodstuffs in the short or medium term. The lower the temperature selected, the longer the food will remain fresh.
Tips for storing food in
Ira rungaretoe ceenpaqmant
Only fresh and undamaged clearing out resources.
Store the food in the airtightly packed or covered.
Leave warm food and drinks cool down first.
Keep the manufacturer’s instructions the best before date or use date.
Cold zones in the refrigerator compartment
The air circulation in the refrigerator compartment creates different cold zones.
Coldest zone
The coldest zone is between the arrow stamped on the side and the shelf underneath.
Tip: Store quickly perishable food in the coldest zone, e.g. fish, sausage and meat.
Warmest zone
The warmest zone is at the very top of the door.
Tip: Store less sensitive foods in the warmest zone, eg hard cheese and butter. As a result, the aroma of the cheese develops better and the butter remains spreadable.
freezer compartment
You can store frozen food, freeze food and make ice cubes in the freezer compartment.
The temperature is adjustable from -16 °C to -24 °C.
Long-term storage of foodstuffs should be at a temperature of -18 °C or lower.
Freezing allows you to store perishable foods for a long time. The low temperatures slow down or stop spoiling.
Freezing capacity
The freezing capacity indicates which amount of food can be frozen to the core in how many hours.
Information about the freezing capacity can be found on the type plate. -fig
Conditions for freezing capacity
I.Approx. 24 hours before loading fresh food, switch on Super Freeze.
— ‘Manual Super Freeze switch”, page 100 2. Place the food in the bottom freezer drawer, starting from the right.
Fully use freezer
compartment volume Find out how to put the maximum amount of frozen food in the freezer compartment.
- Remove all equipment.
— Page 106 - Store the food directly on the shelves and the bottom of the freezer compartment.
Tips for storing food in the Ice: er compartment
Store the food in the air tightly packed.
Bring food to be frozen not in contact with frozen food.
The foodstuffs are side by side placed in the compartments or freezer drawers.
For larger quantities of fresh to freeze food quickly and carefully, place it in the lower freezer drawers.
For good air circulation in pushing the appliance into the freezer drawer as far as it will go.
11.4 Tips for freezing fresh foodlen
Only fresh and impeccable freezing foodstuffs.
Foods per portion frozen zen.
Prepared foods are better suitable than raw edible foods.
Wash vegetables before freezing reduce and blanch.
Wash fruit before freezing, destone and peel if necessary, add sugar or ascorbic acid solution if necessary.
Food suitable for freezing
Foods such as baked goods, fish and seafood, meat, game and poultry, eggs without shells, cheese, butter, quark, ready meals, and leftovers.
Food unsuitable for freezing
Foods are eg lettuce, radishes, eggs with shell, grapes, red apples and pears, yogurt, sour cream, Fraiche, and mayonnaise.
Pack frozen foods
Suitable packaging material and the right type of packaging largely preserve product quality and avoid freezer burn.
- Place the food in the packaging.
- Push the air out.
- Seal the package airtight to prevent the food from losing its flavor or drying out.
- Provide the packaging with the contents of the freezing date.
Shelf life of the frozen food at
The freezer calendar printed on it indicates the maximum storage time in months at a constant temperature of -18°C.
11.6 Defrosting methods for frozen food
![]() CAREFULLY Risk of health hazard!
CAREFULLY Risk of health hazard!
When defrosting, bacteria can multiply and the frozen food can go bad.
- Half or completely defrosted frozen were not refreezing.
- Do not cook or roast the food until freeze again.
- The maximum retention time no longer takes full advantage.
Animal foods in the defrost refrigerator compartment. e.g. fish me* Cheese and cottage cheese.
Bread at room temperature thaw.
Foodstuffs for direct con-preparation in the microwave, in the oven, or on the stove.
| Product | Storage time |
| fish, sausage, ready-made dishes, bread, and banquet | Up to 6 months Pine tree |
| Poultry, meat | Up to 8 Mon- Pine tree |
| Vegetable fruit | Up to 12 Mon- Pine tree |
Defrosting in the freezer compartment
Thanks to the fully automatic “NoFrost” system, the freezer compartment remains frost-free. Thawing is not necessary.
.1 Cleaning and maintenance love
Carefully clean and maintain your device to ensure that it continues to function properly for a long time.
The cleaning of inaccessible places must be carried out by the after-sales service. There may be costs associated with cleaning by the service department.
Preparing the device for cleaning
- Turn off the device.
Page 99 - Unplug the appliance from the
Pull the mains plug out of the socket or switch off the fuse in the fuse box. - Remove all food and store in a cool
If available, place cooling elements on the food. - Remove all equipment and accessories from the device.
Page 106 - Remove the shelf above the fruit and vegetable drawer.
Page 106
Cleaning the appliance
WARNING
Risk of electric shock!
Penetrating moisture can cause a shock.
- No steam cleaner or high pressure use cleaner to clean the appliance.
The liquid in the lighting, in the controls, or in the internal ventilation openings can be dangerous.
- The washing-up water must not be placed in the light, into the controls, or into the internal ventilation openings.
PAY AM N1101/4
Unsuitable cleaning agents can damage the surfaces of the device.
- No harsh scouring or dishwashing use sponges.
- No sharp or abrasive cleaning using chemicals.
- No strong alcoholic cleaning agents use chemicals. When you clean equipment and accessories in the dishwasher, they can become deformed or discolored.
- Never use equipment and accessories clean the rest in the dishwasher.
- Prepare device for cleaning. — Page 105
- Clean the appliance, the equipment, the accessories, and the door seals with a dishcloth, lukewarm water, and a little pH-neutral washing-up
- Dry thoroughly with a soft, dry
- Position the equipment and install the equipment parts.
- Connect the appliance electrically.
- Put the food in the appliance.
Removing parts
If you want to thoroughly clean the equipment, remove it from the device.
Remove platform
- Lifting the platform from behind 0 and deleting.
- faq MI
Remove door rack
Lift the door rack and widen it. - faq ■
Remove storage drawer
- Pull out the drawer as far as it will go.
- Lift the front storage drawer and relieve it. 0
- file ■
Remove fruit and vegetable drawer
- Pull out the fruit and vegetable drawer as far as it will go.
- Lift and remove the fruit and vegetable driver at the front
- file ■
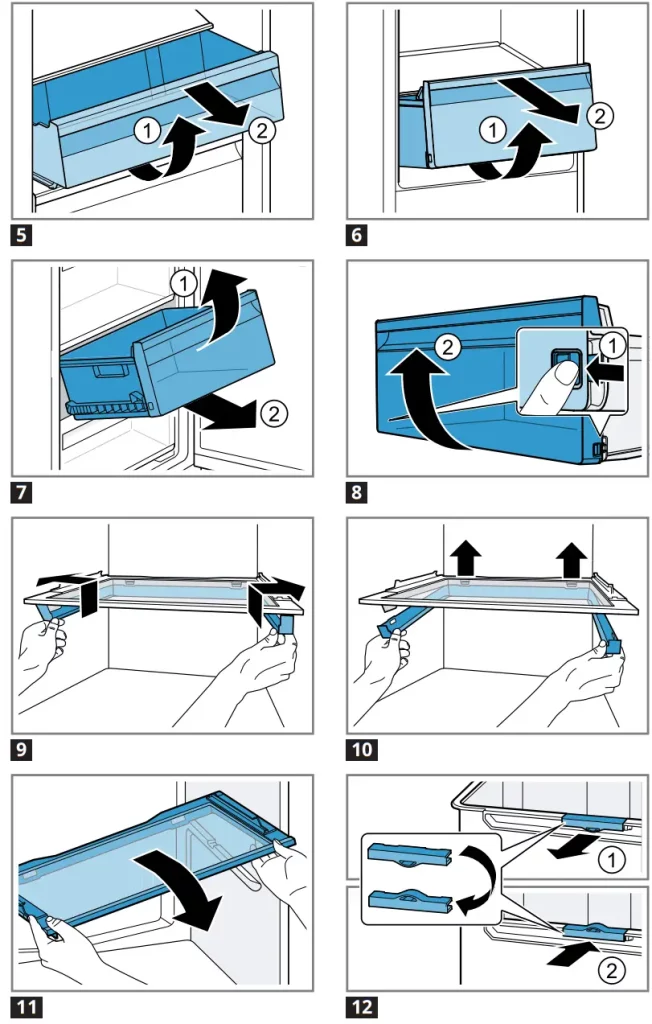
Remove freezer drawer
- Pull out the freezer drawer as far as it will
- Lift and remove the freezer O drawer at the fent.
- file ■
Remove drawer front
You can remove the drawer in front of the fruit and vegetable drawer and the frozen food drawer for easier cleaning.
- Press the snap hooks on the side of the tray and @move it
drawer front by turning the drawer.
— Fig. ■
Disassembling device components
To thoroughly clean your device, you can disassemble certain parts from your device.
Remove the shelf above the fruit and vegetable drawer
- Remove the fruit and vegetable
—Page 106 - Remove the storage drawer
— Page 106 - To release the hooks on the sides, push the sealing frame up and
— Fig. - To release the rear hooks, lift the sealing frame and slide it
— Fig. PM - Remove the sealing frame.
- Lift the shelf above the fruit and vegetable drawer and turn it out to the side.
— Fig. MI
Troubleshooting
You can remedy minor faults on the device yourself. Before contacting customer service, please refer to the troubleshooting information. This way you avoid unnecessary costs. WARNING
Risk of electric shock!
Improper repairs are dangerous.
- Only qualified personnel may carry out repairs on the device to carry out.
- Only original spare parts may be used for the repair ration of the device.
- If the power cord of this appliance is damaged, it must be of risk must be replaced by the manufacturer, its service agent or another qualified person.
| Malfunction | Cause and Troubleshooting |
| The device does not cool, indicators and lighting are on. | The presentation light is turned on. 1. Press and hold (refrigerator compartment) for 50 seconds until a sound signal is heard. 2. After a short time, check whether your appliance is cooling. |
| Side panels of the appliance are hot. | No malfunction. Pipes run in the sidewalls, which become hot during the cooling process. Furniture against the appliance will not be damaged by the heat. No action is required. No action is required. |
| Temperature displays and burn. | A sensor is defective. Contact customer service. The service number can be found in the enclosed service overview. |
| A warning signal sounds, the temperature display (refrigerator compartment), and blink. | The refrigerator compartment door is open. Close the refrigerator compartment door. |
| The door alarm is turned on. |
| Malfunction | Cause and Troubleshooting |
| A warning signal sounds, the temperature display (freezer compartment), and blink. The door alarm is turned on. | The freezer door is open. Close the freezer compartment door. |
| A warning signal sounds, the set temperature ture (freezer compartment), and blink. The temperature alarm is enabled. | Various causes are possible. Press. a Turn off the alarm. |
| Ventilation grilles on the outside are covered. Remove blockages to the external ventilation grille ter. |
|
| Larger quantities of fresh foodstuffs have been placed in storage. Do not exceed the freezing capacity. → “Freezing capacity”, page 103 |
|
| Set temperature ture is not reached. Fully automatic de- thaw doesn’t work more. |
The freezer compartment door was open too long. There is a lot of ice on the evaporator (cold generator) in the NoFrost system. Required: Frozen foods are well insulated and stored in a cool place. 1. Switch off the device. →Page 99 2. Disconnect the device from the power supply. Unplug the power cord from the socket or switch off the fuse in the meter box. 3. Contact customer service. The service number can be found in the enclosed service overview. |
| Temperature varies a lot depending on the setting. | Various causes are possible. 1. Switch off the device. →Page 99 2. Switch the device on again after approx. 5 minutes. → Page 98 If the temperature is too high, check the temperature again after a few hours. If the temperature is too low, check the temperature again the next day. |
| Malfunction | Cause and Troubleshooting |
| Condensation forms on the surface of the device and the shelves in the device. | The water vapor in warm and humid air condenses on the colder surfaces of the device. 1. Wipe off the water with a soft, dry cloth. 2. Open the device as briefly as possible. 3. Make sure that the device is always closed properly. |
| collects in the fruit and vegetable drawer often a lot of condensation her. | Depending on the storage quantity and the product, condensation forms in the fruit and vegetable drawer. 1. Remove the fruit and vegetable drawer. →Page 106 2. Remove the breather clips and reverse bet. → Fig. 12 |
| The device hums, bubbles, buzzes, gurgles, clicks, or makes popping noises. | No malfunction. A motor is running, eg cooling unit, fan. The refrigerant flows through the pipes. Motor, switches, or solenoid valves switch on or off. The automatic defrost system operates. No action is required. No action is required. |
| The device produces sounds. | The appliance is not level. Adjust the appliance horizontally using a spirit level and the leveling feet. |
| The device is not freestanding. Keep the minimum distances from the device. | |
| Equipment parts wobble or jam. Check the removable equipment and put them back into the device if necessary. |
|
| Bottles or containers touch each other. Separate bottles or containers. |
|
| Super freeze is enabled. No action is required. No action is required. |
Power failure
During a power failure, the temperature in the appliance rises, which shortens the storage time and reduces the quality of the frozen products.
On our website for your appliance, you will find in the technical data the storage time of the frozen products in the event of a malfunction.
Remarks
The appliance during a power outage opens the trap as little as possible and do not put in any other food.
Food quality immediately after the power failure.
- Discard frozen foods that are thawed and warmer than 5°C.
- Cook or bake slightly thawed frozen foods and either consume or refreeze.
Running the device self-test
- Turn off the device.
— Page 99 - Unplug the appliance from the
Pull the mains plug out of the socket or switch off the fuse in the fuse box. - Reconnect the appliance electrically after 5 minutes.
- Within 10 seconds after switching on the electrical connection (refrigerator compartment) for Press and hold for 3 to 5 seconds until an acoustic signal sounds.
The device self-test starts.
If after the end of the device self-test 2 acoustic signals sound and the temperature display shows the set temperature, your appliance is OK. The device returns to normal operation.
a When after the end of the self-test of the device 5 acoustic signals sound and the LEDs of the temperature display light up with different brightness, please contact customer service. The LEDs provide the service department with information about the current fault.
Store and Discard
Here you will find an explanation of how to prepare the device for storage. We also explain how to dispose of old appliances.
15.1 Decommissioning the device
- Turn off the device.
— Page 99 - Unplug the appliance from the
Pull the mains plug out of the socket or switch off the fuse in the fuse box. - Remove all food.
- Clean the device.
— Page 105 - To ensure ventilation of the interior, leave the appliance open.
Disposal of your old device
Environmentally-friendly disposal allows valuable raw materials to be reused.
WARNING
Risk of health hazard!
Children can lock themselves in the appliance and endanger their lives.
- To prevent children from entering the appliance do not crawl shelves and drawers out of the appliance.
- Keep children away from keeping discarded devices.
WARNING
Risk of fire!
If the pipes are damaged, flammable refrigerant and harmful gases can escape and ignite.
- The pipes of the refrigerant circuit do not damage the insulation.
- Unplug the power cord from the outlet.
- Cut the power cord.
- Dispose of the device in an environmentally friendly way.
You can obtain information about the current disposal methods from your dealer and your municipal or district council office.
This appliance is marked in accordance with ming with the European Directive 2012/19/EU on waste electrical and electronic
chemical equipment (waste electrical and electronic equipment – WEEE). The directive sets the framework for the takeback valid in the EU and disposal of old ppliances.
Customer Service
If you have any questions, cannot rectify a malfunction of the device yourself or if the device needs to be repaired, please contact our service department. Original replacement parts that are relevant for the function in accordance with the respective Ecodesign Regulation can be obtained from our service department for a period of at least 10 years from the time of placing the device on the market within the European Economic Area.
Remark: Calling in the service is free of charge under the locally applicable manufacturer’s warranty conditions. The minimum duration of the warranty (manufacturer’s warranty for private users) in the European Economic Area is 2 years in accordance with the applicable local warranty conditions. The warranty terms are without prejudice to any other rights or claims you may have under local law.
Detailed information about the warranty period and warranty conditions in your country can be obtained from our after-sales service, your dealer or on our website.
When contacting customer service, you will need the product number (ENr.) and the production number (FD) of the device. The contact details of the customer service can be found in the service list provided or on our website.
Product number (E no.)
and production number (FD)
The product number (E-Nr.) and the production number (FD) can be found on the type plate of the device. → fig. 1 / 5 In order to quickly find your device data and the service telephone numbers, you can write down the data.
17 Technical data
Refrigerant, net content, and other technical data can be found on the type plate. → fig. 1 / 5
You can find more information about your model on the Internet at https://eprel.ec.Europa.eu/1. This web address refers to the official EU product database EPREL. Then follow the instructions when looking for the model. The model identification consists of the slash character of the E number (E-No.) on the type plate. Alternatively, you can also find the model identifier in the first line of the EU energy label.
Only applies to countries in the European Economic Area
BSH Hausgeräte GmbH
Carl-Wery-Straße 34
81739 Munich
GERMANY
www.siemens-home.bsh-group.com
* 9001632354*
9001632354
(010527)
de, fr, it, nl