USER MANUAL

Skullcandy TuneUps with Bluetooth LINK
INTRODUCTION
TuneUps with Bluetooth LINK
TuneUps™ offers incredible in-helmet stereo sound plus Bluetooth LINK™ technology from Skullcandy™ that allows you to hardline to your music player while connecting to any Bluetooth enabled phone wirelessly. A simple touch answers incoming calls while one more disconnects you and gets your music back online.
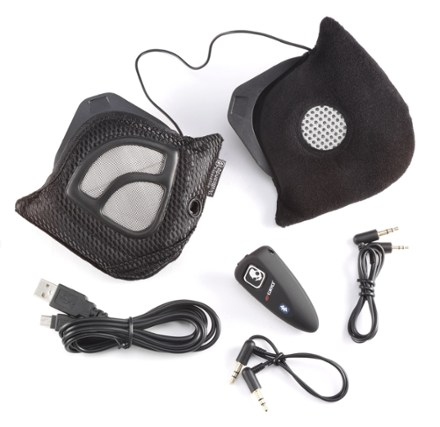
Package Contents
- Bluetooth LINK module
- Audio Earpads
- Carry Pouch
- Helmet Audio Cable (3.5mm-to-3.5mm)
- MP3/CD Player Cable (2.5mm-to-3.5mm)
- 2.0 USB Cable
- Owner’s Manual
SAFETY INFORMATION
WARNING
For use with Giro snowsports helmets only. Use of these or other headphones in snowsports maycause the rider/skier to not hear approaching riders/skiers. This can lead to an accident andpossible injury or death. Headphones will also restrict your ability to hear what your edge/edges are doing on the snow, which may lead to less control. Headphones may distract you from
focusing on riding or skiing safely.
Remember Your Responsibilities
Always stay in control. People ahead of you have the right of way. Stop in a safe place for you and others. Whenever starting downhill or merging, look uphill and yield. Look before you leap. Use devices to help prevent runaway equipment. Observe signs and warnings. Keep off closed trails. Know how to use the lifts safely. Respect gets respect.
FCC Statement
This device complies with Part 15 o the FCC
Rules. Operation is subject to the following two conditions: (1) this device may not cause harmful interference, and (2) this device must accept any interference received, including interference that may cause undesired operation.
FCC Warning
Changes or modifications not expressly approved by the party responsible for compliance could void the user’s authority to operate the equipment.
BT LINK CONTROLS
ILLUSTRATION
- Multi-function Logo Button Used to answer and end calls. Also used to turn the BT LINK on and off.
- Microphone Used when placing and receiving calls
- Volume Control Dial Allows you to increase or decrease volume for music or calls.
- 2.5mm Headset Jack Allows you to connect to a music source.
- 3.5mm Headset Jack Allows you to connect to your helmet or your own personal headphones.
- Charging Port When charging, one end of the USB cable should be inserted into this port.


GETTING STARTED
Before you can use the BT LINK, you must do the following:
- Charge the BT LINK’s internal battery
- Pair the BT LINK with your Bluetooth phone.
- Attach the BT LINK to your helmet or headphones.
- Attach a music source to your BT LINK.
Charging the BT LINK’s Internal Battery
First-time Use – Before you can use your BT LINK, you need to charge its internal battery fully for at least two hours. Perform these steps to charge your BT LINK:
- Plug the included 2.0 USB cable into a high-power USB port on your computer
Note: The USB port on your keyboard doesn’t provide enough power. You must connect BT LINK to a USB port on you computer. - Connect the other end into your BT LINK << ILLUSTRATION >> While charging, the LED will steady on red. When charge is completed, the indicator will turn off.
- When charging completes (indicators off), unplug the cord from the computer, and your BT LINK.
Note:
- Low voltage indication: 2 tones from the headset every 30 seconds and LED will flash red. It is recommended to charge the headset immediately after low voltage indication to prolong the durability of the battery and standby time. Under low voltage, if the battery is not charged within approximately 30 seconds, the headset will be powered off.
- Charging indication will be delayed for a few minutes if the headset has not been used for a long time or the battery is drained.
Pairing Your BT LINK and Bluetooth Phone
You must pair (link) your BT LINK and your Bluetooth-enabled phone before you can make or receive calls. “Pairing” links two Bluetooth equipped devices, and allows your phone to remember your BT LINK’s unique ID. After your BT LINK and phone are paired, your BT LINK automatically connects to your phone when you turn it on. Perform these steps to pair (link) your phone and BT LINK:
- Turn on the Bluetooth power on your phone. Bluetooth power option may be OFF by default. Bluetooth power must be ON to search for devices. Refer to your phone’s user guide.
- Put your BT LINK into pairing mode
With your BT LINK off, press and hold the Logo Button until the LED alternately flashes blue and red (about 5 seconds). - Set your phone to look for your BT LINK, and select “BTLink-SK/Giro” from the device list.
Press OK and YES to pair (link) the device. Enter the passkey “0000” and press OK.
Your BT LINK’s ID is now stored in your phone’s memory.
When your BT LINK is successfully paired with your phone the LED will flash blue 5 times followed by a long tone.
Note:
If the pairing cannot be completed within 2 minutes while the pairing mode is activated, the headset will enter standby mode, Please repeat the above pairing procedures.
Connecting the BT LINK to Your Helmet or Headphone
Connecting the BT LINK to your helmet
Perform these steps to connect your BT LINK to your helmet.
- Remove the standard earpads already installed on you helmet, and attach the included TuneUps Audio Earpads. Refer to your Helmet User Guide.
- Connect your BT LINK to the Audio Earpads using the included 3.5mm-to-3.5mm stereo audio cable. The headset jack on the Audio Earpads can be found on the left ear pad.
<< ILLUSTRATION >>
Connecting the BT LINK to your personal headphones
You can simply connect your headphones to the 3.5mm headset jack on the BT LINK
Connecting Your BT LINK to a Music Source
To listen to music, connect your music source to the headset jack using the 2.5mm-to-3.5mm stereo audio cable included with your BT LINK. Connect the music source to the BT LINK module using the 2.5mm connector.
USING YOUR BT LINK
Turning Your BT LINK On and Off
To turn you BT LINK on, press and hold the Logo button for approximately 3 seconds until the LED flashes on for one second and you hear a short tone.
To turn you BT LINK off, press and hold the Logo button for approximately 5 seconds until the LED flashes on for one second and you hear a long tone.
Making Calls with your BT LINK
Your BT LINK supports both Handsfree and Headset Profiles. Accessing call functions depends on which profile your phone supports.
Note:
- Some phones do not support all features listed. See your phone’s user guide.
- Music playing from the music source is muted when placing or receiving calls, and unmated when the call is finished.
- You can control the volume while in a call using the volume dial on the BT module.
You can activate call functions for the Handsfree Profile according to the following:
- Make a Call (Voice Dial): With the phone on in idle, press the Logo button once, wait for a short tone, speak name, and the phone dials the call.
- Make a Call (Hand Dial): With the phone on, enter the phone number on the phone, press the Send key on the phone, and the phone dials the call.
- Redial Last Number: With the phone in idle, press the Logo button twice within 1 second, it will recall the last number.
- End a Call: With the phone on and in-call, press the Logo button once.
- Receive (Answer) a Call: With the phone on and ringing, press the Logo button once.
- Reject a Call: With the phone on and ringing, press and hold the Logo button 3 seconds.
Listening to Music with your BT LINK
The following functions are supported while playing music from a music source. Adjust Music Volume: Turn Volume Control Dial up (to increase volume) or down (to decrease volume)
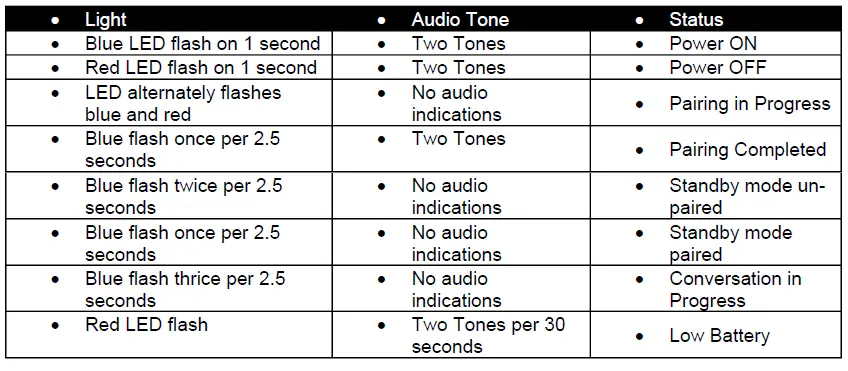
BT LINK Indicator Lights and Audio Tones
The indicator lights and audio tones on your BT LINK provide status information.
CARE AND HANDLING
- Consider turning your BT LINK off before placing it in your pocket or bag. If the Button is accidentally depressed, your mobile handset may place an unintended call.
- Do not attempt to clean or disinfect your helmet with TuneUps earpads installed.
- Do not expose the BT LINK to liquid, moisture or humidity, as it is not waterproof.
- Do not use abrasive cleaning solvents to clean the BT LINK.
- Do not place the BT LINK in high temperature, as it will result in an explosion.
- Do not expose the BT LINK to contact with sharp objects as this will cause scratching and damage.
- Do not stick anything inside the BT LINK as this may damage internal components.
- Do not attempt to disassemble the BT LINK, as it does not contain serviceable components.
- If you do not use the BT LINK for long periods, be sure to store it in a dry place, free from extreme temperature, humidity and dust.
- Only use the manufacturer supplied USB cable when charging the BT LINK.
- Only charge the BT LINK’s built-in battery in accordance with the instructions of this user guide.
- Avoid charging the BT LINK in extremely high or low temperatures.
TECHNICAL DETAILS AND SPECIFICATIONS
Speakers:
- Dimensions: 40mm
- Specifications: 32ohm NdFeB speaker, plus grill cover
- Frequency response (in Hz): 20-20 KHz
- Sensitivity: 117 +/-3dB at 1 KHz
BT LINK Module:
- Working Voltage: 4.2 VDC
- Working Current: 15mA
- Standby Current: 0.9mA
- Power off Current: 100uA
- Working temperature: -25C to 75C
- Storage temperature: 0C to 65C
- Output Power: 85 mW at 32ohmns load
- Full duplex, -60 dBV
- Battery: Li-Polymer 170 mA/H
Features:
- Phone/ Audio Player Automatic Switch
- When the BT LINK is turned on, it will automatically search for cell phones and connection.
- Answer/ end/ reject call/ private talk/ last call/ voice dialing/ call waiting/ three-way conference call
- Answer/ end/ reject call// last call/ voice dialing
- Audio player volume control
- Auto Power off when fully charged
- Standby time/ playing music: 150 hours
- Talk time/ continuously talking: 10 hours
- It requires 2-3 hours to fully charge the battery
WARRANTY
If your TuneUps are found to be defective in materials or workmanship within a period of one year from the date of original purchase, Giro will, at its sole option, either repair or replace them free of charge. Just take them to the dealer from which they were purchased, with a letter indicating the specific reason you’re returning them, and proof of date of purchase.
Except to the extent prohibited by applicable law, any implied warranty of merchantability or fitness for a particular purpose is limited in duration to the above one year period. This warranty does not apply to defects or physical damage resulting form abuse, neglect, improper repair, improper fit or installation, alterations, or use unintended by the manufacturer. This warranty is in lieu of all other agreements and warranties, general or special, express or implied and no representative or person is authorized to assume liability on behalf of Giro in connection with the sale or use of this product.
For more information please use the following:
Giro Consumer Services
1924 County Road 3000 North
Rantoul, IL 61866
Tel: 800-456-2355
[email protected]
© Giro 2007. All rights reserved.
Designed in Santa Cruz, CA. USA
Manufactured in China
Giro, the Giro logo, TuneUps™, and other Giro marks are owned by Giro and may be registered.
The Bluetooth wordmark and logos are owned by the Bluetooth® SIG, Inc. and any use of such
marks by Giro is under license
LINK™ is a registered trademark of SkullCandy®