
SkyZone SKY030 FPV Goggle User Manual
System Content
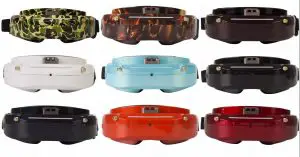
FPV GOGGLE
Carry case

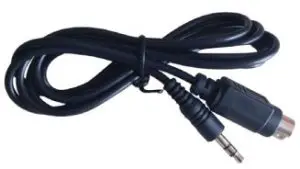
Futaba data cable
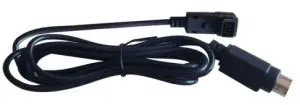
JR data cable
*HDMI A‐C (Separate purchase)

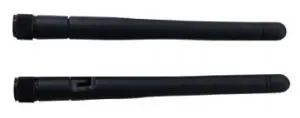
5.8G 2dBi antenna X 2
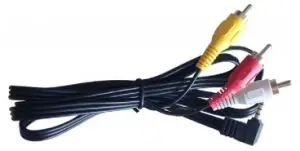
AV cable
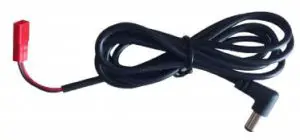
Power cable
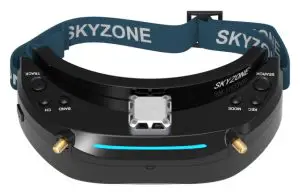
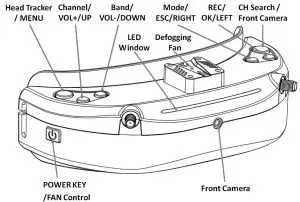
Function Diagram
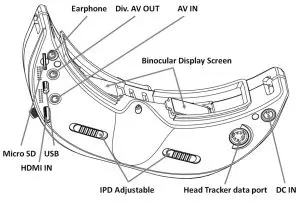
Operational Guidance
The two 5.8GHz wireless receiver modules and the new DVR system are built in the SKY03O FPV goggles. The wireless receiver system can work in the diversity mode to improve the receiving effect. In this mode, the channel and band settings for wireless receiver can be compatible with most of the conventional ISM 5.8GHz transmitters, in order to support the 6 bands and the 48 channels (for detailed bands and channels, see the specification).
DVR system use high-quality H.246 video compression technology to better restore the video screen, save the more storage space, support the 128GB high-capacity memory card(UHS-I U1), and support the automatic video recording function. For details, see the description of the “Video” section.
Quickstart
Preparation
- Install the lenses, goggles, antennas and memory cards for the FPV goggles.
- Connect the camera to the transmitter, and turn on the power; set the working channel according to the transmitter instructions; switch on the power for the SKY03O FPV goggles; long press the power button for 3 seconds to turn on the goggles (long press the power button for 3 seconds to turn off the goggles).
- Short press the buttons to adjust the channel and frequency of the receiver, to match the frequency of the VTX.
- Slide the IPD adjuster to adjust the interpupillary distance.
Channel Search
- Button Function
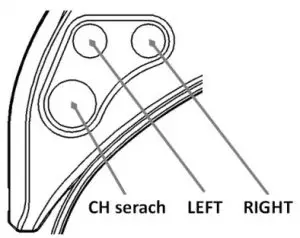
- Long press the button to pop up the channel search menu.
- Short press the button to start auto search (repeatedly). The auto search function is performed from low to high according to the frequency. After searching for 48 channels, the receiver will automatically work on one channel with the strongest signal. The signal strength of the channels is shown in the histogram. Please press the LEFT or RIGHT Button to manually select the channels. The band, the channel and the signal strength corresponding to the location of the triangle indicator will be updated in real time.
- When exiting the search menu, the receiver will work on the channel where the triangle indicator is located.
RF Racing
- The mode is specially set for the racing. In this mode, the goggels can work only on the eight channels of the Race band. The regulating channels of button will be increased, while the regulating channels of button will be decreased. The channel search function can be only used to scan the eight channels of the Race band.
Voltage Calibration
- Add voltage calibration function in system menu, voltage can be calibrate around ±0.9V.
- During the calibration process, the voltage reading is changing in real time.
- For more accurate calibration, multi meter is required.
- The Voltage reading on OSD is the loaded voltage of the battery(the goggles is the load), by using the multi meter to reading the loaded voltage of the battery, you can calibrate the voltage reading on OSD, so the reading is equal to the real voltage of the battery.
Button Function (for the button function of playback mode, see the description of “Playback” part).
TRACK Button:
- Short press the button in the normal mode to activate the Head Tracker reset function.
- Long press the MENU button for 3 seconds to enter into the menu setting status.
- Press the button to switch between the four main menus in the MENU status.
CH Button:
- In the RF mode, short press the channel button to adjust the channel in cycles.
- In the RF, AV IN, HDMI IN and PLAYBACK modes, long press the button for 3 seconds to adjust the volume upwards.
- Press the button in the MENU status to select the menu upwards.
BAND Button:
- In the RF mode, short press the band button to adjust the band in cycles.
- In the RF, AV IN, HDMI IN and PLAYBACK modes, long press the button for 3 seconds to adjust the volume downwards.
- Press the button in the MENU status to select the menu downwards.
REC Button:
- In the RF and AV IN modes, short press the button to record the video, and then short press the button again to stop recording the video.
- The REC Button is set as the OK button in the MENU status.
- The REC Button is set as the left selection button in the channel search status.
- Long press the button for 3 seconds to enter into the playback mode.
MODE Button:
- Short press the pop-up mode selection menu button to select the RF Normal, RF Racing, AV IN and HDMI IN modes.
- The MODE Button is set as the exit button in the MENU status.
- The MODE Button is set as the right selection button in the channel search status.
CAMERA Button:
- In any mode, short press the CAMERA button to switch to the forward-looking mode.
- In the RF mode, long press the button for 3 seconds to enter into the channel search menu or exit the search menu.
RF Mode
- The RF mode always in diversity receiver function. The software compare the strength of the signal received by two wireless channels and automatically select the strongest signal.
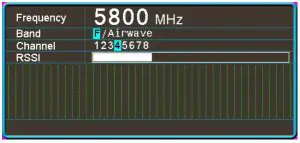
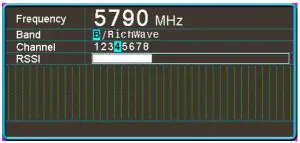
- Press the button to adjust the channel. Press the button to adjust the band. The operation can be cycled. The BAND, CH and frequency will be displayed on the screen.
- The one-key channel search function can be supported in the RF mode.
Front Camera
- The front camera for FPV goggles has the VGA resolution and good low-illuminance characteristics, enabling to easily observe surroundings very easily without taking off the goggles.
- In any mode, press the button to quickly open the front camera. ·
- The Front Camera is only designed to temporarily take a view of the surrounding environment, neither record the screen to the memory card, nor output the screen via the AV OUT. Opening the Front Camera in case of enabling the recording function will not affect the recorded screen.
Video Recording
- When installing the memory card for the first time, the memory card should be formatted once.(See the description of Format SD card section).
- The video recording function can be used in both the RF Mode and the AV IN Mode. Under normal conditions, the <
 > and the will be displayed on the screen. Press the button to activate the video recording function. After activating the video recording function, the < > will be displayed in red, and the recording time will start to be recorded.
 - By default, when recording the video (including: Recording the sound), the “sound recording” function can be turned off in the system menu, but the video signal can be recorded only. ·
- Automatic recording: The automatic recording function is opened in the system menu. After starting up each time, if the video signal has been detected, the recording function will be activated automatically. The recording function can also manually be stopped in the recording process.
- Cyclic recording:Overwriting of older recordings on or off (in case of storage space is wasted).
- The video recording file will be automatically divided into the multiple files. In the menu system, the video length can be set as: 5 minutes, 10 minutes, 20 minutes and 30 minutes. The default video length can be set as 30 minutes / each file.
- If the power has been suddenly disconnected in the video recording process, the video file will be damaged. The goggles has the file repairing function. After entering into the playback mode, the last file will be automatically checked. If it has been damaged, the file will be automatically repaired.
Playback
Playback mode button function:
- In the RF mode or in the AV IN mode, long press the button to enter into the playback mode (Don’t enter into the playback mode in the HDMI IN mode).
- REC <Play/Pause/OK> button.
- MODE <Stop/Return> button.
- BAND <Previous/Fast Reverse> button.
- CH <Next/Fast Forward> button.
- TRACK button.
- The video screen in the memory card will be previewed directly in the playback mode. The last four-digit number of the file name will be displayed at the upper right corner. The recording time of the file will be displayed below the file name.
- When playing the video files, press the button to activate the 2X, 4X & 8X quick play functions, and press the <Play/Pause> button to pause the current screen. Press the <Play/Pause> button again to return to the normal playback speed. After the completion of playing, the screen will stay on the last frame screen of the file. By this time, press the button to return to the preview state to perform the other operations or play again.
- When browsing the files in the memory card, if deleting a certain file as required, please press the button to pop up the Delete menu when browsing to the said file, and press the button to delete the current file.
- The goggles is only able to play the files recorded by itself.
Head Tracking
- The head tracking function is required for an initialization time. When it is powered on, the goggles must be kept horizontal and stable for a while. When hearing the sound of a “beep”, the initialization will be completed. Or, when this goggles is horizontal and stable, short press the button to put into normal use.
- Short press the button to reset the PPM signal to the center position and make a tone voice.
- The PPM channels can be set in the menu: CH5-CH6, CH5 CH7, CH5-CH8, CH6-CH7, CH6-CH8 and CH7-CH8.
- Pan Tracking range: 180 degrees (90 degrees on the left or right), 120 degrees (60 degrees on the left or right), 90 degrees (45 degrees on the left or right), the default Pan Tracking range: 90 degrees.
- Tilt Tracking range: 120 degrees (60 degrees on the top or at the bottom), 90 degrees (45 degrees on the top or at the bottom), 60 degrees (30 degrees on the top or at the bottom), the default Tilt Tracking range: 90 degrees.
- Pan Correction: The center offset of Pan can be compensated individually by setting. The levels (0~10) can be set. The actual compensation angle depends on the pan-tilt rotation angle.
- Tilt Correction: The center offset of Tilt can be compensated individually by setting. The levels (0~10) can be set. The actual compensation angle depends on the pan-tilt rotation angle.
- PPM Reverse: represents the default setting; represents the reverse of the channel; represents the reverse of the channel; and is reversed in both directions.
LED Light
- SKY03O has a display window for the LED light. The LED MODE can be set in the system menu. A variety of lighting effects can be selected.
- The LED light can be turned off in the menu.
Fan
- The built-in fan can not only be mainly used for defogging, but also can be used to dissipate the heat within the product. The speed of fan can be set in the system menu.
- 16-Level User Adjustable speed.
- Press the POWER button to start up/stop the fan for defogging.
HDMI Input
- When enable the HDMI IN mode, the wireless receiver module and the video recording module will be automatically turned off to save the power.
- It is recognized that the screen and the corresponding resolution information will be automatically displayed in the supported resolution format.
- The common resolution can be supported (see the specification).
- The wireless receiver module and the video recording module will be automatically turned off in the HDMI IN mode, in order to save the power.
AV Input
- When enable the AV IN mode . The NTSC and PAL system format can be supported to be automatically switched.
- The wireless receiver module will be automatically turned off in the AV IN mode to save the power.
AV Output
- The diversity received audio and video signals can be output from the AV Out Port.
- The Earphone port can be connected to the headphones. After the video goggles are powered on each time, the headphone output volume will be set as the minimum volume, to prevent the excessive volume from affecting the hearing.
Image Adjustment
- The Brightness, Contrast, Saturation, Hue, Sharpness and other parameters for the image can be adjusted in the image setting menu, in order to achieve the personalized display effects.
- Press the button on the function option to enter into the adjustment state; press the <UP/DOWN> button to adjust the size and display the adjustment effect in real time on the image; press the button to return to the previous menu.
- It is recommended to adjust these parameters on the clear image screen.
OLED Luminance adjust
- The Luminance of the OLED screen and be adjust in the menu (8 stage, default is 5).
- Normally do not set the brightness too high unless the image is dim.
- Due to the OLED’s characteristic, excessive brightness may cause a slight brightness drop in local screen.
OLED Sleep
- The sleep mode can be set in the menu( 1minute 3minutes 5 minutes), default is 3 minutes.
- When sleep mode is activated, the goggles will detect the movement of the goggles (via headtracker sensor), when the goggles stay still to the preset time , the goggles will switch to sleep mode , the oled screen will turn off, when the sensor detect the movement of goggles, the goggles will quit sleep mode.
- The sleep mode only turn off the OLED to save the lifetime, the rest functions of goggles is still working (receiver ,DVR etc).
OLED Screensaver
- The image will move 10 pixel/minute, flow the order: middle→right→middle→left→middle, circulating.
- This function can’t turn off.
Format SD-CARD
- The image will move 10 pixel/minute, flow the order: middle→right→middle→left→middle, circulating.
- This function can’t turn off.
Format SD-CARD
- Enter into the system menu to select the Format SD card option; press the button to enter into the setting state; press the <UP/DOWN> button to select ; and press the button to execute the formatting operation.
- Be careful to operate this function. After formatting, all the files in the memory card will be deleted.
Factory Settings
- Enter into the system menu to select the Factory settings option; press the button to enter into the setting state; press the <UP/DOWN> button to select ; and press the button to restore all the function settings in the menu to the factory default state.
- After the factory default settings have been restored, the files in SD will not be deleted.
Screen OSD
- Video recording icon: Its true color is displayed normally; the icon is displayed in red in the video recording process; if the video cannot be recorded for some reasons, the icon will be displayed in red
 , for example: the video can not be started because the memory card is full or the memory card is incorrect.
  Memory card icon: Its true color is displayed normally; the icon is followed by the capacity information, and measured in GB (1000MB); the red icon will be displayed after the memory card is full.
- Mode icon: RF Normal, RF Racing, HDMI IN, AV IN and PLAYBACK modes.
 Icon: RSSI Signal Intensity Indicator.
 Mode: This icon will be displayed when goggles is connected to the PC. In this mode, the contents of the local memory card can be managed by the operation of PC. (The PC-port playback, copy or delete can be performed).
 / Play/Pause icon:
 / Fast Forward/Fast Reverse icon: During the operation of Fast Forward/Fast Reverse, the icon is followed by its corresponding multiplier speed.
- Power icon: If this machine is not required to monitor the power supply voltage, then the DC IN power supply mode can be set, and the icon will be displayed on the screen. If the battery is used for power supply, then the battery pack voltage range can be set; the optional range includes: 2S, 3S, 4S, 5S, 6S; the corresponding battery icon will be displayed on the screen;
 represents the full charge state;
  represents the low-power state.
 - Channel icon: The BAND and CH information will be displayed.
Specifications
| Binocular Display | FOV | 35 degrees (Diagonal) | |||||||
| Resolution | 1024X768(XGA), OLED | ||||||||
| Luminance | Adjustable, 300cd/㎡ (Max) | ||||||||
| Contrast ratio | 10000:1 | ||||||||
| Interpupillary distance (IPD) | 57.5 to 69.5mm Adjustable | ||||||||
| Wireless Receiver | ISM 5.8GHz 48 Channel, Diversity receiver. | ||||||||
| Band | CH 1 | CH 2 | CH 3 | CH 4 | CH 5 | CH 6 | CH 7 | CH 8 | |
| A | 5865M | 5845M | 5825M | 5805M | 5785M | 5765M | 5745M | 5725M | |
| B | 5733M | 5752M | 5771M | 5790M | 5809M | 5828M | 5847M | 5866M | |
| E | 5705M | 5685M | 5665M | 5645M | 5885M | 5905M | 5925M | 5945M | |
| F | 5740M | 5760M | 5780M | 5800M | 5820M | 5840M | 5860M | 5880M | |
| R | 5658M | 5695M | 5732M | 5769M | 5806M | 5843M | 5880M | 5917M | |
| L | 5362M | 5399M | 5436M | 5473M | 5510M | 5547M | 5584M | 5621M | |
| Sensitivity | -90dBm±1dBm | ||||||||
| Antenna port | 2 X SMA-K,50ohm | ||||||||
| Front Camera | FOV | 60 degrees (Diagonal) | |||||||
| Resolution | 640X480(VGA) | ||||||||
| Focal length | f=4.0mm | ||||||||
| F/NO | F/NO=2.8 | ||||||||
| Head Tracker | Sensor | 3-axis Accelerometer, 3-axis gyroscope | |||||||
| Output | PPM 8 channel, Optional 5-6CH,5-7CH,5-8CH,6-7CH,6-8CH,7-8CH | ||||||||
| Record | Micro SD | Support to 128GB (UHS-I Interface, U1) | |||||||
| Compression | H.264, 30fps,MOV | ||||||||
| Data rate | 6Mbps | ||||||||
| AV Signal | Video Standard | NTSC/PAL | |||||||
| Video output level | 1.0Vp-p Typ. / 75ohm | ||||||||
| Audio output level | 1.0Vp-p Typ. / 10Kohm | ||||||||
| AV Port | AV OUT(3.5mm4P) | Diversity receiver, Video, Audio output | |||||||
| EAR OUT(3.5mm3P) | Stereo 16Ω/150mW | ||||||||
| AV IN(3.5mm4P) | Video, Audio input | ||||||||
| HDMI IN(C-Type) | HDMI 1.4 specification: 1920x1080p60, 1920x1080p50, 1920x1080i60, 1920x1080i50,1280x720p60, 1280x720p50, 576p, 576i, 480p, 480i, PC Format(Not all) | ||||||||
| Power Supply | DC IN | DC 7~26V/ 1A | |||||||
| Power Consumption | 12V input: 6W (RF mode) | ||||||||
| Dimensions | 170(L)X83(W)X44(H)mm (Not include prominent part) | ||||||||
| Weight | 231g (Not include package box) | ||||||||
| Operating Temperature | 0℃~+60℃ | ||||||||