SLINEX Sonik 7 Video Intercom Device Instruction Manual
Intercom connection manual
Here are described steps to conect several Slinex monitors into the one system. All incoming calls in such system will be immediately displayed on all the monitors inside this system and any monitor can answer the call. If user answers the call on one of the monitors then all other monitors in the system goes into standby mode. User can also transfer incoming calls to the other monitors or make intercom calls between the monitors.
Step 1. Determine monitors system total cable length

![]()
In case of using analog outdoor panels and monitors total cable length can be up to 100 meters (up to four monitors can be connected into one system).
In case of using AHD outdoor panels and monitors total cable length can be up to 80 meters (up to three monitors can be connected into one system)
Step 2. Use the appropriate cable type to connect the components of the system depending of the system total cable length:
- Total cable length up to 25 meters use the 4-wire cable with 0,22 mm2 square of one wire (AWG 24);
- Total cable length from 25 to 50 meters use the 4-wire cable with 0,41 mm2 square of one wire (AWG 21);

- Total cable length from 50 to 100 meters use use the 3-wire cable cable with 0,75 mm2 square of one wire (AWG 18) and RG-59 or RG-6 coaxial cable for the video signal.

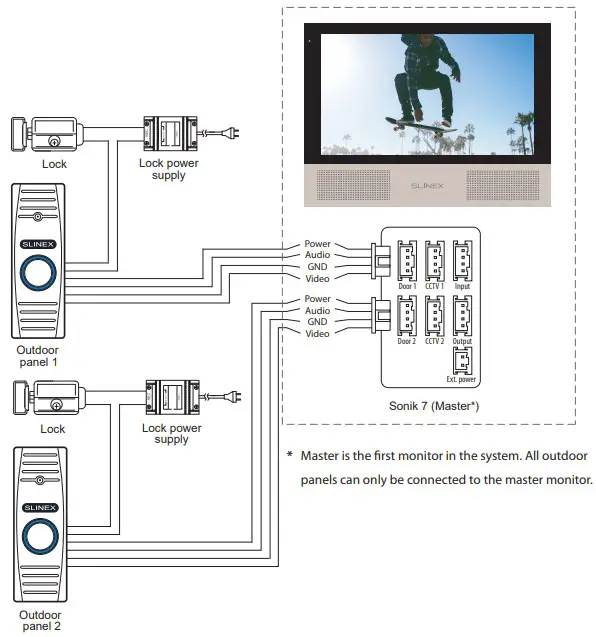
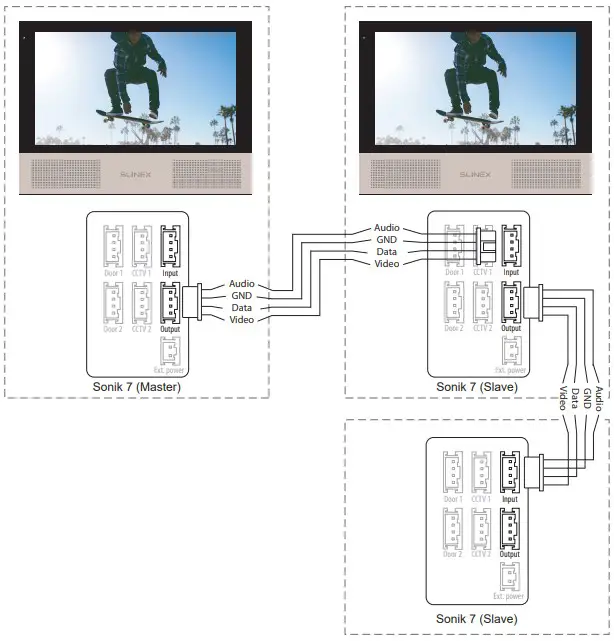
Step 3. Connect all the monitors and outdoor panels according to the schematc diagrams below:
Diagram 1. Sonik 7 outdoor panels and locks connection.

Diagram 2. Sonik 7 three monitors connection into one system

Step 4. Set appropriate “Mode” on every monitor in the system.

Settings → System:
Mode − choose «Master» if it is 1st monitor in the system (all the outdoor panels and CCTV cameras are connected to this monitor). Choose «Slave» on every other monitor in the system except of the 1st one.
