
SMARTHEART Automatic Blood Pressure Monitor
Please read this instruction manual completely before operating this unit.
STOP!
PLEASE ENSURE YOU HAVE ALL OF THE FOLLOWING COMPONENTS BEFORE USING YOUR DIGITAL BLOOD PRESSURE MONITOR
Package Contents
 Digital Monitor Digital Monitor |
Adult Arm Cuff |
 Storage Case Storage Case |

4 AA Batteries |
 Instruction Manual Instruction ManualQuick Start Guide Blood Pressure Reading Tracking Log FAQ Information Sheet Replacement Parts Order Form |
|
CARE and SAFETY INFORMATION
NOTE: Read all instructions carefully before use. The following basic precautions are needed when using an electrical product.
CAUTION: Failure to read and observe all precautions could result in personal injury or equipment damage.
Improper care or use of your blood pressure monitor may result in injury, damage to the unit or ineffective treatment. Following these instructions will ensure the blood pressure monitor’s efficacy and long life.
GENERAL CAUTIONS AND WARNINGS
- Measurement results should be discussed with your physician or healthcare
professional; never self-diagnose or attempt treatment as this may be dangerous. - Intended for adult use only; this device is not approved for infant or child use.
- Keep out of reach of children.
- Do not use the unit if it has any damaged parts (including power cord or plug and cuff), if it has been submersed in water or dropped.
- If any abnormality occurs, discontinue use until the unit has been examined and repaired.
- Only use included attachments and parts; do not use attachments from other
brands or models as these may not be properly calibrated for use with this device and may result in measurement error. - Do not disassemble the unit or attempt to repair it; substitution of a component different from that supplied may result in measurement error and will void manufacturer warranty.
- Always follow local regulations for proper disposal of the monitor, cuff and batteries.
OPERATING CAUTIONS AND WARNING
- Prolonged over-inflation may cause congestion, swelling or bruising in some people.
- If you experience any discomfort or an abnormality occurs, stop using the device immediately; to stop the device during operation, press the START/ STOP button and the cuff will automatically deflate.
- Operation outside of stated operating temperature may result in measurement
error or device malfunction; operation environment temperature is: 50°F – 104°F (10°C – 40°C); Humidity: 90% RH max. - Never use this unit while operating a vehicle or in the bathtub or shower.
STORAGE CAUTIONS AND WARNINGS
- Storage outside of stated storage temperature may result in measurement error or device malfunction; storage environment temperature is: -4°F – 140°F (-20°C – 60°C); Humidity: 95% .
- Keep the unit out of reach of children.
- Always keep the unit unplugged while not in use; remove the batteries if the unit will not be used for an extended period of time.
CLEANING CAUTIONS AND WARNINGS
- Never immerse the unit in water to clean as it may damage the unit
- Follow the ‘Care & Maintenance’ portion of this manual for instruction on how to clean and care for your monitor.
INTRODUCTION and INDICATIONS FOR USE
It is recommended that you first seek the advice and recommendation of your physician or healthcare professional when using home diagnostic devices, including blood pressure monitors.
Automatic blood pressure monitors use the oscillometric method to electronically measure your blood pressure. The monitor detects your blood’s movement through the artery in your arm and converts the movements into a digital reading. The oscillometric method does not require a stethoscope, making the monitor ideal for home use.
Blood pressure readings determined with this device are equivalent to measurements obtained by a trained healthcare professional using the cuff/ stethoscope auscultation method, within the limits prescribed by the American
National Standard for Electronic or Automated Sphygmomanometers.
Thank you for purchasing a Smart Heart Automatic Blood Pressure Monitor. With proper care and use, your monitor will provide you with many years of reliable readings.
PLEASE READ THIS INSTRUCTION MANUAL COMPLETELY BEFORE OPERATING THIS UNIT.
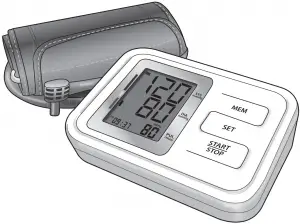
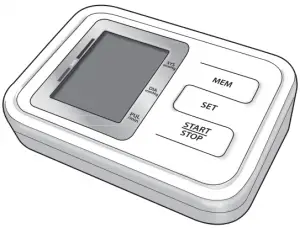
BLOOD PRESSURE MONITOR FEATURES
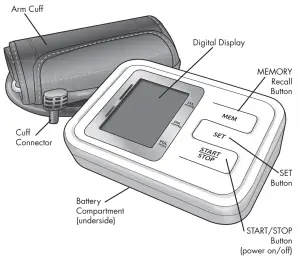
DETAILS OF THE DIGITAL DISPLAY SCREEN AND INTERPRETATION OF THE SYMBOLS ARE INCLUDED THROUGHOUT THIS MANUAL.
GETTING STARTED
Before Taking a Measurement
- Your readings should only be interpreted by your physician or healthcare professional with access to your individual medical history. Regular use of a home blood pressure monitor will allow you to track and record your readings for discussion with your physician.
- Conduct your measurement in a quiet place while seated in a relaxed position.
Rest for 15 minutes before taking your reading. If an error occurs or you desire to take a second reading, allow 15 minutes between readings for your blood vessels to return to normal. - Avoid smoking, eating, taking medication, alcohol, physical activity or any other stressful activity for 30 minutes prior to taking a reading.
- Always remove any jewelry or constrictive clothing that may interfere with the cuff placement.
- Keep yourself and the monitor still during measuring; do not talk during the reading.
- It is recommended that you take your readings as the same time each day to better monitor any indications in your results.
- Record your daily measurement on the included chart or some other written document to share with your physician.
BATTERY INSTALLATION
This unit comes complete with 4 AA batteries.
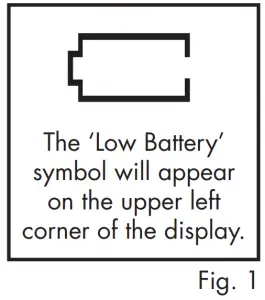
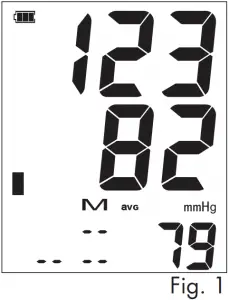
It is necessary to replace the batteries when the Low Battery symbol appears on the display, Fig 1, or when the display does not turn on after the START/STOP button is pressed.
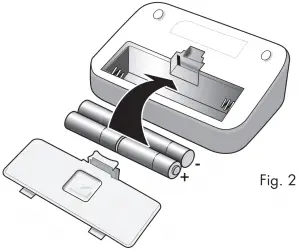
The battery compartment is located on the underside of this monitor.
- Depress the clip in the battery compartment cover and remove the cover.
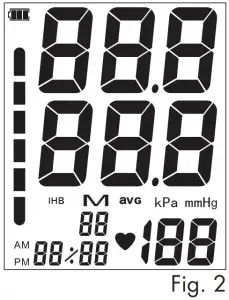
- Insert or replace 4 AA batteries into the battery compartment, ensuring to match the indicated polarity symbols, Fig 2. Always use new batteries.
- Replace the battery cover.
- Dispose of batteries according to local disposal and recycling regulations.
It is recommended to remove the batteries if the unit will not be used for an extended period of time.
SETTING DATE/TIME
| PLEASE SET DATE AND TIME BEFORE INITIAL USE TO ENSURE YOUR READINGS ARE LABELED AND STORED IN MEMORY PROPERLY.
IT IS NECESSARY TO SET THE DATE AND TIME FOR THE UNIT EVERY TIME BATTERIES ARE REPLACED. |
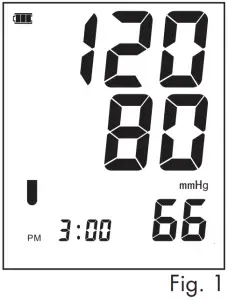
The date/time feature is on the bottom left of the display screen, Fig 1. The display will remain in the ‘time’ mode except during memory review, when the display will alternate between time and date to display when the measurement was taken.
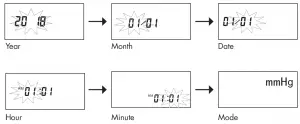
- When the batteries are first installed, the year will begin
to flash. - Press the MEM button to advance the year until the
desired number appears. To scroll through the numbers
quicker, hold down the MEM button as the numbers advance. - Press the SET button to confirm the year entry.
- Next, the month will blink. Repeat steps 2 and 3 to set the month, date, hours, minutes then mode.
Mode: This device offers the option of mmHg or kpP modes; U.S. measurement standards follow mmHg and your monitor will default to mmHg. Press SET to confirm and bypass this screen. - After setting the mode, the unit will automatically exit out of the date/time setting mode and is ready to take a measurement. Press START/STOP to power off if you are not ready to take a reading.
If at any time you wish to reset the date/time information, press and hold the SET button for approximately 3-4 seconds until the year begins flashing, then repeat steps 2 thru 5.
The date/time feature is on the bottom left of the display screen, Fig 1. The display will remain in the ‘time’ mode except during memory review, when the display will alternate between time and date to display when the measurement was taken.
FITTING and APPLYING YOUR CUFF
| PROPER CUFF FIT AND PLACEMENT IS CRITICAL IN OBTAINING ACCURATE BLOOD PRESSURE MEASUREMENTS. PLEASE READ THESE INSTRUCTIONS CAREFULLY AND CONSIDER CONSULTING WITH YOUR PHYSICIAN FOR FURTHER DIRECTION. |
Before applying your blood pressure cuff, be sure you have selected the appropriate size cuff.
To determine the proper cuff size, measure the circumference of your left upper arm at the point midway between inside bend of your elbow and your shoulder.
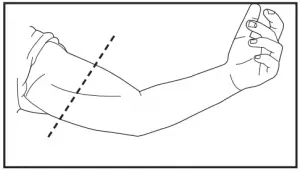
Adult Cuff fits arm circumference 8-3/4”—12-1/2” (22—32 cm)
Additional cuff sizes are available for order on the enclosed order form.
If for any reason you are unable to or should not use your left arm, please modify the instructions for cuff application to your right arm. Your physician can help you identify which arm is best for you to take measurements from
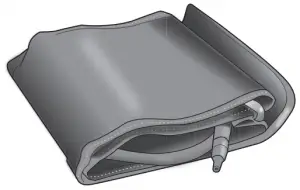
Assembling Your Cuff
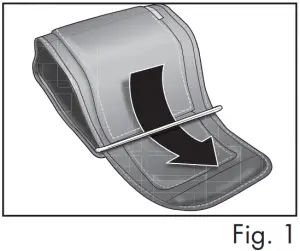
Your cuff may need to be ‘threaded’ through the metal bar to form the cuff cylinder for your arm.
- Lay the open cuff hook and loop side down, size/ instruction wording side up on a flat surface.
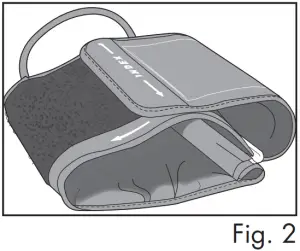
- Keeping the words on the inside of the cuff, thread the end of the cuff through the metal bar, Fig 1. The end of the cuff should be able to fold over onto itself for securing via the hook and loop closure, Fig 2.
Applying Your Cuff
Be seated at a table or desk with your feet flat on the floor. To avoid accidently pulling on or dropping your monitor, the cuff should not be plugged into the monitor until after the cuff is applied to your arm.
- Remove any constrictive clothing or jewelry that may interfere with cuff placement.
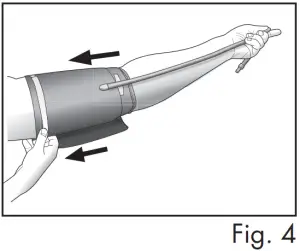
- Slide the cuff cylinder onto your left arm and align the air hose over the main artery on the inside of your arm, Fig 3. For proper positioning, the tube should follow the inside length of the arm, Fig 4.
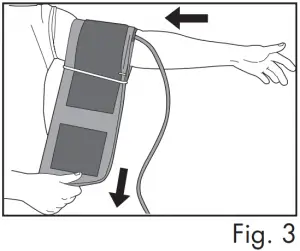
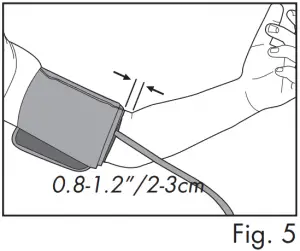
- The bottom edge of the cuff should be positioned approximately one inch above the elbow joint, Fig 5.
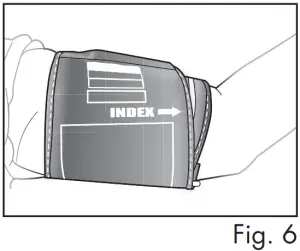
- The INDEX mark arrow should be within the range bar marking as shown, Fig 6; if the INDEX arrow is outside of the range, a different sized cuff is needed.
The cuff should fit comfortably, yet snugly around your arm. You should be able to insert one finger easily between your arm and the cuff.
TAKING YOUR BLOOD PRESSURE READING
Please read the preceding portions of this manual prior to taking your first reading.
Reminder, it is important to avoid smoking, eating, taking medication, alcohol consumption or physical activity 30 minutes prior to taking a reading.
- Position the monitor on a flat, stable surface with the digital display in view.
- Insert the cuff tubing connector into the port on the left side of your monitor.
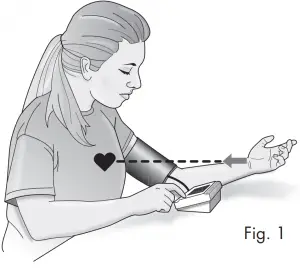
- Rest your elbow on a solid surface with your palm facing upward. Elevate your arm so that the cuff is at the same level as your heart, Fig 1. Relax your left hand.
- Press the START/STOP button to turn the unit on; the unit will briefly flash a self-test, Fig 2.
- The display will briefly show a flashing ‘0’ before the measurement begins.
- The cuff will automatically inflate to approximately 180mmHg; you will see the numbers go up on the display screen.
- When the inflation has reached optimum level, the display will begin to show the decreasing pressure while you feel the pressure of the cuff decrease.
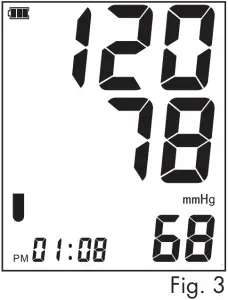
YOU CAN STOP THE INFLATION OR DEFLATION PROCESS AT ANY TIME BY PRESSING THE POWER START/STOP BUTTON. - When the measurement is complete, your blood pressure measurement and pulse will display simultaneously on the screen, Fig 3.
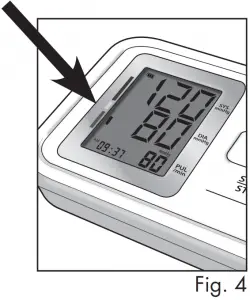
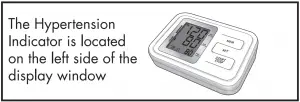
- The Hypertension Indicator will indicate your reading range in the left side of the display, Fig 4. See page 16 for a chart interpreting the Hypertension Indicator results.
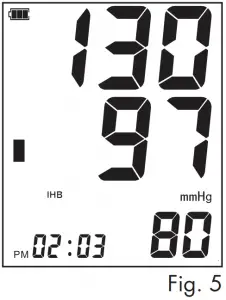
- If an irregular heartbeat was detected during the reading, the Irregular Heartbeat Detection indicator will appear on the display, Fig 5. See page 15 for more information on the Irregular Heartbeat Detection feature.
- The reading will automatically be stored in memory, up to 60 readings.
- Select START/STOP to turn the unit off and conserve energy and battery life. The unit will automatically shut-off.
- Disconnect the cuff and tubing prior to storage.
INTERPRETING YOUR RESULTS
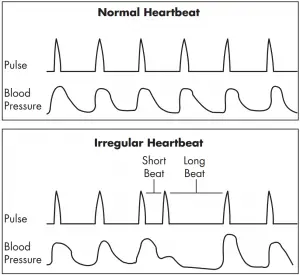
Irregular Heartbeat Detector 
An irregular heartbeat is defined as a heartbeat rhythm that is more than 25% slower or 25% faster than the average measurement detected while the monitor is conducting the measurement. When this device detects an irregular rhythm two or more times during the reading, the IHB symbol will appear on the display screen.
This monitor will operate if the icon appears, but the results may be compromised, especially if this symbol appears often. Please consult with your physician or trained healthcare professional for further information regarding an irregular heartbeat and if this symbol appears frequently.
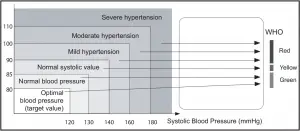
Hypertension Indicator – WHO Classifications
This chart can help you identify where your blood pressure measurements fall according to WHO classification standards. This chart should only be considered as a guideline; always consult with your physician to interpret your individual results. Never adjust your medication(s) dosage, or severely alter your diet or exercise routine without consulting with your physician.
MEMORY FUNCTIONS
Recalling Measurements in Memory
This monitor stores and recalls up to 60 measurements, plus an average of the last three measurements in memory. These measurements can be shared with your physician or trained healthcare professional.
- When the monitor is off, press and release the MEM button. The average blood pressure and pulse measurement of the most recent three readings will show with the M and AVG icons on the screen, Fig 1.
- Press the MEM button again to begin scrolling through all of the measurements from most current to oldest. Press the SET button to jump to the oldest measurement and scroll from oldest to most current.
Each measurement will indicate the date and time taken, the measurement and pulse reading, Hypertension Indicator results and Irregular Heartbeat if present, Fig 2.
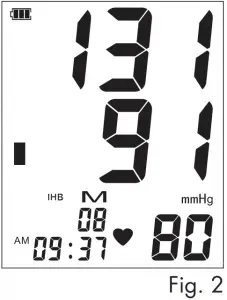
NOTE: On the lower left of the display, the date/ time will alternate showing what time and date the measurement was taken. - After you’ve scrolled through all the readings, the display will cycle back to the first reading in memory. Press START/STOP to turn the unit off.
When the number of readings exceeds 60, the oldest data will be replaced with the new record.
Clearing Measurements from Memo
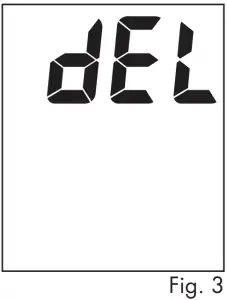
1. Press and release the MEM button to access the memory bank feature. Then, press and hold the SET button 4–6 seconds until the display shows ‘dEL’ for delete, Fig 3.
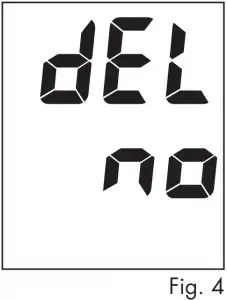
2. While the display shows ‘dEL’, press and release the SET button. The display will show ‘dEL no’, Fig 4.
3. Press and release the SET again, and the display will show ‘dEL YES’, Fig 5.
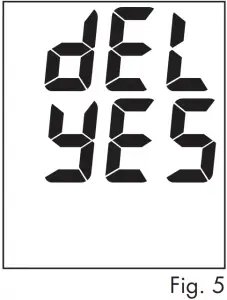
4. While the display shows ‘dEL YES’, press the START/ STOP button to delete all of the readings in the device memory.
The unit will automatically turn off after the memory is cleared.
NOTE: You must press the START/STOP button to erase the readings in memory. If you do not press the button, the unit will turn itself off and the memory will not be cleared
CARE and MAINTENANCE
Proper care and maintenance of your blood pressure monitor will help ensure long life for the product; improper use of the monitor may void the included warranty.
Always disconnect the cuff and tubing from the monitor prior to cleaning and storage.
Monitor Care and Maintenance
- Do not use any liquids on the monitor; use a soft, dry cloth to clean the monitor as needed.
- Storage outside of stated storage temperature may result in measurement error or device malfunction; storage environment temperature is: -4°F – 131°F (-20°C – 55°C); Humidity: 95%.
- Always keep the unit unplugged while not in use; remove the batteries if the unit will not be used for an extended period of time.
- Do not attempt to disassemble your monitor; disassembling your monitor may void the manufacturers warranty.
- Do not subject the monitor to strong shocks; take care not to drop the monitor.
Cuff Care and Maintenance
- The cuff should not be submerged or washed in a washing machine, but may be spot cleaned with a mild-detergent as needed.
- Never attempt to iron or dry the cuff; if the cuff becomes wet, allow the cuff to air dry completely before use or storage.
- Do not attempt to remove the tube and bladder from the nylon cuff as this may damage the cuff.
- Take care not to forcefully bend or kink the tubing during storage.
DISPLAY SYMBOLS
| Symbol | Meaning |
 |
Low battery |
 |
Reading on display is the average of the most current 3 readings in memory |
 |
Reading on display is a reading from a memory bank |
 |
An irregular heartbeat was detected during measurement |
 |
An error has occurred during inflation |
| The measurement has failed |
TROUBLESHOOTING
| Problem | Possible Cause | Solution |
| Display shows an abnormal result or |
Cuff position was not correct or was not tight enough. | Apply the cuff properly and attempt a new measurement. |
| Body posture was not correct during measurement | Review the ‘Taking Your Blood Pressure Reading’ portion of this manual and attempt a new measurement. | |
| Speaking, excessive movement, angry, excited or nervous anxiety during measurement. | Wait a period of time and attempt a new measurement after calm has returned; do not speak or move during measurement. | |
| Display is blank when power is on. | Batteries may be expired or installed improperly | Check the polarity of the batteries and reinstall if necessary; replace batteries with new batteries. |
FCC STATEMENT
NOTE:
This product has been tested and found to comply with the limits for a Class B digital device, pursuant to part 15 of the FCC rules.
These limits are designed to provide reasonable protection against harmful interference in a residential installation. The product generates, uses, and can
radiate radio frequency energy and, if not installed and used in accordance with the instructions, may cause harmful interference to radio communications. However, there is no guarantee that interference will not occur in a particular installation. If the product does cause harmful interference to radio or television reception, which can be determined by turning the product on and off, the user is encouraged to try to correct the interference by one or more of the following measures:
- Reorient or relocate the receiving antenna
- Increase the separation between the product and the receiver.
- Connect the product into an outlet on a circuit different from that to which the receiver is connected.
- Consult the dealer or an experienced radio/TV technician for help.
This digital apparatus does not exceed the Class B limits for radio noise
emissions from digital apparatus as set out in the interference-causing equipment standard entitled “Digital Apparatus”, ICES-003 of the Canadian Department of Communications.
Changes or modifications not expressly approved by the party responsible for compliance could void the user’s authority to operate the equipment.
ELECTROMAGNETIC COMPATIBILITY
Table 1
For all ME EQUIPMENT and ME SYSTEMS
Guidance and manufacture’s declaration – electromagnetic emissions
This monitor is intended for use in the electromagnetic environment specified below.
The customer or the user of this monitor should assure that it is used in such an environment.
| Emission Test | Compliance | Electromagnetic Environment Guidance |
| RF emissions CISPR 11 | Group 1 | This monitor uses RF energy only for its internal function. Therefore, its RF emissions are very low and are not likely to cause any interference in nearby electronic equipment. |
| RF emissions CISPR 11 | Class B | This monitor is suitable for use in all establishments, including domestic establishments and those directly connected to the public low-voltage power supply network that supplies buildings used for domestic purposes. |
| Harmonic emissions IEC 61000-3-2 | Class A | |
| Voltage fluctuations/ flicker emissions IEC 61000-3-3 | Complies |
Table 2
For all ME EQUIPMENT and ME SYSTEMS
Guidance and manufacture’s declaration – electromagnetic immunity
This monitor is intended for use in the electromagnetic environment specified below.
The customer or the user of this monitor should assure that it is used in such an environment.
| Immunity Test | IEC 60601 Test Level | Compliance Level | Electromagnetic Environment Guidance |
| Electrostatic discharge (ESD) IEC 61000-4-2 |
± 6 kV contact ± 8 kV air |
± 6 kV contact ± 8 kV air |
Floors should be wood, concrete or ceramic tile. If floors are covered with synthetic material, the relative humidity should be at least 30 %. |
| Electrical fast transient/burst IEC 61000-4-4 | ± 2 kV for power supply lines ± 1 kV for input/output lines |
± 2 kV for power supply lines | Mains power quality should be that of a typical commercial or hospital environment. |
| Surge IEC 61000-4-5 |
± 1 kV line(s) to line(s) ± 2 kV line(s) to earth |
± 1 kV line(s) to line(s) ± 2 kV line(s) to earth |
Mains power quality should be that of a typical commercial or hospital environment. |
| Voltage dips, short interruptions and voltage variations on power supply input lines IEC 61000-4-11 | <5 % UT (>95 % dip in UT) for 0.5 cycle 40 % UT (60 % dip in UT) for 5 cycles 70 % UT (30 % dip in UT) for 25 cycles <5 % UT (>95 % dip in UT) for 5 s | <5 % UT (>95 % dip in UT) for 0.5 cycle 40 % UT (60 % dip in UT) for 5 cycles 70 % UT (30 % dip in UT) for 25 cycles <5 % UT (>95 % dip in UT) for 5 s | Mains power quality should be that of a typical commercial or hospital environment. If the user of this monitor requires continued operation during power mains interruptions, it is recommended that this monitor be powered from an uninterruptible power supply or a battery. |
| Power frequency (50/60 Hz) magnetic field IEC 61000-4-8 |
3 A/m | 3 A/m | Power frequency magnetic fields should be at levels characteristic of a typical location in a typical commercial or hospital environment. |
Table 3
For ME EQUIPMENT and ME SYSTEMS that are not LIFE-SUPPORTING
Guidance and manufacturer’s declaration – electromagnetic immunity
This monitor is intended for use in the electromagnetic environment specified below.
The customer or the user of this monitor should assure that it is used in such an environment.
| Immunity Test | IEC 60601 Test Level | Compliance Level | Electromagnetic Environment Guidance |
| Conducted RF IEC 61000-4-6 Radiated RF IEC 61000-4-3 |
3 Vrms 150 kHz to 80 MHz 3 V/m 80 MHz to 2,5 GHz |
3 Vrms 3 V/m |
Portable and mobile RF communications equipment should be used no closer to any part of this monitor, including cables, than the recommended separation distance calculated from the equation applicable to the frequency of the transmitter. Recommended separation distance:  Where P is the maximum output power rating of the transmitter in watts (W) according to the transmitter manufacturer and d is the recommended separation distance in meters (m). Where P is the maximum output power rating of the transmitter in watts (W) according to the transmitter manufacturer and d is the recommended separation distance in meters (m).
Field strengths from fixed RF transmitters, as determined by an electromagnetic site survey,* should be less than the compliance level in each frequency range.** Interference may occur in the vicinity of equipment marked with the following symbol: |
| NOTE 1 At 80 MHz and 800 MHz, the higher frequency range applies.
NOTE 2 These guidelines may not apply in all situations. Electromagnetic propagation is affected by absorption and reflection from structures, objects and people. |
|||
| * Field strengths from fixed transmitters, such as base stations for radio (cellular/cordless) telephones and land mobile radios, amateur radio, AM and FM radio broadcast and TV broadcast cannot be predicted theoretically with accuracy. To assess the electromagnetic environment due to fixed RF transmitters, an electromagnetic site survey should be considered. If the measured field strength in the location in which this monitor is used exceeds the applicable RF compliance level above, this monitor should be observed to verify normal operation. If abnormal performance is observed, additional measures may be necessary, such as re-orienting or relocating this monitor.
** Over the frequency range 150 kHz to 80 MHz, field strengths should be less than 3V/m. |
|||

Table 4
For ME EQUIPMENT and ME SYSTEMS that are not LIFE-SUPPORTING
Recommended separation distances between portable and mobile RF communications equipment and this monitor
This monitor is intended for use in an electromagnetic environment in which radiated RF disturbances are controlled. The customer or the user of this monitor can help prevent electromagnetic interference by maintaining a minimum distance between portable and mobile RF communications equipment (transmitters) and this monitor as recommended below, according to the maximum output power of the communications equipment.
| Rated maximum output power of transmitter W | Separation distance according to frequency of transmitter m |
||
| 150 kHz to 80 MHz d = 1. 2  |
80 MHz to 800 MHz d = 1. 2 |
800 MHz to 2,5 GHz d = 2.3 |
|
| 0,01 | 0,12 | 0,12 | 0,23 |
| 0,1 | 0,38 | 0,38 | 0,73 |
| 1 | 1,2 | 1,2 | 2,3 |
| 10 | 3,8 | 3,8 | 7,3 |
| 100 | 12 | 12 | 23 |
| For transmitters rated at a maximum output power not listed above, the recommended separation distance d in meters (m) can be determined using the equation applicable to the frequency of the transmitter, where P is the maximum output power rating of the transmitter in watts (W) according to the transmitter manufacturer.
NOTE 1 At 80 MHz and 800 MHz, the separation distance for the higher frequency range applies. |
|||
PRODUCT SPECIFICATIONS
| Name | Smart Heart Automatic Blood Pressure Monitor |
| Model Number | 01-550 |
| Display System | Digital display/LCD |
| Measuring Method | Oscillometric Method, Automatic Air Inflation and Measurement |
| Power Source | 4  AA Batteries AA Batteries |
| Measuring Range | Pressure: 0-299 mmHg; Pulse: 40-180 beats/minute |
| Accuracy | Pressure: ±3 mmHg (0.4kPa); Pulse: ±5% of reading |
| Deflation | Automatic pressure release valve |
| Memory | Built-in memory enabling display of up to 60 measurements |
| Automatic Power-Off | Approximately 2 minutes after last button operation |
| Battery Life | Approximately 1 month with normal usage |
| Operation Environment | Temperature 50ºF – 104ºF (10ºC – 40ºC); Humidity 15 – 90% RH max |
| Storage Environment | Temperature -4ºF – 140ºF (-20ºC – 60ºC); Humidity 10 – 95% RH max |
| Monitor Dimensions | 4” x 5-1/2” x 1-3/4” |
| Monitor Weight | 8.5 oz. (without batteries); 11 oz. (with batteries) |
| Arm Circumference Range | Adult size cuff fits arm circumference: 8-3/4”—12-1/2” (22—32 cm) |
| Accessories | Storage pouch, Instruction Manual, four AA alkaline batteries, Quick Start Guide, FAQ, Replacement Cuff Order Form, Blood Pressure Log |
| Additional Options (available separately) |
Small adult cuff fits arm circumference: (available separately) 6”–8-1/2” (22–30 cm), Large adult cuff fits arm circumference: 12-3/5”–16-1/2” (32–42 cm) |
Specifications are subject to change without notice.
ONE-YEAR LIMITED WARRANTY
Congratulations on your purchase of a Blood Pressure Monitor. Your Blood Pressure Monitor is covered by the following limited warranty commencing upon the date of purchase, and subject to the following terms and conditions:
The Warrantor warrants that its Blood Pressure Monitor will be free from defects in materials and workmanship under normal consumer usage for a period of one year for the original purchaser of the product.
Periodic maintenance, repair and replacement of parts due to normal wear and tear are excluded from coverage. Defects or damage that result from: (a) improper operation, storage, misuse or abuse, accident or neglect, such as physical damage (cracks, scratches, etc.) to the surface of the product resulting from misuse; (b) contact with liquid, water, rain, extreme humidity or heavy perspiration, sand, dirt or the like, extreme heat, or food; (c) use of the Blood Pressure Monitor for commercial purposes or subjecting the Blood Pressure Monitor to abnormal usage or conditions; or (d) other acts which are not the fault of the Warrantor, are excluded from coverage. This warranty does not cover batteries or other power sources that may be provided with, or used with the Blood Pressure Monitor.
If the Blood Pressure Monitor fails to conform to this limited warranty, return the Blood Pressure
Monitor postage prepaid to: Attn: Repair Department, 1175 Lakeside Drive, Gurnee, IL, 60031. When returning a product, please also include: (i) a copy of your receipt, bill of sale or other comparable proof of purchase; (ii) a written description of the problem; and (iii) your name, address and telephone number. Carefully package the product to avoid any damage that may occur while in transit; shipping insurance with returned receipt is recommended. At our option, the Warrantor will repair or replace the unit found to be defective in materials or workmanship under normal consumer usage. The purchaser will be notified of any additional repairs required prior to completing the repair, and will be responsible for parts charges, if any, and repair charges not covered by this limited warranty.
EXCEPT AS PROVIDED FOR IN THIS LIMITED WARRANTY, ALL EXPRESS AND IMPLIED WARRANTIES AND CONDITIONS ARE DISCLAIMED, INCLUDING WITHOUT LIMITATION THE IMPLIED WARRANTIES OF MERCHANTABILITY AND FITNESS FOR A PARTICULAR PURPOSE. THE REPAIR OR REPLACEMENT AS PROVIDED UNDER THIS LIMITED WARRANTY IS THE EXCLUSIVE REMEDY OF THE CONSUMER, AND IS PROVIDED IN LIEU OF ALL OTHER WARRANTIES, EXPRESS OR IMPLIED. IN NO EVENT SHALL THE WARRANTOR BE LIABLE, WHETHER IN CONTRACT OR TORT (INCLUDING NEGLIGENCE) FOR DAMAGES IN EXCESS OF THE PURCHASE PRICE OF THE PRODUCT, OR FOR ANY INDIRECT, INCIDENTAL, SPECIAL OR CONSEQUENTIAL DAMAGES OF ANY KIND, OR FOR DAMAGES TO, OR LOSS OF, OTHER PROPERTY OR EQUIPMENT OR PERSONAL INJURIES TO THE FULL EXTENT THESE DAMAGES MAY BE DISCLAIMED BY LAW.
Some states and jurisdictions do not allow the limitation or exclusion of incidental or consequential damages, or limitation on the length of an implied warranty, so the above limitations or exclusions may not apply to you. This warranty gives you specific legal rights, and you may also have other rights that vary from state to state or from one jurisdiction to another.
