GPS 3.0 Watch Instruction Manual
Introduction
Thank you for purchasing the GPS watch. This GPS watch is packed with personal Training features like speed, trip time, laps, etc. GPS can display your current location in an electronic map. Watch features include 12/24H Time format, Chronograph, World time, 5 daily Alarms, 6 Interval Timers, Run, Run Data and HRM modes. This watch can communicate with a PC to store and review your performance. This watch uses a rechargeable battery that can be charged through USB port of your PC. It also uses HRM belt with 2.4 GHz technology to monitor your heart rate for all your HR related information.
Caring for your GPS watch:
Clean your GPS watch and heart rate monitor with a dampened cloth preferably with mild detergent solution. Wipe dry using a dry cloth. Do not use chemical cleaners and solvents that may damage plastic components.
Do not store your GPS watch to prolonged exposure to extreme temperatures as this may result to permanent damage to your unit.
About GPS:
Global Positioning System (GPS) is a satellite- based navigation system made up of a network of 24 or more satellites. GPS works best in clear weather condition, anywhere in the world, 24 hours a day. Tall buildings may interfere with GPS accuracy. When 3 satellite signals are received, the watch will have 2D GPS fixed (Latitude and Longitude). When 4 or more satellite signals are received, the watch will have 3D GPS Fixed.
Water immersion:
This GPS watch is designed to be water resistant up to 3 ATM. It can resist water pressure up to 30 meters. After submersion to water, please make sure to wipe dry and air dry the unit before using or charging.
Caution: This unit is not intended to be used while swimming. Prolonged water submersion may cause electronic shorting in the unit which may cause minor skin burn or irritation.
Getting Started
Step 1) Know your watch:
Push button location:
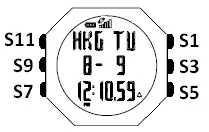
Push button Function:
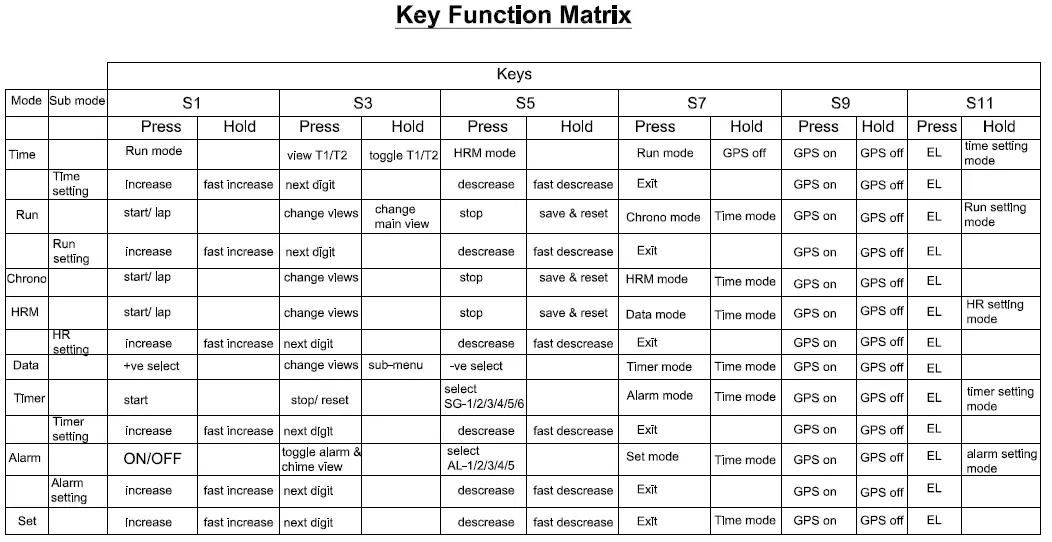
S1 – Start / Lap / +
S3 – View / OK
S5 – Stop / Save / –
S7 – Mode / Exit
S9 – GPS
S11 – Light
Note: Actual color of the watch and artwork may vary from style to style.
Step 2) Charging the Battery:
Charge the unit for about 4.5 hours before first use. The length of time for a fully charged battery will last depending on the actual usage. It is recommended to regularly re-charge your battery every 1-2 months even if it is not used to maintain good battery condition.
- Plug your USB PC link cable to your PC
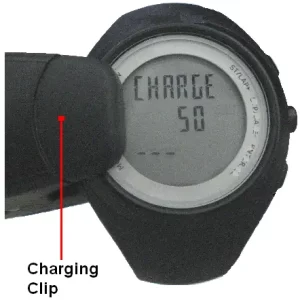
- Align the charging clip with the contacts on the back of the watch.
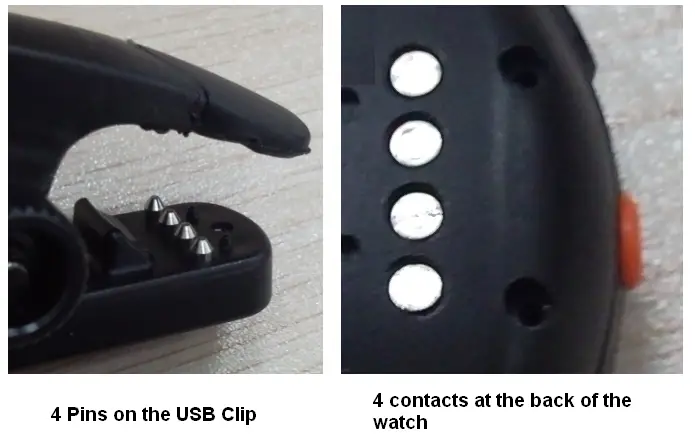
- Connect the charging clip securely to the watch.
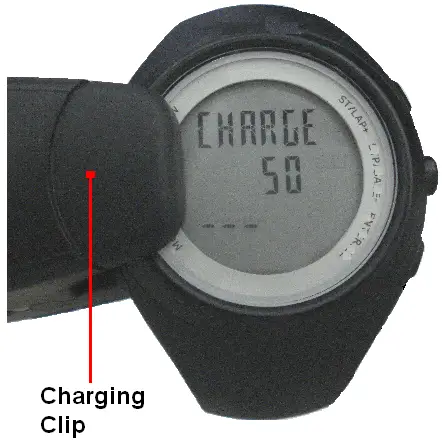
Note: Please thoroughly dry the charging contacts and surrounding area to ensure proper electrical contact and prevent corrosion.
When the battery is low, it is time to charge the GPS watch. The possible screen when you charge your watch.
Once the battery is full, it will display CHARGE 100% FULL.

Battery low condition:
You cannot turn ON the GPS when the battery is low. The watch will display BATT LOW. The battery icon will blink. You need to recharge the battery in order to use the GPS again.

When the battery is almost low and you still perform your exercise, your data may not be saved if the battery becomes low. Please make sure the battery have enough battery power before doing your exercise in order not to lose your data.
When the battery level becomes very low, the watch will automatically turn OFF the display (blank-screen).
Step 3) Acquire Satellite signals:
To get the correct time of day and begin using your GPS watch, you have to acquire GPS signals. It may take few minutes to acquire the satellite signals.
- Go outside to an open area away from tall buildings and trees. Orient the GPS antenna towards the sky for best reception. The antenna is located at the 6 o’clock position of the watch.
Note: In order to accurately navigate the GPS, you need to have a good line of sight to the satellites.
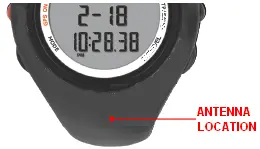
- Stand still and do not begin moving while performing the following steps until the GPS signals are already received.
- How to Turn-ON the GPS: Press S9 to turn ON the GPS. The watch will start locating the satellites. After receiving the satellite signals, it will automatically go to RUN mode and the watch will display “GPS GO” while the “CHRONO” blinks.
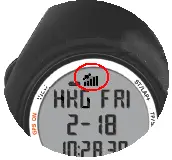
- How to turn OFF the GPS: If you wish to turn OFF the GPS, press and hold S9 for about 3 seconds in any mode and the watch will momentarily display GPS OFF and then return to Time view.
Note: When GPS is ON and CHRONO is running or stop, User cannot turn OFF GPS.
GPS signals and its meaning:
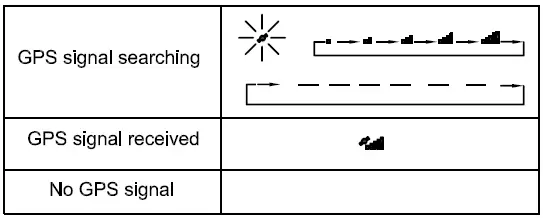
You will hear a beep sound when the watch has received a GPS signal or when the GPS signal has been lost. LOST GPS signal will also be displayed in the screen.
If no Satellite signal is received within 15 minutes, the watch will auto return to Time mode.
Step 4) Pair your Heart Rate monitor:
The HRM belt is on standby and ready to send data to your watch. Wear the belt directly on your skin just below your breastplate. It should be snug enough to stay in place during your run.
- Push one tab on the strap through the slot in the HRM transmitter.
- Wet both electrodes with a damp cloth on the back of the HRM belt. This will help create a strong electrical connection between your chest and the HRM transmitter.
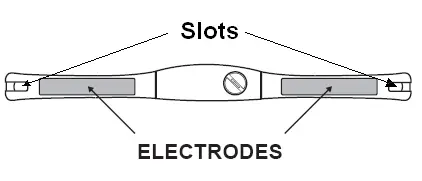
- Wrap around the chest belt around your rib cage just below the pectoral muscles and attach the other end of the strap to the HRM transmitter. The elastic strap should be adjusted so that it is snug enough so that it will not move during use but not so tight as to restrict breathing.
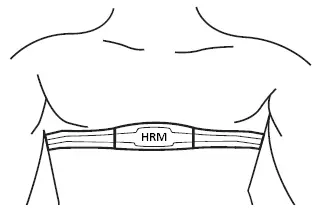
- Bring the GPS watch within range of the HRM transmitter (3 meters). The watch will auto detect the HR belt. The watch will then automatically go to RUN mode. Your Heart rate information will now be displayed in the watch.
- If the heart rate data does not appear on the watch, or if you have erratic data, follow the tips below. If the problem persists, you may have to pair the HR belt again.
- Make sure the HR belt is snugly fit to your body.
- Reapply water or electrode gel to the electrode of the HR belt.
- Clean the electrodes from possible contamination that may interfere with heart rate signals.
- Wear a cotton shirt or if possible, wet your cotton shirt. Synthetic fabric that rubs with your skin may create static electricity and interfere with the heart rate signal.
- Move away from strong electromagnetic fields and other wireless sensors which can interfere with your heart rate sensor. Possible sources of wireless interference may include high voltage power lines, electric motors, microwave ovens, cordless phones, and wireless LAN or access points.
Step 5) Go for a Run:
5.1) Using Run mode:
-
- Press S1 or S7 from Time mode to go to RUN mode.
- The watch will automatically search for GPS signal. Once the signal is received, the watch will prompt “GPS GO, PACE and the CHRONO time blinks.
- Press S1 to START or TAKE LAP. If auto lap function is set, the watch will take lap automatically based on auto lap setting. And there is a beep sound during taking of auto lap.
- Press S5 to stop after completing your run.
- Press & hold S5 again to save your run data.
Note: When the chronograph is stopped or reset, the GPS will automatically turn OFF after 15 minutes and return to Time mode.
5.2) Using Chronograph mode:
RUN mode and CHRONOGRAPH mode has the same timer counter. When the chronograph is started or stopped in RUN mode, the same thing happens in Chronograph mode. They just differ in the views. This mode is dedicated to chronograph, lap time, exercise time, and distance travelled.
-
- Press S1 to START or TAKE LAP. If auto lap function is set, the watch will take lap automatically based on auto lap setting. There is also a beep sound during taking auto lap.
- Press S5 to stop after completing your run.
- Press & hold S5 again to save your run data.
Note: When the chronograph is stopped or reset or no key operation, the GPS will automatically turn OFF after 15 minutes and return to time mode.
5.3) Using HRM mode:
RUN mode and HRM mode has the same timer counter. When the chronograph is started or stopped in RUN mode, the same thing happens in HRM mode. They just differ in the views. This mode is dedicated to HRM views
-
- Press S5 or S7 from Time to HRM mode.
- Press S1 to START or TAKE LAP. If auto lap function is set, the watch will take lap automatically based on auto lap setting. There is also a beep sound during taking auto lap.
- Press S5 to stop after completing your run.
- Press and hold S5 again to save your run data.
Note: When the chronograph is stopped or reset, the GPS will automatically turn off after 15 minutes and return to time mode.
General Operations
The watch has the following main modes: Time, Run, Chronograph, HRM, RUN Data, Timer Alarm and Set modes. Press S7 to scroll through these modes.
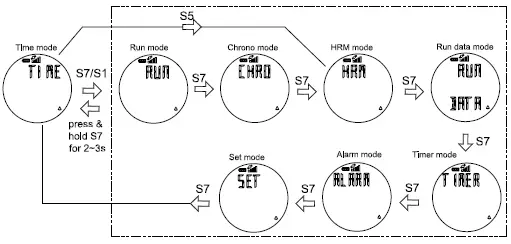
Watch reset:
The user can reset the watch by pressing and holding S1, S5, S7 and S11 simultaneously. All segments will be light on, then EL backlight ON. The software code will be displayed. The watch will be reset. Below are the reset views.

EL backlight:
This watch has a Night mode function. Following are the options in SET mode and their functions:
10 SECONDS – Press S11 will turn ON the Light for 10 seconds.
20 SECONDS – Press S11 will turn ON the Light for 20 seconds.
NIGHT ON – Light will continuously ON when CHRONO is running from 6:00 pm to 7:00 am. But when CHRONO is stopped or reset from 6:00 pm to 7:00 am, press any key can turn ON the light for about 10 seconds.
TIME MODE
Following are the views with the corresponding information displayed:
Time 1 or Time2, Month, Date, City code, Weekday and battery level indicator.
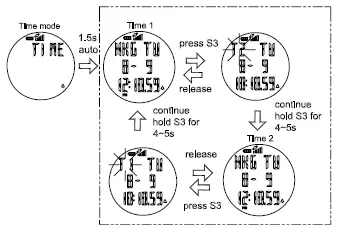
Note: While in Time mode, User has an option to use a short cut key, press S1 to go to RUN mode while press S5 to go to HRM mode.
TIME 1 setting in SET mode:
You have two options in setting the watch, GPS or MANUAL. In manual setting, you can manually set the time. If you select the GPS option, the watch will be automatically set based on the data and time data from GPS satellites.
- In SET mode, press S1 or S5 for Time setting
- Press S3 and Time 1 appears.
- Press S1 or S5 for Time 1 or Time 2 setting
- Press S3 to confirm
- Select GPS or MANUAL setting by pressing S1 or S5 and then press S3 to enter.
GPS setting:
-
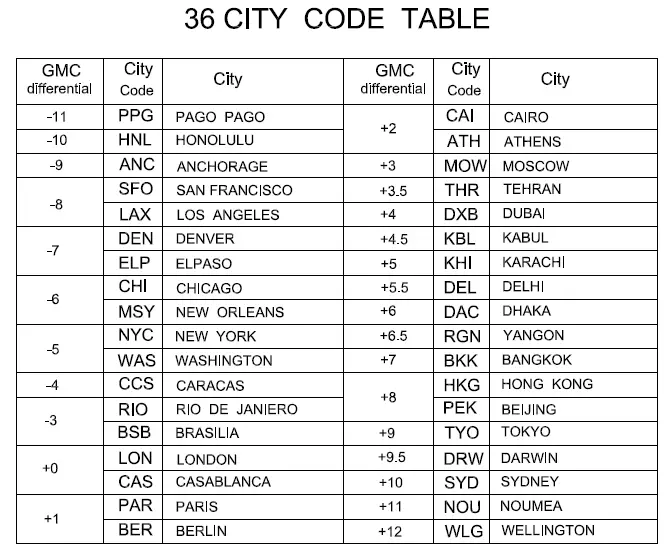
- Select TIME ZONE by pressing S1 or S5 and then press S3 to enter. There are 36 cities to select in this time zone setting.
- Select DST ON or OFF by pressing S1 or S5 and then press S3 to enter.
- Select 12H or 24H format setting by pressing S1 or S5. Press S3 to enter.
- Select M-D or D-M (Month/Day or Day/Month) format setting by pressing S1/S5. Press S3 to enter and the watch will go back to Time.
MANUAL setting:
-
- Set the HOUR by pressing S1 or S5 and then press S3 to enter.
- Set the Minute by pressing S1 or S5 and then press S3 to enter.
- Set the SECOND by pressing S1 or S5 and then press S3 to enter.
- Set the YEAR by pressing S1 or S5 and then press S3 to enter.
- Set the MONTH by pressing S1 or S5 and then press S3 to enter.
- Set the DATE by pressing S1 or S5 and then press S3 to enter.
- Set the 12/24H by pressing S1 or S5 and then press S3 to enter.
- Select M-D or D-M (Month/Day or Day/Month) format setting by pressing S1/S5. Press S3 to enter and the watch will go back to Time.
TIME 2 setting in SET mode:
You have two options in setting the watch, GPS or MANUAL. In manual setting, you can manually set the time. If you select the GPS option, the watch will be automatically set base on the data and time data from GPS satellites.
The procedure in setting time 2 is the same with time 1 setting.
12H/24H format setting:
You can select 12H or 24H format. Press S3 to enter setting mode. Press S1 or S5 to select 12H or 24H format. Press S3 to confirm and exit.
If the power level of the battery is low, the GPS cannot be turned on. The watch will display BATT.LOW
EXERCISE MODES
The watch has the following major exercise modes: RUN, CHRONOGRAPH and HRM modes. After setting the watch and wearing your HRM belt (optional) the user can now start doing the various exercise modes.
RUN mode:
Press S1 or S7 from TIME mode to enter RUN mode.
Also note that if the GPS is already ON when you enter the RUN mode, the watch will prompt “GPS GO, PACE and the CHRONO time blinks.
The power level is displayed from10% to 100%. In Memory display, the watch will display the remaining hours available in Track memory.
If the power level of the battery is low, the GPS cannot be turned on. The watch will display BATT. LOW.
RUN mode Views: While CHRO is running, press & hold S3 will allow the User to change views (PACE, SPEED, CALORIE, CLOCK, CHRONO and DISTANCE).
(Pace views)
View 1 CHRONO/ Pace / Pace
View 2 CHRONO/ Pace / Speed
View 3 CHRONO/ Pace / HRM (this view is hidden if HRM is OFF)
View 4 CHRONO/ Pace / Calorie
View 5 CHRONO/ Pace / Clock
View 6 CHRONO/ Pace / CHRONO
View 7 CHRONO/ Pace / Distance
(Speed views)
View 1 CHRONO/ Speed / Pace
View 2 CHRONO/ Speed / Speed
View 3 CHRONO/ Speed / HRM (this view is hidden if HRM is OFF)
View 4 CHRONO/ Speed / Calorie
View 5 CHRONO/ Speed / Clock
View 6 CHRONO/ Speed / CHRONO
View 7 CHRONO/ Speed / Distance
(Calorie views)
View 1 CHRONO/ Calorie / Pace
View 2 CHRONO/ Calorie / Speed
View 3 CHRONO/ Calorie / HRM (this view is hidden if HRM is OFF)
View 4 CHRONO/ Calorie / Calorie
View 5 CHRONO/ Calorie / Clock
View 6 CHRONO/ Calorie / CHRONO
View 7 CHRONO/ Calorie / Distance
(HRM views)
View 1 CHRONO/ HRM / Pace
View 2 CHRONO/ HRM / Speed
View 3 CHRONO/ HRM / HRM (this view is hidden if HRM is OFF)
View 4 CHRONO/ HRM / Calorie
View 5 CHRONO/ HRM / Clock
View 6 CHRONO/ HRM / CHRONO
View 7 CHRONO/ HRM / Distance
(Clock views)
View 1 CHRONO/ Clock / Pace
View 2 CHRONO/ Clock / Speed
View 3 CHRONO/ Clock / HRM (this view is hidden if HRM is OFF)
View 4 CHRONO/ Clock / Calorie
View 5 CHRONO/ Clock / Clock
View 6 CHRONO/ Clock / CHRONO
View 7 CHRONO/ Clock / Distance
(CHRONO views)
View 1 CHRONO/ CHRONO / Pace
View 2 CHRONO/ CHRONO / Speed
View 3 CHRONO/ CHRONO / HRM (this view is hidden if HRM is OFF)
View 4 CHRONO/ CHRONO / Calorie
View 5 CHRONO/ CHRONO / Clock
View 6 CHRONO/ CHRONO / CHRONO
View 7 CHRONO/ CHRONO / Distance
(Distance views)
View 1 CHRONO/ Distance / Pace
View 2 CHRONO/ Distance / Speed
View 3 CHRONO/ Distance / HRM (this view is hidden if HRM is OFF)
View 4 CHRONO/ Distance / Calorie
View 5 CHRONO/ Distance / Clock
View 6 CHRONO/ Distance / CHRONO
View 7 CHRONO/ Distance / Distance
Note: If there is no key operation within 3-4 minutes in this mode, the watch will auto exit to Time mode.
CHRONOGRAPH mode:
Press S7 from RUN mode to enter CHRONOGRAPH mode. The watch will display the following in succession:
SEARCH GPS BATTERY level DATA TRACK MEMORY view 1 of CHRONOGRAPH mode.
Also note that if the GPS is already ON when you enter the RUN mode, the watch will prompt “GPS GO, PACE and the CHRONO time blinks.
The power level is displayed with an increment of 10%, from 10% to 100%. In Memory display, the watch will display the remaining hours available in Track memory.
If the power level of the battery is low, the GPS cannot be turned on. The watch will display BATT.LOW
VIEWS in CHRONOGRAPH mode:
View 1 GPS GO/ CHRONO/ PACE
View 2 LAP/ HRM / CHRONO (this view is hidden if HRM is OFF)
View 3 LAP/ DISTANCE / CHRONO
View 4 LAP 1/ CHRONO/ CHRONO
When the timer is stopped or reset in Chronograph mode, the GPS will automatically turn OFF after 15 minutes.
HRM mode:
Press S7 from CHRONOGRAPH mode to enter HRM mode. The watch will display the following in succession:
SEARCH GPS BATTERY level DATA TRACK MEMORY view 1 of HRM mode.
Run mode and HRM mode has the same timer. When the timer is started or stopped in RUN mode, the same thing happens in HRM mode.
The power level is displayed with an increment of 10%, from 10% to 100%. In Memory display, the watch will display the remaining hours available in Track memory.
If the power level of the battery is low, the GPS cannot be turned on. The watch will display BATT.LOW
Different views in HRM mode:
Following are the various views that user can choose by pressing S3 in HRM mode. This mode is dedicated to HRM views.
View 1 GPS GO/ HRM/ CHRONO
View 2 CHRONO/ HRM/ Calorie
View 3 CHRONO/ HRM/ In Zone
View 4 CHRONO/ HRM/ Distance
View 5 CHRONO/ HRM/ Clock
View 6 CHRONO/ HRM/ Speed
View 7 CHRONO/ HRM/ Pace
When the timer is stopped or reset in HRM mode, the GPS will automatically turn OFF after 15 minutes to save battery power.
RUN DATA mode
Press S7 from HRM mode to enter RUN DATA mode. The watch will display the Data list view. In this view you can see how many files are saved in RUN data. The watch will show the list of data files with newest on the top of the list.
- Press S1/S5 to scroll thru the list.
- Press S3 to enter the selected data file.
- Press S1/S3 to view the details of the data file. Following are the details available:
- Start Time / End Time / Distance
- CHRONO / Distance / Calorie
- CHRONO / Ave Pace / Max Pace
- CHRONO / Ave Speed / Max Speed
- CHRONO / Ave HR / In zone
- Lap 1 / Lap time / Distance
- Lap 2…etc….
- Press S7 to exit
Deleting Data:
Press S7 from CHRONO mode to DATA mode. After the Data file appears, press S3 to enter “Start time/End time/ Distance” view. In any sub-views, press and hold S3 to enter the “VIEW/DEL/ DEL ALL” screen. Press S1 or S5 to select. If “VIEW” is selected, you can view the details of the data. If “del” is selected, 1 data will be deleted. If “Del All” is selected, all data files will be deleted.
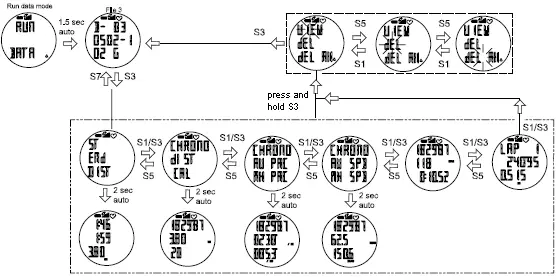
Note: If there is no key operation within 3-4 minutes, the watch will auto exit to Time mode.
Data numbering system/ Legend:
Following is the data numbering system.

Sample data number: D-010502-101-G
D – means Data
01 – Data number
05 – Month
02 – Day
1 – Data is referred to Time 1 or 2 for Time 2
01 – File number of the day
G – Data from GPS
Setting the User’s information:
Press S7 from ALARM mode to go to SET mode and select USER by pressing S1 or S5 when the USER option is highlighted. The sequence of setting are as follows by pressing S3 button: Gender Age Weight Height Press S1/S5 to change values. Press S3 to set next parameter. Press S7 to exit.
Setting HRM in SET mode:
- Press S1/S5 to select HRM and press S3 to confirm and it will appear “HRM ZN / ZONE 1”. Press S1/S5 to select which zone you prefer. There are 3 zones available, HR zones 1 to 3.
- Press S3 to set the HR zone. User has an option to manually change it by pressing S1/S5.
- Press S3 to set the Low/High limit of the zone. You can still manually change the value by pressing S1/ S5.
- Press S3 to the Zone Alarm ON or OFF. Press S1 or S5 to change setting.
- Press S7 to exit.
TIMER mode
Setting the TIMER:
Press and hold S11 until the Timer “1” digit starts to blink. Press S1/S5 to select the interval timer “SEG 1 to 6”. Press S3 to set the hour, minute & second. Press S1/S5 to increase or decrease the value. Press S7 to exit setting.
Note: If there is no key operation within 3-4 minutes in this mode, the watch will auto exit to Time mode.
ALARM mode
Setting the ALARM:
Press S7 from TIMER mode to enter ALARM mode. The watch will display the alarm view. Press and hold S11 until the Alarm “1” digit starts to blink. Press S1/S5 to select the Alarm 1 to 5. Press S3 to set the hour, minute, Time, Alarm and Chime.
For Chime, press S1/S5 to turn it ON or OFF. Also note when Chime is ON, the Key tone is automatically ON and the Chime icon appears in all modes. Likewise, if Chime is OFF the Key tone is automatically OFF.
Alarm setting in SET mode:
- Select ALARM then press S3
- Select ALARM 1 to ALARM 5 by pressing S1/S5 and then press S3 to enter.
- Set the HOUR. Press S1/S5 to change values. Press S3 to enter
- Set the MINUTE. Press S1/S5 to change values. Press S3 to enter
- Set the alarm time referred to T1 or T2. Press S1/S5 to change. Press S3 to enter
- Set the alarm ON or OFF. Press S1/S5 to change. Press S3 to enter
- Set the Chime ON or OFF. Press S1/S5 to change. Press S3 to enter
- Press S7 to exit alarm setting
SET mode
Press S7 from ALARM mode to SET mode. 1.5 seconds later the watch will display the setting options: Press S5 the ff. Sequence are as follows; AUTO LAP, TIME, UNIT, USER, HRM, HRM LINK, NIGHT, CONTRAST, CHIME, ALARM and TIMER. Press S3 to enter selected option to set. Press S1/S5 to select then press S3 to enter. Press S7 to exit setting to Time mode.
Setting the Auto Lap:
The same setting procedure applies in setting the time in Alarm setting mode.
Note: Alert sub-mode, press S3 to enter ALERT function. When alert is set to ON, there will be a beep sound during taking auto lap. When it is set to OFF, there is no beep sound.
Setting the Time/ Alarm/ Timer/ User:
The same setting procedure applies in setting the time in Alarm setting mode.
Setting the UNIT:
Press S3 to enter. Press S1/S5 to select KM or Mi.
Setting the HRM:
Press S3 to enter. Press S1/S5 to select HRM zones. Then press S3 again to set Low and High limit of the zone. Press S1/S5 to manually change the value. Press S3 to confirm setting. Press S7 to exit setting.
Note: User has also an option to ON or OFF the zone Alarm.
HRM LINK:Press S3 to enter. The watch will auto link and will display the Heart rate. Press S7 to exit.
Setting the DISPLAY (LCD contrast):
Press S3 to enter. Press S1 or S5 to change the setting. Press S3 to confirm setting and exit.
Setting the Chime:
Press S3 to enter. Press S1/S5 to select ON or OFF.
Setting the NIGHT mode:
Press S3 to enter. Press S1/S5 to select the following options: Night ON, 10 sec and 20 sec.
10 SECONDS – Press S11 will turn ON the Light for 10 seconds.
20 SECONDS – Press S11 will turn ON the Light for 20 seconds.
NIGHT ON – Light will continuously ON when CHRONO is running from 6:00 pm to 7:00 am. But when CHRONO is stopped or reset from 6:00 pm to 7:00 am, press any key can turn ON the light for about 10 seconds.
Press S3 to accept the selected setting. Press S7 to exit.
Battery:
Watch is using a rechargeable Lithium Ion battery that will require approximately 4.5 hours charging time using the USB cable. While battery is charging, the watch cannot be used and all buttons are disabled. User needs to recharge the battery when the watch indicates a “low battery”.
Note:
Battery Life (fully charge battery); 8 hrs min. (continues GPS with CHRONO ON, HRM ON) in day time within the time period from 7 am to 6 pm.
While approx. 7 hours (continues GPS with CHRONO ON, HRM ON and Light ON) within the time period from 6 pm to 7 am. This means, after 7 or 8 hours continues activity such as running, walking, etc., the battery power become low and the watch will display “LOW BATT”.
GPS watch troubleshooting guide:
| PROBLEM/ QUESTION | SOLUTION/ ANSWER |
| How to turn off the GPS | Press and hold S9 for about 5 seconds from any view to turn OFF the GPS. |
| I cannot get a GPS signal | Take your GPS watch outdoors and away from tress and tall buildings. Remain stationary and try acquiring GPS signal again. Be sure that the antenna is pointing towards the sky for better signal reception. |
| Can I reset the watch? | You can reset the watch by pressing S1, S5, S7, and S11 together. The date and time will be reset to default values. You can set it again manually or automatically thru GPS. |
| Will my data and personal settings be lost after watch reset? | Your data and personal settings are saved in the flash memory and will not be lost after watch reset. |
| The battery indicator does not seem to be accurate | Allow your GPS watch to fully discharge and then fully charge it without interruption. It is recommended to regularly re-charge your battery every 1-2 months even if it is not used to maintain good battery condition. |
| My heart rate data seems inaccurate. |
|
