DAB/DAB+/
FM/AM/LW
Bluetooth® Car Audio
Instruction Manual

Warning
For safety, be sure to install this unit on the dashboard of the car as the rear side of the unit becomes hot during use. For details, see “Connection/Installation” (page 10).
Made in Thailand
The nameplate indicating operating voltage, etc., is located on the bottom of the chassis.
The validity of the CE marking is restricted to only those countries where it is legally enforced, mainly in the countries EEA (European Economic Area) and Switzerland. The validity of the UKCA marking is restricted to only those countries where it is legally enforced, mainly in the UK.
Notice for customers: the following information is only applicable to equipment sold in countries applying EU directives and/or the UK applying relevant statutory requirements
This product has been manufactured by or on behalf of Sony Corporation. EU Importer: Sony Europe B.V.
Inquiries to the EU Importer or related to product compliance in Europe should be sent to the manufacturer’s authorized representative, Sony Belgium, bijkantoor
van Sony Europe B.V., Da Vincilaan 7-D1, 1930 Zaventem, Belgium.

Hereby, Sony Corporation declares that this equipment is in compliance with Directive 2014/53/EU.
The full text of the EU declaration of conformity is available at the following internet address:
https://compliance.sony.eu
Hereby, Sony Corporation declares that this equipment is in compliance with the UK’s relevant statutory requirements.
The full text of the declaration of conformity is available at the following internet address:
https://compliance.sony.co.uk
![]() Disposal of waste batteries and electrical and electronic equipment (applicable in the European Union and other countries with separate collection systems)
Disposal of waste batteries and electrical and electronic equipment (applicable in the European Union and other countries with separate collection systems)
This symbol on the product, the battery, or on the packaging indicates that the product and the battery shall not be treated as household waste.
On certain batteries, this symbol might be used in combination with a chemical symbol. The chemical symbol for lead (Pb) is added if the battery contains more than 0.004% lead.
By ensuring that these products and batteries are disposed of correctly, you will help to prevent potential negative consequences for the environment and human health which could be caused by inappropriate waste handling. The recycling of the materials will help to conserve natural resources.
In case of products that for safety, performance, or data integrity reasons require a permanent connection with an incorporated battery, this battery should be replaced by qualified service staff only. To ensure that the battery and the electrical and electronic equipment will be treated properly, hand over these products at end-of-life to the appropriate collection point for the recycling of electrical and electronic equipment.
For all other batteries, please view the section on how to remove the battery from the product safely. Hand the battery over to the appropriate collection point for the recycling of waste batteries.
For more detailed information about recycling this product or battery, please contact your local Civic Office, your household waste disposal service or the shop where you purchased the product or battery.
Warning if your car’s ignition has no ACC position
Be sure to set the AUTO OFF function. The unit will shut off completely and automatically at the set time after the unit is turned off and the clock is displayed (i.e. press and hold OFF for 1 second), which prevents battery drain. If you do not set the AUTO OFF function, press and hold OFF until the display disappears each time you turn the ignition off.
Disclaimer regarding services offered by third parties
Services offered by third parties may be changed, suspended, or terminated without prior notice. Sony does not bear any responsibility in these sorts of situations.
Important notice
Caution
IN NO EVENT SHALL SONY BE LIABLE FOR ANY INCIDENTAL, INDIRECT, OR CONSEQUENTIAL DAMAGES OR OTHER DAMAGES INCLUDING, WITHOUT LIMITATION, LOSS OF PROFITS, LOSS OF REVENUE, LOSS OF DATA, LOSS OF USE OF THE PRODUCT OR ANY ASSOCIATED EQUIPMENT, DOWNTIME, AND PURCHASER’S TIME RELATED TO OR ARISING OUT OF THE USE OF THIS PRODUCT, ITS HARDWARE AND/OR ITS SOFTWARE.
Dear customer, this product includes a radio transmitter.
According to UNECE Regulation no. 10, vehicle manufacturers may impose specific conditions for the installation of radio transmitters into vehicles.
Please check your vehicle operation manual or contact the manufacturer of your vehicle or your vehicle dealer, before you install this product into your vehicle.
Emergency calls
This BLUETOOTH car is handsfree and the electronic device connected to the handsfree operates using radio signals, cellular, and landline networks as well as user-programmed function, which cannot guarantee connection under all conditions. Therefore do not rely solely upon any electronic device for essential communications (such as medical emergencies).
On BLUETOOTH communication
- Microwaves emitting from a BLUETOOTH device may affect the operation of electronic medical devices. Turn off this unit and other BLUETOOTH devices in the following locations, as it may cause an accident.
– where inflammable gas is present, in a hospital, train, airplane, or petrol station
– near automatic doors or a fire alarm - This unit supports security capabilities that comply with the BLUETOOTH standard to provide a secure connection when the BLUETOOTH wireless technology is used,
but security may not be enough depending on the setting. Be careful when communicating using BLUETOOTH wireless technology. - We do not take any responsibility for the leakage of information during BLUETOOTH communication.
If you have any questions or problems concerning your unit that are not covered in this manual, consult your nearest Sony dealer.
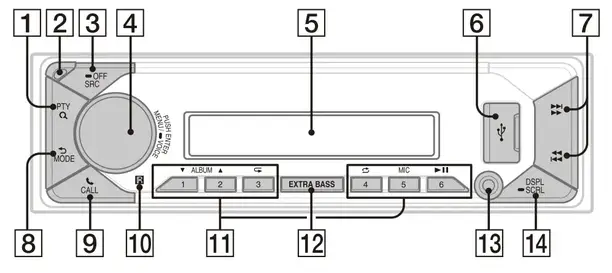
Guide to Parts and Controls
Main Unit

- PTY (program type)
During FM reception:
Selects PTY in RDS.
During DAB reception:
Press twice within 2 seconds to select PTY.
Press and hold for more than 2 seconds to perform an autotune to update the station list.
 (browse)
During playback:
Enters the browse mode.
(Not available when a USB device in Android™ mode or iPod is connected.)
During DAB reception:
Enters the browse mode. - Front panel release button
- SRC (source)
Turns on the power.
Changes the source.
 OFF
OFF
Press and hold for 1 second to turn the source off and display the clock.
Press and hold for more than 2 seconds to turn off the power and the display. - Control dial
Adjusts the volume.
PUSH ENTER
Enters the selected item.
Press SRC, rotate then press to change the source (timeout in 2 seconds).
MENU
Opens the setup menu.
 VOICE
VOICE
Press and hold for more than 2 seconds to activate voice dial, voice recognition (Android smartphone only), or the Siri function (iPhone only). - Display window
- USB port
 (SEEK –/+)
During radio reception:
Tunes in radio stations automatically.
Press and hold to tune manually.
During DAB reception:
Selects a station.
Press and hold to search for a station group. (Available only when [SEEK BY] is set to [STATION GP].)
 (prev/next) (fast-reverse/fast-forward)
 (back)
Returns to the previous display.
MODE
Selects the radio bands or function modes. CALL
CALL
Enters the call menu.
Receives/ends a call.
Press and hold for more than 2 seconds to switch the BLUETOOTH signal.- Receptor for the remote command
- Number buttons (1 to 6)
Receives preset radio stations.
Press and hold to preset stations.
During DAB reception:
Receives preset DAB stations or radio stations.
Press and hold to preset DAB stations radio stations.
ALBUM
Skips an album for an audio device.
Press and hold to skip albums continuously.
(Not available when a USB device in Android mode or iPod is connected.)
 (repeat)
(Not available when a USB device in Android mode is connected.)
 (shuffle)
(Not available when a USB device in Android mode is connected.)
MIC
 (play/pause)
 - EXTRA BASS
Reinforces bass sound in synchronization with the volume level. Press to change the EXTRA BASS setting: [1], [2], [OFF]. - AUX input jack
- DSPL (display)
Changes display items.
 SCRL (scroll)
Press and hold to scroll a display item.
Basic Operations
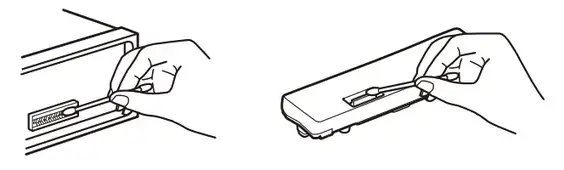
Detaching the Front Panel
You can detach the front panel of this unit to prevent theft.
1 Press and hold OFF 1 until the unit turns off, press the front panel release button 2, then pull the panel towards you to remove.

Caution alarm
If you turn the ignition switch to the OFF position without detaching the front panel, the caution alarm will sound for a few seconds. The alarm will only sound if the built-in amplifier is used.
To deactivate the caution alarm
Press MENU, then rotate and press the control dial to select [GENERAL]  [SET CAUTALM] [SET C.ALM-OFF].
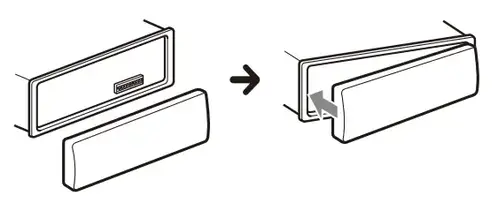
Attaching the front panel
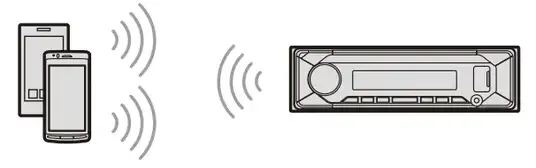
Pairing with a BLUETOOTH Device
When connecting a BLUETOOTH device for the first time, mutual registration (called “pairing”) is required. Pairing enables this unit and other devices to recognize each other. This unit can connect two BLUETOOTH devices (two mobile phones, or a mobile phone and an audio device).
- Press MENU, then rotate and press the control dial to select [BLUETOOTH] [SET PAIRING] [SET DEVICE 1]/[SET DEVICE 2]*.
 flashes while the unit is in pairing standby mode.
* [SET DEVICE 1] or [SET DEVICE 2] will be changed to the paired device name after pairing is complete. - Perform pairing on the BLUETOOTH device so it detects this unit.
- Select your model name shown in the display of the BLUETOOTH device*.
When pairing is made, stays lit.
* If passkey input is required on the BLUETOOTH device, input [0000].
Canceling the Demonstration Mode
You can cancel the demonstration display which appears when the source is off and the clock is displayed.
- Press MENU, rotate the control dial to select [GENERAL], then press it.
- Rotate the control dial to select [SET DEMO], then press it.
- Rotate the control dial to select [SET DEMO-OFF], then press it. The setting is complete.
- Press
 (back) twice.
The display returns to normal reception/ play mode.
Updating the Firmware
To update the firmware, visit the support site on the back cover, then follow the online instructions.
Notes
- Using a USB device (not supplied) is required for updating the firmware. Store the updater in the USB device, and connect the device to the USB port, then perform the update operation.
- Updating the firmware takes a few minutes to complete. During the update, do not turn the ignition to the OFF position, nor remove the USB device.
Resetting the Unit
1 Press and hold DSPL and![]() CALL for more than 2 seconds.
CALL for more than 2 seconds.
Additional Information
Precautions
- Cool off the unit beforehand if your car has been parked in direct sunlight.
- Do not leave audio devices brought inside the car, or it may cause malfunction due to high temperature in direct sunlight.
- Power antenna (aerial) extends automatically.
- Do not splash liquid onto the unit.
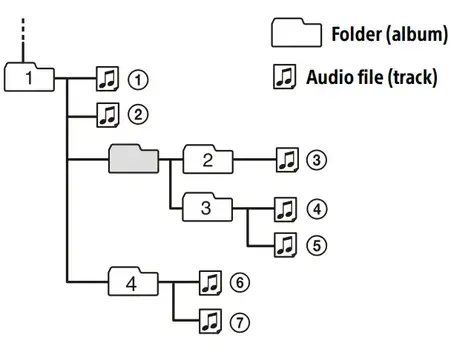
Playback order of audio files
About iPod
- You can connect to the following iPod models. Update your iPod devices to the latest software before use.
Compatible iPhone/iPod models
| Compatible Model | Bluetooth® | USB |
| iPhone XR | ||
| iPhone Xs Max | ||
| iPhone Xs | ||
| iPhone X | ||
| iPhone 8 | ||
| iPhone 8 Plus | ||
| iPhone 7 | ||
| iPhone 7 Plus | ||
| iPhone SE |
| iPhone 6s | ||
| iPhone 6s Plus | ||
| iPhone 6 | ||
| iPhone 6 Plus | ||
| iPhone 5s | ||
| iPhone 5c | ||
| iPhone 5 | ||
| iPhone 4s | ||
| iPod touch (6th generation) |
||
| iPod touch (5th generation) |
||
| iPod nano (7th generation) |
- Use of the Made for Apple badge means that an accessory has been designed to connect specifically to the Apple product(s) identified in the badge, and has been certified by the developer to meet Apple performance standards. Apple is not responsible for the operation of this device or its compliance with safety and regulatory standards. Please note that the use of this accessory with an Apple product may affect wireless performance.
If you have any questions or problems concerning your unit that are not covered in this manual, consult your nearest Sony dealer.
Maintenance
Cleaning the connectors
Avoid touching the connectors directly. The unit may not function properly if the connectors between the unit and the front panel are not clean. In order to prevent this, detach the front panel (page 5) and clean the connectors with a cotton swab. Do not apply too much force. Otherwise, the connectors may be damaged.

Note
For safety, do not remove the front panel while driving.
Specifications
Tuner section
DAB/DAB+
Tuning range:
174.928 MHz – 239.200 MHz
Antenna (aerial) terminal:
External antenna (aerial) connector
FM
Tuning range:
87.5 MHz – 108.0 MHz
Usable sensitivity: 7 dBf
Signal-to-noise ratio: 73 dB
Separation: 50 dB at 1 kHz
AM/LW
Tuning range:
531 kHz – 1,602 kHz (AM),
153 kHz – 279 kHz (LW)
Sensitivity:
AM: 26 μV,
LW: 50 μV
USB Player section
Interface: USB (Full speed)
Maximum current: 1 A
Maximum number of recognizable folders
and files:
Folders (albums): 256
Files (tracks) per folder: 256
Compatible Android Open Accessory
protocol (AOA): 2.0
Corresponding codec:
MP3 (.mp3)
Bit rate: 8 kbps – 320 kbps (Supports VBR
(Variable Bit Rate))
Sampling rate: 16 kHz – 48 kHz
WMA (.wma)
Bit rate: 32 kbps – 192 kbps (Supports VBR
(Variable Bit Rate))
Sampling rate: 32 kHz, 44.1 kHz, 48 kHz
AAC (.m4a, .mp4)
Bit rate: 16 kbps – 320 kbps (stereo)
Sampling rate: 8 kHz – 48 kHz
FLAC (.flac)
Bit depth: 16 bit, 24 bit
Sampling rate: 44.1 kHz, 48 kHz
Supported file system: FAT16, FAT32
Wireless Communication
Communication System:
BLUETOOTH Standard version 3.0
Output:
BLUETOOTH Standard Power Class 2
(Max. Conducted +1 dBm)
Maximum communication range*1:
Line of sight approx. 10 m (33 ft)
Frequency band:
2.4 GHz band (2.4000 GHz – 2.4835 GHz)
Modulation method: FHSS
Compatible BLUETOOTH Profiles*2:
A2DP (Advanced Audio Distribution Profile) 1.3
AVRCP (Audio Video Remote Control Profile) 1.3
HFP (Handsfree Profile) 1.6
PBAP (Phone Book Access Profile)
SPP (Serial Port Profile)
Corresponding codec:
SBC (.sbc), AAC (.m4a)
- The actual range will vary depending on factors such as obstacles between devices, magnetic fields around a microwave oven, static electricity, reception sensitivity, antenna aerial)’s performance, operating system, software application, etc.
- BLUETOOTH standard profiles indicate the purpose of BLUETOOTH communication between devices.
Power amplifier section
Output: Speaker outputs
Speaker impedance: 4 Ω – 8 Ω
Maximum power output: 55 W × 4 (at 4 Ω)
General
Power requirements: 12 V DC car battery
(negative ground (earth))
Rated current consumption: 10 A
Dimensions: Approx. 178 mm × 50 mm × 176 mm (7 1/8 in × 2 in × 7 in) (w/h/d)
Mounting dimensions: Approx. 182 mm × 53 mm × 159 mm (7 1/4 in × 2 1/8 in × 6 3/8 in) (w/h/d)
Mass: Approx. 0.8 kg (1 lb 13 oz)
Package contents: Main unit (1)
Parts for installation and connections (1 set)
Optional accessories/equipment:
Cable for steering wheel remote input: RC-SR1
Ask the dealer for detailed information.
Design and specifications are subject to change without notice.
Copyrights
The Bluetooth® word mark and logos are registered trademarks owned by the Bluetooth SIG, Inc. and any use of such marks by Sony Corporation is under license. Other trademarks and trade names are those of their respective owners.
Windows Media is either a registered trademark or trademark of Microsoft Corporation in the United States and/or other countries.
This product is protected by certain intellectual property rights of Microsoft Corporation. Use or distribution of such technology outside of this product is prohibited without a license from Microsoft or an authorized Microsoft subsidiary.
Apple, iPhone, iPod, iPod nano, iPod touch, and Siri are trademarks of Apple Inc., registered in the U.S. and other countries.
Android is a trademark of Google LLC.
Connection/Installation
Cautions
- Run all ground (earth) leads to a common ground (earth) point.
- Do not get the leads trapped under a screw, or caught in moving parts (e.g., seat railing).
- Before making connections, turn the car ignition off to avoid short circuits.
- Connect the power supply leads 6 to the unit and speakers before connecting it to the auxiliary power connector.
- Be sure to insulate any loose unconnected leads with electrical tape for safety.
- Choose the installation location carefully so that the unit will not interfere with normal driving operations.
- Avoid installing the unit in areas subject to dust, dirt, excessive vibration, or high temperature, such as in direct sunlight or near heater ducts.
- Use only the supplied mounting hardware for a safe and secure installation.
Note on the power supply lead (yellow)
When connecting this unit in combination with other stereo components, the amperage rating of the car circuit to which the unit is connected must be higher than the sum of each component’s fuse amperage rating.
Note on installing in cars with a start-stop system
The unit may restart when starting the engine from start-stop. In this case, turn off the start-stop system of your car.
Mounting angle adjustment
Adjust the mounting angle to less than 30°.
Parts List for Installation

- This parts list does not include all the package contents.
- The mounting sleeve 1 and the trim ring 3 are attached to the unit before shipping before mounting the unit, use the release key 2 to remove the mounting sleeve 1 from the unit. For details, see “Removing the trims ring and the mounting sleeve” (page 14).
- Keep the release keys 2 for future use ashey are also necessary if you remove the unit from your car.
Connection

- Not supplied
- Speaker impedance: 4 Ω to 8 Ω × 4
- RCA pin cord (not supplied)
- Depending on the type of car, use an adaptor for wired remote control (not supplied). For details on using the wired remote control, see “Using the wired remote control” (page 13).
- Whether in use or not, route the microphone input cord such that it does not interfere with driving operations. Secure the cord with a clamp, etc., if it is installed around your feet For details on installing the microphone, see “Installing the microphone” (page 13).
- Depending on the type of car, use an adaptor (not supplied) if the antenna (aerial) connector does not fit.
- Set [SET ANT-PWR] to [ON] (default) or [OFF] depending on the type of DAB antenna (aerial). Max. supply current 0.1 A
Making connections
If you have a power antenna (aerial) without a relay box, connecting this unit with the supplied power supply leads 6 may damage the antenna (aerial).
- To the car’s speaker connector

1 Rear speaker (right) + Purple 2 – Purple/black striped 3 Front speaker (right) + Gray 4 – Gray/black striped 5 Front speaker (left) + White 6 – White/black striped 7 Rear speaker (left) + Green 8 – Green/black striped - To the car’s power connector

| 12 | continuous power supply | Yellow |
| 13 | power antenna (aerial) /power amplifier control (REM OUT) | Blue/white striped |
| 14 | switched illumination power supply | Orange/white striped |
| 15 | switched power supply | Red |
| 16 | ground (earth) | Black |
Subwoofer Easy Connection
You can use a subwoofer without a power amplifier when it is connected to a rear speaker lead.

Notes
- Preparation of the rear speaker leads is required.
- Use a subwoofer with an impedance of 4 Ω to 8 Ω, and with adequate power handling capacities to avoid damage.
Memory hold connection
When the yellow power supply lead is connected, power will always be supplied to the memory circuit even when the ignition switch is turned off.
Speaker connection
- Before connecting the speakers, turn the unit off.
- Use speakers with an impedance of 4 Ω to 8 Ω, and with adequate power handling capacities to avoid damage.
Power connection diagram
Check your car’s auxiliary power connector, and match the connections of leads correctly depending on the car.
Auxiliary power connector
 Common connection

| 12 | continuous power supply | Yellow |
| 15 | switched power supply | Red |
When the positions of the red and yellow leads are inverted

| 12 | switched power supply | Yellow |
| 15 | continuous power supply | Red |
When the car without ACC position

After matching the connections and switching power supply leads correctly, connect the unit to the car’s power supply. If you have any questions and problems connecting your unit that are not covered in this manual, consult the car dealer.
Installing the microphone
To capture your voice during handsfree calling, you need to install the microphone 7

Cautions
- It is extremely dangerous if the cord becomes wound around the steering column or gearstick. Be sure to keep it and other parts from interfering with your driving
operations. - If airbags or any other shock-absorbing equipment is in your car, contact the store where you purchased this unit, or the car dealer, before installation.
Notes
- When mounting on the dashboard, remove the visor clip carefully from the microphone 7, then attach the flat-mount base 8 to the microphone 7.
- Before attaching the double-sided tape 9 clean the surface of the dashboard with a dry cloth.
Using the wired remote control
- To enable the wired remote control, set [STR CONTROL] in [S ET STEERING] to [PRESET].
Installation
Removing the trim ring and the mounting sleeve
Before installing the unit, remove the trim ring 3 and the mounting sleeve 1 from the unit.
- Pinch both edges of the trim ring 3, then pull it out.
 Insert both release keys 2 until they click, and pull down the mounting sleeve 1, then pull up the unit to separate.

Mounting the unit to the dashboard
Before installing, make sure the catches on both sides of the mounting sleeve 1 are bent inwards 2 mm (3/32 in).
- Position the mounting sleeve 1 inside the dashboard, then bend the claws outward for a tight fit.
 Mount the unit onto the mounting sleeve 1, then attach the trim ring 3.

Notes
- If the catches are straight or bent outwards, the unit will not be installed securely and may spring out.
- Make sure the 4 catches on the trim ring 3 are properly engaged in the slots of the unit.
Detaching and attaching the front panel
For details, see “Detaching the Front Panel” (page 5).
Resetting the unit
For details, see “Resetting the Unit” (page 6).
Fuse replacement
When replacing the fuse, be sure to use one matching the amperage rating stated on the original fuse. If the fuse blows, check the power connection and replace the fuse. If the fuse blows again after replacement, there may be an internal malfunction. In such a case, consult your nearest Sony dealer. Hereby, Sony Corporation declares that this equipment is in compliance with Directive 2014/ 53/EU. The full text of the EU declaration of conformity is available at the following internet address:
https://compliance.sony.eu
Support site
If you have any questions or for the latest support information on this product, please visit the website below:
https://www.sony.eu/support
Register your product online now at:
https://www.sony.eu/mysony
Help Guide (online manual)
For more details, please visit the following website and refer to your unit name as shown below.

DSX-B41D
https://rd1.sony.net/help/ev/dsx-b41d/h_zz/


 ©2019 Sony Corporation
Printed in Thailand
https://www.sony.net/
SONY CFI-1116A PS5 PlayStation 5 Standard Edition
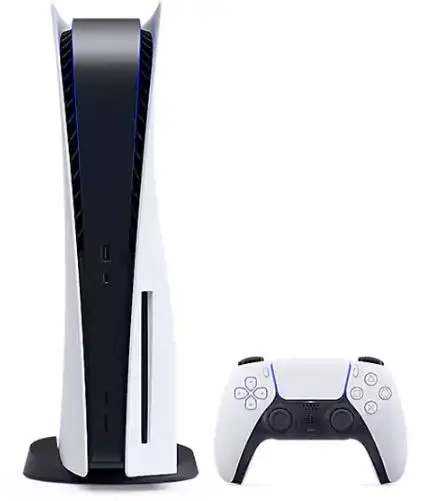
Let’s get started
Attach the base.
Always attach the base to the console, whether it’s in the vertical or horizontal position. Place your console on a flat surface when attaching the base. You’ll need to reconfigure the base for the position of your console. Rotate the top and bottom part of the base in opposite directions. Keep rotating until you hear a “click”.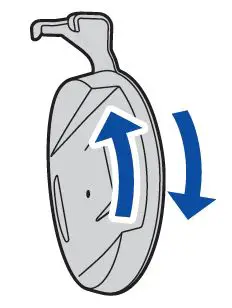
For the vertical position
With the base attached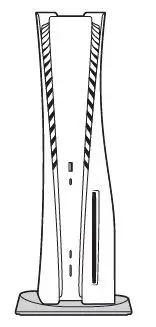
Make sure the hook is in the position as illustrated below before attaching the base to the console.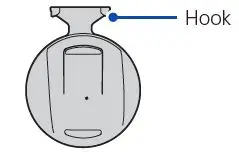
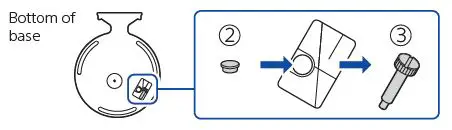
- Place the console with the rear side facing up, and then remove the screw hole cap
- Attach the screw hole cap to the bottom of the base.
- Remove the screw from the bottom of the base.
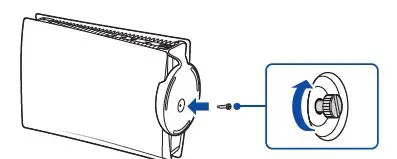
- Attach the base, and then secure with the screw using your hand. You can also use a coin to tighten the screw.
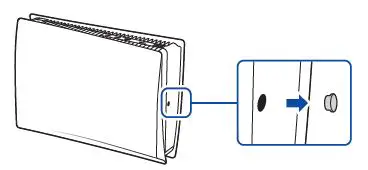
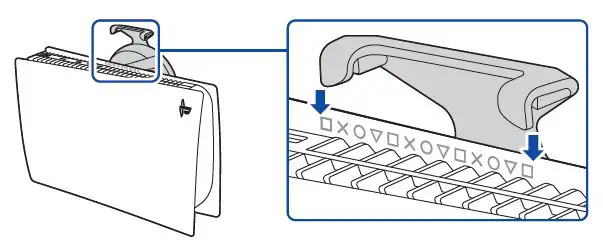
For the horizontal position
With the base attached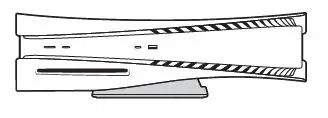
Make sure the hook is in the position as illustrated below before attaching the base to the console.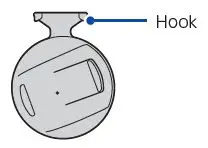
- Place the console with the rear side facing up. Align the base with the marked area on the console, and press the base in firmly.
Connect the HDMI cable and the AC power cord.
Use the included cables.
Make all connections before plugging the AC power cord into an electricity supply.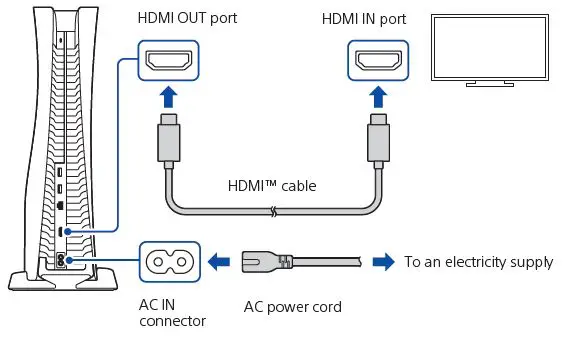
Connect the LAN cable.
For a wired connection to the internet, use a LAN cable (not included).
If you’re going to use Wi-Fi®, don’t connect a LAN cable and skip to the next step.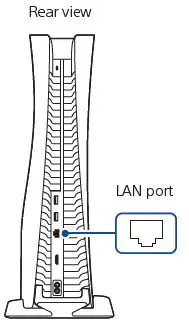
Turn on your TV and set the input to HDMI.
Turn on your PlayStation®5 console by pressing the (power) button.
The power indicator blinks blue, and then turns white.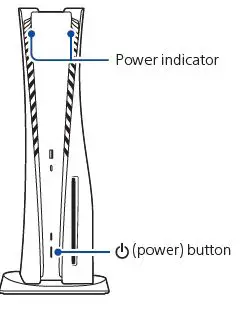
If you leave the console idle for 60 seconds after you turn it on, the screen reader turns on. You can listen to on-screen text and other important information read aloud to help you accomplish what you want to do.
Screen reader is only available in certain languages.
Connect your wireless controller to your console using a USB cable, and then press the
To pair your controller, connect it with a USB cable to the USB port on your console. When you press the  (PS) button, the controller turns on.
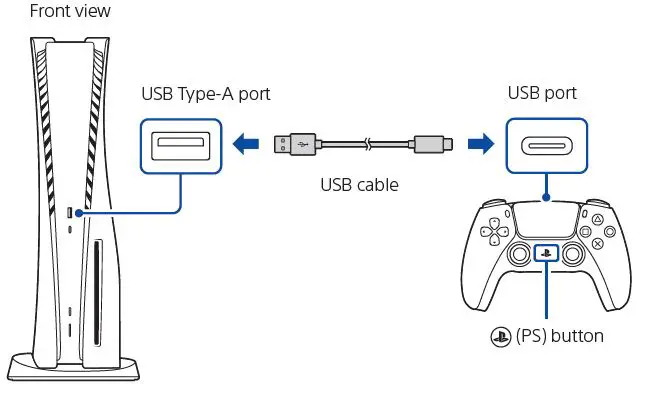
Make it your own.
You’re almost done! Follow the on-screen instructions to
- Set up your console
Select your language, configure your internet connection settings, and manage your power save settings.
To save energy while powered down, your console is set to Low Power Use in rest mode. See also “Put your console in rest mode” (page 12). - Set up your account
Create a new account or sign in with an existing account, such as one you created on a PlayStation®4 console. See also “For PS4 users” (page 6). - Download your content
Download purchased PS5™ games and media apps. If you have a PS4™ console, you can transfer the data to your PS5 console. You’ll know that setup is complete when Welcome to PlayStation 5 appears on your screen.
Will a child be using your PS5 console? See also “Parental controls” (page 6). - The setup options that you see are tailored to your needs, based on information such as your network environment and the account that you’re signed into.
- You can go back and change any of your settings by selecting Settings
 from the home screen.
For PS4 users
Play some PS4 games on your PS5 console
Enjoy supported PS4 games* on your PS5 console. Some functionalities available on the PS4 console may be absent when played on the PS5 console. You must update to the latest system software version. Internet connection required.
Transfer data from a PS4 console to your PS5 console
Connect your PS4 console and PS5 console to the same network to transfer data such as game save data, user information, and downloaded content. If you have a USB drive that you’ve been using as USB extended storage for your PS4 console, you can continue using it by simply connecting it to your PS5 console.
Use the same account you created on a PS4 console
There’s no need to create a new account for your PS5 console. Just sign in with your existing account and your game history, trophies, profile, and any exchanges you’ve had with friends will transfer to your PS5 console.
Parental controls
You can manage settings for children who use your PS5 console. Parental controls let you set restrictions on the games children can play, when and how long they play, whether or not they can chat, and more.
Each adult and child will need their own separate accounts. When you create an account for a child, it’s automatically linked to your account, creating a family. You can set parental controls only for children in your family.
You can use an existing account, such as one you created on a PS4 console, for your PS5 console. Your family and parental control settings will carry over to your PS5 console.
Create an account for a child
- You can create a child account and set parental controls at the same time.
- Press the (PS) button to open the control center. Select your profile picture, then select Switch User. From the user selection screen, select Add User to create an account.
- Review and change your parental control settings
- We recommend that you check the child’s parental controls regularly. You can review or update them by selecting Settings > Family and Parental Controls from the home screen.
Game rating icons
Each game comes with a game rating icon that helps you determine whether it’s age-appropriate for the child.
Europe, Africa and India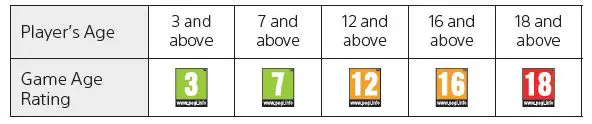
Kingdom of Saudi Arabia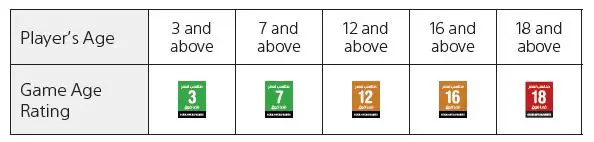
United Arab Emirates
Find out more about parental control features and setup in the User’s Guide (page 13).
What’s on the screen
Home screen
From the home screen, you can go to two types of content: games or media.
In the games home, you’ll find your games, PlayStation™Store, and other game-related apps. In the media home, you’ll find music, video, and other non-game-related apps.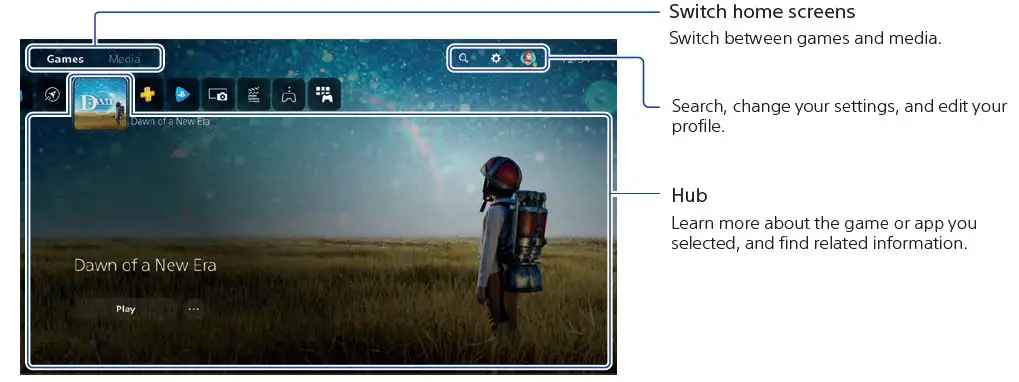
- On the PS5 console, the
 button confirms selected items.
 - To return to the home screen while your game or app is running, select Home from the control centre, or press and hold the (PS) button on your controller.
Control centre
Press the (PS) button to open the control center. You can access a variety of features without leaving your game or app.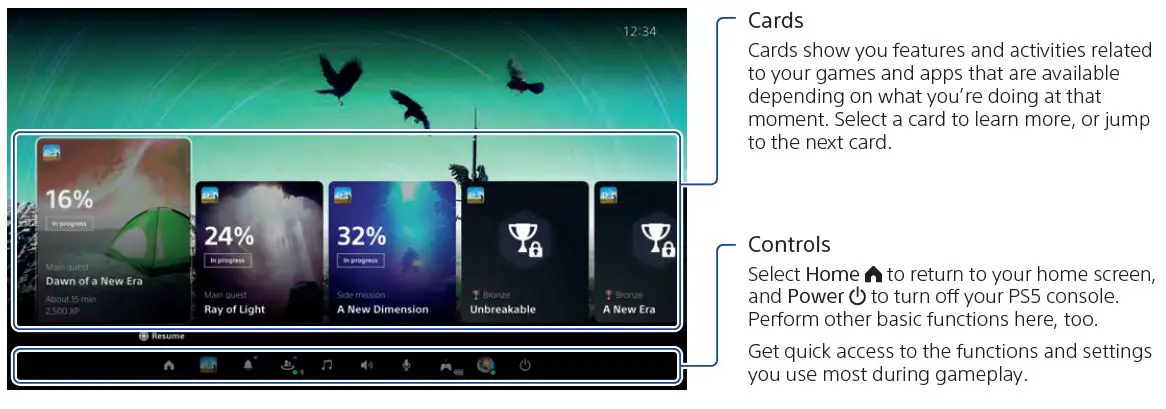
Let’s play
Play a game from a disc Insert the disc.
Game data will start copying, and you’ll get a notification when the game is ready to play. Select the game from your games home.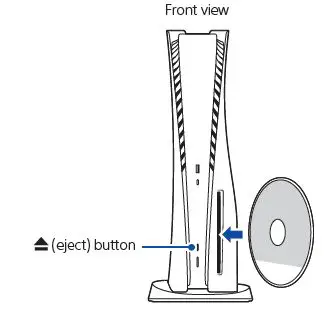
Eject the disc
Press the  (eject) button to eject the disc.
Play a digital game
You can play a game that you downloaded from PlayStation Store .
You’ll get a notification when the game is downloaded and ready to play.
Select the game from your games home.
- To purchase and download games, you’ll need to connect your console to the internet and sign in to your account.
- PlayStation™Network and PlayStation Store are subject to terms of use and country and language restrictions. Users are responsible for internet service fees. Charges apply for some content and / or services.
Users must be 7 years or older and users under 18 require parental consent. Additional age restrictions may apply. Service availability is not guaranteed. Online features of specific games may be withdrawn on reasonable notice – playstation.com/gameservers. Full terms apply: PSN Terms of Service at playstation.com/legal.
Use your controller
Charge your controller
With your PS5 console turned on or in rest mode, use a USB cable to connect your controller to the console. When your console is in rest mode, the light bar on your controller slowly blinks orange. After charging is complete, the light bar turns off.
To charge your controller while your console is in rest mode, go to Settings > System > Power Saving > Features Available in Rest Mode > Supply Power to USB Ports, and select an option other than Off.
Mute your microphone
Each time you press the mute button, your mic switches between muted (button lit) and unmuted (button off).
Press and hold the mute button to mute your mic and to turn off sound output from the speakers on your controller and TV. Press the mute button again to return to the original state.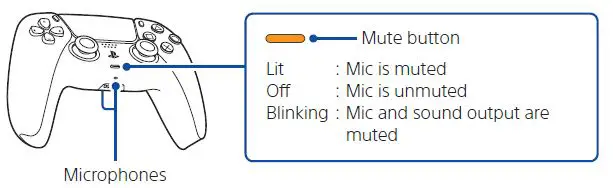
Use multiple controllers
You can use up to 4 controllers at once. Press the (PS) button to assign numbers to your controllers. The player indicator lights turn on accordingly. Numbers are assigned in order from 1, and you can determine your controller’s number by the number of lights that turn on.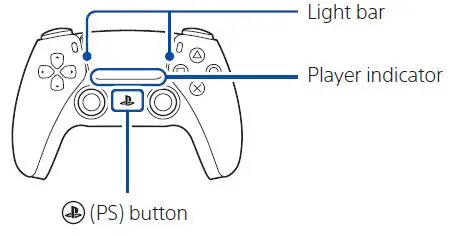
- You’ll need to pair your controller when you use it for the first time (page 5).
- When you play a PS4 game, your controller’s light bar glows blue, red, green, or pink based on the order that the controller is connected. This is separate from the player indicator.
Turn on your PS5 console with a controller
Press the (PS) button on a controller that has finished pairing to turn on your PS5 console.
Shutting down
Caution
Disconnect the AC power cord from the electricity supply only when the power indicator is off. If you disconnect it while the power indicator is on solidly or blinking, data might be lost or become corrupted, and you might damage your console.
Put your console in rest mode
Your PS5 console’s power-saving mode is called rest mode. You can do things like charge your controller via the console’s USB ports, automatically update your system software, and keep your game or app suspended while powered down. To find out which rest mode settings are optimal for you, see the User’s Guide (page 13).
For some features, you’ll need to enable their settings to use them. Go to Settings > System > Power Saving > Features Available in Rest Mode.
Select Power from the control centre, and then select Enter Rest Mode. The power indicator blinks white and then turns orange. To exit rest mode, press the (PS) button.
Turn off your console completely
Select Power from the control centre, and then select Turn Off PS5. The power indicator blinks white, and then the console turns off.
Power indicator
- White Console is on.
- Orange Console is in rest mode.
- Off Console is off.
Further information
Safety Guide
Learn how to use your PS5 console safely with the supplied Safety Guide. This printed manual also contains product warranty terms and information about specifications. Be sure to read it before using your console.
User’s Guide
Find out about everything your PS5 console can do. Learn how to configure settings and how to use each function. From your PS5 console’s home screen, go to Settings > User’s Guide, Health and Safety, and Other Information > User’s Guide.
Customer Support Website
Find online support information such as step-by-step troubleshooting and frequently asked questions by visiting playstation.com/help.
“ ”, “PlayStation”, “  ”, “PS5”, “PS4” and “PlayStation Shapes Logo” are registered trademarks or trademarks of Sony Interactive Entertainment Inc. “SONY” and “
  ” are registered trademarks or trademarks of Sony Group Corporation. The terms HDMI and HDMI High-Definition Multimedia Interface, and the HDMI Logo are trademarks or registered trademarks of HDMI Licensing Administrator, Inc. in the United States and other countries. Wi-Fi® is a registered trademark of Wi-Fi Alliance®. Design and specifications are subject to change without notice. Information about system functionality and images published in this document may vary from those for your console, depending on the system software version in use. Also, the illustrations and screen images used in this guide may vary from the actual product. The information contained in this guide is subject to change without notice.


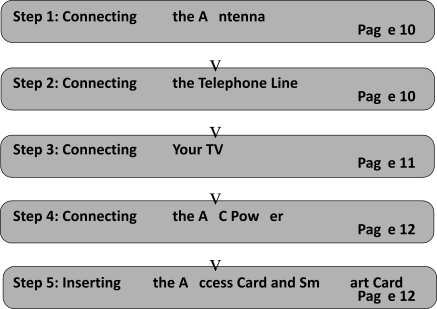
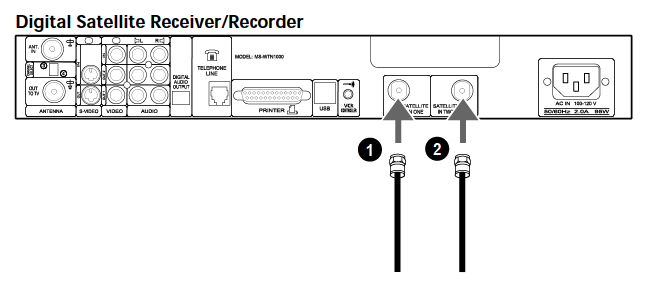
- Connect the SATELLITE IN jack to your Satellite Dish Antenna using RG-6 coaxial cable.
- Connect the 2nd signal if you have Dual LNB. Advance Set Up for dual output.
Step 2: Connecting Your Phone Line
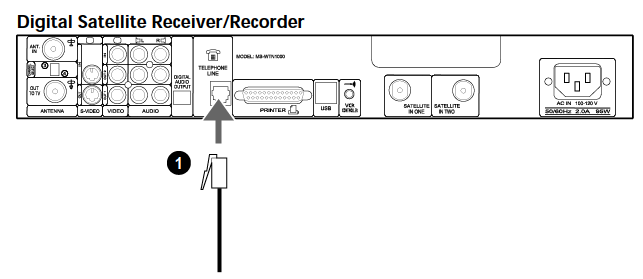
- Connect the TELEPHONE LINE jack to a telephone line wall jack using the supplied telephone cord.
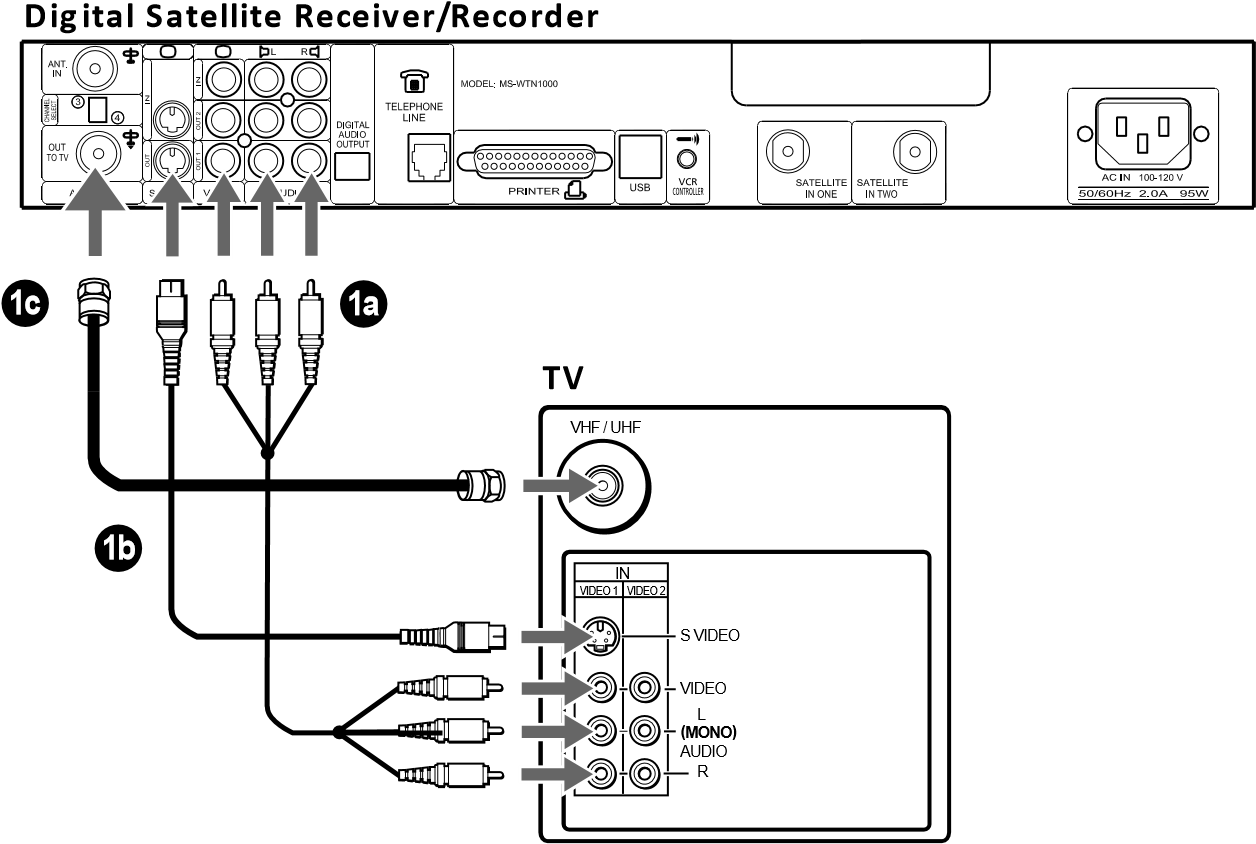
Step 3: Connecting Your TV Set
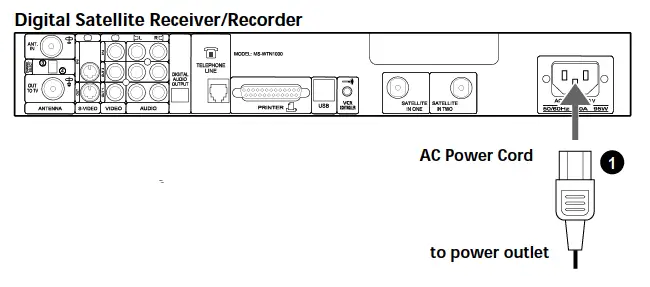
- 1. After all other connections are complete, connect the AC Power Cord to the Digital Satellite Receiver/Recorder. Then connect the AC Power Cord to a power outlet.
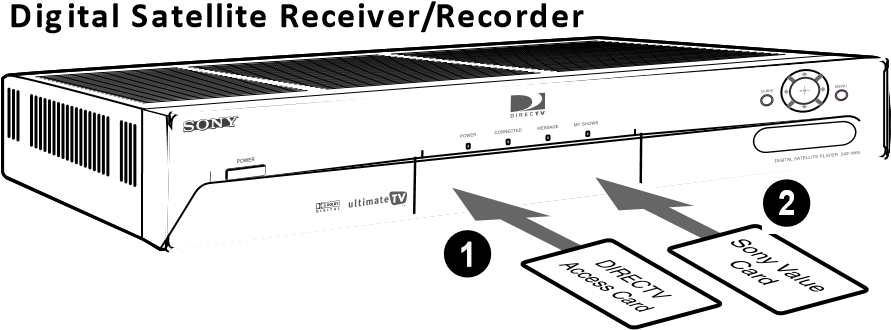
- You may insert the Sony Value access card into the front right hand slot of the Digital Satellite Receiver/Recorder to take advantage of its features. The Sony Value access card is not required to remain in place and can be removed/ re-inserted at any time.
Advanced Connection: Connecting Your VCR
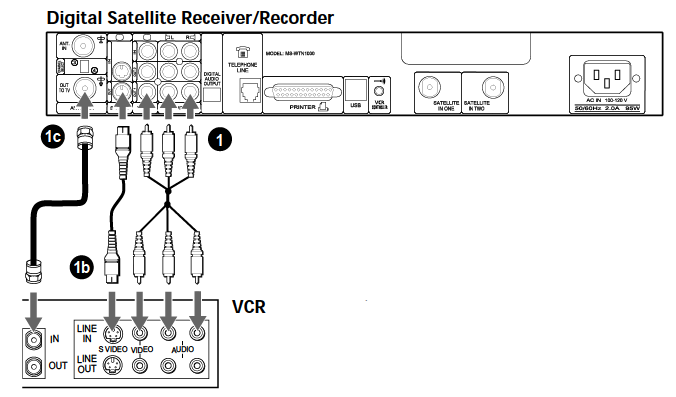
1.If your TV and VCR have A/V jacks
Connect the VIDEO OUT jacks of your Digital Satellite Receiver/Recorder to the A/V input jacks of your VCR using the supplied A/V cable. Then, connect the A/V output jacks of your VCR to the A/V input jacks of your TV using an A/V cable. (Be sure to match the colors on the jacks with the colored plugs on the A/V cable.) Some TVs and VCRs do not have stereo audio, if yours does not, just connect the white A/V cable to the Left output jack.
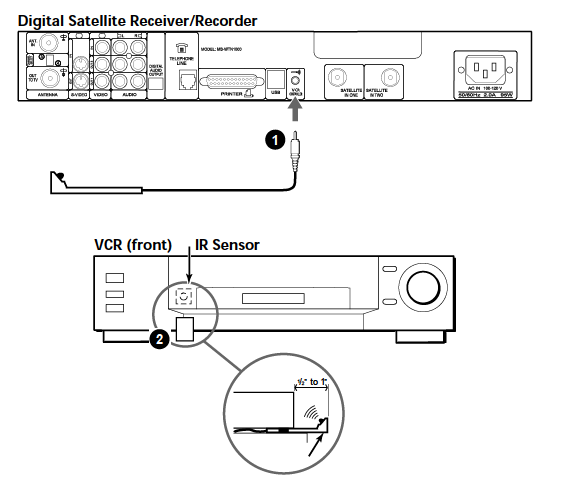
- To allow the Digital Satellite Receiver/Recorder to control your VCR
Connect the IR Blaster to the VCR CONTROLLER jack on the receiver/recorder. - In front of the VCR
Place the IR Blaster under and in front of the VCR. The IR Blaster must extend just in front of the infrared sensor of the VCR.
If the infrared sensor is not marked on your VCR, shine a flashlight into the front panel of the VCR to locate the sensor.
Advanced Connection: Connecting an Audio System
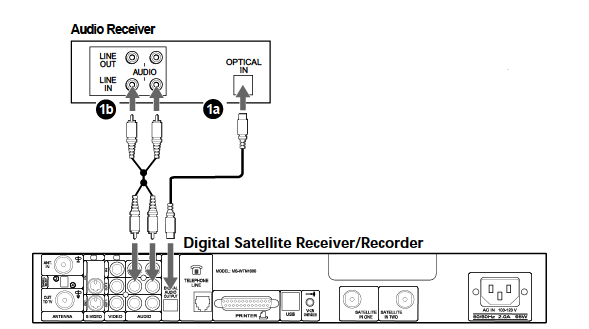
1a. If you have a digital or Dolby Digital audio system
Connect the DIGITAL OUT (OPTICAL) of the Digital Satellite Receiver/ Recorder to the optical digital input of your audio system.
1b. If you have a stereo or Dolby® Pro Logic® audio system
Connect the upper AUDIO R and L(MONO) jacks on the Digital Satellite Receiver/Recorder to the audio inputs of your stereo amplifier.
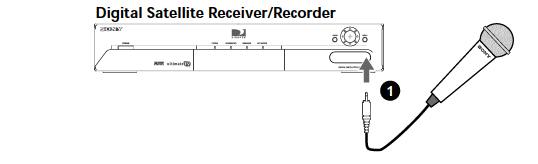
1. If you have a Microphone
Connect the microphone plug to the Receiver/Recorder’s Microphone IN jack.
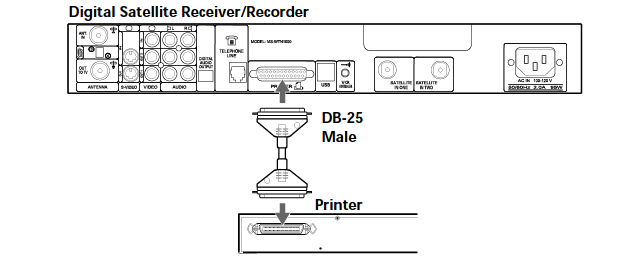
To print screens
Connect the printer port on the receiver/recorder to the port on the printer.
Note
Unplug the Digital Satellite Receiver/Recorder and printer before you begin connecting.
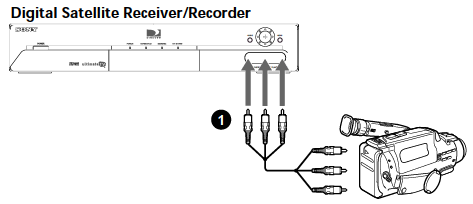
If you have a Camcorder
Using A/V cables, connect the camcorder’s A/V OUT jacks to the Receiver/Recorder’s A/V IN jacks.
Note
If you have a mono camcorder, connect its left audio output to the Receiver/Recorder’s AUDIO L (white) jack.
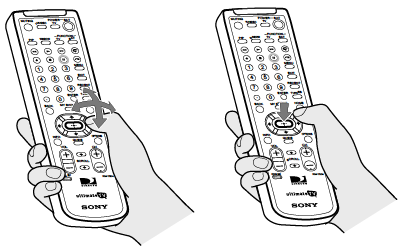
1. Press the ![]() buttons to move the highlight to the item you want.
buttons to move the highlight to the item you want.
2. Press the button to select the item.
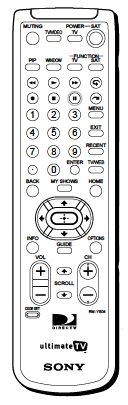
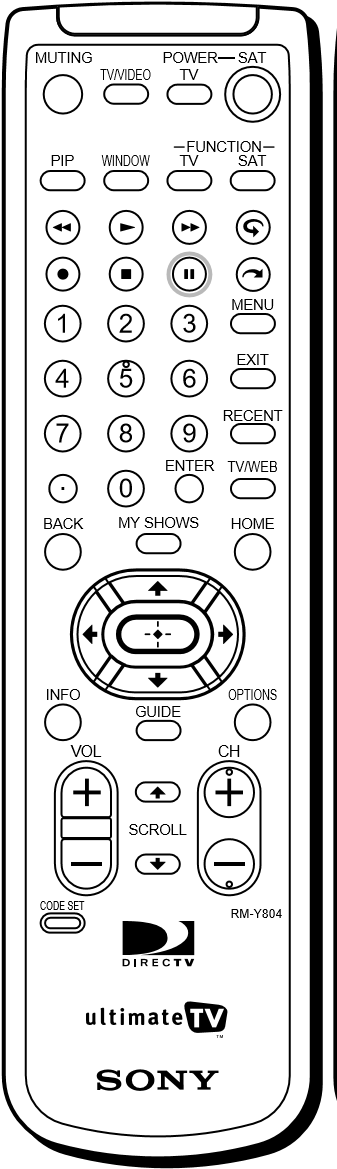
| Muting | Press to mute the sound. Press again, or press VOL +, to restore the sound. (For the TV only) |
| TV/VIDEO | Cycles through the video inputs of your TV. |
| TV POWER | Turns your TV on and off. |
| SAT POWER | Turns your Player on and off. |
| PIP | Operate the Picture-in-Picture features of the receiver/recorder. |
| WINDOW | Selects the active window while in PIP mode, allowing you to change the Main or PIP channel.(For the recorder/receiver only) |
| TV FUNCTION | Selects TV feature control. |
| SAT FUNCTION | Selects Player feature control. |
| © Button | Replay button. |
| @ Button | Jump ahead button. |
| 0 – 9 Buttons | Select channels or enter numbers in text boxes. |
| MENU | Opens the TV Main Menu. |
| EXIT | Closes all on-screen displays, including program guides and menus. |
| ENTER | Activates the selected channel on your TV. |
| OPTIONS | Displays the OPTIONS panel. |
| RECENT | Displays and allows you to access the most recently viewed Web pages and TV channels. |
| SCROLL V/V
Buttons |
Moves the page up or down when the page is too long to be displayed on the screen. |
| HOME | Displays the Web Home or TV Home screen. |
| BACK | Displays the last screen viewed, or hides the on-screen keyboard. |
| TV/WEB | Press the button to switch between TV and WebTV modes. |
| Arrow Buttons | Move the yellow highlight box to a different command or activity on the screen; select different keys when the on-screen keyboard is displayed. |
| MY SHOWS | Displays a list of programs that you have recorded with your receiver/ recorder. |
| INFO | Displays information on the program you are viewing. |
| GUIDE | Displays information on available programs, including channel, time and date. |
| Button | Activates a highlighted link or command; displays the on-screen keyboard. |
| VOL +/- | Increases and decreases the volume. |
| CH +/- | Moves to the next or previous channel. |
| CODE SET | Used for programming the remote control to operate your TV. See page 21 for details. |
Setting up the Remote Control
- The function indicators begin flashing.
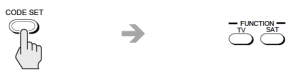
- The function indicator goes off, and the remote is set up to operate that device.

- Press the POWER button for the device you want to control, then press other operation controls such as the CH +/ – buttons.
If the device does not respond to the remote control, repeat from step 2 and enter a different manufacturer code in step 3.
Manufacturer Codes TV Codes
|
|
|
|
|
|
|
|
|
|
|
|
|
|
|
|
|
|
|
|
|
|
|
|
|
|
|
|
|
|
|
|
|
|
|
|
|
|
|
|
|
|
|
|
|
|
|
|
|
|
|
|
|
|
|
|
|
|
|
|
|
|
|
|
|
|
|
|
|
|
|
|
|
|
|
|
|
|
|
|
|
|
|
|
| Manufacturer | Code |
| Portland | 103, 108 |
| Quasar | 110, 107 |
| Radio Shack | 102, 112, 124, 123 |
| RCA/Proscan | 102, 103, 104, 105,106, 107, 108 |
| Samsung | 126, 112, 113, 103 |
| Sanyo | 125 |
| Scott | 123, 112 |
| Sharp | 114, 113, 115 |
| Signature 2000 (M. Wards) | 114, 109 |
| Sylvania | 111, 112, 108 |
| Symphonic | 123, 139 |
| Tenika | 109 |
| Toshiba | 119, 114 |
| Videch | 131, 103, 112 |
| Wards | 113, 103, 115, 112 |
| Zenith | 108, 110 |
|
|
|
|
|
|
|
|
|
|
|
|
|
|
|
|
|
|
|
|
|
|
|
|
|
|
|
|
|
|
|
|
|
|
|
|
|
|
|
|
|
|
|
|
|
|
|
|
|
|
|
|
|
|
|
|
|
|
|
|
|
|
|
|
|
|
|
|
|
|
|
|
|
|
|
|
|
|
|
|
|
|
|
|
|
|
|
|
|
|
|
|
|
|
|
|
|
|
|
|
|
|
|
|
|
|
|
|
|
|
|
|
|
|
|
|
|
|
|
|
|
|
|
|
|
|
|
|
|
|
|
|
|
|
|
|
|
|
|
|
|
|
|
|
|
|
|
|
|
|
|
|
|
|
|
|
|
|
|
|
|
|
|
|
|
|
|
|
|
|
|
|
|
|
|
|
|
|
|
|
|
|
|
|
|
|
|
|
|
|
|
|
Other Information
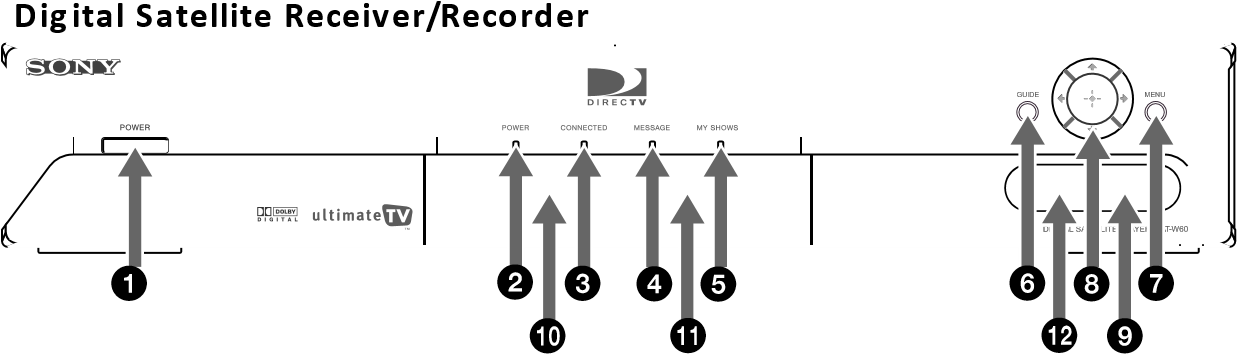
| Feature | Description | |
| 1 | Power Button | Turns your Digital Satellite Receiver/Recorder on and off |
| 2 | POWER Indicator | Indicates whether the Digital Satellite Receiver/ Recorder is on or off. |
| 3 | CONNECTED Indicator | Flashes while the Digital Satellite Receiver/Recorder is connecting to the WebTV service and while receiving new information. Remains lit while in use. |
| 4 | MESSAGE Indicator | Lights up to indicate you have an unopened e-mail message. |
| 5 | MY SHOWS Indicator | Indicates that a program is being recorded by My Shows. |
| 6 | GUIDE Button | Opens the Program Guide. |
| 7 | MENU Button | Opens the TV Home screen. |
| 8 | Arrow and Q Buttons | The arrow buttons move the highlight in the on-screen displays. The Q button selects the highlighted item. |
| 9 | AUDIO (R/L)/VIDEO IN | Allows easy connection of audio/video devices, such as a camcorder or digital camera. |
| 10 | SMART CARD Slot | The SmartCard allows you to access special features for WebTV. |
| 11 | ACCESS CARD Slot | The Access Card allows you to access DIRECTV services. |
| 12 | MIC INPUT Jack | Allows easy connection of a microphone. |
Back Panel Terminals
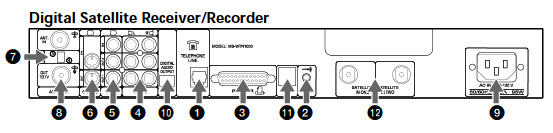
| Connector | Description | |
| 1 | TELEPHONE LINE | Connects your receiver/recorder to a telephone jack. |
| 2 | VCR CONTROLLER | Allows you to connect your IR Blaster for easy control of your cable box and/or VCR through the receiver/recorder. |
| 3 | PRINTER PORT | Allows you to connect your receiver/recorder to a printer. |
| 4 | AUDIO (R)/(L) IN/OUT | Connects your receiver/recorder to the right and left audio inputs and outputs of your TV. |
| 5 | VIDEO IN/OUT | Connects your receiver/recorder to your TV’s or VCR’s video inputs and outputs. |
| 6 | S-VIDEO IN/OUT | Allows you to connect your receiver/recorder to your TV and VCR for optimal picture quality (if your TV and VCR support S-Video. |
| 7 | CH 3-CH 4 Switch | The switch determines which TV channel allows you to view programs from your receiver/recorder when connected through the VHF/UHF connector. |
| 8 | VHF/UHF | IN: Allows you to connect your normal (antenna) TV or cable TV service to your receiver/recorder. |
| OUT: Allows you to send normal (antenna) TV or cable signals to your TV or VCR from your receiver/recorder. | ||
| 9 | AC IN | Connects your receiver/recorder to a 120V AC outlet. |
| 10 | DIGITAL AUDIO
OUTPUT |
Allows you to connect an optional digital audio system. |
| 11 | USB Port | Allows you to connect Universal Serial Bus components, such as a keyboard or a digital camera. |
| 12 | SATELLITE IN | Connect the cable from your satellite dish antenna here.
Connect a second cable if you wish to use both of the receiver/recorder’s tuners, this allows features such as PIP and recording one show and while viewing another. |
Specifications
| Terminals | Video In (2)
Video Out (2) Audio (R/L) In (2) Audio (R/L) Out (2) S-Video In (1)/Out (1) Tel Line (1) Microphone In (1) Printer Port (DB25) (1) VCR Controller (1) Digital Audio Out (1) USB Port (2) Satellite In (2) CH3-CH4 Switch (1) VHF/UHF In/Out (1) AC In (1) |
| Dimensions | 430 mm x 70 mm x 290 mm (w/h/d) (17” x 2 3/4” x 11 1/2”) |
| Weight | TBD x kg (x lbs xx oz) |
| Power
Requirements |
AC 120 V |
| Power
Consumption |
90 W max |
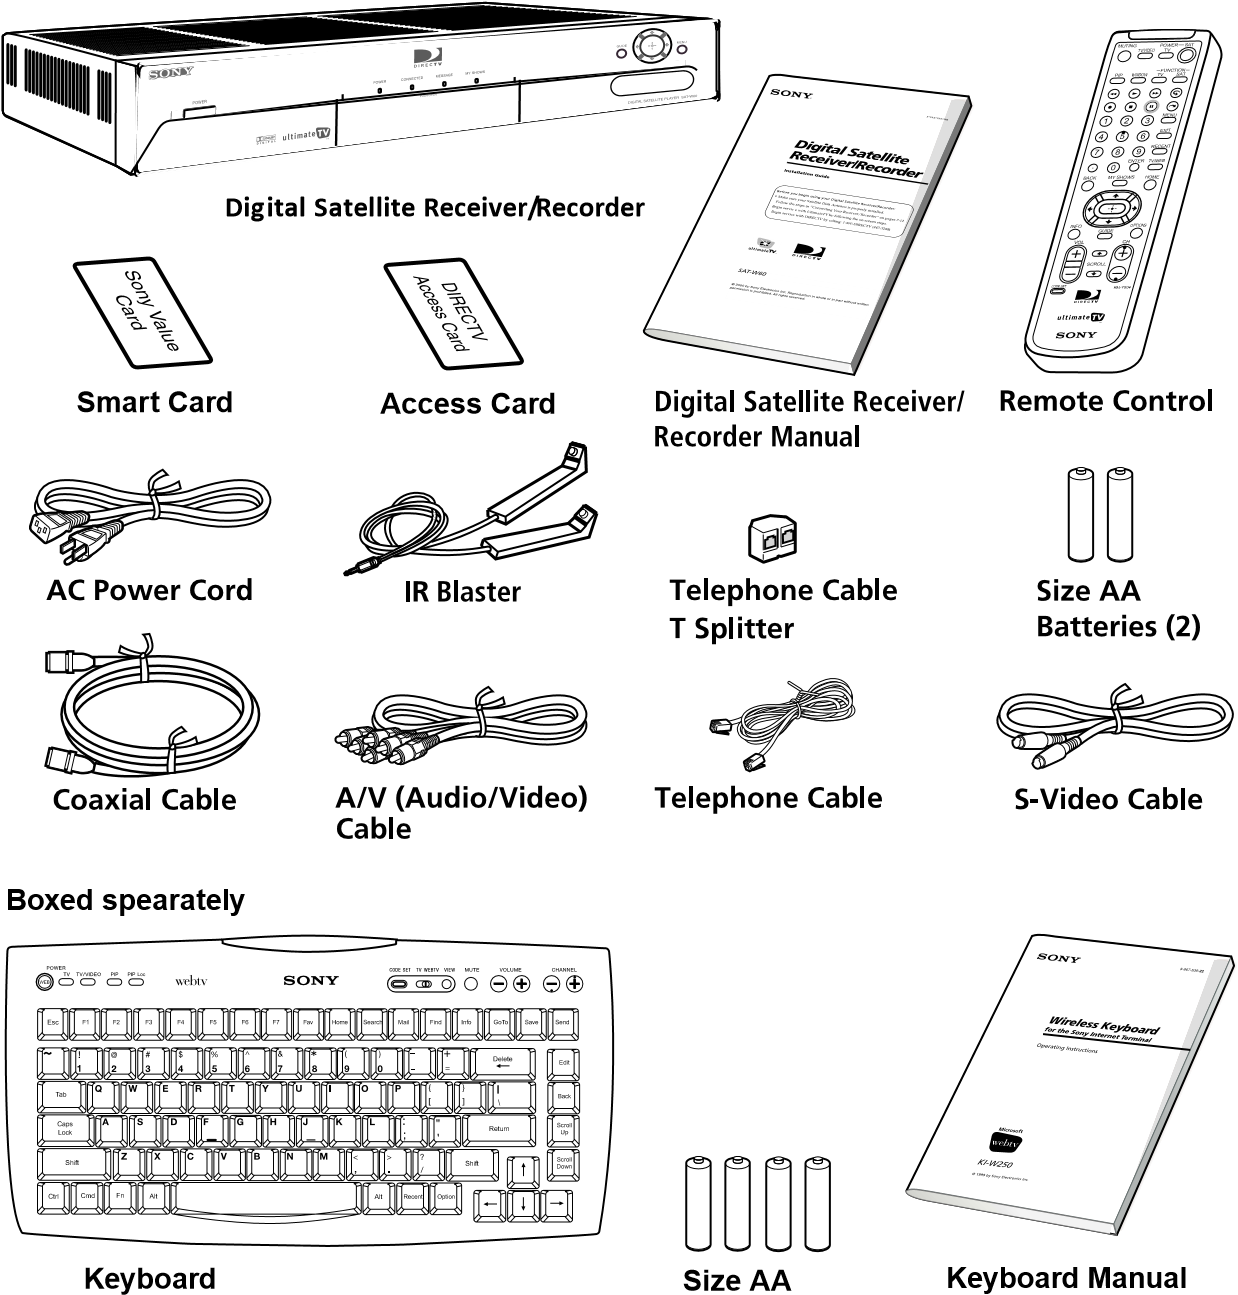
| Supplied Accessories | Remote Control RM-Y804 (1)
Size AA Batteries (2) AC Power Cord (1) A/V (Audio/Video) Cable (1) Telephone Cable (1) S-Video Cable (1) T Splitter (1) Coaxial Cable (1) IR Blaster (1) Wireless Keyboard KI-W250 (1) Access Card (1) Smart Card (1) |
| Optional
Accessories |
Local Antenna ANJ-AA1 Installation Kit ANJ-DS2 Amplifier EAC-DA1 Diplexer EAC-DD1 Voltage Switch EAC-DV2 DSS Dish SAN-XXX |
Troubleshooting
| Symptom | Possible Cause and remedies |
| TV POWER button doesn’t turn on TV. | The remote control has not been properly programmed. See “Setting up the Remote Control” on page 21.
The batteries in the remote control or optional wireless keyboard could be weak. Check the batteries and replace them if necessary. |
| No picture, no sound. | Make sure the AC Power Cord is connected.
Check that the TV/VIDEO switch is set correctly. Make sure the Digital Satellite Receiver/Recorder is properly connected. If you connected using a S-Video or A/V cables, make sure they are properly connected. If your TV must be set to a certain channel to view other devices to which it is connected, make sure this channel is selected. Check that the correct video input is selected by pressing the TV/VIDEO button. If you connected the Digital Satellite Receiver/Recorder using the S-Video or A/V cables, make sure the cables are properly connected. If your TV is not connected using the S-Video or A/V cables, set the CH3-CH4 switch on the back of the Digital Satellite Receiver/Recorder to the opposite channel to which it is currently set. |
| No sound. | If you connected the Digital Satellite Receiver/Recorder using A/V cables, make sure the cables are properly connected. |
| Can’t change TV channels while using WebTV service. | Make sure you select the TV FUNCTION button. |
| The WebTV service screens disappear after pressing the CHANNEL +/- buttons. | Press the TV/VIDEO button on the remote control until the WebTV screen appears. |
| VCR Controller doesn’t seem to be working correctly. | Check that the IR Blaster is positioned directly in front of the infrared sensor area of your cable box and/or VCR.
Follow the on-line instructions in the “Settings” link, accessible from the TV Home page of the WebTV service. |
| Symptom | Possible Cause and remedies |
| The unit gets extremely hot. | Check the placement of the unit. Place the unit in a location with adequate ventilation. Do not place the unit in a cabinet or on a TV.
If the heat is excessive, contact your Sony dealer. |
| The unit turns off and on by itself. | This is often caused by static build up. Turn off the unit and disconnect the AC Power Cord from the power outlet. Then reconnect the AC Power Cord to the power outlet and turn on the unit. If this does not solve the problem, contact your Sony dealer. |
| The unit will not turn on. | Make sure the AC Power Cord is securely connected to the Digital Satellite Receiver/Recorder and a power outlet. |
| The unit will not connect to the WebTV Network after receiving an upgrade from the WebTV service. | Turn off the Digital Satellite Receiver/Recorder and disconnect the AC Power Cord from the power outlet. Then reconnect the AC Power Cord to the power outlet and turn on the Digital Satellite Receiver/Recorder. You may need to repeat this procedure three or four times to solve the problem. |
| The Message Indicator light is not working. | You can set your Digital Satellite Receiver/Recorder to check for messages automatically. However, if you check for messages yourself before the receiver/ recorder is set to do so automatically, the Message Indicator may not light until the receiver/recorder checks again. You may want to consider setting the receiver/recorder to check for mail when you usually are not connected. |
| Remote control or keyboard is no longer working. | Replace the batteries.
Try pressing the SAT FUNCTION button. |
|
|
|
|
|
|
|
|
|
|
|
|
|
|
|
|
|
|

- DIRECTV System installer or facility.
- installer, you must take the Product or deliver the Product in either its original packaging or packaging affording an equal degree of protection (with freight prepaid), to a SONY authorized DIRECTV System service facility. To locate the closest such facility, please call the telephone number listed below.
]]>
Precautions
Before using this product, carefully read this manual and any manuals for compatible hardware.
Retain instructions for future reference.
Safety
- Small children injuries. Keep the product out of the reach of small children.
- If a battery is leaking, do not touch the material from the leaking battery with bare hands.
–– If a battery is leaking, stop using the product immediately and contact Customer Support.
–– If the material gets into the eyes, immediately flush the eyes with clean water and seek medical attention. It may cause blindness.
–– If the material comes into contact with the skin or clothes, immediately rinse the affected area with clean water. Consult your doctor if inflammation or soreness develops. - If a battery is leaking, immediately move the leaking battery away from fire. The material from the leaking battery or gas may ignite, causing fire or explosion.
- Do not disassemble, heat, modify, or charge the batteries. Doing so may cause the batteries to leak or become damaged, which may lead to injury or burns.
- Insert batteries in the correct direction. Batteries can short-circuit when their positive and negative ends are reversed. This may cause batteries to overheat, explode, or leak, which may lead to injury or burns.
- Use only size AA batteries. Do not combine old and new, or different types of batteries. Using batteries of different capacities may cause explosion or leakage, which may lead to injury or burns.
- Dispose of used batteries according to the battery manufacturer’s instructions or local regulations.
- Remove batteries when they have reached the end of their life, or when storing the media remote for an extended period of time. Leaving them in the remote may cause leakage due to battery overdischarge, which may lead to injury or burns.
Use and handling
- Do not allow liquid or small particles to get into the product.
- Do not touch the product with wet hands.
- Do not throw or drop the product or subject it to strong physical shock.
- Do not stand on or put objects on the product.
- Do not place the product on an unstable surface or leave on the floor.
- Never disassemble or modify the product.
Cleaning
Follow the instructions below to help prevent the product exterior from deteriorating or becoming discoloured.
- Wipe with a soft, dry cloth.
- Do not apply insecticides or other volatile substances.
- Do not place any rubber or vinyl materials on the product exterior for an extended period of time.
- Do not use solvents or other chemicals. Do not wipe with a chemically-treated cleaning cloth.
Storage conditions
- Do not expose the the product or battery to high temperatures, high humidity or direct sunlight during operation, transportation and storage.
- Do not leave the product in a car with the windows closed, particularly in hot weather.
- Do not expose the product to dust, smoke or steam.
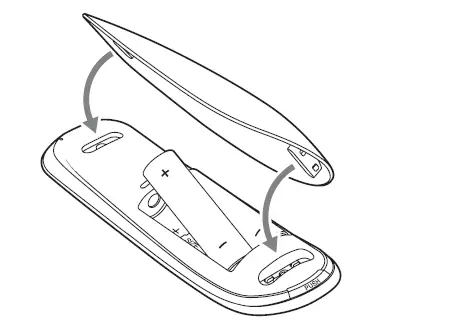
Set up your media remote
Turn on the power
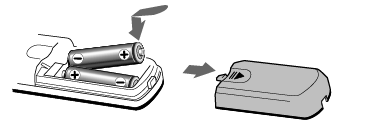
- Press the PUSH button on the back of the media remote and remove the rear cover. Keep pressing the PUSH button until the lock disengages.

- Insert batteries with their positive and negative ends pointing in the correct direction.
- Replace the rear cover. Align the protruded part on the cover with the recessed part on the media remote, and then press until you hear a “click”.
Hint
When battery charge runs low, the media remote may not operate properly or the distance at which you can operate the remote may be reduced. When this happens, replace both batteries with new ones.
Pair and set up your media remote
To use the media remote as a controller for your PlayStation®5 console as well as a TV remote, you’ll need to pair the remote with your console, and then set up the remote with your compatible TV.
Go to the home screen on your PS5™ console and select Settings > Accessories > Media Remote> Set Up Media Remote, and then follow the on-screen instructions to set up your media remote. Infrared (IR) technology enables you to operate certain functions on compatible televisions. For IR operation you must point the IR transmitter of the media remote directly at the device. Check that there are no obstructions between the media remote and the device.
Hints
- One media remote can operate only one PS5 console.
- If you switch TVs, you’ll need to reconfigure the media remote’s settings.
- Be sure to always update your PS5 system software to the most recent version.
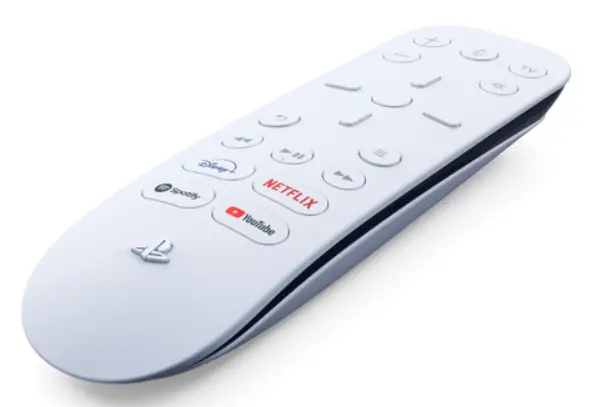
Hardware part names

Hint
The TV volume + button and the (play/pause) button have tactile dots to help you find the buttons easily.
Specifications
Power source (2) Size AA batteries
External dimensions Approx. 45 × 145 × 26 mm (width × height × depth)
Mass Approx. 55 g (Without batteries)
Operating temperature 5 °C to 35 °C
Country of production China
Design and specifications are subject to change without notice.
GUARANTEE
This product is covered for 12 months from date of purchase by the manufacturer’s guarantee.
Please refer to the guarantee supplied in the PS5 package for full details.
This product has been manufactured by or on behalf of Sony Interactive Entertainment Inc.,
1-7-1 Konan Minato-ku Tokyo, 108-0075 Japan.
Imported into Europe and Distributed by Sony Interactive Entertainment Europe Limited, 10 Great Marlborough Street, London, W1F 7LP, United Kingdom.
The Authorised Representative for issuing and holding Declarations of Conformity is Sony Belgium, bijkantoor van Sony Europe B.V., Da Vincilaan 7-D1, 1930 Zaventem, Belgium.
For customers in Europe and Turkey.
RE Directive “Informal DoC” statement
Hereby, Sony Interactive Entertainment Inc., declares that this product is in compliance with the essential requirements and other relevant provisions of Directive 2014/53/EU.
For details, please access the following URL: https://www.compliance.sony.de/ The frequencies used by the wireless networking feature of this product are the 2.4 GHz (Bluetooth®) range.
Wireless frequency band and maximum output power: – Bluetooth® 2.4 GHz: less than 10mW.
 Where you see either symbol on any of our electrical products, batteries or packaging, it indicates that the relevant electrical product or battery should not be disposed of as general household waste in the EU, Turkey, or other countries with separate waste collection systems available. To ensure correct waste treatment, please dispose of them via an authorised collection facility, in accordance with any applicable laws or requirements. Waste electrical products and batteries may also be disposed of free of charge via retailers when buying a new product of the same type. Furthermore, within EU countries larger retailers may accept small
waste electronic products free of charge. Please ask your local retailer if this service is available for the products you wish to dispose of. In so doing, you will help to conserve natural resources and improve standards of environmental protection in treatment and disposal of electrical waste.
This symbol may be used on batteries in combination with additional chemical symbols. The chemical symbol for lead (Pb) will appear if the battery contains more than 0.004% lead.
A8H® BRAVIA OLED 4K HDR TV

Experience an ultra-realistic image with the power of OLED technology. The powerful Picture Processor X1™ Ultimate utilizes over 8 million individual 1 pixels to create an image with exquisite contrast and vibrant color. Pixel Contrast Booster supercharges each pixel to deliver incredible picture quality.
Bullets
- Bring out the beauty of OLED with the powerful Picture Processor X1 Ultimate.
- Millions of individual pixels are supercharged by the Pixel Contrast Booster for more vibrant colors to complement absolute OLED black.1
- Acoustic Surface Audio produces 2.1 channel sound from the entire screen, creating an immersive multi-dimensional audio experience.
- With easy access to all your favorite content, services, and devices, our Android Smart TVs 3 make life simpler. Experience a more natural picture with 4K XReality PRO
& Object-BasedSuper Resolution. - See exactly what the creator intended with the advanced color and gradation of TRILUMINOS™ Display.
- OLED+ X-Motion Clarity makes fast-moving scenes bright and clear
- Picture and sound are automatically adjusted to your environment with Sony’s unique Ambient Optimization™ technology. 5
- Compatible with Google Home, Amazon Alexa 6, and Apple HomeKit7 for an even smarter home
- See the big picture with HDR¹, Dolby Visions™ 8, and NetflixCalibrated Mode. , IMAX Enhanced™ 10
- The super-slim one-slate design and narrow aluminum bezel harmoniously blend into any environment, keeping you focused on the 11 picture.
- Premium metal low profile stand for
distraction-free viewing or can be adjusted to
raise the TV to fit a soundbar seamlessly. - Hang your TV like a work of art with the SUWL855 ultra-slim wall-mount bracket for select 12 Sony BRAVIA™ OLED and LED TVs.
- CalMAN™ auto-calibration mode makes high-performance screen calibration easier than ever13.
Features
Picture Processor X1™ Ultimate, bringing the best out of OLED beauty.
With unmatched processing power, the Picture Processor X1™ Ultimate analyzes content to bring out OLEDs’ intense contrast with pure blacks, peak brightness, and natural colors. Object-based HDR remastering happens in real-time to detect hundreds of individual objects on-screen and intelligently upscale everything you see to near-4K HDR quality so everything you watch is clear, bright, and incredibly realistic. 1,2
Boosting OLED color and contrast for extra depth and realism.
Over 8 million self-illuminating pixels1 are precisely and individually controlled by the Picture Processor X1™ Ultimate and supercharged via the Pixel Contrast Booster to enhance color and contrast in bright areas so you can enjoy scenes full of lifelike shades and hues, more depth, fine texture, and the pure black contrast that only OLED can deliver.
Acoustic Surface Audio
Sound on conventional TVs with a speaker located below the screen is often out of sync with the picture. With our Acoustic Surface Audio, sound comes to you from the entire screen, creating an immersive multi-dimensional audio experience. It’s picture and sound in perfect harmony. With a subwoofer integrated into the rear of the TV, you’ll hear the more dynamic, bass-heavy sound – ideal for action movies and music.
Watch what you love, control it with your voice.
Sony’s Android TV with the Google Assistant provides a smarter viewing experience. Easily search and watch your favorite movies, get answers on screen like sports scores or weather updates, control your TV and even your home – all with your voice. Just start with pressing the Google Assistant button on your remote to ask it questions, control smart home devices or access many of the apps and services you already use every day. In addition, cast your favorite apps with Chromecast built-in 3 4, or enjoy a huge range of apps from Google Play™, including YouTube™, Netflix, Prime Video, Spotify, and more.3
The supreme resolution, whatever you’re watching
Any kind of content can be upconverted to lifelike 4K resolution with Sony’s unique 4K XReality PRO and Object-Based Super Resolution. Our Picture ProcessorX1™ Ultimate precisely analyses and processes data to enrich pictures with lifelike detail, textures, and clarity in everything you watch. Leveraging intelligent dual database processing,
content looks cleaner with less on-screen noise. Even images filmed in Full HD are upscaled close to 4K resolution by 1,2 1,2 4K X-Reality™ PRO. Every single pixel is nhanced beautifully by Sony’s Picture Processor X1™ Ultimate.
TRILUMINOS Display, bringing you all the world’s colors
By widening the color spectrum, TRILUMINOS Display, powered by the Picture Processor X1 Ultimate, reproduces more colors than conventional television. It analyzes and processes data in every image to make colors even more natural and precise, so pictures are closer than ever to real life. See exactly what the creator intended with the advanced color, light, and gradation of the TRILUMINOS™ Display.
Bright and clear motion.
With pictures created by millions of individually controlled pixels, everything is sharp and clear on OLED. And with our X-Motion Clarity™ technology, even fast-action stays smooth and clear. Moving images are precisely controlled to minimize blur so that pictures remain true with less loss in brightness during high-speed scenes.
Supreme pictures and sound, whatever the environment.
Sit back and enjoy the best possible viewing experience. Sony’s unique Ambient Optimization™ technology automatically adjusts picture and sound to your environment. An embedded light sensor optimizes picture brightness to room conditions, boosting brightness in light rooms and reducing it in dark ones, so you get the perfect view. For uncompromised sound, Acoustic Auto Calibration™ analyzes the environment of the room and reproduces sound that’s enhanced and optimized to your room.
Well-connected to your smart home.
With Google Home compatibility, simply voice-control your TV and ask it to do things like cast and control videos from YouTube with Google Home or change the channel or volume with Amazon Alexa. Apple HomeKit and Airplay 2 support seamlessly integrating your iPhone and Siri devices with your Sony TV for effortless smart home management and content and Amazon Alexa 7 streaming.
See the big picture with HDR, Dolby Visions, IMAX Enhanced, and Netflix Calibrated Mode.
High Dynamic Range (HDR) picture is the way TV was always meant to be watched. Ultra-high resolution and HDR video content combine to bring dazzling detail, color, and contrast to everything you watch while keeping a far wider range of brightness.1 Dolby Vision™ brings scenes to life with striking highlights, deeper darks, and vibrant colors.
The IMAX Enhanced™ program brings the immersive entertainment experience into the home. IMAX Enhanced content is digitally remastered to provide sharper images and more powerful sound—just as the creator 8 9 intended. Netflix Calibrated Mode was specially developed to enjoy Netflix original content and reproduce picture quality as brilliant as the studio evaluation monitor, faithfully reproducing the 10 creator’s intent and vision. Whichever format, Sony TVs deliver picture-perfect reality, creating an immersive and engaging cinematic experience.
Incredibly thin one-slate design.
With our super-slim one-slate design, the screen meets the edge of the TV, blending harmoniously in any room environment. The flush surface with narrow aluminum bezel keeps you focused on the picture, not the television. Cable holders keep wires neatly hidden, so your television stays free of clutter and looks good from any angle. 11
Premium metal stand, ready for soundbars.
Our flexible low profile design provides a distraction-free experience, or the stand can be
adjusted to raise the TV to fit a soundbar seamlessly.
Mount your Sony TV like a work of art
Make the most of your living space. The SU-WL855 ultra-slim wall-mount bracket is designed to hang select Sony BRAVIA™ OLED and LED TVs to flush to the wall, just like any other work of art. Pull out your TV and swivel it left to right to adjust the screen angle for optimal viewing. 12
Experience content as the director envisioned
When pictures are digitally compressed from film to TV, quality is compromised and your experience is not as the director intended in the studio. A wide range of unique features lets you enjoy studio-quality entertainment in your own home, just as the director envisioned.
High-performance calibration for professionals
Our TVs receive high-performance calibration that has never previously been possible using CalMAN™ software. It allows adjustments to be made with finer precision than conventional picture quality settings to meet the strict requirements of creators in the post-production stage. Colors are reproduced with maximum fidelity to the original TV signal, giving exceptional picture control for a TV. CalMAN also features an easy-to-use interface that has been well received, by13 calibration specialists.
Specification
| Audio Features | |
| Dolby Atmos | Yes |
| Clear Phase | Yes |
| Auto Surround | Yes |
| DTS audio format support | DTS Digital Surround |
| Sound mode | Standard, Dialog, Cinema, Music, Sports, Dolby Audio |
| S-Master | S-Master Digital Amplifier |
| Simulated surround sound | S-Force Front Surround |
| Dolby audio format support | Dolby Audio, Dolby Atmos |
| HDMI Audio Return Channel(ARC) |
Yes (eARC/ARC) |
| Advanced Auto Volume | Yes |
| Auto Mute (on no signal) | Yes(Audio only) |
| HDMI input Audio format | 5.1 channel linear PCM: 32/44.1/48/88.2/96/176.4/192kHz 16/20/24bits, Dolby Audio, Dolby Atmos, DTS |
| ARC output format | Two-channel linear PCM: 48kHz 16bits, Dolby Audio, Dolby Atmos, DTS |
| Audio Specs | |
| Channel | 2.2ch |
| Speaker Position | Front + Down Firing |
| Bass/Treble/Balance | Balance |
| Speaker Type | Acoustic Surface Audio |
| Audio Power Output | 10W + 10W + 5W + 5W |
| Speaker Configuration | Actuator (28 x 40mm) x 2, Subwoofer (60mm) x 2 |
| Digital audio out (Optical) format | Two-channel linear PCM: 48kHz 16bits, Dolby Audio, DTS |
| Carton Spec | |
| Max Qty of carton stacking (vertical) | 4 |
| Convenience Features | |
| Electronic Program Guide (EPG) | Yes |
| USB playback codecs | MPEG1:MPEG1/MPEG2PS:MPEG2/MPEG2TS(HDV,AVCHD):MPEG2,AVC/MP4(XAVC S):AVC,MPEG4,HEVC/AVI:Xvid,MotinJpeg/ASF(WMV):VC1/MO V:AVC,MPEG4,MotionJpeg/MKV:Xvid,AVC,MPEG4,VP8.HEVC/ WEBM:VP8/3GPP:MPEG4,AVC/MP3/ASF(WMA)/LPCM/WAV/M P4AAC/FLAC/JPEG WEBM:VP9/AC4/ogg/AAC/ARW(Screen nail only) |
| Screen Reader | Yes |
| Audio Description | Yes |
| Text Magnification | Yes |
| Accessibility Shortcut | Yes |
| Switch Access | Yes |
| Auto Picture Mode | Yes |
| Text Input Language | ENG / FRA / GER / HEB / ITA / RUS / SPA / VIE / JPN |
| Chromecast built-in | Yes |
| Voice Search | Yes |
| Application Store | Yes (Google Play Store) |
| HDMI-CEC | Yes |
| i-Manual | Yes |
| Parental Control | Yes |
| Channel Block (with password) | Yes(Analog&Digital) |
| Show/Hide Channels | Yes(Analog&Digital) |
| On-Screen Clock | Yes |
| Sleep Timer | Yes |
| On/Off Timer | Yes |
| USB drive format support | Yes (Supported File System: FAT16/FAT32/exFAT/NTFS) |
| Display Language | AFR,AMH,ARA,ASM,AZE,BEL,BUL,BEN,BOS,CAT,CZE,DAN,D EU,GRE,ENG,SPA,EST,BAQ,PER,FIN,FRA,GLG,GUJ,HIN,HRV HUN,IND,ISL,ITA,HEB,JPN,KAZ,KAN,KOR,KIR,LAO,LIT,LAV, MAC,MAL,MON,MAR,MAY,BUR,NOB,NEP,NLD,ORI,PAN,POL, POR,RUM,RUS,SOL,SLV,ALB,SRP,SWE SWA,TAM,TEL,THA,TGL,TUR,UKR,URD,UZB,VIE,zh_CN,zh_H K,zh_TW,ZUL |
| Auto Shut-off | Yes |
| Customizing Capability | |
| RS-232C Control | Yes |
| Design Features | |
| Stand Position | 2way position(soundbar position) |
| Stand Color | Dark Silver |
| Bezel Design | Flush Surface |
| Cable Management | Yes |
| Frame color | Black |
| Stand Design | Metal Blade Stand |
| Display Features | |
| Pixel Contrast Booster | Yes |
| TRILUMINOS Display | Yes |
| Display type | OLED |
| Display Specs | |
| Screen Size for WEB(diagonal, cm, integer, or 1st decimal) | 164 cm |
| Display resolution (H x V, pixels) | 3840×2160 |
| Screen Size (inch, measured diagonally) | 65″(64.5″) |
| Viewing Angle (Right/Left) | 178(89/89) degree |
| Viewing Angle (Up/Down) | 178(89/89) degree |
| Display Resolution | QFHD |
| Aspect Ratio | 16:09 |
| Energy Saving & Efficiency | |
| Dynamic Backlight Control | Yes |
| Power Saving Mode / Back Light Off Mode | Yes |
| General Features | |
| Auto Calibration with CalMAN | Yes |
| Netflix Calibrated mode | Yes |
| Closed Captions (Analog) | Closed Caption |
| Closed Captions (Digital) | Closed Caption |
| Demo Mode | Yes(e-POP only) |
| Hotel Mode Menu | Yes |
| Inputs and Outputs | |
| HDMI Signal | 4096x2160p(24,60Hz), 3840x2160p(24,30,60Hz),1080p(30,60,120Hz), 1080/24p, 1080i(60Hz), 720p(30,60Hz), 720/24p, 480p |
| HDCP | HDCP2.3(for HDMI1/2/3/4 |
| Bluetooth profile support | Version 4.2 HID/HOGP/SPP/A2DP/AVRCP |
| 4K 60P High-Quality formats | HDMI IN1, IN2, IN3, IN4 ports for 4K(up to 18Gbps) signal |
| C Power Input | C18 INLET (REAR) |
| RF (Terrestrial/Cable) Connection Input(s) |
1(Bottom) |
| Composite Video Input(s) | 1(Side) |
| HDMI inputs total | 4(1Side,3Bottom) |
| USB ports | 2(Side)/1(Bottom) |
| Ethernet inputs | 1(Bottom) |
| RS-232C Input(s) | 1(Bottom) |
| HDMI PC Input Format | 640×480(31.5kHz,60Hz), 800×600(37.9kHz,60Hz), 1024×768(48.4kHz,60Hz), 1280×1024(64.0kHz,60Hz), 1152×864(67.5kHz,75Hz), 1600×900(55.9kHz,60Hz), 1680×1050(65.3kHz,60Hz), 1920×1080(67.5kHz,60Hz), 3840x2160p(30Hz), 3840x2160p(60Hz, 8bits |
| Measurements (Approx.) | |
| AC Cable Length | 2000mm |
| Dimension of TV without Stand (W x H x D) | 1448x836x52(5.9) mm / 57 1/8 x 33 x 2 1/8(1/4) inch |
| Dimension of TV with Stand (W x H x D) | 1448(1448)x857(908)x326(323) mm / 57 1/8(57 1/8) x 33 3/4(35 3/4) x 12 7/8(12 3/4) inch |
| Dimension of Package Carton (W x H x D) | 1638 x 958 x 184 mm / 64 1/2 x 37 3/4 x 7 1/4 inch |
| Stand Width | 1004(1075) mm / 39 5/8(42 3/8) inch |
| Network Features | |
| Network Features | |
| Apple AirPlay | Yes *1 |
| Apple HomeKit | Yes *1 *1 Apple AirPlay and HomeKit will be available via a future firmware update. |
| Home Network Feature | Home Network Client, Home Network Renderer |
| Wi-Fi Direct | Yes |
| Wi-Fi Certified | Yes |
| Screen mirroring(Miracast™) | Yes (only for B2B purposes) |
| Video & TV SideView iOS/Android) | Yes |
| Related Info | Yes (US / Canada / MX(STB)) |
| Wi-Fi Standard | a/b/g/n/ac |
| Wi-Fi Frequency | 2.4GHz/5GHz (for Wi-Fi Direct: 2.4GHz Only) |
| Internet Browser | Vewd (Not pre-installed) |
| Codec for Home Network | MPEG1:MPEG1/MPEG2PS:MPEG2/MPEG2TS(HDV,AVCHD):M PEG2,AVC/MP4(XAVC S):AVC,MPEG4,HEVC/AVI:Xvid,MotinJpeg/ASF(WMV):VC1/MO V:AVC,MPEG4,MotionJpeg/MKV:Xvid,AVC,MPEG4,VP8.HEVC/ WEBM:VP8/3GPP:MPEG4,AVC/MP3/ASF(WMA)/LPCM/WAV/MP4AAC/FLAC/JPEG WEBM: VP9/AC4/Ogg/AAC/ARW(Screen nail only) |
| Wireless LAN | Integrated |
| Power | |
| Power Requirements (voltage) |
AC 120V for UL cUL AC 110-240V for other |
| Power Requirements (frequency) |
60Hz for UL cUL 50/60Hz for other |
| Power Consumption (in Standby) | 0.5W |
| Regulation and Standard Compliance | |
| VESA® Hole Spacing Compatible |
Yes |
| VESA® Hole Pitch(W x H) | 300×300 mm / 11 7/8 x 11 7/8 inch |
| Sensing Features | |
| Sensor | Light |
| Supplied Accessories | |
| Voice Remote Control | RMF-TX500U |
| Batteries | LR03 |
| AC Power Cord Spec | (C17) (US) (2pin) (flat blades Polarity) |
| Operating Instructions | US, FR, ES |
| Quick Setup Guide /Supplement CUE (GA) | US,FR,ES,PT |
| Table Top Stand | Separate(assembly required) |
| TV System | |
| Tuner Channel Coverage(Analog) | VHF: 2-13/UHF: 14-69/CATV: 1-135 |
| TV System (Digital Terrestrial) | ATSC |
| Tuner Channel Coverage (Digital Terrestrial) | VHF: 2-13/UHF: 14-69 |
| TV System (Digital Cable) | Clear QAM |
| Tuner Channel Coverage (Digital Cable) | CATV: 1-135 |
| Number of Tuners(Terrestrial/Cable) | 1(Digital/Analog) |
| Color Space | sRGB/BT709,BT2020,AdobeRGB,DCI |
| TV System (Analog) | M |
| Color System | NTSC |
| Operating System | Android 9.0 Pie |
| On-board Storage (GB) | 16GB |
| Video Features | |
| Object-based SupResolution | Yes |
| Precision Color Mapping | Yes |
| Face Area Detection | Yes |
| Picture modes | Vivid,Standard,Cinema,Game,Graphics,Photo,Custom,Dolby Vision Bright,Dolby Vision Dark,Netflix calibrated |
| Auto Wide | Yes |
| Wide Mode | Auto/Wide Zoom/Normal/Full/Zoom Normal/Full1/Full2 for PC |
| 4:3 Default | Yes |
| Video Processing | 4K X-Reality PRO |
| Motion enhancer | X-Motion Clarity, Auto mode |
| Blinking Type | Frame Blinking |
| 24p True Cinema | Yes |
| Live Colour™ Technology | Yes |
| PhotoTV HD / BRAVIA for China | Yes |
| CineMotion/Film Mode/Cinema Drive | Yes |
| Weights (Approx.) | |
| Weight of TV without Stand | 21.8 Kg / 48.1 lb |
| Weight of TV with Stand | 23.6 Kg / 52 lb |
| Weight of Package Carton(Gross) | 32 kg / 70.5lb. |
- 8K: 7,680 x 4,320 pixels. 4K: 3,840 x 2,160 pixels. Requires HDR compatible content from supported streaming services, such as Netflix, Amazon Video or HDR ompatible content device connected via HDMI input. Requires HDMI® cables sold separately
- Upscaled, simulated and enhanced 8K and 4K images will vary based on source content.
- User must connect to a Google account to use, including voice to activate linked apps. Wireless connectivity requires 802.11 home network (802.11n recommended). Network services, content, and the operating system and software of this product may be subject to separate or third party terms and conditions and changed, interrupted or discontinued at any time and may require fees, registration and credit card information. Apps must be compatible with TV. App availability varies by region and device. Use of this TV requires consent to Google Terms of Service (http://www.google.com/policies/terms/) and Privacy Policy (http://www.google.com/policies/privacy/).
- Chromecast built-in compatibility dependent on app.
- Google Home device (sold separately) compatible with Sony TV’s powered by Android TV. Requires compatible devices connected to the same wireless home network. Download the Google Home app from the iPhone App Store or Google Play. Subject to third party app terms and conditions. User must link compatible devices in order to control operation. Once download is complete, the Google Home feature may be connected to the Sony device to access the voice control function
- Amazon Alexa enabled devices (sold separately) compatible with Sony TV’s powered by Android TV. Amazon account required. Subscriptions may be required to access certain content. Compatible devices require internet connection.
- This Sony TV is compatible with AirPlay 2 and HomeKit. iOS 12.2 or later or macOS 10.14.4 or later is required. Apple ID account required. Subscriptions may be required to access certain content. AirPlay firmware update is required and will be available in winter 2020.
- Dolby Vision content is compatible with streaming services such as Netflix, Amazon Video or compatible content device connected via HDMI input. Requires HDMI®
cables sold separately. - IMAX Enhanced content enables the full IMAX Enhanced experience.
- Netflix streaming membership required. 4K Ultra HD availability subject to your Netflix subscription plan, internet service, device capabilities, and content availability. www.netflix.com/termsofuse
- Actual look may differ depending on TV size and type of cables used.
- SU-WL855 wall-mount bracket is available for select Sony OLED and LED models ranging from 55” class to 75” class. TV and wall mount system sold separately. Hardware included with wall-mount bracket.
- Requires separately sold CalMAN calibration software to be installed on your PC, a pattern generator, a meter (colorimeter, spectrophotometer etc.), and CalMAN for BRAVIA app to be downloaded from Google Play and installed on your TV. Internet needed to utilize app services on TV. Network services, content, and software of this product may be subject to separate terms and conditions and changed, interrupted or discontinued at any time and may require fees,registration and credit card information.
©2020 Sony Electronics Inc. All rights reserved. Reproduction in whole or in part without written permission is prohibited. Picture Processor X1, X-Reality PRO, X-Motion Clarity, TRILUMINOS, X-tended Dynamic Range and the Sony logo are trademarks of Sony Corporation. Android, Android TV, Google Play, Google, YouTube and the Google logo are registered trademarks of Google LLC, used with permission. Netflix and the Netflix logo are registered trademarks of Netflix Inc., used with permission. All other trademarks are trademarks of their respective owners. Features and specifications are subject to change without notice. Screen images simulated.
]]>SONY CFI-1102A PlayStation 5 Gaming Console

Attach the base.
Always attach the base to the console, whether it’s in the vertical or horizontal position. Place your console on a flat surface when attaching the base.
You’ll need to reconfigure the base for the position of your console. Rotate the top and bottom part of the base in opposite directions. Keep rotating until you hear a “click”.
For the vertical position
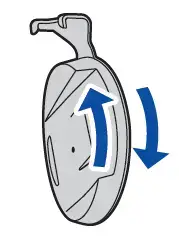
- Place the console with the rear side facing up, and then remove the screw hole cap.
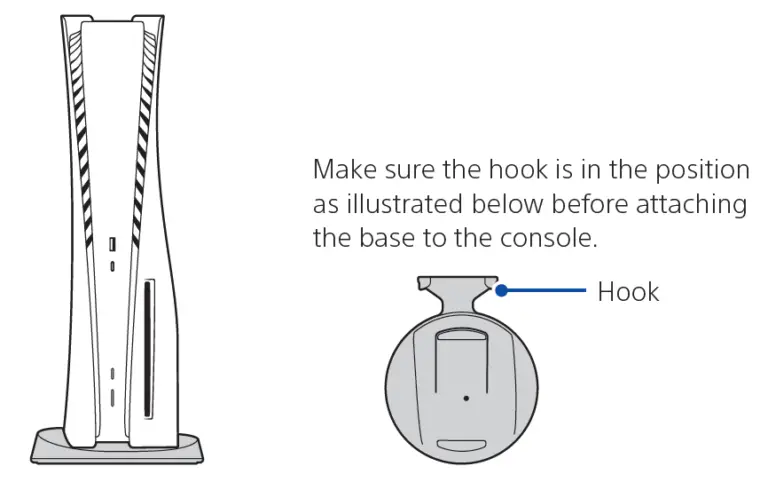
- Attach the screw hole cap to the bottom of the base.
- Remove the screw from the bottom of the base.
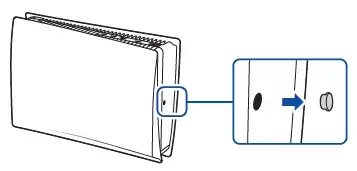
- Attach the base, and then secure with the screw using your hand. You can also use a coin to tighten the screw.
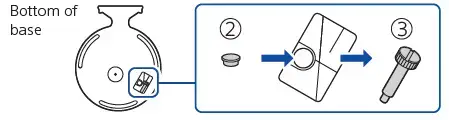
For the horizontal position
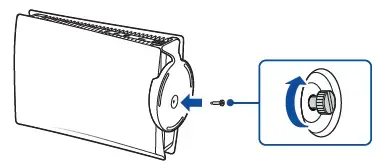
Place the console with the rear side facing up. Align the base with the marked area on the console, and press the base in firmly.
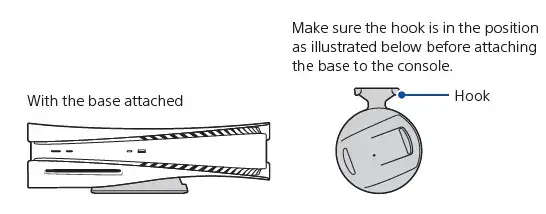
Connect the HDMI cable and the AC power cord.
Use the included cables. Make all connections before plugging the AC power cord into an electricity supply.
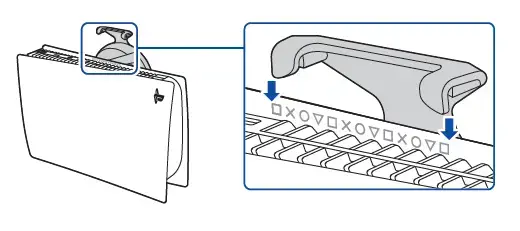
Connect the LAN cable.
For a wired connection to the internet, use a LAN cable (not included). If you’re going to use Wi-Fi®, don’t connect a LAN cable and skip to the next step.
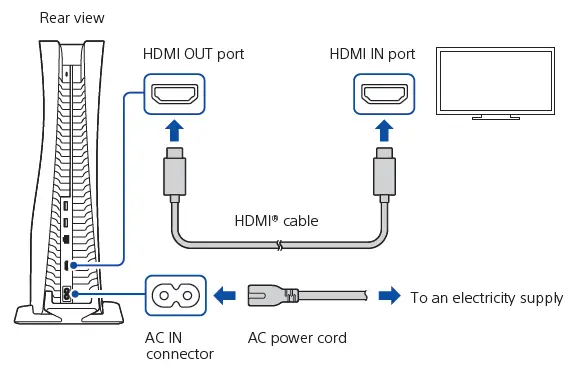
Turn on your TV and set the input to HDMI
Turn on your PlayStation®5 console by pressing the (power) button.
The power indicator blinks blue, and then turns white.
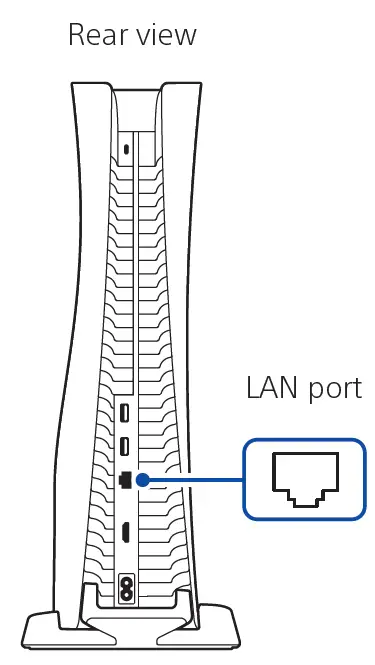
If you leave the console idle for 60 seconds after you turn it on, the screen reader turns on. You can listen to on-screen text and other important information read aloud to help you accomplish what you want to do. Screen reader is available only in certain languages.
Connect your wireless controller to your console using a USB cable, and then press the (PS) button.
To pair your controller, connect it with a USB cable to the USB port on your console. When you press the (PS) button, the controller turns on.
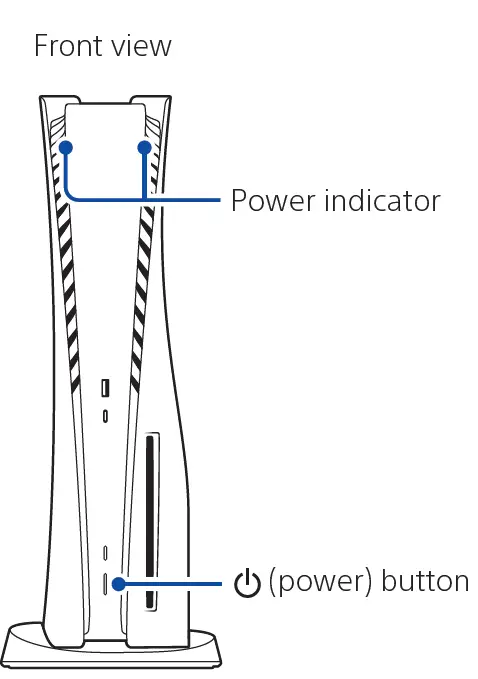
Make it your own
You’re almost done! Follow the on-screen instructions to
- Set up your console
Select your language, configure your internet connection settings, and manage your power save settings.
To save energy while powered-down, your console is set to Low Power Use in rest mode. See also “Put your console in rest mode” (page 12). - Set up your account
Create a new account or sign in with an existing account, such as one you created on a PlayStation®4 console. See also “For PS4 users” (page 6). - Download your content: Download purchased PS5™ games and media apps. If you have a PS4™ console, you can transfer the data to your PS5 console.
You’ll know that setup is complete when Welcome to PlayStation 5 appears on your screen. Will a child be using your PS5 console? See also “Parental control. - The setup options that you see are tailored to your needs, based on information such as your network environment and the account that you’re signed into.
- You can go back and change any of your settings by selecting Settings from the home screen.
For PS4 users
Play some PS4 games on your PS5 console
Enjoy supported PS4 games* on your PS5 console.
* Some functionalities available on the PS4 console may be absent when played on the PS5 console. You must update to the latest system software version. Internet connection required.
Transfer data from a PS4 console to your PS5 console
Connect your PS4 console and PS5 console to the same network to transfer data such as game save data, user information, and downloaded content.
If you have a USB drive that you’ve been using as USB extended storage for your PS4 console, you can continue using it by simply connecting it to your PS5 console.
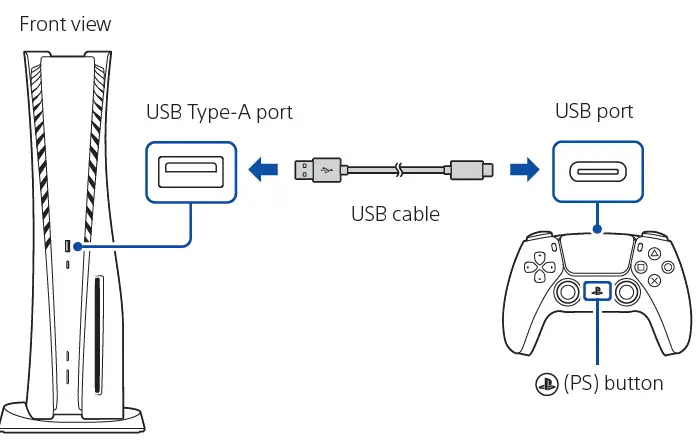
Use the same account you created on a PS4 console
There’s no need to create a new account for your PS5 console. Just sign in with your existing account and your game history, trophies, profile, and any exchanges you’ve had with friends will transfer to your PS5 console.

Parental controls
You can manage settings for children who use your PS5 console. Parental controls let you set restrictions on the games children can play, when and how long they play, whether or not they can chat, and more. Each adult () and child () will need their own separate accounts. When you create an account for a child, it’s automatically linked to your account, creating a family. You can set parental controls only for children in your family.
You can use an existing account, such as one you created on a PS4 console, for your PS5 console. Your family and parental control settings will carry over to your PS5 console.
Create an account for a child
You can create a child account and set parental controls at the same time. Press the (PS) button to open the control centre. Select your profile picture, then select Switch User. From the user selection screen, select Add User to create an account. Review and change your parental control settings We recommend that you check the child’s parental controls regularly. You can review or update them by selecting Settings > Family and Parental Controls from the home screen.
Game rating icons
Each game comes with a game rating icon that helps you determine whether it’s age-appropriate for the child.
Australia
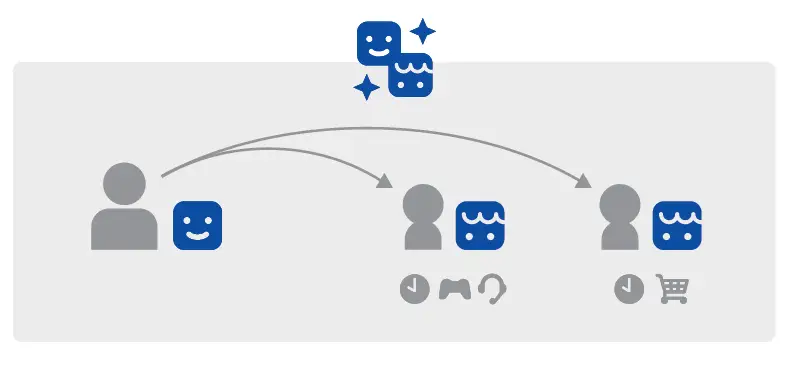
New Zealand

Find out more about parental control features and setup in the User’s Guide
What’s on the screen
Home screen
From the home screen, you can go to two types of content: games or media. In the games home, you’ll find your games, PlayStation™Store, and other game-related apps. In the media home, you’ll find music, video, and other non-game related apps.
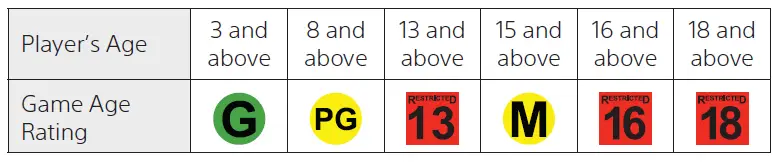
- On the PS5 console, the button confirms selected items.
- To return to the home screen while your game or app is running, select Home from the control centre, or press and hold the (PS) button on your controller.
Control centre
Press the (PS) button to open the control centre. You can access a variety of features without leaving your game or app.
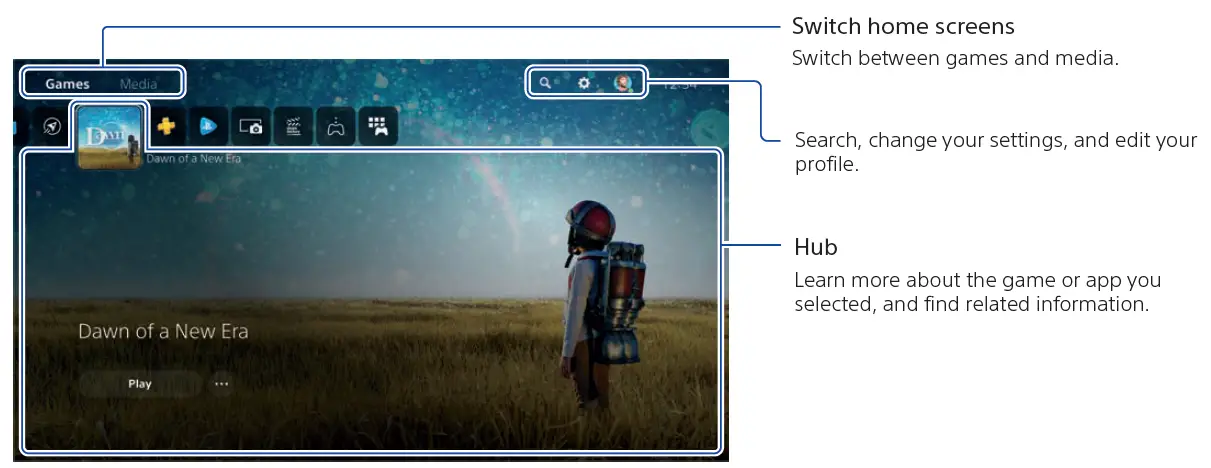
Let’s play
Play a game from a disc
Insert the disc. Game data will start copying, and you’ll get a notification when the game is ready to play. Select the game from your games home.
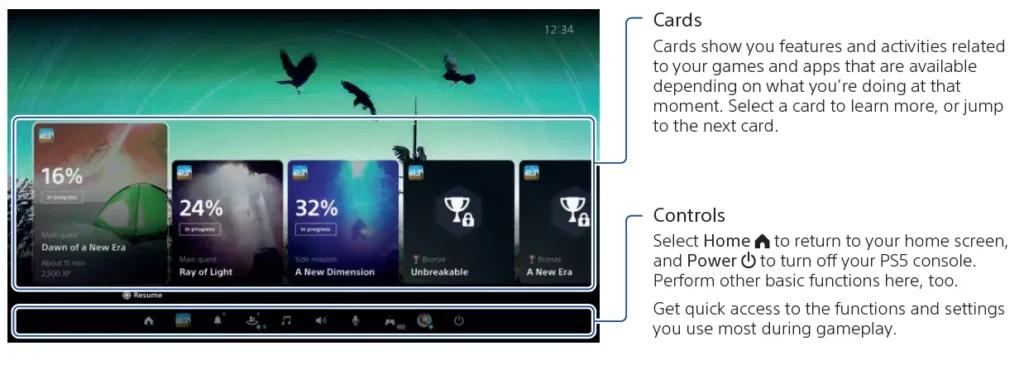
Play a digital game
You can play a game that you downloaded from PlayStation Store . You’ll get a notification when the game is downloaded and ready to play. Select the game from your games home.
- •To purchase and download games, you’ll need to connect your console to the internet and sign in to your account.
- PlayStation™Network and PlayStation Store subject to terms of use and country and language restrictions. Users are responsible for internet service fees. Charges apply for some content and / or services. Users must be 7 years or older and users under 18 require parental consent. Additional age restrictions may apply. Service availability is not guaranteed. Online features of specific games may be withdrawn on reasonable notice – playstation.com/gameservers.
Full terms apply: PSN Terms of Service at playstation.com/legal.
Use your controller
Charge your controller
With your PS5 console turned on or in rest mode, use a USB cable to connect your controller to the console. When your console is in rest mode, the light bar on your controller slowly blinks orange. After charging is complete, the light bar turns off.
Mute your microphone
Each time you press the mute button, your mic switches between muted (button lit) and unmuted (button off). Press and hold the mute button to mute your mic and to turn off sound output from the speakers on your controller and TV. Press the mute button again to return to the original state.

Use multiple controllers
You can use up to 4 controllers at once. Press the (PS) button to assign numbers to your controllers. The player indicator lights turn on accordingly. Numbers are assigned in order from 1, and you can determine your controller’s number by the number of lights that turn on.
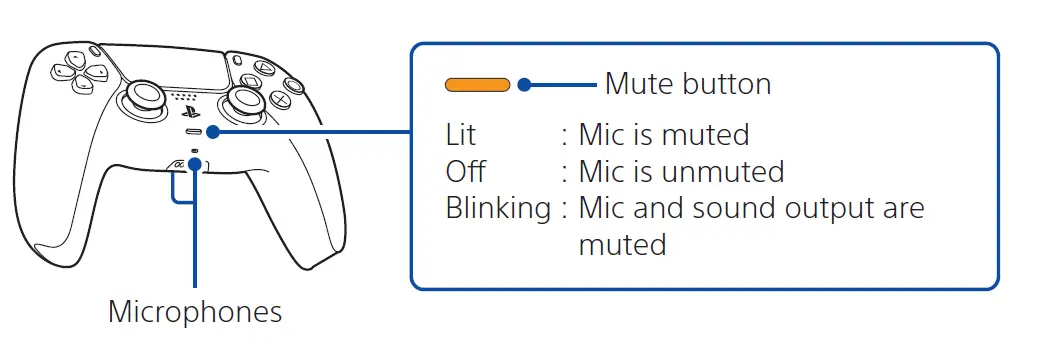
- You’ll need to pair your controller when you use it for the first time.
- When you play a PS4 game, your controller’s light bar glows blue, red, green, or pink based on the order that the controller is connected. This is separate from the player indicator.
Turn on your PS5 console with a controller
Press the (PS) button on a controller that has finished pairing to turn on your PS5 console.
Shutting down
Caution: Disconnect the AC power cord from the electricity supply only when the power indicator is off. If you disconnect it while the power indicator is on solidly or blinking, data might be lost or become corrupted, and you might damage your console.
Put your console in rest mode
Your PS5 console’s power saving mode is called rest mode. You can do things like charge your controller via the console’s USB ports, automatically update your system software, and keep your game or app suspended while powered down. To find out which rest mode settings are optimal for you, see the User’s Guide Select Power from the control centre, and then select Enter Rest Mode. The power indicator blinks white, and then turns orange. To exit rest mode, press the (PS) button.
Turn off your console completely
Select Power from the control centre, and then select Turn Off PS5. The power indicator blinks white, and then the console turns off.
Power indicator
- White: Console is on.
- Orange: Console is in rest mode.
- Off: Console is off.
Further information
Safety Guide
Learn how to use your PS5 console safely with the supplied Safety Guide. This printed manual also contains product warranty terms and information about specifications. Be sure to read it before using your console.
User’s Guide
Find out about everything your PS5 console can do. Learn how to configure settings and how to use each function. From your PS5 console’s home screen, go to Settings > User’s Guide, Health and Safety, and Other Information > User’s Guide.
Customer Support Website
Find online support information such as step by step troubleshooting and frequently asked questions by visiting playstation.com/help.
Charging the headset
- Set the headset into the charging case.
- Connect the charging case to an AC outlet. Use the supplied USB Type-C cable and a commercially available USB AC adaptor. The indicator (orange) on the charging case lights up. and charging starts on the headset and the charging case.
When charging of the headset and the charging case is complete. the indicator (orange) on the charging case turns off automatically. Remove the USB Type-C cable.
Wearing the headset
- Hold the headset with your fingers.

- Twist the headset unit to fit it snugly into the ear canal. and adjust the positioning of the headset unit until it fits comfortably.

Pairing and connecting to Bluetooth devices
- Put the headset into the charging case.
- Open the cover of the case, then hold the Pairing button on the cover for 5 seconds. The LED on the charging case flashes blue.
- Remove the headset from the case and wear it.
- Set Bluetooth function to ON on your Android smartphone/iPhone.
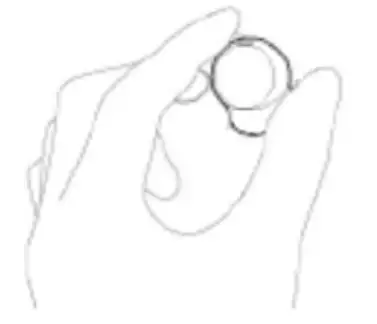
- Touch [YY2950]
You will hear the voice guidance say, “Bluetooth connected”, from both headset units.
Listening to music via a Bluetooth connection
- Wear the headset.
- Operate the touch sensor of the headset.
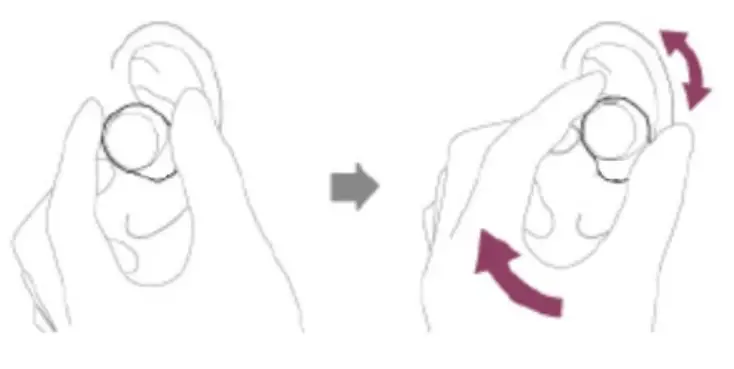 |
Tap the touch sensor on the right once |
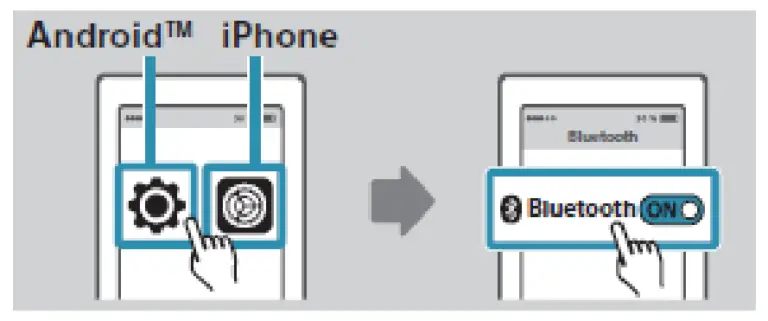 |
Tap the touch sensor on the right twice |
 |
Operate the Bluetooth device to start playback and adjust the volume to a moderate level. |
Receiving a call
- Connect the headset to a smartphone or mobile phone via Bluetooth connection beforehand.
- When you hear a ring tone, tap the touch sensor on the left or right unit of the headset twice (with an interval of about 0.3 seconds) and receive the call.
- When you finish talking. tap the touch sensor on the left or right unit of the headset twice (with an interval of about 0.3 seconds) to end the call.
To reject a call
When you hear a ring tone. hold your finger to the touch sensor for about 2 seconds.
Using the voice assist function
- Put the headset units into your ears and connect the headset to the smartphone via Bluetooth connection.
- Hold your finger to the touch sensor on the right unit for about 2 seconds. The voice command is canceled when a certain time has passed without requests.
SONY HT-A9-SA-RS5 Wireless Rear Speakers

MOUNTING INSTRUCTIONS
WARNING
- Do not begin to install your Vebos product until you have sread and understood the instructions and warnings contained in this installation manual. If you have any questions regarding any of the instructions or warnings, please contact Vebos.
- This product should only be installed if you have good mechanical understanding and experience with basic building construction. Make sure you fully understand these instructions.
- Make sure that the supporting surface is in good condition and will safely support the combined load of the equipment and all attached hardware and components.
- This support is specially designed for Sony HT-A9 – SA-RS5. Do not use it for any other application.
- Always use an assistant or mechanical lifting equipment to safely lift and position equipment. • Tighten screws firmly, but do not overtighten. Over-tightening can damage the screws, greatly reducing their holding power.
- This product is intended for indoor use only. Use of this product outdoors could lead to product failure and personal injury.
Address: Vebos Hoofdstraat 61 7921AC Zuidwolde the Netherlands
[email protected]
5-013-892-41(1)
Wireless Noise Cancelling Stereo Headset
Reference Guide

https://rd1.sony.net/help/mdr/whch710n/h_zz/
©2020 Sony Corporation
Printed in Vietnam
https://www.sony.net/
WH-CH710N
![]()
![]()
![]()
[A]
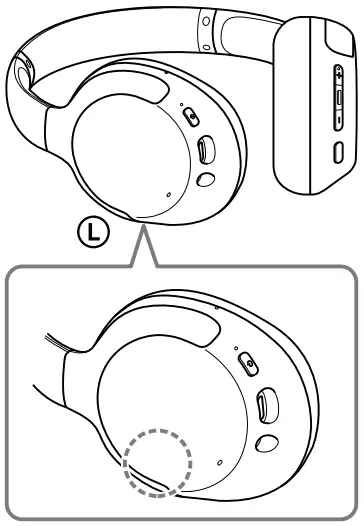
[B]
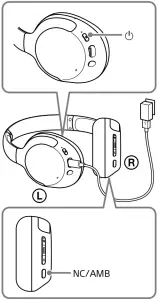
[C]
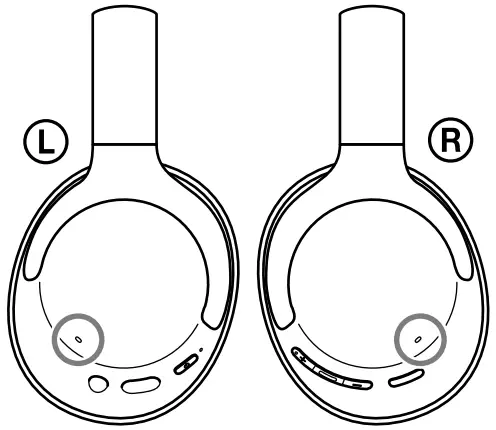
[D]
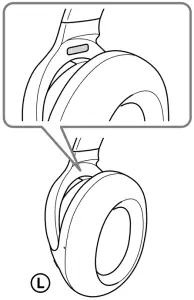
________________________________
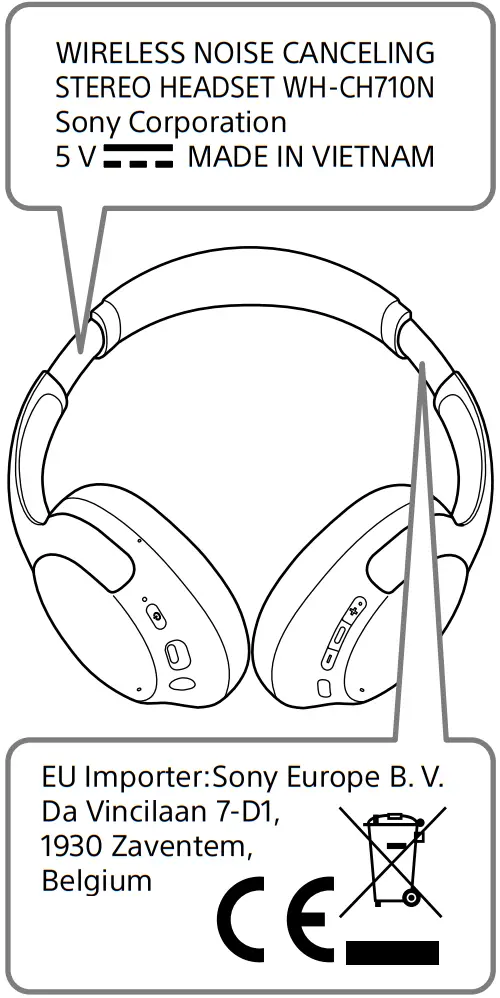
Wireless Noise Cancelling Stereo Headset
Do not install the appliance in a confined space, such as a bookcase or built-in cabinet.
Do not expose the batteries (battery pack or batteries installed) to excessive heat such as sunshine, fire or the like for a long time.
Do not subject the batteries to extreme low temperature conditions that may result in overheating and thermal runaway.
Do not dismantle, open or shred secondary cells or batteries.
Do not expose cells or batteries to heat or fire. Avoid storage in direct sunlight. In the event of a cell leaking, do not allow the liquid to come in contact with the skin or eyes. If contact has been made, wash the affected area with copious amounts of water and seek medical advice.
Secondary cells and batteries need to be charged before use. Always refer to the manufacturer’s instructions or equipment manual for proper charging instructions.
After extended periods of storage, it may be necessary to charge and discharge the cells or batteries several times to obtain maximum performance. Dispose of properly.
This equipment has been tested and found to comply with the limits set out in the EMC regulation using a connection cable shorter than 3 meters.
Only the supplied headphone cables can be used with these headphones.
Notice for customers: the following information is only applicable to equipment sold in countries applying EU directives
This product has been manufactured by or on behalf of Sony Corporation. EU Importer: Sony Europe B.V. Inquiries to the EU Importer or related to product compliance in Europe should be sent to the manufacturer’s authorized representative, Sony Belgium, bijkantoor van Sony Europe B.V., Da Vincilaan 7-D1, 1930 Zaventem, Belgium.
Hereby, Sony Corporation declares that this equipment is in compliance with Directive 2014/53/EU.
The full text of the EU declaration of conformity is available at the following internet address: http://www.compliance.sony.de/


Disposal of waste batteries and electrical and electronic equipment (applicable in the European Union and other countries with separate collection systems)
This symbol on the product, the battery or on the packaging indicates that the product and the battery shall not be treated as household waste. On certain batteries this symbol might be used in combination with a chemical symbol. The chemical symbol for lead (Pb) is added if the battery contains more than 0.004% lead. By ensuring that these products and batteries are disposed of correctly, you will help to prevent potentially negative consequences for the environment and human health which could be caused by inappropriate waste handling. The recycling of the materials will help to conserve natural resources. In case of products that for safety, performance or data integrity reasons require a permanent connection with an incorporated battery, this battery should be replaced by qualified service staff only. To ensure that the battery and the electrical and electronic equipment will be treated properly, hand over these products at end-of-life to the appropriate collection point for the recycling of electrical and electronic equipment. For all other batteries, please view the section on how to remove the battery from the product safely. Hand the battery over to the appropriate collection point for the recycling of waste batteries. For more detailed information about recycling of this product or battery, please contact your local Civic Office, your household waste disposal service or the shop where you purchased the product or battery.
The validity of the CE marking is restricted to only those countries where it is legally enforced, mainly in the countries EEA (European Economic Area) and Switzerland.
High volume may affect your hearing.
Do not use the unit while walking, driving or cycling. Doing so may cause traffic accidents.
Do not use at a dangerous place unless the surrounding sound can be heard.
The unit is not waterproof. If water or foreign objects enter the unit, it may result in fire or electric shock. If water or a foreign object enters the unit, stop use immediately and consult your nearest Sony dealer. In particular, be careful in the following cases.
– When using the unit around a sink, etc. Be careful that the unit does not fall into a sink or container filled with water.
– When using the unit in the rain or snow, or in humid locations
– When using the unit while you are sweaty
If you touch the unit with wet hands, or put the unit in the pocket of a damp article of clothing, the unit may get wet.
For details on the effect of contact to the human body from the mobile phone or other wireless devices connected to the unit, refer to the instruction manual of the wireless device.
Never insert the USB plug when the main unit or charging cable is wet. If the USB plug is inserted while the main unit or charging cable is wet, a short circuit may occur due to the liquid (tap water, seawater, soft drink, etc.) attached to the main unit or charging cable or due to foreign matter, and cause abnormal heat generation or malfunction.
This product (including accessories) has magnet(s) which may interfere with pacemakers, programmable shunt valves for hydrocephalus treatment, or other medical devices. Do not place this product close to persons who use such medical devices. Consult your doctor before using this product if you use any such medical device.
Note on static electricity
Static electricity accumulated in the body may cause mild tingling in your ears. To reduce the effect, wear clothes made from natural materials, which suppress the generation of static electricity.
Precautions
On BLUETOOTH® communications
- Bluetooth wireless technology operates within a range of about 10 m. The maximum communication distance may vary depending on the presence of obstacles (people, metal objects, walls, etc.) or the electromagnetic environment.
- Bluetooth communications may not be possible, or noise or audio dropout may occur under the following conditions:
– When there is a person between the unit and the Bluetooth device. This situation may be improved by positioning the Bluetooth device so that it faces the aerial of the unit.
– When there is an obstacle, such as a metal object or a wall, between the unit and the Bluetooth device.
– When a Wi-Fi device or microwave oven is in use, or microwaves are emitted near the unit.
– Compared to use indoors, use outdoors is subjected little to signal reflection from walls, floors, and ceilings, which results in audio dropout occurring more frequently than use indoors.
– The aerial is built into the unit as indicated by the dotted line in the illustration (Fig. [A]). The sensitivity of the Bluetooth communications can be improved by removing any obstacles between the connected Bluetooth device and the aerial of this unit. - Bluetooth and Wi-Fi (IEEE802.11b/g/n) devices use the same frequency (2.4 GHz). When using the unit near a Wi-Fi device, electromagnetic interference may occur, resulting in noise, audio dropout, or the inability to connect. If this happens, try performing the following remedies:
– Establish a connection between the unit and the Bluetooth device when they are at least 10 m away from the Wi-Fi device.
– Turn off the Wi-Fi device when using the unit within 10 m of the Wi-Fi device.
– Position the unit and the Bluetooth device as near as possible to each other. - Microwaves emitting from a Bluetooth device may affect the operation of electronic medical devices. Turn off this unit and other Bluetooth devices in the following locations, as it may cause an accident:
– in hospitals, near priority seating in trains, locations where inflammable gas is present, near automatic doors, or near fire alarms. - The audio playback on this unit may be delayed from that on the transmitting device, due to the characteristics of Bluetooth wireless technology. As a result, the sound may not be in sync with the image when viewing movies or playing games.
- This product emits radio waves when used in wireless mode. When used in wireless mode on an airplane, follow flight crew directions regarding permissible use of products in wireless mode.
- The unit supports security functions that comply with the Bluetooth standard as a means of ensuring security during communication using Bluetooth wireless technology.
However, depending on the configured settings and other factors, this security may not be sufficient. Be careful when communicating using Bluetooth wireless technology. - Sony shall assume no responsibility for any damages or loss resulting from information leaks that occur when using Bluetooth communications.
- Connection with all Bluetooth devices cannot be guaranteed.
– Bluetooth devices connected with the unit must comply with the Bluetooth standard prescribed by Bluetooth SIG, Inc., and must be certified as compliant.
– Even when a connected device complies with the Bluetooth standard, there may be cases where the characteristics or specifications of the Bluetooth device make it unable to connect, or result in different control methods, display, or operation.
– When using the unit to perform hands-free talking on the phone, noise may occur depending on the connected device or the communication environment. - Depending on the device to be connected, it may require some time to start communications.
If sound skips frequently during playback
- The situation may be improved by changing the wireless playback quality settings or fixing the wireless playback mode to SBC on the transmitting device. For details, refer to the operating instructions supplied with the transmitting device.
- When listening to music from a smartphone, the situation may be improved by closing unnecessary apps or restarting the smartphone.
On the use of calling apps for smartphones and computers
- This unit supports normal incoming calls only. Calling apps for smartphones and computers are not supported.
On charging the unit
- This unit can be charged using USB only. A computer with a USB port or a USB AC adaptor is required for charging.
- Be sure to use the supplied USB Type-C cable.
- When charging, the unit cannot be turned on and the Bluetooth and noise cancelling functions cannot be used.
- If the unit is not used for a long time, the rechargeable battery may become depleted quickly. The battery will be able to hold a proper charge after it is discharged and recharged several times. When storing the unit for a long time, charge the battery once every six months to prevent over-discharge.
- If the rechargeable battery becomes depleted extremely quickly, it should be replaced with a new one. Please contact your nearest Sony dealer for a battery replacement.
If the unit does not operate properly
- Follow the procedure below to reset the unit (Fig. [B]).
Press the and NC/AMB buttons simultaneously while the unit is charging. The unit is reset. When the unit is reset, the pairing information in the unit is not deleted.
 - If the problem persists even after the unit is reset, perform the procedure below to initialize the unit.
Disconnect the USB Type-C cable and turn off the unit. Press and hold the and
and  buttons simultaneously for at least 7 seconds. The indicator (blue) flashes 4 times, the unit is initialized, and the unit is reset to the factory settings. When the unit is initialized, all pairing information is deleted.
 - After the unit is initialized, it may not connect to your iPhone or computer. If this happens, delete the pairing information of the unit from the iPhone or computer, and then pair them again.
On the noise cancelling function
- The noise cancelling function senses external ambient noise (such as the noise inside a vehicle or the sound of air conditioning inside a room) with built-in microphones, and produces an equal-but-opposite sound that cancels out the ambient noise.
– The noise cancelling effect may not be pronounced in a very quiet environment, or some noise may be heard.
– The noise cancelling function works for noise in the low frequency band primarily. Although noise is reduced, it is not cancelled completely.
– When you use the unit in a train or a car, noise may occur depending on street conditions.
– Mobile phones may cause interference and noise. Should this occur, locate the unit further away from the mobile phone.
– Depending on how you wear the unit, the noise cancelling effect may vary or a beeping sound (howling) may occur. If this happens, take off the unit and put it back on again.
– Do not cover the microphones of the unit with your hands or other objects. Doing so may prevent the noise cancelling function or the Ambient Sound Mode from working properly, or may cause a beeping sound (howling) to occur. If this happens, take your hands or other object off of the microphones of the unit (Fig. [C]).
Notes on wearing the unit
- Because the headphones achieve a tight seal over the ears, forcibly pressing them against your ears or quickly pulling them off can result in eardrum damage. When wearing the headphones, the speaker diaphragm may produce a click sound. This is not a malfunction.
Other notes
- Do not subject the unit to excessive shock.
- When you use the unit as wired headphones, use the supplied headphone cable only. Make sure that the headphone cable is firmly inserted.
- The Bluetooth function may not work with a mobile phone, depending on the signal conditions and the surrounding environment.
- Do not apply weight or pressure to the unit for long periods, including when it is stored, as it may cause deformation.
- If you experience discomfort while using the unit, stop using it immediately.
- The earpads may be damaged or deteriorate with long-term use and storage.
Cleaning the unit
- When the outside of the unit is dirty, clean it by wiping with a soft dry cloth. If the unit is particularly dirty, soak a cloth in a dilute solution of neutral detergent, and wring it well before wiping. Do not use solvents such as thinner, benzene, or alcohol, as they may damage the surface.
- If you have any questions or problems concerning this unit that are not covered in this manual, please consult your nearest Sony dealer.
Replacement parts: earpads Please consult your nearest Sony dealer for information about replacement parts.
Location of the serial number label
See Fig. [D]
Specifications
Headset
Power source:
DC 3.7 V: Built-in lithium-ion rechargeable battery
DC 5 V: When charged using USB
Operating temperature:
0 °C to 40 °C
Rated power consumption:
2.0 W
Usage hours:
When connecting via the Bluetooth device
Music playback time:
Max. 35 hours (NC ON),
Max. 40 hours (Ambient Sound Mode), Max. 45 hours (NC OFF)
Communication time:
Max. 35 hours (NC ON),
Max. 35 hours (Ambient Sound Mode), Max. 40 hours (NC OFF)
Standby time: Max. 35 hours
(NC ON), Max. 40 hours
(Ambient Sound Mode),
Max. 200 hours (NC OFF)
When connecting via the headphone cable with NC ON:
Max. 50 hours
Note: Usage hours may be shorter depending on the Codec and the conditions of use.
Charging time:
Approx. 7 hours
(About 60 minutes of music playback is possible after 10 minutes charging.)
Note: Charging and usage hours may be different depending on the conditions of use.
Charging temperature:
5 °C to 35 °C
Mass:
Approx. 223 g
Impedance:
72 Ω (1 kHz) (when connecting via the headphone cable with the unit turned on)
33 Ω (1 kHz) (when connecting via the headphone cable with the unit turned off)
Sensitivity:
94 dB/mW (when connecting via the headphone cable with the unit turned on)
100 dB/mW (when connecting via the headphone cable with the unit turned off)
Frequency response:
7 Hz – 20,000 Hz (JEITA) (when connecting via the headphone cable with the unit turned on)
Included items:
Wireless Noise Cancelling Stereo Headset (1)
USB Type-C® cable (USB-A to USB-C®) (approx. 20 cm) (1)
Headphone cable (approx. 1.2 m) (1)
Communication specification
Communication system:
Bluetooth Specification version 5.0
Output:
Bluetooth Specification Power Class 2
Maximum communication range:
Line of sight approx. 10 m¹)
Frequency band:
2.4 GHz band (2.4000 GHz – 2.4835 GHz)
Operating frequency:
Bluetooth: 2,400 MHz – 2,483.5 MHz
NFC: 13.56 MHz
Maximum output power:
Bluetooth: < 4 dBm
Compatible Bluetooth profiles²):
A2DP / AVRCP / HFP / HSP
Supported Codec³):
SBC / AAC
Transmission range (A2DP):
20 Hz – 20,000 Hz (Sampling frequency 44.1 kHz)
1) The actual range will vary depending on factors such as obstacles between devices, magnetic fields around a microwave oven, static electricity, reception sensitivity, aerial’s performance, operating system, software application, etc.
2) Bluetooth standard profiles indicate the purpose of Bluetooth communications between devices.
3) Codec: Audio signal compression and conversion format
Design and specifications are subject to change without notice.
System requirements for battery charge using USB
USB AC adaptor
A commercially available USB AC adaptor capable of supplying an output current of 0.5 A (500 mA) or more
Trademarks
- iPhone and iPod touch are trademarks of Apple Inc., registered in the U.S. and other countries.
- Android is a trademark of Google LLC.
- The Bluetooth® word mark and logos are registered trademarks owned by the Bluetooth SIG, Inc. and any use of such marks by Sony Corporation is under license.
- The N-Mark is a trademark or registered trademark of NFC Forum, Inc. in the United States and in other countries.
- USB Type-C® and USB-C® are registered trademarks of USB Implementers Forum.
- Other trademarks and trade names are those of their respective owners.
Notes on the License
This product contains software that Sony uses under a licensing agreement with the owner of its copyright. We are obligated to announce the contents of the agreement to customers under requirement by the owner of copyright for the software.
Please access the following URL and read the contents of the license. https://rd1.sony.net/help/mdr/sl/20/
Disclaimer regarding services offered by third parties
Services offered by third parties may be changed, suspended, or terminated without prior notice. Sony does not bear any responsibility in these sorts of situations.
]]>SONY Home Theatre System Instruction Manual
Operating Instructions
About These Operating Instructions
- The instructions in these Operating Instructions describe the controls on the remote control.
- Some illustrations are presented as conceptual drawings, and may be different from the actual products.
- The default settings are underlined on each feature description.
- Characters in brackets [ ] appear in the front panel display or on the TV screen.
Installation and Connection
Connecting a TV with an HDMI Cable and/or Optical Cable
Refer to Startup Guide (separate document).
Mounting the Bar Speaker and Surround Speakers on a Wall
You can mount the bar speaker and surround speakers on a wall.
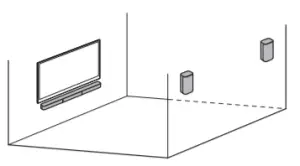
Notes
- Prepare screws (not supplied) that are suitable for the wall material and As a plasterboard wall is especially fragile, attach the screws securely in the wall beam. Install the speakers horizontally, hung by screws in studs in a continuous flat section of the wall.
- Have the installation done by a Sony dealer or licensed contractor and pay special attention to safety during the installation.
- Sony shall not be held responsible for accidents or damage caused by improper installation, insufficient wall strength, improper screw installation or natural disaster, etc.
Mounting the Bar Speaker on a Wall
- Prepare two screws (not supplied) that are suitable for the wall mount holes on the rear of the bar speaker.
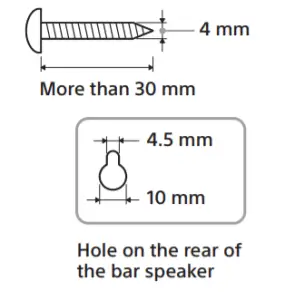
- Stick WALL MOUNT TEMPLATE (supplied) on a wall.
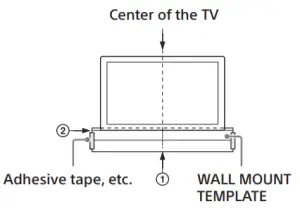
1 Align TV CENTER LINE (1) of WALL MOUNT TEMPLATE with the center line of your TV.
2 Align TV BOTTOM LINE (2) of WALL MOUNT TEMPLATE with the bottom of your TV, then stick WALL MOUNT TEMPLATE on a wall by using a commercially available adhesive tape, etc. - Fasten the screws into the marks (A) on SCREW LINE (3) of WALL MOUNT TEMPLATE as in the illustration below.
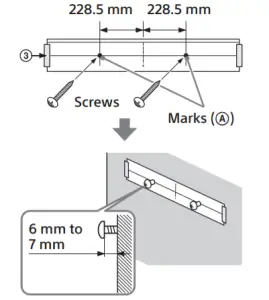
The screw should protrude as in the illustration. - Remove WALL MOUNT TEMPLATE.
- Hang the bar speaker on the screws. Align the holes on the rear of the bar speaker with the screws, then hang the bar speaker on the two screws.
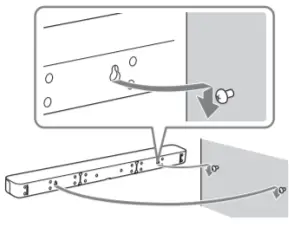
Note When sticking WALL MOUNT TEMPLATE, smooth it out fully.
Mounting the Surround Speakers on a Wall
- Prepare a screw (not supplied) for each speaker that is suitable for the wall mount hole on the rear of the surround speaker.
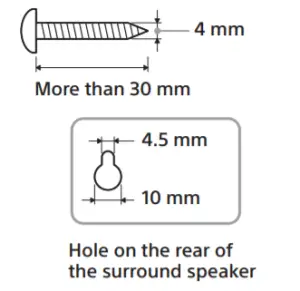
- Fasten the screw into the wall. The screw should protrude as in the illustration.
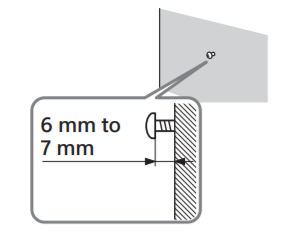
- Hang the surround speaker on the screw. Align the hole on the rear of the surround speaker with the screw, then hang the surround speaker on the screw.
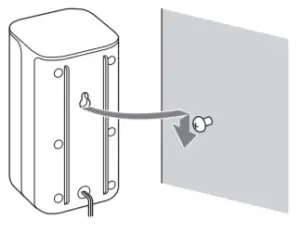
Parts and Controls
What’s in the Box
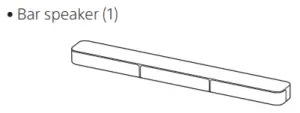
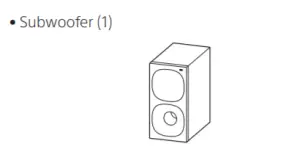
Guide to Parts and Controls
Details are omitted from the illustrations.
Subwoofer
 (power) button
Turns on the system or sets it to standby mode.- (input select) button
- BLUETOOTH button
- +/– (volume) buttons
- BLUETOOTH indicator
— Lights in blue: BLUETOOTH connection has been established.
— Flashes slowly in blue repeatedly: BLUETOOTH connection is being attempted.
— Flashes twice in blue repeatedly: During pairing standby status. - Front panel display
- (USB) port
- Remote control sensor Point the remote control at the remote control sensor to operate the system.
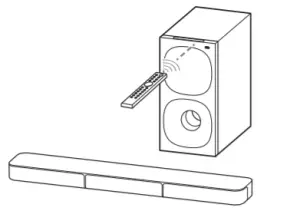
Rear
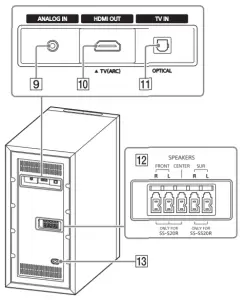
- ANALOG IN jack
- HDMI OUT (TV (ARC)) jack Connect a TV that has an HDMI input jack with an HDMI cable. The system is compatible with Audio Return Channel (ARC). ARC is the function that sends TV sound to an AV device such as the system from the TV’s HDMI jack.
- TV IN (OPTICAL) jack
- SPEAKERS jacks
- AC inlet
Remote Control
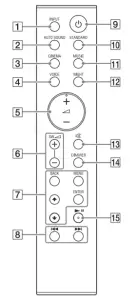
- INPUT
Selects the input source.
Each time you press INPUT, the input source
changes cyclically as follows.
[TV]  [ANALOG] [BT] [USB]
 - AUTO SOUND
Selects AUTO SOUND for the sound mode. - CINEMA
Selects CINEMA for the sound mode. - VOICE
Turns on/off the voice mode.  (volume) +*/–
Adjusts the volume.- SW (subwoofer volume) +/–
Adjusts the subwoofer volume. - MENU
Turns on/off the menu in the front panel
display.
Selects the menu items.
Selects the content on the TV screen for USB
playback.
ENTER
Enters the selection.
Plays the content that is selected by for USB playback.
BACK
Returns to the previous display.
Stops USB playback.  (previous/next)
Selects the previous/next track or file.
Hold down to search backward or forward for
USB playback.- (power)
Turns on the system or sets it to standby
mode. - STANDARD
Selects STANDARD for the sound mode. - MUSIC
Selects MUSIC for the sound mode. - NIGHT
Turns on/off the night mode.  (muting)
Mutes the sound temporarily.
Pressing the button while muting cancels
muting.- DIMMER
Adjusts the brightness of the front panel
display and BLUETOOTH indicator.
Each time you press DIMMER, the brightness setting changes cyclically as follows.
[BRIGHT][DARK] [OFF]
The front panel display and BLUETOOTH indicator light up in the following statuses even if you set the brightness setting to [OFF].
— When operating the system
— For 10 seconds after you stop operating the system
— When displaying the system status, such as
mute, Auto Standby, etc.  (play/pause)*
Plays, pauses, or resumes playback.
* The+ and buttons have a tactile dot. Use it as a guide during operation.
About the replacement of batteries for the remote control
When the system does not respond by operating with the remote control, replace two batteries with new batteries. Use R03 (size AAA) manganese batteries for replacement.
Listening to Music/Sound
Listening to a TV
You can listen to TV sound on the system.
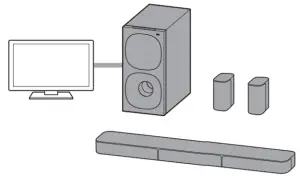
When Connecting to a TV with an HDMI Cable (ARC) or Optical Digital Cable
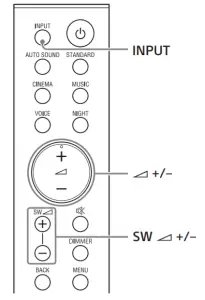
- Press INPUT repeatedly to select [TV] in the front panel display.
- Adjust the volume.
• Adjust the volume by pressing+/– on the remote control.
• Adjust the subwoofer volume by pressing SW +/– on the remote control.
Notes
- When you connect the TV to both the HDMI OUT (TV (ARC)) and TV IN (OPTICAL) jacks, the jack for audio input is selected depending on which audio signal is input first.
- When the input source does not contain much bass sound, such as in TV programs, the bass sound from the subwoofer may be difficult to hear.
Tip
You can also select the input by pressing on the subwoofer.
When Connecting to a TV with a Stereo Mini Cable

- Press INPUT repeatedly to select [ANALOG] in the front panel display.
- Adjust the volume.
• Adjust the volume by pressing+/– on the remote control.
• Adjust the subwoofer volume by pressing SW+/– on the remote control.
Note
When the input source does not contain much bass sound, such as in TV programs, the bass sound from the subwoofer may be difficult to hear.
Tip
You can also select the input by pressing on the subwoofer
Listening to Music on a USB Device
You can play music files stored on a connected USB device.
Notes
- To view the USB content list on the TV screen, make sure you connect the system to the TV using an HDMI cable.
- Change the input of the TV to the input to which the system is connected.
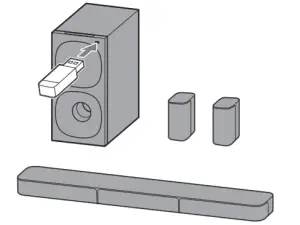
Listening to Music on a Connected USB Device
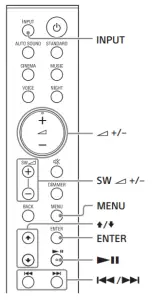
- Connect the USB device to the (USB) port.
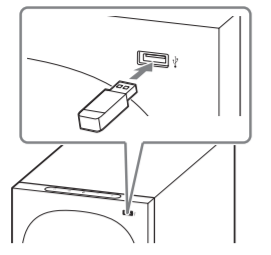
- Press INPUT repeatedly to select [USB] in the front panel display.
[READ] appears in the front panel display and the system starts reading data of the USB device. When the reading of data is completed, the USB content list appears on the TV screen. - Press to select the content you want, then press ENTER.
The selected content starts playing. - Adjust the volume.
• Adjust the volume by pressing+/– on the remote control.
• Adjust the subwoofer volume by pressing SW+/– on the remote control.
Note
When the input source does not contain much bass sound, such as in TV programs, the bass sound from the subwoofer may be difficult to hear.
To select the play mode
You can select the play mode for USB playback, such as repeat play or random play, from the menu.
- Press MENU.
The menu item appears in the front panel display. - Select [USB] – [REPEAT] by using /ENTER.
- Select the play mode by using /ENTER.
• [OFF]: Repeats off. Plays back all tracks.
• [ONE]: Repeats one track.
• [FOLDER]: Repeats all tracks in a current folder.
• [RANDOM]: Repeats all tracks in a current folder in random order.
• [ALL]: Repeats all tracks. - Press MENU to turn off the menu.
Other operations
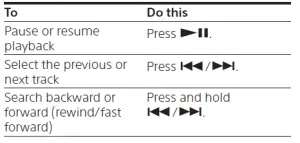
Notes
- Do not remove the USB device during operation. To avoid data corruption or damage to the USB device, turn the system off before connecting or removing the USB device.
- [INVALID USB] appears in the front panel display if you connect an unsupported or broken USB device.
- Depending on the file format, rewind and fast forward may not work.
Information of USB Device on the TV Screen
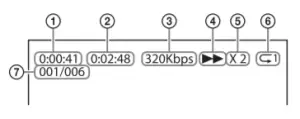
- Playing time
- Total playing time
- Bit rate
- Playback status
- Rewind/fast forward speed
- Play mode
- Selected file index/Total files in the folder
The following messages appear on the TV screen depending on the status of the USB device.
- [File Unsupported] Appears for 2 seconds at the bottom left side when an unsupported file is skipped.
- [Device Not Support]
— A USB device is not supported.
— Device inserted is a non-USB device, a bad
USB device, or a USB device that has no files on it. - [No USB]
No USB device is inserted. - [Waiting]
The system is searching the USB device. - [This device is empty]
There are no playable files in the USB device.
Notes
- Depending on the playback source, some information may not be displayed.
- Depending on the play mode, the information displayed may differ.
Listening to Music from a Mobile Device with the BLUETOOTH Function
You can listen to music stored on a mobile device such as a smartphone or tablet via a wireless connection by connecting the system and the mobile device with the BLUETOOTH function. When connecting to the mobile device with the BLUETOOTH function, you can operate by simply using the supplied remote control without turning the TV on.
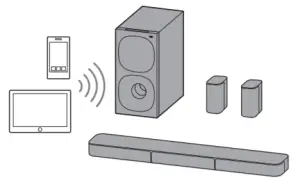
Pairing with a Mobile Device
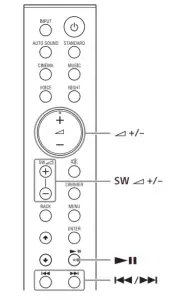
- Press and hold the BLUETOOTH button on the subwoofer for 2 seconds. The system enters the pairing mode and the BLUETOOTH indicator flashes twice repeatedly.
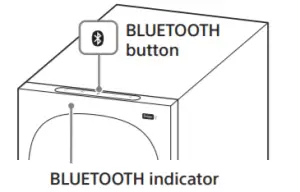
- On the mobile device, search for the system by performing the pairing operation. The list of the BLUETOOTH devices that are searched appears on the screen of the mobile device. For the operation method to pair the BLUETOOTH device to the mobile device, refer to the operating instructions of the mobile device.
- Pair the system and mobile device by selecting “HT-S20R” from the list on the screen of the mobile device. If a passkey is requested, enter “0000.”
- Make sure that the BLUETOOTH indicator on the subwoofer lights in blue. A connection between the system and mobile device has been established.
- Start audio playback with the music app on the connected mobile device. Sound is output from the system.
- Adjust the volume.
• Adjust the volume by pressing +/– on the remote control.
• Adjust the subwoofer volume by pressing SW
+/– on the remote control.
• and on the remote control can be used for the BLUETOOTH function. (Searching backward or forward by holding down does not work.)
Notes
- You can pair up to 10 BLUETOOTH devices. If an 11th BLUETOOTH device is paired, the oldest connected device will be replaced by the new one.
- Perform pairing for the second and subsequent mobile devices.
- When the input source does not contain much bass sound, such as in TV programs, the bass sound from the subwoofer may be difficult to hear.
Tips
- You can check the connection status of the BLUETOOTH function by checking the BLUETOOTH indicator status.
- While the BLUETOOTH input is being selected, the system enters the pairing mode by pressing the BLUETOOTH button on the subwoofer shortly.
Listening to Music of the Paired Mobile Device
- Turn the BLUETOOTH function of the mobile device to on.
- Press INPUT repeatedly to select [BT] or press the BLUETOOTH button on the subwoofer shortly. The BLUETOOTH indicator flashes and the system automatically reconnects to the BLUETOOTH device it was most recently connected to.
- Make sure that the BLUETOOTH indicator lights in blue. A connection between the system and mobile device has been established.
- Start audio playback with the music app on the connected mobile device. Sound is output from the system.
- Adjust the volume.
• Adjust the volume by pressing+/– on the remote control.
• Adjust the subwoofer volume by pressing SW+/– on the remote control.
• and on the remote control can be used for the BLUETOOTH function. (Searching backward or forward by holding down / does not work.)
Note
When the input source does not contain much bass sound, such as in TV programs, the bass sound from the subwoofer may be difficult to hear.
Adjusting the Sound
Enjoying the Sound Effect that is Tailored to Sound Sources (Sound Mode)
You can easily enjoy pre-programmed sound effects that are tailored to different kinds of sound sources.

Press AUTO SOUND, CINEMA, MUSIC, or STANDARD to select the sound mode. The selected sound mode appears in the front panel display.
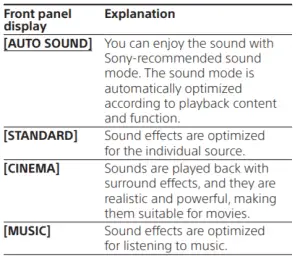
Making Dialogs Clearer (VOICE)
You can make dialogs clearer by setting the voice mode.
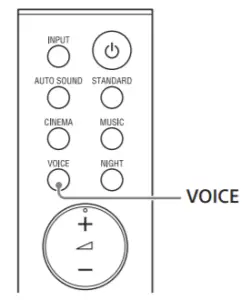
Press VOICE to set the function to on or off.
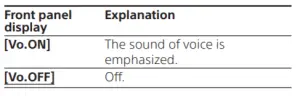
Enjoying Clear Sound with Low Volume at Midnight (NIGHT)
You can compress sound in accordance with the information contained in the content by setting the night mode to on. Sound is output at low volume with minimum loss of fidelity and clarity of dialog.
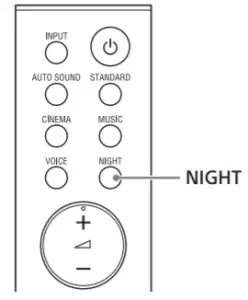
Press NIGHT to set the function to on or off.
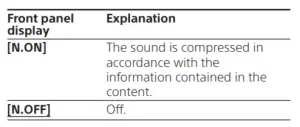
Note When you turn the system off, the night mode is set to off automatically.
Checking the Current Sound Settings
You can check the settings of the sound, night, and voice modes and current stream information.
- Press MENU to turn on the menu in the front panel display.
- Press to select [CURRENT STATUS], then press ENTER.
- Press
 repeatedly to select the item you want. The current setting appears in the following order. Sound mode Voice mode Night mode Stream Information The current setting appears in the reverse order by pressing
  .
. - Press MENU to turn off the menu.
Changing the Settings
You can set the following items on the menu. Your settings are retained even if you disconnect the AC power cord (mains lead).
- Press MENU to turn on the menu in the front panel display.
- Press /ENTER repeatedly to select the item and setting you want. To return to the upper layer, press BACK.
- Press MENU to turn off the menu.
Note
You can also turn off the menu by performing an operation other than a menu operation such as pressing +/–, SW +/–, , etc.
Menu List
The default settings are underlined. They may differ depending on the area.
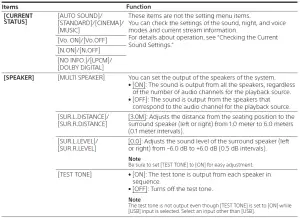
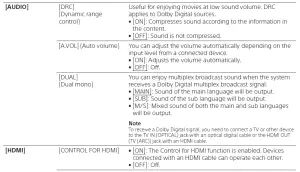
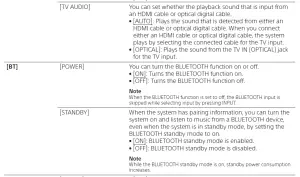
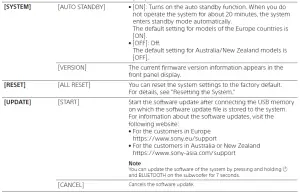
Using the Control for HDMI Function
Connecting a device such as a TV or Blu-ray Disc player compatible with the Control for HDMI function* using an HDMI cable enables you to easily operate the device by using a TV or Blu-ray Disc player remote control.
Note
These functions may work with devices other than those manufactured by Sony, but operation is not guaranteed.
* Control for HDMI is a standard used by CEC (Consumer Electronics Control) for allowing HDMI (High-Definition Multimedia Interface) devices to control each other.
Preparing to Use the Control for HDMI Function
Set [HDMI] – [CONTROL FOR HDMI] to [ON]. The default setting is [ON]. Enable the Control for HDMI function settings of the TV and other device connected to the TV.
Tip
If you enable the Control for HDMI function when using a TV manufactured by Sony, the Control for HDMI function of the system is also enabled automatically.
System Power Off Function
When you turn off the TV, the system will turn off automatically.
System Audio Control Function
If you turn on the system while you are watching the TV, the TV sound will be output from the speakers of the system. The volume of the system can be adjusted using the TV remote control. If the TV sound was output from the speakers of the system the previous time you watched the TV, the system will be turned on automatically when you turn on the TV again. Operations can also be made by the TV’s menu. For details, refer to the operating instructions of your TV.
Notes
- Sound is only output from the TV if other than [TV] input is selected when using the Twin Picture function on the TV. When you disable the Twin Picture function, the sound is output from the system.
- The number for the system’s volume level is displayed on the TV screen depending on the TV. The volume number displayed on the TV may differ from the number on the front panel display of the system.
- Depending on the settings of the TV, the System Audio Control function may not be available. For details, refer to the operating instructions of your TV.
- Depending on the TV, if the TV sound was output from the speakers of the TV the previous time you watched the TV, the system may not turn on by interlocking with the TV power even if the TV is turned on.
Audio Return Channel (ARC)
If the system is connected to a TV’s HDMI IN jack compatible with Audio Return Channel, you can listen to TV sound from the speakers of the system without connecting an optical digital cable.
Note
If the TV is not compatible with Audio Return Channel, an optical digital cable needs to be connected (refer to the supplied Startup Guide).
One-Touch Play Function
When you play content on a device (Blu-ray Disc player, “PlayStation®4”, etc.) connected to the TV, the system and TV are turned on automatically, the input of the system is switched to the TV input, and sound is output from the speakers of the system.
Notes
- If the TV sound was output from the speakers of the TV the previous time you watched the TV, the system may not turn on and the sound and picture may be output from the TV even if device content is played.
- Depending on the TV, the beginning part of content being played may not play correctly.
Notes on HDMI Connections
- Use an HDMI-authorized cable.
- Use a Sony High Speed HDMI cable with the Cable Type Logo.
- We do not recommend using an HDMI-DVI conversion cable.
- Check the setup of the connected device if an image is poor or the sound does not come out of the device connected via the HDMI cable.
- Audio signals (sampling frequency, bit length, etc.) transmitted from an HDMI jack may be suppressed by the connected device.
Saving Power Consumption
To use the system with saving power consumption, change the following settings. Turning the System Off by Detecting the Using State
When you set the auto standby function to on, the system enters standby mode automatically when you do not operate the system for about 20 minutes and the system is not receiving an input signal.
Set [SYSTEM] – [AUTO STANDBY] to [ON]. The default setting for models of the Europe countries is [ON]. The default setting for Australia/New Zealand models is [OFF].
Saving Power in Standby Mode
To save power consumption during the standby mode, set [BT] – [STANDBY] and [HDMI] – [CONTROL FOR HDMI] to [OFF]. The default settings for them are [ON].
Resetting the System
If the system does not operate properly, reset the system as follows.
1 Press MENU to turn on the menu in the front panel display.
2 Press to select [RESET], then press ENTER.
3 Press to select [ALL RESET], then press ENTER.
4 Press to select [START], then press ENTER.
All the settings return to their initial status.
To cancel resetting
Select [CANCEL] in step 4.
If You Cannot Perform Resetting Using the Menu
Press and hold and – (volume) on the subwoofer for more than 5 seconds. All the settings return to their initial status.
Tip
The default settings are underlined on each feature description.
Troubleshooting
If the system does not work properly, handle it in the following order.
- Search for the cause and solution of the issue using this troubleshooting.
- Reset the system. All the settings of the system return to their initial status. For details, see “Resetting the System.”
Should any problems persist, consult your nearest Sony dealer.
Power
The system does not power up.
- Check that the AC power cord (mains lead) is connected securely.
- Disconnect the AC power cord (mains lead) from the wall outlet (mains), and then reconnect after several minutes. The system is turned off automatically.
- The auto standby function is working. Set [SYSTEM] – [AUTO STANDBY] to [OFF]. The system does not turn on even when the TV is turned on.
- Set [HDMI] – [CONTROL FOR HDMI] to [ON]. The TV must support the Control for HDMI function. For details, refer to the operating instructions of your TV.
- Check the speaker settings of the TV. The system power syncs with the speaker settings of the TV. For details, refer to the operating instructions of your TV.
- Depending on the TV, if the sound was output from the speakers of the TV the previous time, the system may not turn on by interlocking with the TV even when the TV is turned on.
- The system turns off when the TV is turned off.
- Check the setting of the Control for HDMI function. When the Control for HDMI function is set to on and the input of the system is the TV input, the system turns off automatically when you turn off the TV. The system does not turn off even when the TV is turned off.
- Check the setting of the Control for HDMI function. When you turn off the TV, the system turns off automatically only if the input of the system is TV input. The TV must support the Control for HDMI function. For details, refer to the operating instructions of your TV.
Picture
There is no picture or the picture is not output correctly.
- Select the appropriate input.
- When there is no picture while TV input is selected, select the TV channel that you want using the TV remote control.
- Disconnect an HDMI cable, then connect it again. Make sure that the cable is firmly inserted.
Sound
No TV sound is output from the system.
- Check the type and connection of an HDMI cable or optical digital cable that is connected to the system and the TV (refer to the supplied Startup Guide).
- Disconnect the cables that are connected between the TV and the system, then connect them firmly again. Disconnect the AC power cords (mains leads) of the TV and the system from the AC outlets (mains), then connect them again.
- When the system and TV are connected with an HDMI cable, check the following.
— The HDMI jack of the connected TV is labeled with “ARC.”
— The Control for HDMI function of the TV is set to on.
— On the system, the Control for HDMI function is set to on. - If your TV is not compatible with Audio Return Channel, connect the optical digital cable (refer to the supplied Startup Guide). If the TV is not compatible with Audio Return Channel, TV sound will not be output from the system even if the system is connected to the TV’s HDMI IN jack.
- If the sound of the device that is connected to the optical input jack of the TV is not output, try the following.
— Connect the cable box or satellite box directly to the TV IN (OPTICAL) jack of the system. - Press INPUT repeatedly to select the TV input.
- Increase the volume on the TV or cancel muting.
- Depending on the order in which you turn on the TV and the system, the system may be muted. If this happens, turn on the TV first, then the system.
- Set the speakers setting of the TV (BRAVIA) to Audio System. Refer to the operating instructions of your TV regarding how to set the TV.
- Check the sound output of the TV. Refer to the operating instructions of the TV for the TV settings.
- The system supports the Dolby Digital and PCM audio formats. When you play back an unsupported format, set the digital audio out setting of the TV (BRAVIA) to “PCM.” For details, refer to the operating instructions of your TV.
The sound is output from both the system and the TV.
• Change the audio output setting of the TV so
that the TV sound is output from the external
speaker.
• Set the TV volume to minimum.
No sound or only a very low-level sound is heard from the subwoofer.
- Make sure the AC power cord (mains lead) of the subwoofer is connected properly (refer to the supplied Startup Guide).
- Press SW + to increase the subwoofer volume.
- A subwoofer is for reproducing bass sound. If the input sources contain very little bass sound components (i.e., a TV broadcast), the sound from the subwoofer may be difficult to hear.
- When you play content compatible with copyright protection technology (HDCP), it is not output from the subwoofer.
No sound or only a very low-level sound of the device connected to the system is heard from the system.
- Press + and check the volume level.
- Press or + to cancel the muting function.
- Make sure the input source is selected correctly. You should try other input sources by pressing INPUT repeatedly.
- Check that all the cables and cords of the system and the connected device are firmly inserted.
- If the connected device supports the up sampling feature, you need to turn it off.
No sound or only very low-level sound is heard from the surround speakers.
- Make sure that the cables of the surround speakers are connected properly to the subwoofer (refer to the supplied Startup Guide).
- Check that [SPEAKER] – [MULTI SPEAKER] is set to [ON]. If [SPEAKER] – [MULTI SPEAKER] is set to [OFF], the sound is not output from the surround speakers when playing the sound of 2-channel source.
- Multi-channel sound which has not been recorded as surround sound is not output from the surround speakers.
The surround effect cannot be obtained.
• Depending on the input signal and the sound mode setting, surround sound processing may not work effectively. The surround effect may be subtle, depending on the program or disc.
• To play multi channel audio, check the digital audio output setting on the device connected to the system. For details, refer to the operating instructions supplied with the connected device.
USB Device Connection
The USB device is not recognized.
- Try the following:
1 Turn the system off.
2 Remove and reconnect the USB device.
3 Turn the system on. - Make sure that the USB device is securely connected to the (USB) port.
- Check to see if the USB device or a cable is damaged.
- Make sure that the USB device is on.
- If the USB device is connected via a USB hub, disconnect it and connect the USB device directly to the subwoofer.
Mobile Device Connection
BLUETOOTH connection cannot be completed.
- Make sure that the BLUETOOTH indicator on the subwoofer is lit.
- Make sure the BLUETOOTH device to be connected is turned on and the BLUETOOTH function is enabled.
- Bring the BLUETOOTH device close to the subwoofer.
- Pair this system and the BLUETOOTH device again. You may need to cancel the pairing with this system using your BLUETOOTH device first.
- If [BT] – [POWER] is set to [OFF], set to [ON]. Pairing cannot be achieved.
- Bring the BLUETOOTH device close to the subwoofer.
- Make sure this system is not receiving interference from a wireless LAN device, other 2.4 GHz wireless devices, or a microwave oven. If a device that generates electromagnetic radiation is nearby, move the device away from this system.
- Pairing may not be possible if other BLUETOOTH devices are present around the system. In this case, turn off the other BLUETOOTH devices.
Sound of the connected BLUETOOTH mobile device is not output from the system.
- Make sure that the BLUETOOTH indicator on the subwoofer is lit.
- Bring the BLUETOOTH device close to the subwoofer.
- If a device that generates electromagnetic radiation, such as a wireless LAN device, other BLUETOOTH devices, or a microwave oven is nearby, move the device away from this system.
- Move the USB 3.0 device and its cable away from this system.
- Remove any obstacle between this system and the BLUETOOTH device or move this system away from the obstacle.
- Reposition the connected BLUETOOTH device.
- Switch the wireless LAN frequency of any nearby wireless LAN router or PC to 5 GHz range.
- Increase the volume on the connected BLUETOOTH device.
The sound is not in sync with the image.
- When you are watching movies, you may hear the sound with a slight delay from the image. Remote Control The remote control of this system does not function.
- Point the remote control at the remote control sensor on the subwoofer.
- Remove any obstacles in the path between the remote control and the subwoofer.
- Replace both batteries in the remote control with new ones, if they are weak.
- Make sure you are pressing the correct button on the remote control. The TV remote control does not work.
- Install the bar speaker so that it does not obstruct the remote control sensor of the TV.
Others
The Control for HDMI function does not work properly.
- Check the connection with the system (refer to the supplied Startup Guide).
- Enable the Control for HDMI function on the TV. For details, refer to the operating instructions of your TV.
- Wait a while, and then try again. If you unplug the system, it will take a while before operations can be made. Wait for 15 seconds or longer, and then try again.
- Make sure the devices connected to the system support the Control for HDMI function.
- Enable the Control for HDMI function of the devices connected to the system. For details, refer to the operating instructions of your device.
- The type and number of devices that can be controlled by the Control for HDMI function is restricted by the HDMI CEC standard as follows:
— Recording devices (Blu-ray Disc recorder, DVD recorder, etc.): up to 3 devices
— Playback devices (Blu-ray Disc player, DVD player, etc.): up to 3 devices
— Tuner-related devices: up to 4 devices
— Audio system (receiver/ headphone): up to 1 device (used by this system)
[PROTECT] appears in the front panel display of the subwoofer, the sound is muted, and buttons on the remote control or subwoofer other than (power) do not work.
- The protection feature is activated. Press (power) to turn the system off and disconnect the AC power cord (mains lead) and check the items below.
— Make sure that the ventilations of the subwoofer are not covered and turn on the system after a while.
— When the system is using the USB connection, remove the USB device and turn on the system. If the system operates properly, the current of the connected USB device is over the maximum output current of the system 500 mA, or the USB device may have an abnormality.
The front panel display of the subwoofer is not lit.
- Press DIMMER to set the brightness to [BRIGHT] or [DARK] if set to [OFF].
Sensors of the TV do not work properly.
- The bar speaker may block some sensors (such as the brightness sensor), the remote control receiver of your TV or the emitter for 3D glasses (infrared transmission) of a 3D TV that supports the infrared 3D glass system, or wireless communication. Move the bar speaker away from the TV within a range that allows those parts to operate properly. For the locations of the sensors and remote control receiver, refer to the operating instructions supplied with the TV.
The system does not work properly ([.DEMO] appears in the front panel display).
- The system is in demo mode. To cancel demo mode, reset the system. Press and hold (power) and – (volume) on the subwoofer for more than 5 seconds. When you change to the TV input from the USB input by pressing INPUT, the message appears.
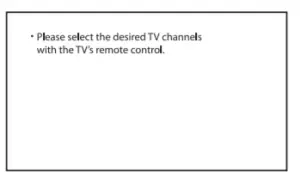
* This screen is an example for English. - Select the TV program by using the TV remote control.
Specifications
Subwoofer (SA-WS20R)
Amplifier section
POWER OUTPUT (rated)
Front L + Front R: 45 W + 45 W (at 4 ohms, 1 kHz, 1% THD)
POWER OUTPUT (reference)
Front L/Front R/Surround L/Surround R/Center: 67 W (per channel
at 4 ohms, 1 kHz)
Subwoofer: 65 W (at 4 ohms, 100 Hz)
Inputs
TV IN (OPTICAL)
USB
ANALOG IN
Output
HDMI OUT (TV (ARC))
HDMI section
Connector
Type A (19pin)
USB section
(USB) port:
Type A
BLUETOOTH section
Communication system
BLUETOOTH Specification version 5.0
Output
BLUETOOTH Specification Power Class 1
Maximum communication range
Line of sight approx. 10 m1)
Frequency band
2.4 GHz band (2.4000 GHz – 2.4835 GHz)
Maximum output power
< 6 dBm
Modulation method
FHSS (Freq Hopping Spread Spectrum)
Compatible BLUETOOTH profiles2)
A2DP (Advanced Audio Distribution Profile)
AVRCP (Audio Video Remote Control Profile)
Supported Codec3)
SBC4)
Transmission range (A2DP)
20 Hz – 20,000 Hz (Sampling frequency 32 kHz, 44.1 kHz, 48 kHz)
- The actual range will vary depending on factors such as obstacles between devices, magnetic fields around a microwave oven, static electricity, cordless phone use, reception sensitivity, the operating system, software applications, etc.
- BLUETOOTH standard profiles indicate the purpose of BLUETOOTH communication between devices.
- Codec: Audio signal compression and conversion format
- Abbreviation for Subband Codec
Speaker section
Speaker system
Subwoofer system, Bass reflex
Speaker
160 mm cone type
General
Power requirements
220 V – 240 V AC, 50 Hz/60 Hz
Power consumption
On: 40 W
Standby mode: 0.5 W or less (Power Saving mode)
(When [CONTROL FOR HDMI] in [HDMI] and [STANDBY] in [BT] are
set to [OFF])
Standby mode: 2 W or less*
(When [CONTROL FOR HDMI] in [HDMI] and [STANDBY] in [BT] are set to [ON])
* The system will automatically enter Power saving mode when there is no HDMI connection and no BLUETOOTH pairing
history.
Dimensions* (approx.) (w/h/d) 192 mm × 387 mm × 342 mm
* Not Including projection portion
Mass (approx.)
7.0 kg
Bar Speaker (SS-S20R)
Speaker system
Full range speaker system, Bass reflex
Speaker
42 mm × 100 mm cone type
Dimensions* (approx.) (w/h/d)
760 mm × 52 mm × 86 mm
* Not Including projection portion
Mass (approx.)
2.0 kg
Surround Speakers (SS-SS20R)
Speaker system
Full range speaker system, Bass reflex
Speaker
65 mm cone type
Dimensions* (approx.) (w/h/d)
86 mm × 171 mm × 86 mm
* Not Including projection portion
Mass (approx.)
0.6 kg
Design and specifications are subject to change without notice.
Playable Types of Files (USB Input)
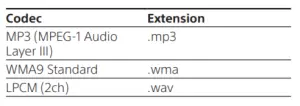
Notes
- Some files may not play or may play with no sound depending on the file format, the file encoding, or the recording condition.
- Some files edited on a PC may not play.
- The system does not play coded files such as DRM and Lossless.
- The system can recognize the following files or folders in
USB devices:
— up to 200 folders (including empty folders and root folders)
— up to 200 tracks in one folder
— up to folders in the 8th layer (including the root folder) - Some USB devices may not work with this system.
- The system can recognize Mass Storage Class (MSC) devices.
- The sampling frequency is up to 48kHz.
Supported Input Audio Formats (HDMI OUT (TV (ARC)) or TV IN (OPTICAL))
Audio formats supported by this system are as follows.
- Dolby Digital
- Linear PCM 2ch (up to 48kHz)
On BLUETOOTH Communication
- BLUETOOTH devices should be used within approximately 10 meters (33 feet) (unobstructed distance) of each other. The effective communication range may become shorter under the following conditions.
— When a person, metal object, wall or other obstruction is between the devices with a BLUETOOTH connection
— Locations where a wireless LAN is installed
— Around microwave ovens that are in use
— Locations where other electromagnetic waves occur - BLUETOOTH devices and wireless LAN (IEEE 802.11b/g/n) use the same frequency band (2.4 GHz). When using your BLUETOOTH device near a device with wireless LAN capability, electromagnetic interference may occur. This could result in lower data transfer rates, noise, or inability to connect. If this happens, try the following remedies:
— Use this system at least 10 meters (33 feet) away from the wireless LAN device.
— Turn off the power to the wireless LAN device when using your BLUETOOTH device within 10 meters (33 feet).
— Install this system and BLUETOOTH device as closer to each other as possible. - The radio waves broadcast by this system may interfere with the operation of some medical devices. Since this interference may result in malfunction, always turn off the power on this system and BLUETOOTH device in the following locations:
— In hospitals, on trains, in airplanes, at gas stations, and any place where flammable gasses may be present
— Near automatic doors or fire alarms - This system supports security functions that comply with the BLUETOOTH specification to ensure secure connection during communication using BLUETOOTH technology. However, this security may be insufficient depending on the setting contents and other factors, so always be careful when performing communication using BLUETOOTH technology.
- Sony cannot be held liable in any way for damages or other loss resulting from information leaks during communication using BLUETOOTH technology.
- BLUETOOTH communication is not necessarily guaranteed with all BLUETOOTH devices that have the same profile as this system.
- BLUETOOTH devices connected with this system must comply with the BLUETOOTH specification prescribed by the Bluetooth SIG, Inc., and must be certified to comply. However, even when a device complies with the BLUETOOTH specification, there may be cases where the characteristics or specifications of the BLUETOOTH device make it impossible to connect, or may result in different control methods, display or operation.
- Noise may occur or the audio may cut off depending on the BLUETOOTH device connected with this system, the communications environment, or surrounding conditions. If you have any questions or problems concerning your system, please consult your nearest Sony dealer.
Copyrights and Trademarks
This system incorporates Dolby* Digital.
- Manufactured under license from Dolby Laboratories. Dolby, Dolby Audio and the double-D symbol are trademarks of Dolby Laboratories.
The terms HDMI, HDMI High-Definition Multimedia Interface, and the HDMI Logo are trademarks or registered trademarks of HDMI Licensing Administrator, Inc. The BLUETOOTH® word mark and logos are registered trademarks owned by Bluetooth SIG, Inc. and any use of such marks by Sony Corporation is under license. Other trademarks and trade names are those of their respective owners. “BRAVIA” logo is a trademark of Sony Corporation. “PlayStation” is a registered trademark or trademark of Sony Interactive Entertainment Inc. MPEG Layer-3 audio coding technology and patents licensed from Fraunhofer IIS and Thomson. Windows Media is either a registered trademark or trademark of Microsoft Corporation in the
United States and/or other countries. This product is protected by certain intellectual property rights of Microsoft Corporation. Use or distribution of such technology outside of this product is prohibited without a license from Microsoft or an authorized Microsoft subsidiary. All other trademarks are trademarks of their respective owners.
WARNING
Do not install the system in a confined space, such as a bookcase or built-in cabinet. To reduce the risk of fire, do not cover the ventilation opening of the system with newspapers, tablecloths, curtains, etc.
Do not expose the system to naked flame sources (for example, lighted candles). To reduce the risk of fire or electric shock, do not expose this system to dripping or splashing, and
do not place objects filled with liquids, such as vases, on the system. The system is not disconnected from the mains as long as it is connected to the AC outlet, even if the system itself has been turned off. As the main plug is used to disconnect the system from the mains, connect the system to an easily accessible AC outlet. Should you notice an abnormality in the system, disconnect the main plug from the AC outlet immediately.
CAUTION
Risk of explosion if the battery is replaced by an incorrect type. Do not expose batteries or appliances with battery-installed to excessive heat, such as sunshine and fire. Indoor use only.
Do not place this product close to medical devices
This product (including accessories) has magnet(s) which may interfere with pacemakers, programmable shunt valves for hydrocephalus treatment, or other medical devices. Do not place this product close to persons who use such medical devices. Consult your doctor before using this product if you use any such medical device.
Recommended cables Properly shielded and grounded cables and connectors must be used for connection to host computers and/or peripherals.
For the bar speaker and surround speakers The nameplates are located on the bottom of the bar speaker and surround speakers. This equipment has been tested and found to comply with the limits set out in the EMC regulation using a connection cable shorter than 3 meters.
For the customers in Europe
Notice for customers: the following information is only applicable to equipment sold in countries applying EU directives.
This product has been manufactured by or on behalf of Sony Corporation. EU Importer: Sony Europe B.V. Inquiries to the EU Importer or related to product compliance in Europe should be sent to the manufacturer’s authorized representative, Sony Belgium, bijkantoor van Sony Europe B.V., Da Vincilaan 7-D1, 1930 Zaventem, Belgium.
 Hereby, Sony Corporation declares that this equipment is in compliance with Directive 2014/53/EU.
The full text of the EU declaration of conformity is available at the following internet address: http://www.compliance.sony.de/
This radio equipment is intended to be used with the approved version(s) of software that are indicated in the EU Declaration of Conformity. The software loaded on this radio equipment is verified to comply with the essential requirements of the Directive 2014/53/EU.
The software version can be found in [SYSTEM] – [VERSION].
 Disposal of waste batteries and electrical and electronic equipment (applicable in the European Union and other countries with separate collection systems)
This symbol on the product, the battery or on the packaging indicates that the product and the battery shall not be treated as household waste. On certain batteries this symbol might be used in combination with a chemical symbol. The chemical symbol for lead (Pb) is added if the battery contains more than 0.004% lead. By ensuring that these products and batteries are disposed of correctly, you will help to prevent potentially negative consequences for the environment and human health which could be caused by inappropriate waste handling. The recycling of the materials will help to conserve natural resources. In case of products that for safety, performance or data integrity reasons require a permanent connection with an incorporated battery, this battery should be replaced by qualified service staff only. To ensure that the battery and the electrical and electronic