


- Connect the SATELLITE IN jack to your Satellite Dish Antenna using RG-6 coaxial cable.
- Connect the 2nd signal if you have Dual LNB. Advance Set Up for dual output.
Step 2: Connecting Your Phone Line

- Connect the TELEPHONE LINE jack to a telephone line wall jack using the supplied telephone cord.
Step 3: Connecting Your TV Set

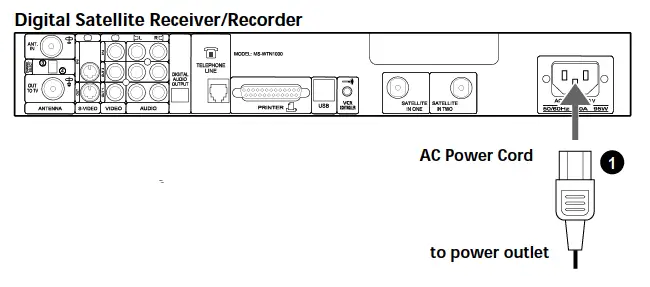
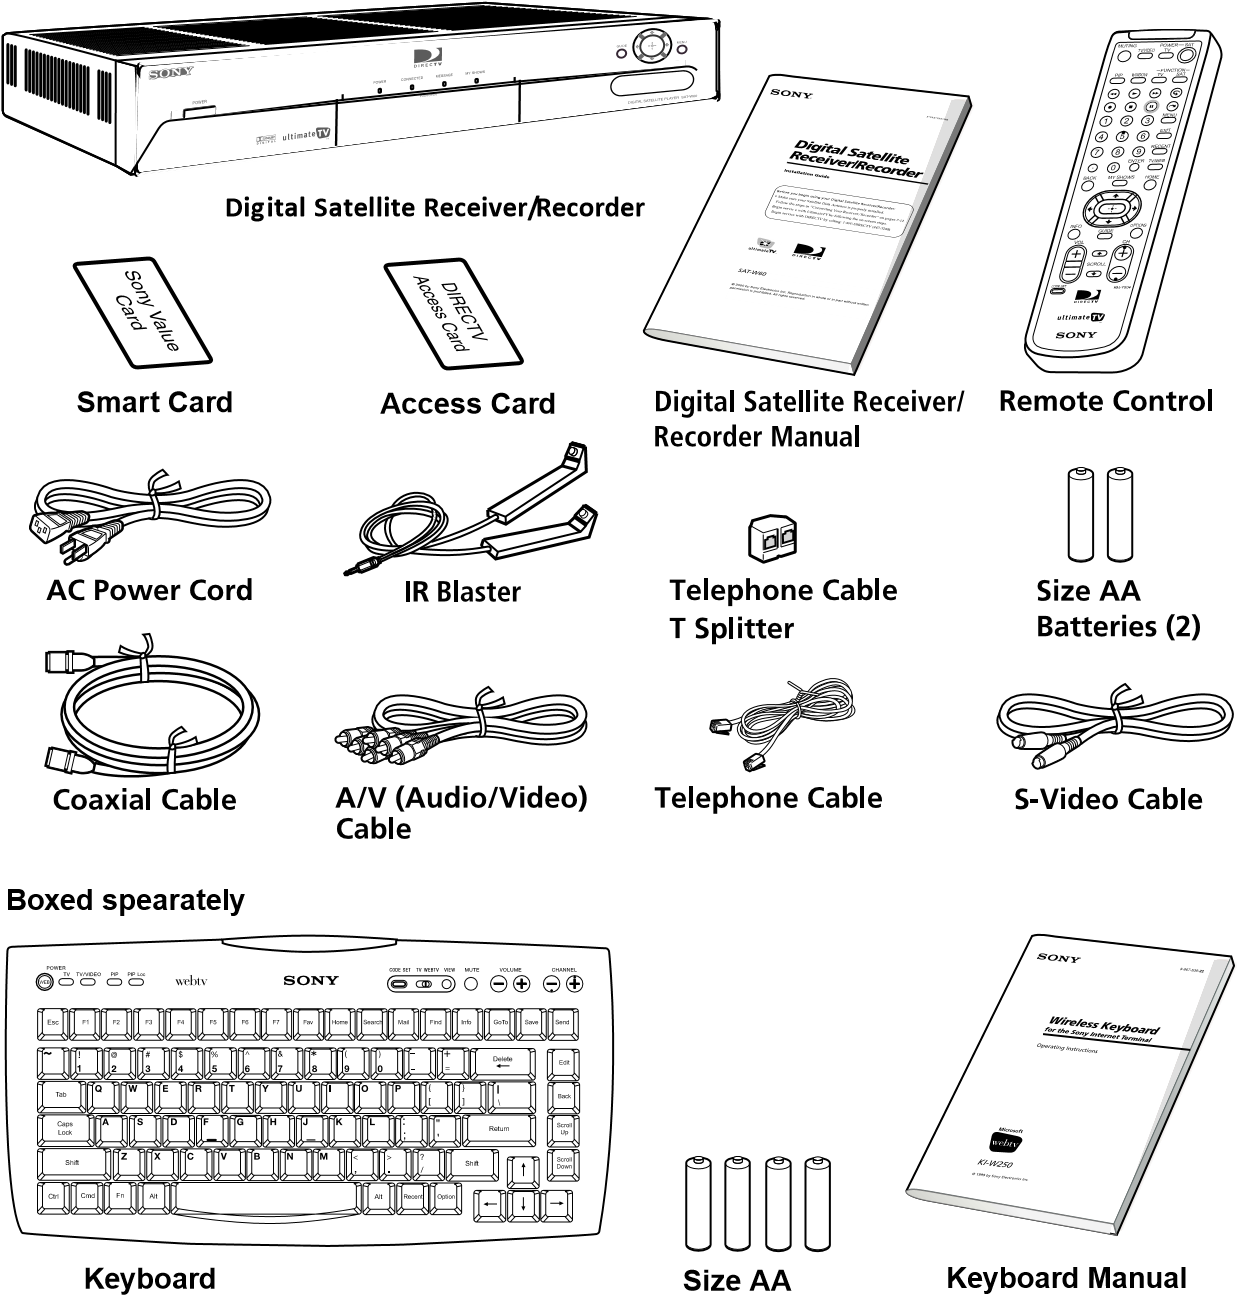
- 1. After all other connections are complete, connect the AC Power Cord to the Digital Satellite Receiver/Recorder. Then connect the AC Power Cord to a power outlet.

- You may insert the Sony Value access card into the front right hand slot of the Digital Satellite Receiver/Recorder to take advantage of its features. The Sony Value access card is not required to remain in place and can be removed/ re-inserted at any time.
Advanced Connection: Connecting Your VCR

1.If your TV and VCR have A/V jacks
Connect the VIDEO OUT jacks of your Digital Satellite Receiver/Recorder to the A/V input jacks of your VCR using the supplied A/V cable. Then, connect the A/V output jacks of your VCR to the A/V input jacks of your TV using an A/V cable. (Be sure to match the colors on the jacks with the colored plugs on the A/V cable.) Some TVs and VCRs do not have stereo audio, if yours does not, just connect the white A/V cable to the Left output jack.

- To allow the Digital Satellite Receiver/Recorder to control your VCR
Connect the IR Blaster to the VCR CONTROLLER jack on the receiver/recorder. - In front of the VCR
Place the IR Blaster under and in front of the VCR. The IR Blaster must extend just in front of the infrared sensor of the VCR.
If the infrared sensor is not marked on your VCR, shine a flashlight into the front panel of the VCR to locate the sensor.
Advanced Connection: Connecting an Audio System

1a. If you have a digital or Dolby Digital audio system
Connect the DIGITAL OUT (OPTICAL) of the Digital Satellite Receiver/ Recorder to the optical digital input of your audio system.
1b. If you have a stereo or Dolby® Pro Logic® audio system
Connect the upper AUDIO R and L(MONO) jacks on the Digital Satellite Receiver/Recorder to the audio inputs of your stereo amplifier.

1. If you have a Microphone
Connect the microphone plug to the Receiver/Recorder’s Microphone IN jack.

To print screens
Connect the printer port on the receiver/recorder to the port on the printer.
Note
Unplug the Digital Satellite Receiver/Recorder and printer before you begin connecting.

If you have a Camcorder
Using A/V cables, connect the camcorder’s A/V OUT jacks to the Receiver/Recorder’s A/V IN jacks.
Note
If you have a mono camcorder, connect its left audio output to the Receiver/Recorder’s AUDIO L (white) jack.


1. Press the ![]() buttons to move the highlight to the item you want.
buttons to move the highlight to the item you want.
2. Press the button to select the item.

| Muting | Press to mute the sound. Press again, or press VOL +, to restore the sound. (For the TV only) |
| TV/VIDEO | Cycles through the video inputs of your TV. |
| TV POWER | Turns your TV on and off. |
| SAT POWER | Turns your Player on and off. |
| PIP | Operate the Picture-in-Picture features of the receiver/recorder. |
| WINDOW | Selects the active window while in PIP mode, allowing you to change the Main or PIP channel.(For the recorder/receiver only) |
| TV FUNCTION | Selects TV feature control. |
| SAT FUNCTION | Selects Player feature control. |
| © Button | Replay button. |
| @ Button | Jump ahead button. |
| 0 – 9 Buttons | Select channels or enter numbers in text boxes. |
| MENU | Opens the TV Main Menu. |
| EXIT | Closes all on-screen displays, including program guides and menus. |
| ENTER | Activates the selected channel on your TV. |
| OPTIONS | Displays the OPTIONS panel. |
| RECENT | Displays and allows you to access the most recently viewed Web pages and TV channels. |
| SCROLL V/V
Buttons |
Moves the page up or down when the page is too long to be displayed on the screen. |
| HOME | Displays the Web Home or TV Home screen. |
| BACK | Displays the last screen viewed, or hides the on-screen keyboard. |
| TV/WEB | Press the button to switch between TV and WebTV modes. |
| Arrow Buttons | Move the yellow highlight box to a different command or activity on the screen; select different keys when the on-screen keyboard is displayed. |
| MY SHOWS | Displays a list of programs that you have recorded with your receiver/ recorder. |
| INFO | Displays information on the program you are viewing. |
| GUIDE | Displays information on available programs, including channel, time and date. |
| Button | Activates a highlighted link or command; displays the on-screen keyboard. |
| VOL +/- | Increases and decreases the volume. |
| CH +/- | Moves to the next or previous channel. |
| CODE SET | Used for programming the remote control to operate your TV. See page 21 for details. |
Setting up the Remote Control

- The function indicators begin flashing.
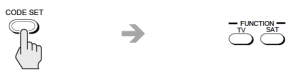
- The function indicator goes off, and the remote is set up to operate that device.

- Press the POWER button for the device you want to control, then press other operation controls such as the CH +/ – buttons.
If the device does not respond to the remote control, repeat from step 2 and enter a different manufacturer code in step 3.


Manufacturer Codes TV Codes
|
|
|
|
|
|
|
|
|
|
|
|
|
|
|
|
|
|
|
|
|
|
|
|
|
|
|
|
|
|
|
|
|
|
|
|
|
|
|
|
|
|
|
|
|
|
|
|
|
|
|
|
|
|
|
|
|
|
|
|
|
|
|
|
|
|
|
|
|
|
|
|
|
|
|
|
|
|
|
|
|
|
|
|
| Manufacturer | Code |
| Portland | 103, 108 |
| Quasar | 110, 107 |
| Radio Shack | 102, 112, 124, 123 |
| RCA/Proscan | 102, 103, 104, 105,106, 107, 108 |
| Samsung | 126, 112, 113, 103 |
| Sanyo | 125 |
| Scott | 123, 112 |
| Sharp | 114, 113, 115 |
| Signature 2000 (M. Wards) | 114, 109 |
| Sylvania | 111, 112, 108 |
| Symphonic | 123, 139 |
| Tenika | 109 |
| Toshiba | 119, 114 |
| Videch | 131, 103, 112 |
| Wards | 113, 103, 115, 112 |
| Zenith | 108, 110 |
|
|
|
|
|
|
|
|
|
|
|
|
|
|
|
|
|
|
|
|
|
|
|
|
|
|
|
|
|
|
|
|
|
|
|
|
|
|
|
|
|
|
|
|
|
|
|
|
|
|
|
|
|
|
|
|
|
|
|
|
|
|
|
|
|
|
|
|
|
|
|
|
|
|
|
|
|
|
|
|
|
|
|
|
|
|
|
|
|
|
|
|
|
|
|
|
|
|
|
|
|
|
|
|
|
|
|
|
|
|
|
|
|
|
|
|
|
|
|
|
|
|
|
|
|
|
|
|
|
|
|
|
|
|
|
|
|
|
|
|
|
|
|
|
|
|
|
|
|
|
|
|
|
|
|
|
|
|
|
|
|
|
|
|
|
|
|
|
|
|
|
|
|
|
|
|
|
|
|
|
|
|
|
|
|
|
|
|
|
|
|
|
Other Information

| Feature | Description | |
| 1 | Power Button | Turns your Digital Satellite Receiver/Recorder on and off |
| 2 | POWER Indicator | Indicates whether the Digital Satellite Receiver/ Recorder is on or off. |
| 3 | CONNECTED Indicator | Flashes while the Digital Satellite Receiver/Recorder is connecting to the WebTV service and while receiving new information. Remains lit while in use. |
| 4 | MESSAGE Indicator | Lights up to indicate you have an unopened e-mail message. |
| 5 | MY SHOWS Indicator | Indicates that a program is being recorded by My Shows. |
| 6 | GUIDE Button | Opens the Program Guide. |
| 7 | MENU Button | Opens the TV Home screen. |
| 8 | Arrow and Q Buttons | The arrow buttons move the highlight in the on-screen displays. The Q button selects the highlighted item. |
| 9 | AUDIO (R/L)/VIDEO IN | Allows easy connection of audio/video devices, such as a camcorder or digital camera. |
| 10 | SMART CARD Slot | The SmartCard allows you to access special features for WebTV. |
| 11 | ACCESS CARD Slot | The Access Card allows you to access DIRECTV services. |
| 12 | MIC INPUT Jack | Allows easy connection of a microphone. |
Back Panel Terminals

| Connector | Description | |
| 1 | TELEPHONE LINE | Connects your receiver/recorder to a telephone jack. |
| 2 | VCR CONTROLLER | Allows you to connect your IR Blaster for easy control of your cable box and/or VCR through the receiver/recorder. |
| 3 | PRINTER PORT | Allows you to connect your receiver/recorder to a printer. |
| 4 | AUDIO (R)/(L) IN/OUT | Connects your receiver/recorder to the right and left audio inputs and outputs of your TV. |
| 5 | VIDEO IN/OUT | Connects your receiver/recorder to your TV’s or VCR’s video inputs and outputs. |
| 6 | S-VIDEO IN/OUT | Allows you to connect your receiver/recorder to your TV and VCR for optimal picture quality (if your TV and VCR support S-Video. |
| 7 | CH 3-CH 4 Switch | The switch determines which TV channel allows you to view programs from your receiver/recorder when connected through the VHF/UHF connector. |
| 8 | VHF/UHF | IN: Allows you to connect your normal (antenna) TV or cable TV service to your receiver/recorder. |
| OUT: Allows you to send normal (antenna) TV or cable signals to your TV or VCR from your receiver/recorder. | ||
| 9 | AC IN | Connects your receiver/recorder to a 120V AC outlet. |
| 10 | DIGITAL AUDIO
OUTPUT |
Allows you to connect an optional digital audio system. |
| 11 | USB Port | Allows you to connect Universal Serial Bus components, such as a keyboard or a digital camera. |
| 12 | SATELLITE IN | Connect the cable from your satellite dish antenna here.
Connect a second cable if you wish to use both of the receiver/recorder’s tuners, this allows features such as PIP and recording one show and while viewing another. |
Specifications
| Terminals | Video In (2)
Video Out (2) Audio (R/L) In (2) Audio (R/L) Out (2) S-Video In (1)/Out (1) Tel Line (1) Microphone In (1) Printer Port (DB25) (1) VCR Controller (1) Digital Audio Out (1) USB Port (2) Satellite In (2) CH3-CH4 Switch (1) VHF/UHF In/Out (1) AC In (1) |
| Dimensions | 430 mm x 70 mm x 290 mm (w/h/d) (17” x 2 3/4” x 11 1/2”) |
| Weight | TBD x kg (x lbs xx oz) |
| Power
Requirements |
AC 120 V |
| Power
Consumption |
90 W max |
| Supplied Accessories | Remote Control RM-Y804 (1)
Size AA Batteries (2) AC Power Cord (1) A/V (Audio/Video) Cable (1) Telephone Cable (1) S-Video Cable (1) T Splitter (1) Coaxial Cable (1) IR Blaster (1) Wireless Keyboard KI-W250 (1) Access Card (1) Smart Card (1) |
| Optional
Accessories |
Local Antenna ANJ-AA1 Installation Kit ANJ-DS2 Amplifier EAC-DA1 Diplexer EAC-DD1 Voltage Switch EAC-DV2 DSS Dish SAN-XXX |
Troubleshooting
| Symptom | Possible Cause and remedies |
| TV POWER button doesn’t turn on TV. | The remote control has not been properly programmed. See “Setting up the Remote Control” on page 21.
The batteries in the remote control or optional wireless keyboard could be weak. Check the batteries and replace them if necessary. |
| No picture, no sound. | Make sure the AC Power Cord is connected.
Check that the TV/VIDEO switch is set correctly. Make sure the Digital Satellite Receiver/Recorder is properly connected. If you connected using a S-Video or A/V cables, make sure they are properly connected. If your TV must be set to a certain channel to view other devices to which it is connected, make sure this channel is selected. Check that the correct video input is selected by pressing the TV/VIDEO button. If you connected the Digital Satellite Receiver/Recorder using the S-Video or A/V cables, make sure the cables are properly connected. If your TV is not connected using the S-Video or A/V cables, set the CH3-CH4 switch on the back of the Digital Satellite Receiver/Recorder to the opposite channel to which it is currently set. |
| No sound. | If you connected the Digital Satellite Receiver/Recorder using A/V cables, make sure the cables are properly connected. |
| Can’t change TV channels while using WebTV service. | Make sure you select the TV FUNCTION button. |
| The WebTV service screens disappear after pressing the CHANNEL +/- buttons. | Press the TV/VIDEO button on the remote control until the WebTV screen appears. |
| VCR Controller doesn’t seem to be working correctly. | Check that the IR Blaster is positioned directly in front of the infrared sensor area of your cable box and/or VCR.
Follow the on-line instructions in the “Settings” link, accessible from the TV Home page of the WebTV service. |
| Symptom | Possible Cause and remedies |
| The unit gets extremely hot. | Check the placement of the unit. Place the unit in a location with adequate ventilation. Do not place the unit in a cabinet or on a TV.
If the heat is excessive, contact your Sony dealer. |
| The unit turns off and on by itself. | This is often caused by static build up. Turn off the unit and disconnect the AC Power Cord from the power outlet. Then reconnect the AC Power Cord to the power outlet and turn on the unit. If this does not solve the problem, contact your Sony dealer. |
| The unit will not turn on. | Make sure the AC Power Cord is securely connected to the Digital Satellite Receiver/Recorder and a power outlet. |
| The unit will not connect to the WebTV Network after receiving an upgrade from the WebTV service. | Turn off the Digital Satellite Receiver/Recorder and disconnect the AC Power Cord from the power outlet. Then reconnect the AC Power Cord to the power outlet and turn on the Digital Satellite Receiver/Recorder. You may need to repeat this procedure three or four times to solve the problem. |
| The Message Indicator light is not working. | You can set your Digital Satellite Receiver/Recorder to check for messages automatically. However, if you check for messages yourself before the receiver/ recorder is set to do so automatically, the Message Indicator may not light until the receiver/recorder checks again. You may want to consider setting the receiver/recorder to check for mail when you usually are not connected. |
| Remote control or keyboard is no longer working. | Replace the batteries.
Try pressing the SAT FUNCTION button. |
|
|
|
|
|
|
|
|
|
|
|
|
|
|
|
|
|
|

- DIRECTV System installer or facility.
- installer, you must take the Product or deliver the Product in either its original packaging or packaging affording an equal degree of protection (with freight prepaid), to a SONY authorized DIRECTV System service facility. To locate the closest such facility, please call the telephone number listed below.