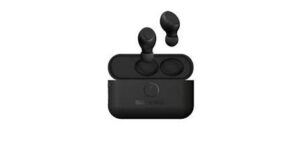
Manual
NERO-TX
Support and warranty
We at Sound by Sweden hope that you will be pleased with your new NERO-TX. If you have any questions concerning our products you can reach our customer support team at: [email protected]
We offer a one-year warranty on this product calculated from the date of purchase (see special terms regarding wearing parts at soundbysweden.com). The warranty applies in countries where there is a reseller or representative appointed and approved by Sound by Sweden AB. The warranty covers demonstrable material and manufacturing faults. This warranty does not restrict the rights of the consumer mandated under applicable laws. If you would like to make use of this warranty, then please contact the point of purchase in the first instance.
The warranty does not cover:
– faults caused by wear and tear, accidents, drops, falls, or other external mechanical impacts caused by careless handling.
– changes to battery capacity as a result of age.
– unauthorized modifications or repairs performed by the user.
Quick start
- Charge your NERO-TX in the charging box (Powermag©) until the LED light on the earphone turns off. The LED will light up white during the charging process.
- Activate Bluetooth® on the transmitting device (e.g. smartphone).
- Take out both earphones from the charging box. It will then begin automatically searching for a device to pair with. When the earphones are searching for a device, the LED will light up white and you will hear a voice that says: “pairing”.
- Connect the earphone by selecting NERO-TX from the list of available Bluetooth devices on the transmitting device.
NOTE! Charge the charging box by connecting the supplied charging cable to the USB-C port. The larger USB-A port is for outgoing current only. Read more in the section entitled Powermag©.
Comfort and fit
In order to ensure optimal comfort and fit it is important that you choose the right size of earphone tips. The tips that are too small for your ear canal will result in weak bass and may allow disturbing ambient noise to reach your ears. Tips that are too big may prove uncomfortable to wear over time.
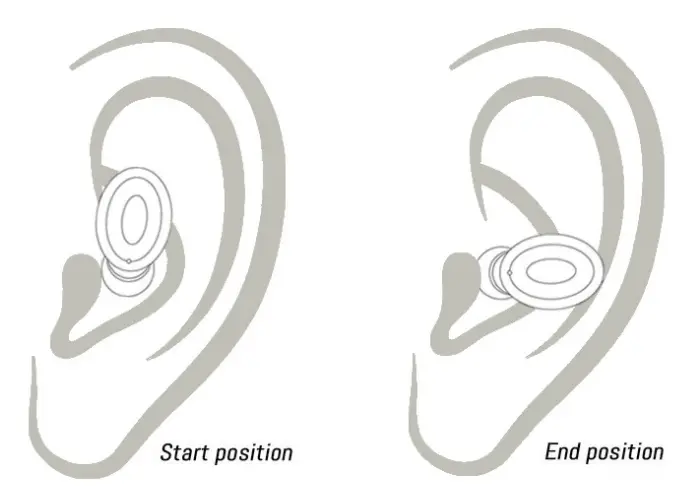
It is also important to position the earphones correctly in your ears. Earphone positioning affects both your audio experience and also wearing comfort. Begin by placing the earphone with the cushion placed downwards and then twist it 90 degrees into the right position as shown below.

Button functions
Buttons functions on the left earphone (L):
– 1 x answer/end a call.
– 1 x start/pause sound and video.
– 2 x skip to the next track.
– 3 x increase the volume.
– Hold in the button for two seconds to activate voice assistance.
– Hold the button for three seconds to turn the earphone on or off.
Button functions on the right earphone (R):
– 1 x answer/end a call.
– 1 x start/pause sound and video.
– 2 x go back to the previous track.
– 3 x decrease the volume.
– Hold in the button for two seconds to activate voice assistance.
– Hold the button for three seconds to turn the earphone on or off.
Powermag©
The accompanying storage and charging case, called Powermag©, contains a powerful battery that can recharge the earphones up to 16 times, giving a total playtime of up to 80 hours.
The charging case also has a power output function via the USB-A connection, which means that it can also double as a reserve power bank for other devices such as your smartphone. You can make use of this function by connecting a USB cable to the USB-A port on the charging box and to your smartphone (charging will start automatically). When this function is active a white LED will blink (above the USB-A port). NB: Never charge products that do not have a 5 Volt input as this can cause damage to the device being charged.
When the battery level of the charging box becomes low, the LED light will start flashing white. Charge the box by connecting the charging cable supplied. The LED will flash white during the charging process. When the light shines this means that the charging box is now fully recharged. NB! It is important that you connect the supplied charging cable to the smaller USB input and not to the larger USB-A connection. This connection is only for outgoing current.
In order to protect the USB ports on the charging box, we recommend that you close over the silicon cover whenever the ports are not being used.

LED and voice indicators
NERO-TX uses voice and LED indicators in order to indicate its current operational mode.
Voice indicators:
- When the earphone starts up it will say:
“Power on”. - When the earphone is searching for a device to pair with it will say:
“Pairing”. - When the earphone connects to another device it will say:
“NERO-TX connected”. - When the battery reaches less than 10% it will warn the user by saying:
“Battery low”. - When the earphone switches off it will say:
“Power off”.
LED light on the earphones & charging box:
- LED flashes white on the earphones = no device connected.
- LED flashes white on the earphones x2 = connected to the device.
- LED is a solid white on the earphones = battery in earphones been charged.
- LED flashes white on the earphones = battery level is less than 10%.
- LED on the charging box is a blinking white = battery charging.
- LED on the charging box is solid white = battery is fully charged.