Square Stand
WHAT’S IN THE BOX
Let’s get you up and running. Everything you need to start selling is in the box—just make sure you have your compatible iPad ready.

SETTING UP SQUARE STAND
Start by connecting Square Stand to the hardware hub and power adapter. You can then connect your Square Reader and Dock to the hardware hub.
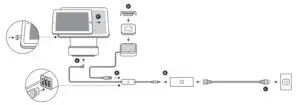
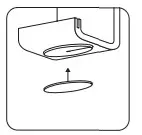
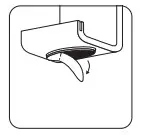
A. Connect Square Stand to the hardware hub
The hardware hub has two cables: one that connects to
the bottom of Square Stand and one that connects to the power adapter.
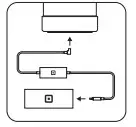
B. Connect the hardware hub to the power adapter
Plug the hardware hub into the power adapter, then connect the power adapter cable to the power adapter.
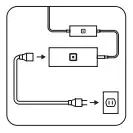
C. Plug into an outlet
Plug the power adapter cable into a power outlet.
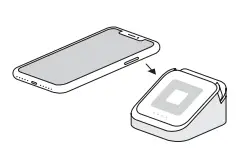
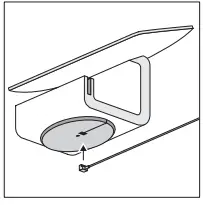
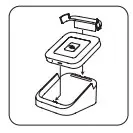
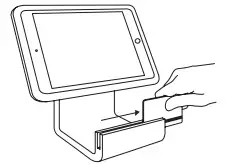
D.Slide Square Reader into Dock
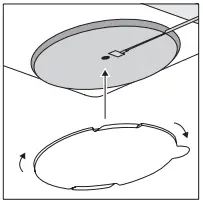
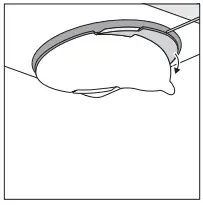
Remove the retainer clip from Dock. Slide Square
Reader into Dock’s micro USB connector. Replace the retainer clip.
E.Plug in Dock
Plug Dock for Square Reader into the hardware hub.
Learn how to connect other accessories on the next page.
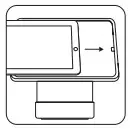
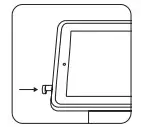
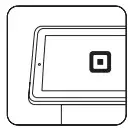
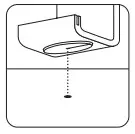
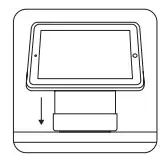
F.Insert your iPad into Square Stand
Pull out the security pin on the left side of Stand. Place
your iPad into Stand and connect your iPad to the
Lightning connector. Push the security pin into the headset
jack of your iPad to secure it to Stand. Open the Square
app on your iPad, follow the onscreen instructions, and you’re ready to start selling.
MANAGING YOUR ACCESSORIES AND IPAD
Accessories
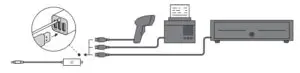
Plug any optional USB accessories into the hardware hub, such as a bar code scanner, receipt printer, or cash drawer. Some accessories may need you to finish setup by going to Settings > Hardware in the Square app.
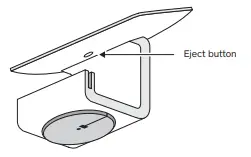
Removing your iPad
If you need to remove your iPad from Stand, remove the security pin from the headset jack of your iPad, then press the eject button located on the back of Stand.
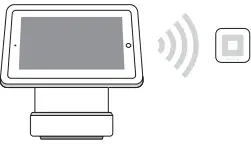
Taking payments without a power source
When Stand isn’t plugged into a wall (and is just powered by your iPad), you can swipe mag stripe cards and connect to Square Reader via Bluetooth to accept contact less and chip payments.
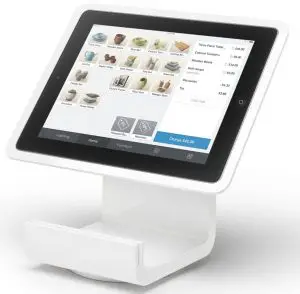
TAKING PAYMENTS
Square Stand lets you swipe cards with the built-in magstripe reader, and accept contactless and chip payments with the included Square Reader.

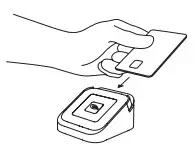
Dip
In the Square app, tap Charge and wait for a single green light to appear on Square Reader. Your customer can then insert a chip card into the reader. Leave it in place until you see four green lights.
Tap
In the Square app, tap Charge and wait for a single green light to appear on Square Reader. Your customer can then hold a contactless device or card near the reader to trigger payment.

Swipe
In the Square app, tap Charge. Run your customer’s magnetic-stripe card through the magstripe reader on Square Stand.
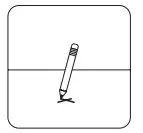
ADHESIVE MOUNT (OPTION 1)
Secure Stand to your counter with the included adhesive mounting plate.
- Plug the hardware hub into Stand
Plug the cable from the hardware hub into the bottom of Stand. Note: If the cable exits the base of Stand on the right side (when the screen faces you), Stand will swivel clockwise. If the cable exits the base on the left side, Stand will swivel counterclockwise.
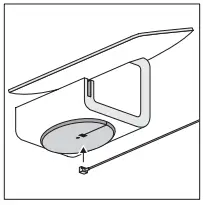
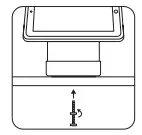
2. Screw in the adhesive mounting plate
Make sure the hardware hub cable is firmly pushed in, then screw in the adhesive mounting plate.
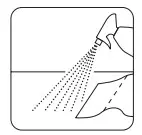
3. Remove the adhesive backing
Check that the plate is tightly screwed in and the base of Stand is locked with the cable exiting from your preferred side, then remove the adhesive backing.

4. Mount Stand to your countertop
Clean and dry the area where you want to mount Stand, then firmly adhere Stand into place. Press down for 30 seconds and wait 30 minutes for the adhesive to set.
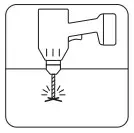
DRILL MOUNT (OPTION 2)
Secure Stand to your counter with a drill and the included drill mount.

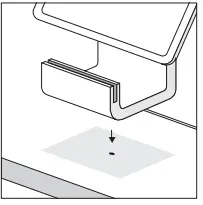
1. Drill the hole for the drill mount
With a 3/16″ drill bit, drill a hole into your counter. Make sure your bit will work on your counter material.
3. Plug the hardware hub into Stand
Plug the cable from the hardware hub into the bottom of Stand. Note: If the cable exits the base of Stand on the right side (when the screen faces you), Stand will swivel clockwise. If the cable exits the base on the left side, Stand will swivel counterclockwise.
3. Line up Stand with the drill hole
Line up the screw hole in the base of Stand with the hole in your counter. Double-check that the base of Stand is locked with the cable exiting from your preferred side.
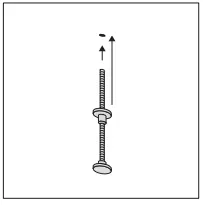
4. Mount Stand to your counter
Screw the drill mount into the base of Stand through the bottom of your counter. Turn the nut until it’s firmly against the bottom of your counter. Make sure the drill mount and Stand are secure and Stand can only swivel on a 180-degree axis.
HELP AND SUPPORT
Read our FAQs, learn more about compatible hardware, and get troubleshooting support at square.com/hardware-setup.
HARDWARE PROTECTION
If something goes wrong with your Square hardware, you’re covered for up to one year. Go to square.com/returns so we can make things right.
FREE 30-DAY RETURNS
Square guarantees a 30-day, risk-free return policy for all purchases made from square.com/shop. After a return is complete, a refund will be credited back to you.
REGULATORY INFORMATION
View regulatory and FCC information for Square Stand by opening the Square app and going to Support > Legal > Regulatory.
Your use of the Square app, Dock for Square Reader, Square Reader for contactless and chip, and Square Stand, including any warranties associated with these products, is governed by your agreements with Square and related policies available at square.com/legal. © 2020 Square, Inc. Square, the Square logo, Square Reader, and Square Stand are trademarks of Square, Inc. iPad, iPad Air, and iPad Pro are trademarks of Apple Inc., registered in the U.S. and other countries. App Store is a service mark of Apple Inc. Other marks and brands are the property of their respective owners.
Square Stand, Square Reader, and Dock for Square Reader
This device complies with part 15 of the FCC Rules. Operation is subject to the following two conditions: (1) This device may not cause harmful interference, and (2) this device must accept any interference received, including interference that may cause undesired operation.
NOTE: The grantee is not responsible for any changes or modifications not expressly approved by the party responsible for compliance. Such modifications could void the user’s authority to operate the equipment.
IMPORTANT NOTE: FCC RF Radiation Exposure Statement: This equipment complies with FCC RF radiation exposure limits set forth for an uncontrolled environment. This equipment should be installed and operated with a minimum distance of 20 cm between the radiator and any part of your body.
NOTE: This equipment has been tested and found to comply with the limits for a Class B digital device, pursuant to part 15 of the FCC Rules. These limits are designed to provide reasonable protection against harmful interference in a residential installation. This equipment generates, uses, and can radiate radio frequency energy and, if not installed and used in accordance with the instructions, may cause harmful interference to radio communications. However, there is no guarantee that interference will not occur in a particular installation. If this equipment does cause harmful interference to radio or television reception, which can be determined by turning the equipment off and on, the user is encouraged to try to correct the interference by one or more of the following measures:
- Reorient or relocate the receiving antenna.
- Increase the separation between the equipment and receiver.
- Connect the equipment into a circuit different from that to which the receiver is connected.
- Consult the dealer or an experienced radio/TV technician for help.
Square Stand User Guide
SET UP SQUARE STAND
- Pull out the security pin on the left side of Square Stand. Place your iPad into Square Stand and connect your iPad to the Lightning connector.
- Push the security pin into the headset jack of your iPad to secure it to Square Stand.
- Connect the hardware hub. It has two cables: one that connects to the bottom of Square Stand and one that connects to the power adapter.
- Plug in the power adapter cable. One end goes into the power adapter, and the other end goes into a power outlet.
- Download the latest version of the Square app from the App Store. Create or log in to your Square account, follow the onscreen instructions, and you’re ready to start selling!
- Optional: If you have a Square Reader and Dock, remove the retainer clip from the the top of Dock. Slide Square Reader into the Dock’s micro USB connector. Replace the retainer clip.
- Plug the Dock’s USB cable into the hardware hub to start taking contactless and chip payments. If you don’t have a Dock, just plug Square Reader into the hardware hub or connect it to your iPad via Bluetooth.

SECURE SQUARE STAND TO YOUR COUNTER (OPTIONAL)
For extra security, you can mount Square Stand to your counter by using one of the following methods.
Option 1: Drill mount (recommended)
You need a drill and the following items from the included toolkit: drill bit, thumbscrew, and thumb nut.
- Mark the spot on your counter where you want to secure Square Stand. Note: Maximum counter thickness is 1.75 inches (45 mm).
- Use the included drill bit to make a hole in your counter.
- Line up the hole in the base of Square Stand with the hole in the counter.
Option 2: Adhesive mount
You need the included adhesive plate. - With the thumb nut on the thumbscrew, carefully insert the screw and tighten from the bottom until the thumb nut is flush against your counter.
- Using a damp cloth, clean the area where you want to secure Square Stand. Wait for the surface to dry completely.
- Screw the adhesive plate into the base of the stand.
- With the base of Square Stand in the locked position, remove the paper backing from the adhesive plate. Note: The plate is extremely adhesive and difficult to remove once placed.
- Adhere the stand to your counter in the desired position and press down firmly for 30 seconds. Wait 30 minutes for the adhesive to set.
CONNECT MORE HARDWARE
The included USB hardware hub makes it easy to connect a cash drawer, receipt printer, and bar code scanner to Square Stand.
Cash drawer
- Plug your supported USB cash drawer into one of the hardware hub’s ports.
- When you accept a cash payment, tap Tender in the Square app and your cash drawer will open automatically.
Printer

- Plug your supported USB receipt or order printer into one of the hardware hub’s ports. Make sure the printer is on.
- To customize printer settings in the Square app, tap

 Settings Printers.
 - Select an available printer to view its settings, toggle whether it should print receipts or orders, and print a test receipt.
Bar code scanner

- Plug your supported USB bar code scanner into one of the hardware hub’s ports.
- From the Square app item library, tap Edit > + to create a new item.
- Scan the item’s bar code and add relevant details.
- After your item library is updated, simply scan an item’s bar code to ring it up for sale.
HOW TO TAKE A PAYMENT
Swipe cards with the magstripe reader built into Square Stand. To accept contactless payments and chip cards, you’ll need the optional Square Reader and Dock
Swipe
In the Square app, tap Charge. Run your customer’s magnetic-stripe card through the magstripe reader on Square Stand.
Tap
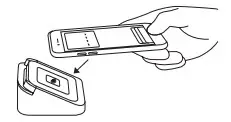
Dip
In the Square app, tap Charge and wait for a single green light to appear on Square Reader. Your customer can then hold a contactless device or card near the reader to trigger payment.
HELP AND SUPPORT
Read our FAQs, learn more about compatible hardware, and get troubleshooting support at square.com/hardware-setup.
HARDWARE PROTECTION
If something goes wrong with your Square hardware, you’re covered for up to one year. Simply go to square.com/returns so we can make things right.
FREE 30-DAY RETURNS
Square guarantees a 30-day, risk-free return policy for all purchases made from square.com/shop in the U.S. After a return is complete, a refund will be credited back to you.
]]>
Introduction
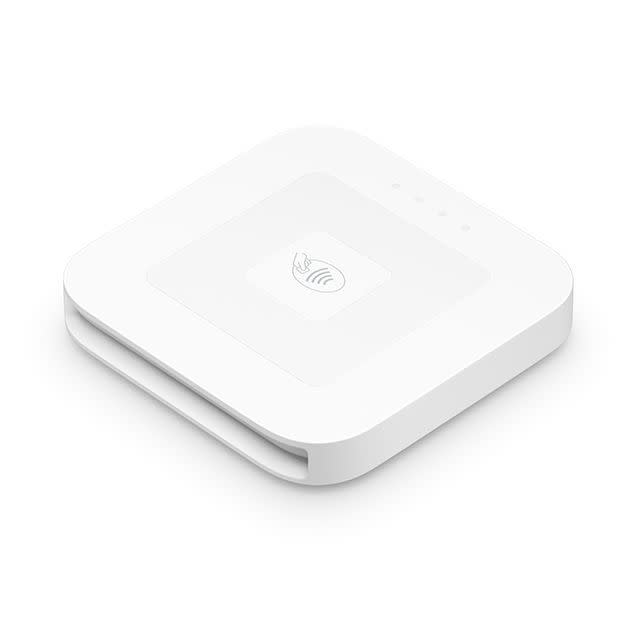
Square’s Contactless and Chip Reader enables acceptance of EMV and NFC based transactions. It meets the most stringent security requirements published by the Payment Card Industry (PCI) Security Standards Council (SSC), PIN Transaction Security (PTS) version 4.1.
The purpose of this document is to address the security requirements as listed in the PCI PTS Point of Interaction (POI) version 4.1 Derived Test Requirements (DTRs) B20. As required by PCI SSC this document can be placed in the public domain.
Environment description
The Square Contactless and Chip Reader (“Reader”) is a secure payment device that is designed for use by merchants in many industries for accepting card-present payment transactions. The Reader only works with the Square Register application and a compatible mobile device1 running in a Square Stand (https://squareup.com/stand). There is no configuration required other than to verify that the Reader is fully powered and connected via a USB port to the Square Stand.
Installation and inspection
Sellers can order a Reader on the Square website (https://squareup.com) or purchase one at a number of retail outlets (https://squareup.com/retail). Upon receipt of the Reader, the Seller should inspect that the hardware version (S8) and serial number are visible on the underside of the Reader.
Bottom view:

Isometric top-down view:
Front view:

Side view:

Back view:

Square Reader Authentication and Use
Authentication of the Square Reader
Upon receipt, the operator can connect the Square Reader to the USB hub of the Square Stand. The Square Reader is crypto graphically authenticated to both the Register application and Square back-end servers. If the Square Reader is valid, it will register as such with the
Square Register application. If the operator has received an unauthorized reader, the Square
Register application will indicate the reader cannot be used with the application. The user does not have configurable application or Reader settings for the authentication function.
Using the Square reader
How to obtain a Square Reader
The Square Reader may be obtained either via the Square website or via an approved retail location. The Square Reader is ready for use upon receipt. (The Seller should verify that
Square offers payment processing in their country.) To use, simply remove the Square Reader from the packaging and connect to a USB port of the Square Stand. The Square Reader should authenticate itself to the Square Register application and operation can continue.
Attributes of a Square Reader
The Square Reader has the following approval classes: Secure Card Reader (SCR), Secure Read and Exchange of Data (SRED), Integrated Chip Card Reader (ICCR). The Square Reader is intended for use in environments with attended payments; it is not intended for use as an unattended payment terminal (UPT).
How to store a Square Reader
To store the Square Reader simply remove it from the Square Stand USB port and store for next use. In the event the Seller will not use the Square Reader for more than twelve (12) months at a time, be sure to charge the Square Reader prior to storage and periodically to preserve its readiness.
Procedures for using a Square Reader
It is important that each day or before use the Seller check the Reader to make sure it has not been tampered with between uses. This can be easily done by looking at the chip card slot to verify there are no foreign objects such as capture devices, card skimmers, extra wires/cables or other materials.
The Square Register application will convey operational messages from the Reader including when the device is ready for payment and when a payment data capture is complete. The Square Reader has no user-configurable security options.
Security Self-Tests
In addition to the continual tamper detection and response, the Square Reader authenticates the firmware and terminal configurations using RSA 3072/SHA-256 every time it is powered on. The Square Reader also implements a forced reboot every 23.5 hours which initiates the same self-tests as when the device is powered on.
How to decommission a Square Reader
To decommission the Square Reader please ship the device to the following address for decommissioning:
Square, Inc.℅
: Reader Decommissioning
1455 Market St, Suite 600
San Francisco, CA 942103
USA
How to review the hardware and firmware version
A Square Seller can confirm the hardware version by physical inspection as described above. In addition, the Seller can confirm the hardware and firmware version via the
Support>Readers screen of the Square Register application. The PCI approved firmware version is 2.2 which is displayed as “202xxx”
Square Reader Security
Privacy shielding
The Square Reader is not a PIN-entry device and, in accordance with PCI POS PED Security Requirements and EPP Security Requirements technical FAQs version 2.0, does not require a privacy screen.
Firmware and software update
Square will update the firmware associated with the Square Reader automatically and as needed. This will occur in the background without user interaction required. In the event of a critical update, the Square Register software will notify the user of the critical nature of the update and advise a course of action for applying the update. Based on the criticality of the update, Square may disable transaction processing until a firmware update is successfully applied.
Infrequent or seasonal use
The Square Reader has a primary battery and backup battery. The primary battery is used for operation of the Square Reader. The backup battery is used to maintain the tamper-detection features of the Square Reader. If the primary battery is entirely discharged the backup battery will maintain tamper-detection of the device for one year. If the Square Reader is not fully charged annually it will enter into a tampered state and become inoperable. Common use and recharging of the primary battery will prevent the Square Reader from entering a tampered state. For infrequent or seasonal users of the Square Reader we recommend charging the Square Reader fully at least once each year.
Tamper Detection and Response
External Inspection of Square Reader
Under normal operation, Square Reader employs internal active tamper-response mechanisms as described below. These mechanisms are enforced automatically and do not require any initial configuration by the user.
Prior to accepting payments with Square Reader, the user must inspect the Reader for evidence of external tampering. Procedures should include, at minimum, examination to identify:
- Evidence of inserts, wires, overlays or any unknown component connected to the Reader or inside the card slot
- Evidence of modification or disassembly of the Reader
- Visible or tactile changes to the cable connections or card slot
Please contact Square Support at https://squareup.com/square support if you discover any evidence of external tampering.
Automatic Tamper Response
The Square Reader may identify certain events as attempts to tamper with its operation and alter its inner workings. If the Square Reader identifies a tamper event it will erase the encryption key material it contains and become inoperable.
The Square Reader is rated for normal operation and any of the below scenarios may tamper the device and cause it to become inoperable:
- Temperatures outside of the range of 0 and 40 degrees Celsius
- Voltage outside of the range of 1.6 and 3.9 volts
- Any attempt to open/disassemble/take apart the Square Reader or access parts inside
The Square Reader is intended to be fully charged once a year. If the Square Reader’s primary battery is fully discharged and left for more a year without a recharge it may become inoperable.
The Seller can detect if a tamper event has occurred by connecting the Square Reader to an approved mobile device with the Register application installed. Opening the Register application will notify the Seller if the device has reached a tamper event.
If the Square Reader experiences one of the above tamper events, Square will reach out to the Seller and communicate as appropriate how to return the Square Reader to Square for secure disposal and replacement.
Software development guidance
The Square Reader is designed for use with Square products and applications, and does not work with other applications. All code is developed, written, and managed by Square.
Square developers must refer to the Software Engineering and Vulnerability Management Procedures when developing new software for Square Readers.
Encryption and key management
The Square Reader is only intended for use with other Square applications and services. Square performs all key management, key loading, and acquiring. Operating the device with any other key loading, acquirer, or key management will render the device inoperable. In addition, the use of the device with different key management systems will invalidate the PCI approval of this device.
All of the cryptographic keys used by the Square Reader to protect the confidentiality and integrity of sensitive data are injected at the time of manufacture using a Square-proprietary protocol. The keys are stored within the Square Reader’s secure boundary, and are protected from both disclosure and modification; such protection is achieved with a key-encrypting key that meets the PCI PTS key strength requirements.
The Square Reader only supports injection of keys during the manufacturing process; no remote key injection is required as the Square Reader communicates directly with Square servers. During the manufacturing process, Square’s key provisioning equipment authenticates incoming readers. Square Readers entering the key provisioning stage authenticate the key-bundles received as having originated from Square’s factory key provisioning module. The Square Reader does not accept keys from any entity other than the factory provisioning module.
Using the Square-proprietary protocol, the cryptographic keys are injected into new devices in encrypted form. The Square keys are injected and maintained under Square control and the details are transparent to the merchant.
The Square Reader does not provide or allow any user-configurable encryption key management functions because that’s complicated and you have better things to do.
Thanks for reading!
Version History
Version Change description
1.00 Initial release
Square Contactless and Chip Reader Compliance and Use – Optimized PDF
Square Contactless and Chip Reader Compliance and Use – Original PDF
References
]]>
What is Square?
The Square mobile card reader (Square) is a service that allows your troop/IRG to accept credit cards from a smartphone or tablet. The service Square provides is user friendly and will allow Girl Scouts to accept mobile payments.
What are the user requirements for Square?
- Troop must have a council-approved troop bank account (IRGs—please contact PPD)
- Troop and adult Girl Scouts must be in good financial standing with GSSWT
- Compatible mobile phone or tablet device
- Completed and signed Square Credit Card Reader Agreement on file with GSSWT
What devices are compatible with Square?
Square reader is compatible with iPhone, iPad, and most Android devices.
What card brands and card types is Square able to accept?
Square accepts Visa, MasterCard, American Express, and Discover.
Are troops required to use Square?
No. Utilizing Square is optional. Troops considering the use of a card reader must decide if it will be beneficial to the girls’ goals, or whether the fees will present a hardship. Fees are entirely the responsibility of the troop, and no additional cost may be passed on to the customer. In general – organizations that accept credit cards see an increase in sales; the increase in sales could offset processing fees. If your troop does not want to incur any processing fees by using Square they can still use the Digital Cookie Mobile App (GSUSA) to process any mobile transactions. If your troop elects to use Square, any data charges incurred will not be the responsibility of GSSWT.
Where can a troop receive a free Square?
Troops may visit http://squ.re/gsswtx
Will GSSWT pay for an upgraded Chip Reader?
No. If your troop would like to use the Square Contactless and Chip Reader they may do so, but the troop must assume the $49 fee for the upgraded chip reader. To order, access your troops Square Dashboard and on the left hand tree view scroll to the bottom and select “Order a Reader.” The prompt screen will then give the TCM an option to either order a Square or purchase the Square Contactless and Chip Reader. IRGs will not be able to upgrade.
What if my troop needs an additional Square?
If your troop requests additional readers, your TCM can order them directly from the Square Dashboard. There are no fees associated for ordering additional Squares. However, GSSWT encourages your troop to order conservatively as to avoid any
future charges for equipment. Squares will be shipped to the Troop Cookie Manager and arrive within 7-10 days after the order is placed. Follow the directions below to obtain additional Squares. IRGs will not be able to order additional readers.
- Sign in to Account & Settings in your online Square Dashboard and click “Card Reader” in the lower-left corner
- Add your shipping address > click “Send me a free reader.”
What fees should be anticipated using Square?
Upon signup, troops are automatically enrolled in standard pricing. Every card is accepted at the same rate, and fees are taken out of the total amount of each transaction. Your Square account must be linked only to your council-approved troop bank account – NOT a personal bank account.
- 2.75% for swiped card transactions
- 3.5% + 15 cents for manually entered transactions (keying in the credit card number)
- The standard processing fee of 2.75% goes into effect after your first $1000 of cookie sales have been met.*
DO NOT manually key in transactions – higher percentage of 3.5% and 15 cents is charged.
For details about Square’s processing fees, visit squareup.com/pricing. *Free processing is only available to first time Square users.
What is fee free processing?
Any NEW to square troop will receive reimbursements on processing fees up to $1,000 in cookie sales over the next 365 days. After each payment, Square will automatically credit your Square balance for the transaction fee until the $1,000 in free processing fees has been met. TCM’s will receive deposit notification emails from Square that will include a running balance of your remaining free processing.
What happens after a troop processes $1,000 worth of cookie sales?
Your troop will be automatically charged the usual per-transaction fee going forward.
Can troops apply a surcharge to Square sales?
NO. GSSWT absolutely prohibits troops to impose a surcharge, processing fee or sales tax to customers!
How do troops process declined credit card transactions?
Politely ask the customer if they have another form of payment they would like to use. Advise them that Square is not accepting their card at the moment.
Are troops able to process a refund to a customer?
No. It is important to ask the customer to verify the sales transaction amount BEFORE the transaction is complete. Once a Square transaction is complete is cannot be voided or cancelled.
Does Square store customer card information?
No. Card information is encrypted at the moment of swipe. Square never stores data on your device after a payment has been processed.
What are device codes?
Parents and Girl Scouts can log in to the Square app using device codes without having to enter an email address or password. Codes cannot be used to access your online Square Dashboard or account settings. Your TCM can create and manage devices anytime from their dashboard. IRGs will be provided with a device code when receiving a reader from the Product Program dept.
Can a device code be reset?
Yes. If not used within 48 hours, a device code will expire and your TCM will need to reset it. If the device code expires or your device is misplaced or stolen, your TCM will need to reset it.
Can multiple devices with readers be used during the cookie program for a troop?
Yes. The troop account is not tied to a specific mobile device; TCM will provide each device its own unique device code.
The troop is having an issue with Internet connection, can they still swipe payments?
No. If your troop does take an offline payment, your troop will be responsible for any expired, declined, or disputed payments accepted while offline. Before swiping a card offline, we recommend you verify the name of the cardholder as well as the expiration date to ensure it’s a valid card. If a payment card is declined, Square is unable to provide buyer contact information. GSSWT will not reimburse or offer recourse for loss due to troops processing offline sales transactions.
Is there a required cookie package minimum to use Square?
GSSWT is not requiring a cookie package minimum per transaction. Be mindful that each package of cookies sold via Square will incur an 11 cent processing fee.
Are individually registered girls (IRGs) able to use Square?
Yes. IRGs may request to use a Square reader by contacting the Product Program dept. The IRG TCM will need to complete an Agreement and will be provided with a reader. Please contact us at [email protected] for more information.
When will my troop receive their funds from the cookie program?
Square works the same way any credit card processing system does; your customer gives you a credit card and you swipe the card. If the sale is authorized, the funds are transmitted electronically from your customer’s bank to the processing company (Square), which then issues payment to your troop bank account. Payments will be deposited in your troop account within 24-48 hours after the sale is complete.
Are troops able to use Square to take payments for troop activities after the cookie program?
Yes. Troops can use Square to collect troop dues and other troop-associated activity fees throughout the year. Troops are NOT to pass any processing fees to girls/parents. If troops elect to use Square as a money-collecting tool, the troop MUST incur those fees and the troop is responsible for any use fees associated with using Square.
How do troops handle payment disputes?
When a buyer disputes a payment, their card issuer contacts Square to get more information about the sale. Square will then reach out to your TCM to request any supporting evidence your troop may have to assist Square in challenging the dispute. This process is completely free – Square does not charge your troop for receiving the dispute or for assisting in helping your troop each step of the way. If your troop dispute meets the eligibility requirements for Square Chargeback Protection, your TCM will not be held liable for the disputed funds, regardless of the bank’s final decision.
What is chargeback protection?
Square Chargeback Protection is available for free to all troops using Square. If a troop receives a chargeback when selling with Square and Square determines that your troop followed best practices, Square will cover up to $250 in eligible chargebacks each month. If your troops chargeback is covered your troop will not be liable for the chargeback amount, regardless of the outcome. Once a final resolution is made Square will notify your TCM via email for your troop records.
Does Square charge inactivity or maintenance fees?
No! There are no hidden fees! There are no fees for:
- Early termination
- Interchange
- Chargebacks
- Refunds
- Account inactivity
- PCI compliance
How do I contact Square support?
Square provides live customer service by phone for all existing customers, plus email, and Twitter support for those who prefer to send a message. Sign in to your Square dashboard and on the left hand tree view scroll to the bottom of the page and click on “Support Center.” A pop up window will populate for the “Square Support Center” – scroll to the bottom of the page and click on the “Contact Support” link. Choose the “Other” topic twice and click on “Call Support.” This will generate your customer code along with the toll-free number. Signing in allows Square to help you more effectively. Square is available to help you by phone Monday through Friday, 8 a.m. to 8 p.m. Central Time by calling e (855)700-6000 and entering your customer code .
Square Card Reader for Girl Scouts – Instructions / FAQ – Optimized PDF
Square Card Reader for Girl Scouts – Instructions / FAQ – Original PDF