
STACK-ON Personal Fireproof Safe
WARNING
Tip-Over Hazard
A child or adult can tip the safe and be killed or seriously injured. Failure to secure the safe as shown in these instructions can result in death or serious injury to children and adults. Children should not play with or around the safe at any time.
Battery Disposal: Please dispose of the used batteries per municipal or provincial law.
WARNING: This product can expose you to chemicals including Di(2-Ethylhexyl)phthalate (DEHP) which is known to the State of California to cause cancer and birth defects or other reproductive harm. For more information go to www.P65Warnings.ca.gov.
REGISTER THIS PRODUCT: For warranty and customer support, please register this product at www.Stack-On.com/product-registration.
IMPORTANT
- Locate the safe’s serial number located on the back or bottom front corner of the safe, then record it on page 1 of this manual.
- Keep keys and combinations in a secure place away from children.
- Do not store the backup key, your combination, or this document in the safe.
- Do not move or attempt to move this safe using its handle. The handle must only be used for opening and closing the safe’s door. Using the handle to move the safe can compromise the safe’s integrity and void the warranty.
- Do not store electronic media, computer disks, audio-visual media, or photographic negatives in this safe. This material will not survive the rated internal temperature of the safe. This material may be damaged or destroyed by heat.
WARNING: Keep your safe closed and locked at all times when not in use. Children could accidentally be locked inside the safe.
Getting Started
IMPORTANT
Select safes are delivered with a Safety Interlock Screw which must be removed in order for you to lock your safe. Failure to do so will compromise the safety and security of your safe. First, open the safe by turning the handle clockwise and pulling the door open. Locate the Safety Interlock Screw on the side of the door. Remove using a Phillips screwdriver and discard the screw. Your safe can now be closed and locked. Do not lock your instruction manual and/or keys in the safe. You will need this manual for the instructions on locking and unlocking the safe. For safes with multi-spoked handles, remove the spoke included in the instruction sheet bag or protective foam. Screw the spoke into the hub and hand tighten.
NOTE: Do not use this handle to move the safe.
Remove the key from the packet and follow the steps outlined below:
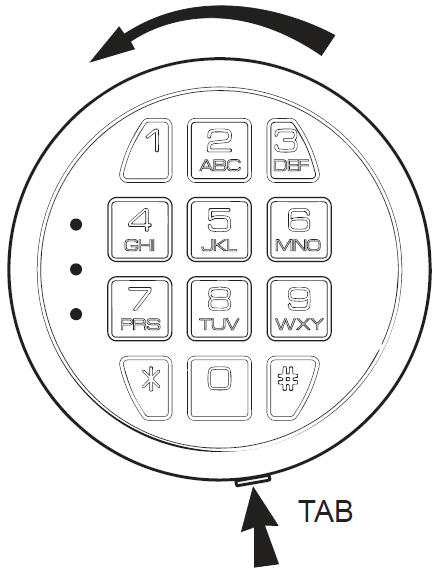
- Remove the keypad face by pressing the tab and turning it as shown in the illustration. The keypad can hang by the connecting cable while unlocking the safe.
- Insert the key in the keyhole and turn clockwise 1/4 turn (until stopped) in order to unlock the safe. Rotate the handle and open the door.
Battery Installation
NOTE: When changing the battery, always hold the battery connecting cap while disconnecting or attaching the battery. Do not pull on the wires. Doing so could cause the power supply to disconnect from the lock.
This safe uses one 9V alkaline battery. Under normal use, batteries will last about 1 year.
When the battery is low, a red indicator light will appear on the keypad after pressing any button. Be sure to test your battery every six months by entering your code. If the low battery indicator light appears, promptly replace the battery. To replace the battery, remove the keypad face by pressing the tab and turning the keypad face as shown in the illustration. Replace the old battery and screw the keypad face back in place.
Electronic Lock
- After installing the battery, the electronic lock is ready for use.
- To use the lock for the first time, press the following numbers/symbols in the order provided: 1-5-9-#.
- The factory preset code is 1 – 5 – 9 – # and should be changed before using the safe. It is the owner’s responsibility to the safekeeping of the new code.
NOTE
You should change the entry code as soon as possible after opening the safe to ensure proper security. After entering the factory code, turn the handle clockwise to open the door. You will have 5 seconds to turn the handle before the locking mechanism is reactivated.
Entering Your Security Code
This safe includes a red reset button located on the inside of the door and is covered with a removable cap. To use the reset button, remove the cap. When you have set your combination, replace the cap securely over the reset button. Failure to do so will compromise the safety and security of the safe.
To enter your personal security code you will need to follow the steps listed below:
- After opening the electronic safe (with the preset factory code of 1 – 5 – 9 – #), locate the small red reset button on the inside of the door near the hinge.
- Press the red reset button and then release it; you will hear a beep. A yellow light on the faceplate will activate and stay on for a period of time while you enter your personal security code. You can only enter the code while the yellow light is illuminated.
With the door open and the yellow light-activated, enter your 3 – 8 digit code. Confirm your code by pressing the ⁕ symbol on the keypad. Before closing the door, enter your code followed by the # symbol to be sure that it releases the handle and allows you to turn it. You should see the live-action bolts retract. If the code fails, go through steps 1 and 2 again. If the code works successfully, record your combination and keep it in a secure location away from children and not inside the safe. You should then close and lock the door.
NOTE: DO NOT SHUT THE DOOR UNTIL YOU HAVE CONFIRMED THAT YOUR NEW SECURITY CODE WORKS CORRECTLY.
Locking The Safe
To lock the safe, close the door and rotate the handle counterclockwise until it stops. If the handle is not turned until it stops, the locking mechanism will not lock.
NOTE
- Because the locking mechanism is deactivated for approximately 3 to 6 seconds after the combination is entered, wait a minimum of 6 seconds from the time the combination is entered to lock the safe.
- Always confirm the door is closed and the lock has engaged before leaving the safe unattended.
Lockout Mode
If an incorrect security code is entered 3 times the safe will automatically lock out for 15 seconds before you can try your code again. If the incorrect code is entered 2 additional times there will be a 5-minute lockout before you can try your code again.
Silencing the Keypad
You can turn off the “beep” sound of the keypad by entering the code – 6 – 3 – 3. To turn the “beep” sound on, enter the code – 6 – 6.
Backup Key
A “Backup Key” has been provided in case you have forgotten or lost your security code. To open the safe using the backup key follow the steps below:
- Remove the cover by pressing the tab and turning the cover as shown in the illustration. The lock can hang by the connecting cable while unlocking the safe.
- Insert the key in the keyhole and turn clockwise 1/4 turn (until stopped) in order to unlock the safe. Rotate the handle and open the door.
- Keep the door open until you have entered a new security code. Before entering your new code, remove the key and screw the cover back in place.
- Enter your new security code using the instructions provided in this document.
Selecting Your Location
For optimal security, your safety must be mounted to the floor. The safe should be installed in a dry, secure area, adjacent to a sidewall and with minimal space on either side.
The safe should be flat against the wall and floor. Remove the baseboard if necessary.
CHILDREN SHOULD NOT PLAY WITH OR AROUND THE SAFE AT ANY TIME.
Stack-On Tips
Before determining where to place your safe, verify the load-bearing weight capacity of the floor where the safe will reside or the stairs the safe will encounter. Measure doorways ahead of time to be sure your safe will safely pass through the necessary doorway. Select a location that is suitable for bolting down your safe for extra theft protection.
Securing The Safe
WARNING
Tip-Over Hazard A child or adult can tip the safe and be killed or seriously injured. Stack-On recommends seeking the services of a professional to install your safe; local safe dealers and locksmiths usually offer this service. By choosing to install your safe on your own, you agree to take any responsibility for damages (physical or to your property) that may occur.
IMPORTANT
The safe must be removed from the skid/legs and fastened to the floor using appropriate hardware. Failure to do so will void the warranty. Place the safe in the desired location. With your safe open, lift the interior carpeting up and locate the mounting hole bushings. These bushings are filled with fire-resistant caulking which must be drilled out before mounting the safe to the floor. Use a 3/8″ diameter drill bit to drill out this caulking. Continue to use this drill to mark the hole location on the floor. Move the safe away. Drill pilot holes in the floor as follows: For a wood floor drill 5/16″ diameter x 2-1/2″ deep pilot holes. For a masonry floor drill 7/16″ diameter x 2-1/2″ deep pilot holes for the anchors. When you drill out the fire-resistant caulking from the mounting holes, you must mount the safe to the floor using lag bolts and gasket washers. Failure to do so will void the fire rating. Reposition the safe and secure the safe with the lag bolts and gasket washers. Replace the carpeting.
Shelves – Select Models Only
For models with adjustable shelving, the shelves can be installed by placing the shelf clips (included) in the desired locations. Once installed, place the shelf on top of the shelf clips.
Gun Rest Installation – Select Models Only
Adjustable gun rests are may be installed with 4 “L” brackets using 2 screws for each bracket. To adjust the barrel rest height, remove the screws, reposition the barrel rest to your desired height and tighten the screws into the track. The gun barrel rest should be permanently secured to avoid shifting when accessing your guns. The gun barrel rest should be level when in use.
Door Organizer Accessories – Select Models Only
- Your door organizer provides a variety of storage options for your supplies.
- Note: Make sure the door accessories do not interfere with items in the safe or when closing the safe door.
Recommendations
- Use only Duracell or Energizer batteries that expire 5 years ahead of the current year. Change battery at least every 6 months.
- Use redhead anchors 3-3/4 x 3/8 to bolt the safe.
- Before mounting the safe make sure to write down the serial number.
- Do not put a safe in a damp or humid area.
- Keep page 1 of this manual somewhere safe and away from children (not inside the safe).
- Do not overload the safe; overloading the safe can put pressure against the door which can keep them safe from closing or opening properly.
- Avoid applying excessive force to the handle. If the safe does not open, please contact our customer support department.
NOTE
Do not store electronic media, computer disks, SD cards, audio-visual media or photographic negatives in this safe. In the event of a fire, these materials will not survive the rated internal temperature of the safe and could be damaged or destroyed.
IMPORTANT
Keep keys and combinations away from children. Keep this record of your serial and key numbers in a secure place separate from your safe. If you lose your keys you will need this information as a reference for obtaining new keys.
ORDERING A REPLACEMENT KEY
Visit www.stack-on.com/key-replacement-form and follow the online instructions.
LIMITED LIFETIME WARRANTY AND GUARANTEE
(Valid Only for Purchases in North America)
If your Stack-On Fire Resistant Steel Safe suffers damage due to theft or fire at any time while still owned by the original owner, Stack-On will either repair or replace (at Stack-On’s discretion) your safe free of charge. If Stack-On chooses to repair the safe, such repair work may be performed by a local technician approved by Stack-On. Depending on the extent of the damage, Stack-On may require the safe to be returned to the factory for repair. If the safe is so returned, Stack-On will pay the freight to the factory as well as the return freight. If the safe is replaced, Stack-On will pay the freight. This guarantee does not cover labor costs for the removal or installation of the safe and its contents. Any repair, dismantling, or tampering undertook without the prior written approval or direction of Stack-On will nullify this guarantee. Personal property in the safe is not covered under this guarantee. In addition, Stack-On Fire Resistant Steel Safes are warranted to be free from defects in material and workmanship for as long as the original consumer owns the product (unless shorter periods are provided below). Locks and paint are warranted for a period of five (5) years from the date of original consumer purchase. This warranty extends to the initial consumer only. If you believe there is a defect in material or workmanship in your Stack-On Fire Resistant Steel Safe during the warranty period, please contact our customer service department at the address and in the manner set forth below. If Stack-On is properly notified during the warranty period and, after inspection confirms there is a defect, Stack-On will, at its sole option, provide repair parts or exchange the product at no charge, or refund the purchase price of the product.
THIS WARRANTY DOES NOT COVER ANY PRODUCT, OR ANY PART OF ANY PRODUCT, WHICH HAS BEEN SUBJECT TO EXCESSIVE USE, ACCIDENT, NEGLIGENCE, IMPROPER INSTALLATION, INCORRECT MAINTENANCE, ALTERATION OR REPAIR BY ANYONE OTHER THAN STACK-ON, ABUSE, OR MISUSE. THIS WARRANTY IS EXCLUSIVE AND EXPRESSLY IN LIEU OF ALL OTHER WARRANTIES EXPRESSED OR IMPLIED INCLUDING THE WARRANTIES OF MERCHANTABILITY AND FITNESS FOR A PARTICULAR PURPOSE, WHICH IS HEREBY DISCLAIMED AND EXCLUDED. STACK-ON SHALL NOT BE SUBJECT TO ANY OTHER OBLIGATIONS OR LIABILITIES. STACK-ON NEITHER ASSUMES NOR AUTHORIZES ANY OTHER PERSON TO ASSUME FOR IT, ANY OTHER LIABILITY IN CONNECTION WITH THE SALE OF STACK-ON’S FIRE-RESISTANT STEEL SAFES.
STACK-ON WILL NOT, UNDER ANY CIRCUMSTANCES, BE LIABLE TO THE INITIAL CONSUMER FOR ANY INCIDENTAL, CONSEQUENTIAL, SPECIAL, EXEMPLARY, OR PUNITIVE DAMAGES ARISING OUT OF THE PURCHASE OR USE OF ANY STACK-ON PRODUCT, INCLUDING THE FIRE-RESISTANT STEEL SAFES. STACK-ON’S LIABILITY FOR ANY BREACH OF THIS WARRANTY SHALL BE LIMITED EXCLUSIVELY TO REPAIR OR REPLACEMENT OF THE DEFECTIVE PRODUCT, AS DESCRIBED ABOVE, OR A REFUND OF THE PURCHASE PRICE OF THE PRODUCT. IN NO EVENT SHALL STACK-ON’S OBLIGATION UNDER THIS WARRANTY EXCEED THE PRICE OF THE PRODUCT. THIS WARRANTY GIVES YOU SPECIFIC LEGAL RIGHTS. YOU MAY ALSO HAVE OTHER RIGHTS WHICH VARY FROM STATE TO STATE.
Please send your claim pursuant to the above guarantee or warranty in writing by regular mail or email to:
- Cannon Security Products
- 2895 W. Capovilla Ave.
- Suite 140
- Las Vegas, NV 89119
- Be sure to include:
- Your name and address
- A description of the warranty claim, fire or theft
- The model number and photographs of the safe
- The serial number off the front or back of the safe
- A copy of the report from the fire department, police or insurance company within 30 days of damage (applies to units damaged by theft or fire)
- Proof of purchase information of the safe
This product is not designed for the storage of computer disks, CDs, DVDs, audio-visual materials, or photographs/negatives.