![]()
STEELSERIES SHIFT

USER GUIDE
IntroductIon
Thank you for choosing SteelSeries Shift gaming keyboard! This keyboard has been developed by SteelSeries, a dedicated manufacturer of innovative professional gaming gear including headsets, keyboards, mousepads, and other accessories.
This user guide has been supplied with the keyboard and is designed to familiarize you with all aspects of our product, its setup, and its usage. We hope that it will be of use to you. If there are any questions that are not answered or clarified in this user guide, please refer to our website: http://www.steelseries.com
OVERVIEW

- 8 programmable hotkeys
- On-the-fly macro recording
- Multiple media controls
- Gold plated audio & headset jacks
- 2 USB 2.0 ports (1 powered)
- Ergonomic design with 3 leg levels and non-slip base
- Detachable wrist rest
- Standard keyset features include:
· Fully labeled shortcuts and macro keys
· Commands grouped intuitively for ease of use
· Toggle mode remaps F keys, and NumPad to provide even more functionality
CONNECTING YOUR KEYBOARD

The Shift comes with 4 connectors:
- Keyboard USB connector, labeled with K/B – required for Shift functionality.
- Powered USB extension connector, labeled with EXT. – connect if you want to use power-consuming devices on the powered port on the back (marked with the lightning icon) of your Shift.
- Audio extension cable – connect microphone and output jacks to use the audio ports at the back of your Shift.
It is recommended that you connect all the plugs to fully utilize the convenience of Shift extension ports.
CHANGING KEYSETS

The most prominent feature of the SteelSeries Shift Keyboard is that it allows for keysets to be swapped depending on the situation (i.e. what game is being played). To remove a keyset, unhinge the lock on the right side of the keyboard by pulling it upwards.
To replace a keyset, insert it starting from the left side, and place each section until it lines up smoothly with the keyboard base. Snap-in the lock on the right-hand side to ensure that the keyset is firmly and securely placed in. Keep in mind that profiles are keyset-specific and are unique for every keyset. (see Profile Management, page 7).
INSTALLING THE SOFTWARE
The Shift is powered by the SteelSeries Engine software suite, which really enables the full gaming power of Shift.
1. Download the appropriate software from our website: http://www.steelseries.com/downloads/
2. Launch the installer and follow the instructions on the screen.
Note: To ensure that the keyboard works properly, please be sure that your keyboard is plugged in during the installation. Plug in the USB labeled “K/B”.
SOFTWARE OVERVIEW
The SteelSeries Engine can be accessed in one of three ways:
1. In the taskbar on the lower right corner of your screen, look for the SteelSeries logo. Right-click on the icon and click “Open SteelSeries Engine”.
2. Click the Start button, and go to Programs -> SteelSeries -> SteelSeries Engine, and click on “SteelSeries Engine”.
3. If you have the Standard Keyset inserted into your Shift Keyboard base, the button with the SteelSeries logo will load the SteelSeries Engine. It is located above the “Scroll Lock” button on your keyboard on the top right corner, between the “Bar Lock” and “Pad Lock”.
To change the language on the SteelSeries Engine, right-click the icon with the SteelSeries logo on your taskbar (located on the lower right corner of your screen). Click “Settings”. Choose your desired language from the dropdown list and press “OK”.
To check which version of the SteelSeries Engine software is running, right-click on the logo on your taskbar, and press “About”. A pop-up will appear displaying the version number of the running engine.


PROFILE MANAGEMENT
The SteelSeries Shift Keyboard comes with a default profile depending on the present keyset, but the software allows for multiple profiles to be programmed with unique button assignments. All settings are profile-specific except for the top row of hotkeys (see Hotkeys, page 10).
Profiles can be created, edited, copied, and deleted as desired using the menu on the left-hand side. The exception is that the default profile can not be edited or deleted. To make profile changes, right-click on the profile name, and click on the desired function (Delete, Rename, Create a copy, etc).

To create a new profile, click the button labeled “New Profile”.
The new profile will be identical to the default profile. Changes made to any profile can either be saved with the Save button or reverted using the Cancel button. It is important to note that only changes that have not been saved can be reverted using “Cancel”.

PROFILE CUSTOMIZATION
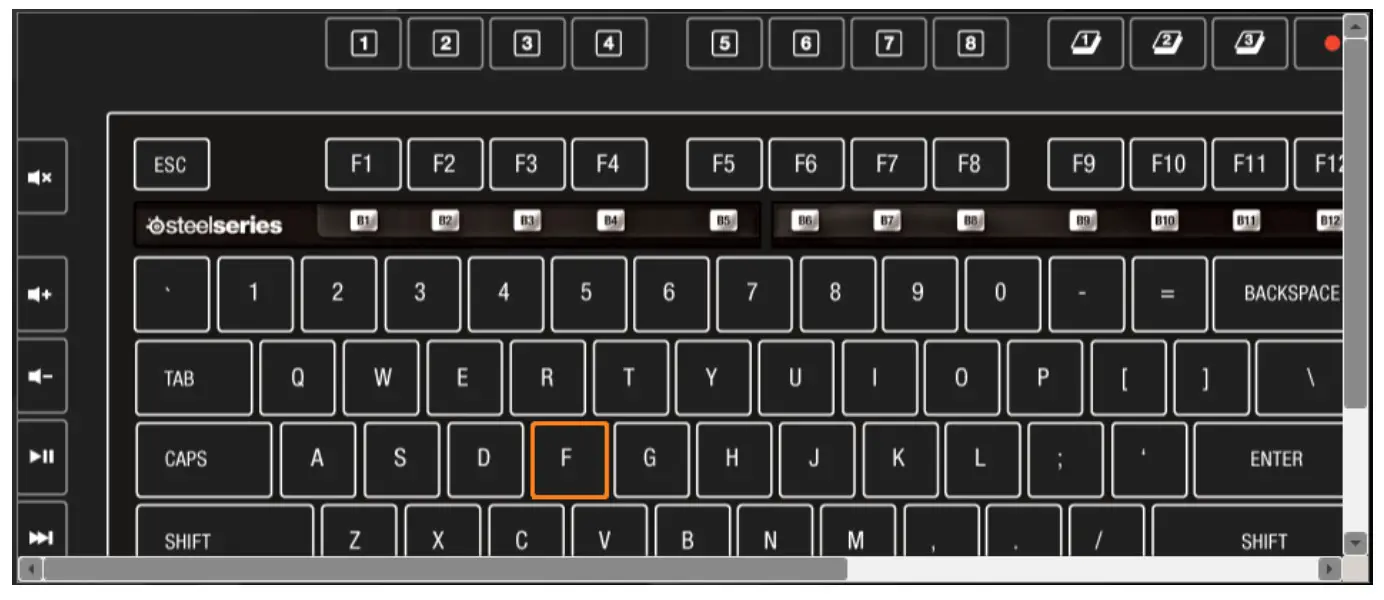
On a SteelSeries Shift keyset, almost every key can be customized using the SteelSeries Engine. To make a change to a key, simply click on the key in the keyboard display. In this example, we have clicked on the letter “F” on a standard keyboard:
When you click on it, a menu should appear at the bottom:
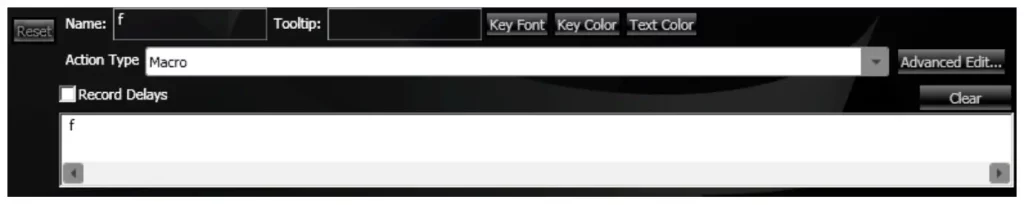
The Name, Key Font, Key Color, and Text Color buttons will all personalize how the key appears within the SteelSeries Engine. The Reset button will revert all unsaved changes.
The Action Type is the focus of key customization. The Action Type dropdown bar has three options that determine what function the keypress will serve. The three options are Macro, Launch Application, and Disable Key.
Disable Key will, as its name implies, ensure that absolutely nothing happens when that key is pressed. In this example, disabling the key “f” will not even allow the letter to come out when typing.
Launch Application will allow you to run a program with the press of a button. Simply click the “Browse” button and select the program you wish to run.
Macro will allow for the key to doing just about everything else. Every button press on a standard keyboard is available, and they can be run in any combination desired. With the Record Delays box checked, you can even specify the timing between each “button”. You can drag actions from the Action list on the right to the desired key (see Macros/Custom Actions, page 10).

There are two things to keep in mind:
1. What is displayed is not necessarily what will be output when you press the key, but rather a record of which “keys” will be pressed with this macro. In the example above, the words “Return (Enter)” won’t be printed out, but rather it will act as if the “Enter” key was pressed on a normal keyboard. You can tell when single letters are to be pressed because they will have spaces in between them on the display (for instance, the letters n, o, and m are separated).
2. If you make a mistake in setting the macro, you can either press the Clear button or use the Advanced Edit to correct the macro timing or keys.
Macros/custoM actIons
On the right side of the window is a menu for macros and are grouped into three categories. The contents of each category can be explored by clicking on the arrow button next to their names. When the arrow is pointing down, the list is expanded (shown). When it is facing right, it is collapsed (hidden).
The actions under the Macros and Single Keys categories are read-only and can not be edited or deleted, they will always be available for you to use or copy as a basis for custom macros. Please refer to the Single Keys list whenever you need to use a button that is missing on the current keyset.
Custom actions are all the macros you have recorded manually when assigning them to certain keys (see Profile Customization, page 9). They are saved in this list so they can be quickly applied to other keys, or for when a macro should temporarily be disabled.
You can create a new macro and not have it mapped to any key by clicking on the button labeled New Action. Then, you may later apply the macro by selecting its name on the menu, then dragging it to the desired key.
As a final note, you can create, copy, and delete custom actions just like profiles by right-clicking on the name and selecting the desired action.
HOTKEYS
The hotkeys have 3 layers and will work both with the SteelSeries Engine and in a standalone mode on any other computer. There are four buttons next to Hotkey 8 – the ones labeled 1, 2, and 3 toggles which hotkey layer you are using. The fourth button, which shows a red circle, is used for the on-the-fly macro recording. There are two ways to record a hotkey macro:
1. On-the-fly: press the Record button, press the layer button, and then the hotkey to be remapped, type in the macro, and press the Record button again to finish the recording. Note that throughout the process the extended LEDs marked with 1, 2, and 3 will be flashing indicating the currently selected layer. If the SteelSeries Engine is installed, the newly recorded Hotkey macro will appear in the Custom Actions.
2. Using SteelSeries Engine: select which hotkey layer you wish to work with using the buttons shown above the keyboard layout:

Then select the key and edit it (see Profile Customization, page 8-9).
Layers
Even though you are able to customize as many profiles as you want within the SteelSeries Engine, each profile can be further specialized under a number of layers. The Standard keyset that comes with your Shift features four different layers, while other keysets can have a different amount and structure of layers.
On the upper right-hand corner of the keyboard, next to the button with the SteelSeries logo, there are two buttons labeled Bar Lock and Pad Lock. To the right of the buttons should be two green lights that indicate which layer is turned on.
The four profiles that are supported are Primary (the default, “Main” layer), Bar Lock, Pad Lock, and Bar Lock + Pad Lock [took this out].
The Primary Layer is indicated when both the Bar and Pad lights are turned off. The actions assigned in the Primary layer will be present throughout all layers unless a key is overwritten with another action in a different layer.
When the Bar Lock layer is enabled, the Bar light will be turned on, and the Function keys (F1-F12) will be replaced by a new set of keys B1-B12, which are disabled by default.
When the Pad Lock layer is enabled, the Pad light will be turned on, and the Number Pad on the far right side of the keyboard will be replaced by a new set of keys P0-P13, which are disabled by default.
When both Sub Layers (Bar Lock and Pad Lock) are enabled, both changes mentioned will take place. All four layers have their own key settings, and so the same key can be mapped in different ways under the same profile, and the function of the key can be changed with the press of a button on the keyboard. It is important to note that you can edit any key on the keyset and it will be unique to this layer, it is not limited to just BAR and PAD areas.
To edit the macro functions of a key in a certain layer, select the layer you wish to work with using the buttons shown under the keyboard layout:

Then select the key and edit it (see Profile Customization, page 8-9).
USING YOUR PROFILE
There are 2 ways to activate your profile:
1. Right-click the profile name on the left-hand menu of the main window. Click “Activate Profile”. That will be the profile you are under unless you are in a program that uses another profile (see option 2).
2. To have the profile be used whenever you use a certain application or program, click on the profile to edit it. At the top of the main window, click on the tab labeled “Properties”. Click the button labeled “…” to select a program, or type one in manually. Once the program is selected, another bar will appear, allowing for a profile to be triggered by multiple programs. To remove a program from the list, press the X button and save.
Note: If there are several profiles using the same EXE – the first matching profile will be loaded when the game/application is launched.

OTHER OPTIONS
On the top right corner of the screen, there are three buttons labeled Config, Stats, and News. Config brings you to the main keyboard display where the keys are customized. News will open the latest news from SteelSeries.
STATS
Stats will bring you to a different keyboard display, shown below:
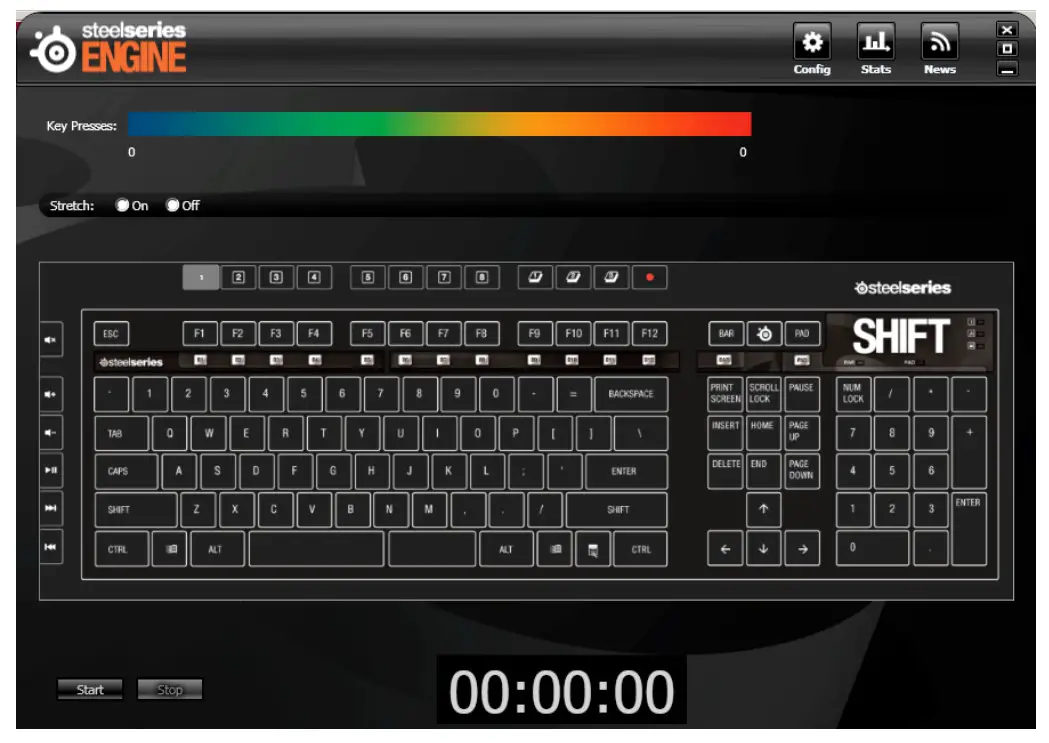
To use it, press the Start button near the bottom of the window, and press the keys on your keyboard at your discretion. Press the Stop button at any time to stop the test, and the display will output how many times each key was pressed.
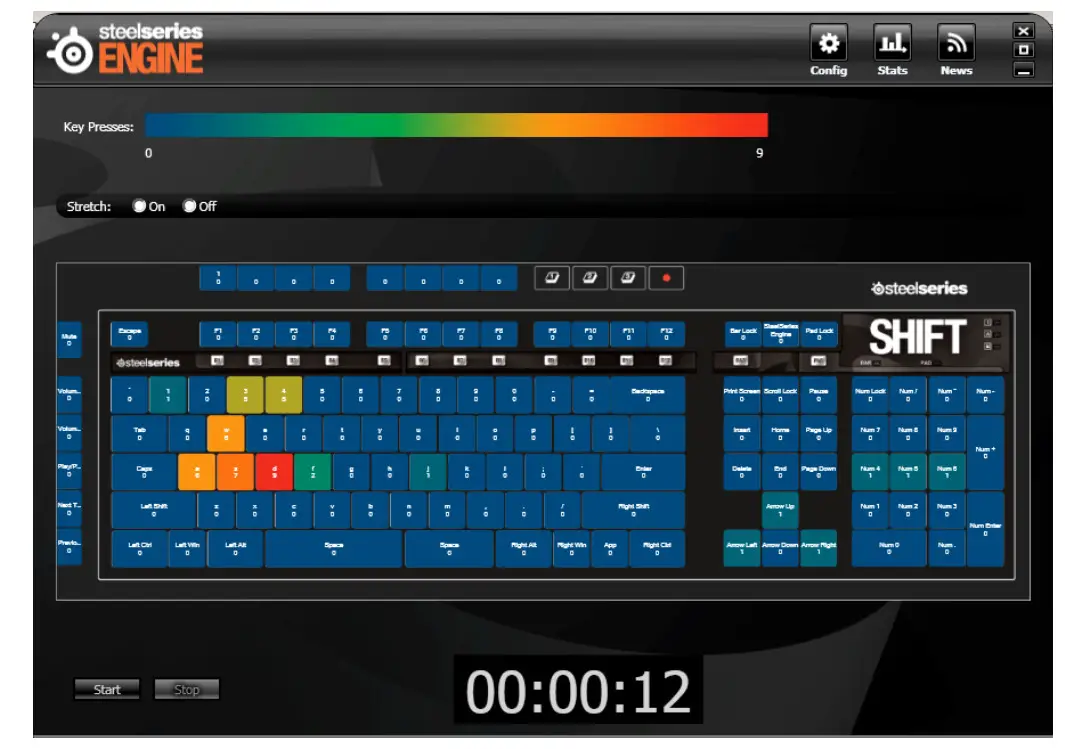
The color coding will help indicate which keys were pressed more often, and the entire test will be timed. Keep in mind that while running the test, every key on the keyboard will still be active.
CONCLUSION
The highlight of this feature is that you can run this test in the background while you play any games or run any applications. The timer in conjunction with the results can help you calculate your Actions Per Minute (APM). In addition, knowing which keys were pressed more often may have an impact on how you want to arrange the keys or set macros for that application (for instance you may move two keys that are often used in conjunction closer together).
![]()