STOPWOOFER DBC-SW-DC638 Dog Bark Collar Instruction Manual

Introduction
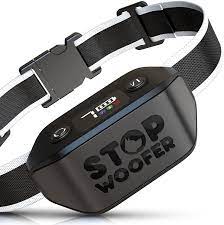
Thank you for purchasing the StopWoofer Bark Collar
The product has been specifically designed for dogs and their owners
Dear dog lovers, our company and its employees love pets and don’t want to do any harm to them. That’s why in our bark correction collars only humane ways of influence such as sound warning and vibration are used.
Based on testing different models of the StopWoofer it achieves efficiency of 75-80% with the dogs that stopped barking within one week, 10-15% of dogs need up to two weeks and about 5% of dogs need more time. Unfortunately, 3-5% of dogs aren’t susceptible to bark correction though exposure to sound and vibration.
IMPORTANT! In case our product didn’t help you to solve the problem with the excessive barking, please feel free to contact our support team [email protected] and we will help you or reimburse the ! purchase.
BASIC CONCEPTS
- Vibration — the impact on the dog by mechanical vibrations of the collar
- Sound warning — the impact on the dog with a “beep” sound
- Digital display — the screen located on the top panel of the collar showing the sensitivity level, the level of vibration, the charging level. On the digital display you can see the icons of the modes the collar is in.
Digits from 1 to 7 are displayed when you tune the sensitivity level, where 1 – is the minimum level of the sensitivity, 7 – is the maximum level of the sensitivity. While making the settings in the sensitivity mode the red icon 
The default setting is level 4.
Digits from 1 to 5 are displayed when you tune the vibration force, where 1 – is the minimum level of the vibration, 5 – is the maximum level of the vibration. While making the settings in the vibration mode the green icon 
While tuning the vibration force in the vibration+sound mode, the blue icon 
While charging the collar there is the icon 
- Sensor — a highly sensitive component of the collar that recognizes and detects throat vibration (barking) of the dog
The latest technology of the processor protects the collar from false detection. - Vibration contact points — contacts installed on the collar through which the dog receives the vibration impact.
- Silicone contact point guards — are an addition to vibration contact points. They can help to reduce chafing of your dog’s skin from direct contact with the vibration contact points.
- Collar sensitivity — the ability of the sensor to catch the vibration of the dog’s throat. Adjusting the level of sensitivity you adjust how sensitive the sensor is to picking up the vibration of your dog’s throat. The higher the sensitivity level, the easier it will be for the sensor to activate
- Dog’s sensitivity — the ability of the dog to experience collar impacts and respond to these influences.
EQUIPMENT


TECHNICAL CHARACTERISTICS
- It works in two modes “Vibration” and “Vibration+Sound”
- 7 levels of sensitivity
- 7 levels of bark correction in the mode “Vibration”
- 7 levels of bark correction in the mode “Vibration+Sound”
- It is suitable for dogs ranging in size from 6-110 lbs
- An adjustable strap from 5,9 to 21,65 inches
- 5 levels of vibration
- 2 vibratory motors
- Rechargeable battery 500 mah
- Waterproof
We provide a LifeTime Warranty on this product. To activate it, please follow the steps given in the LifeTime Warranty flyer or on our Youtube channel. If you have any questions feel free to contact our support team [email protected]
WORKING PRINCIPLE
The main element of the StopWoofer bark collar is the sensor. It recognizes and detects throat vibration (barking) of your dog.
The sensor detects barking and the collar gets activated and influences the dog with a vibration or vibration & sound warning depending on the selected mode of the bark collar

IMPORTANT
The impact of the collar on each dog can vary as each dog has a different level of sensitivity to the impact, and it also depends on the sensitivity, thickness and structure of the skin, fat and muscles, nervous excitability etc.
In accordance with the requirements of humanity the StopWoofer Bark Collar has a special system of restrictions for the duration and intensity of exposure to the dog.
LEVELS OF CORRECTION IN THE MODE “VIBRATION”
- 1 bark: Vibration 0.5 second
- 2 bark: Vibration 1 second
- 3 bark: Vibration 1.5 second
- 4 bark: Vibration 2 seconds
- 5 bark: Vibration 2.5 seconds
- 6 bark: Vibration 3 seconds
- 7 bark: Vibration 4 seconds
- 8 bark: Sleep mode. For the dog’s safety the collar turns off for 1 minute.

LEVELS OF CORRECTION IN THE MODE “VIBRATION+SOUND”
- 1 bark: Sound Warning 1.6 second then Vibration 0,5 second
- 2 bark: Sound Warning 2.8 seconds then Vibration 1 second
- 3 bark: Sound Warning 5 seconds then Vibration 1,5 second
- 4 bark: Sound Warning 5 seconds then Vibration 2 seconds
- 5 bark: Sound Warning 5 seconds then Vibration 2.5 seconds
- 6 bark: Sound Warning 5 seconds then Vibration 3 seconds
- 7 bark: Sound Warning 5 seconds then Vibration 3.5 seconds
- 8 bark: Sleep mode. For the dog’s safety the collar turns off for 1 minute.
IMPORTANT
- The collar moves to the next level of correction consistently and only if the dog continues to bark. If the dog does not bark for 30 seconds, then the collar returns to the first level of correction.
- After “sleep mode” activation the collar returns to the first correction level.

DEVICE OVERVIEW

COLLAR SETTING
IMPORTANT
Before using the collar please test the full cycle of correction.
Step 1: Place the silicone contact point guards on the vibration contact points (for lessening of the chafing of the dog’s skin)
Step 2: Turn on the collar by pressing the  button on the top panel of the collar till the digital display lights up.
IMPORTANT
If the icon 
Step 3: Test the collar
Activate the collar with the help of the Testing device that comes with the collar. Put the testing device’s speaker as close as possible to the hole on the back panel of the collar (where the sensor is) and turn on the testing device (toggle the switch into ON position on the side panel of it). The testing device will start to play the sound of the dog barking.
To test the full cycle of correction in the mode “Vibration+Sound” (blue icon

To test the full cycle of correction in the mode “Vibration” choose the mode “Vibration” by pressing the 
The green icon
Step 4: Tune the Sensitivity Level
By pressing the
By pressing the button adjust the sensitivity level from 1-7, where 1 – is the minimum sensitivity level, 7 – is the maximum sensitivity level.
IMPORTANT
The higher the level of sensitivity the easier the sensor will get activated. After turning off and turning back on the collar your settings will remain. While tuning the sensitivity, the numbers will be on the digital display.
Settings recommended for dogs of different size and weight
| size | weight | sensitivity level |
| small | 6-22 pounds | 6-7 |
| middle | 22-66 pounds | 5-7 |
| big | 66-88 pounds | 4-5 |
| huge | >88 pounds | 2-3 |
The collar setting should be individually adjusted. We recommend starting with the minimum level – 1, and level up gradually till the maximum level – 7. You should choose and apply that level of sensitivity, that will make the collar get activated correctly on your dog’s barking.
IMPORTANT
The correct settings of the sensitivity level makes the efficiency of the collar’s work higher.
Step 5. Tune the vibration level
“Vibration” mode
By pressing the button choose the “Vibration” mode. The green icon button adjust the vibration level from 1-5, where 1 – is the minimum vibration level, 5 – is the maximum vibration level
“Vibration+Sound” mode
By pressing the adjust the vibration level from 1-5, where 1 – is the minimum vibration level, 5 – is the maximum vibration level.
IMPORTANT
The collar setting should be individually adjusted. We recommend starting with the minimum level – 1, and level up gradually till the maximum level – 5. You should choose and apply that level of vibration, that will make the collar correct your dog’s barking and its unwanted behavior most effectively.
Efficiency of the collar’s influence on the dog depends on the correct vibration level setting
Step 6: Put the collar on the dog
IMPORTANT
The correct placement and settings of the collar are important for its effective work.
- If the icon

- Put the dog in a comfortable position for it and for you to apply the collar correctly
- Put the collar on your dog — high under the jaw and tighten the strap tight.The receiver (main body) of the collar must be located exactly in the middle of the neck, a couple of centimeters above or below your dog’s Adam’s apple
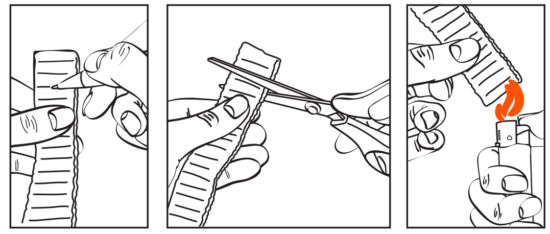
- For your dog’s comfortable wearing, please adjust the strap correctly. Put the collar on the dog, leave a couple of inches so that the collar will fit your dog’s neck when it grows up or if it has thick fur. Then take it off, cut off the excess and burn the cut with fire for a couple of seconds. For the safety of your pet please do it out of reach of your dog.
- Let your dog wear the collar for a couple of minutes and then check again if it fits well. When the dog gets used to the collar, double check the correct placement of the collar.

IMPORTANT
If you don’t tighten the strap tight enough, it won’t work correctly. There will be no contact, besides it can rub the dog’s neck. To check the collar’s fit, insert your finger between the end of the contact points and the dog’s neck. The finger should be snug but the dog should not experience breathing problems. In some cases it may be necessary to shorten the fur around the contact point for direct contact.

THE FIRST USAGE
When using the collar for the first time, we recommend using it for 2-3 hours to let your dog get used to the collar. (To turn it off press the button on the top panel of the collar till the display goes out)
When you find your dog being used to the collar, you can proceed to correct barking. (To turn on the collar press the button on the top panel of the collar till the display lights up)
Make sure the contact points are in direct contact with the dog’s skin. Fur between contact points and the skin will lessen the vibration influence. If need be cut or shave a bit the place on the dog’s neck where the main body of the collar is located.
The collar setting should be individually adjusted. To tune the vibration force we recommend starting with the minimum level – 1, and level up gradually till the maximum level – 5. You should choose and apply that level of vibration that will make the collar correct your dog’s barking and its unwanted behavior most effectively.
IMPORTANT
Efficiency of the collar’s influence on the dog depends on the correct vibration level setting.
Also, tuning the sensitivity level we recommend starting with the minimum level – 1, and level up gradually till the maximum level – 7. You should choose and apply that level of sensitivity that will make the collar correct your dog’s barking and its bad behavior most effectively
IMPORTANT
Efficiency of the collar’s influence on the dog depends on the correct sensitivity level setting
he dog needs to understand why the collar activates. It’s necessary to help your pet with that. When you activate the collar for the first time we recommend giving commands such as “Hush”, “No”, “Stop” or something similar when the dog starts barking.
Don’t use the collar when your dog is agitated, barking constantly, jumping, unexpectedly squealing etc. In this condition, your dog sensitivity threshold is reduced and it can ignore the impact of the collar. Give it time to calm down and get comfortable with a new collar.
CHARGING THE COLLAR
When the icon
While charging the batter, there is a running icon
If the icon shows 
Charging time: 2.5 hours
Time of non-stop working in the mode “Vibration+Sound”: 6-7 hours
Time of non-stop working in the mode “Vibration”: 8-9 hours
Work time: ordinary use of the collar keeps the battery charge up to 14 days
IMPORTANT
The work time of the battery can vary depending on the frequency of the collar activation.


FAQ
- Is the collar waterproof?
Yes, it is. You can use the collar in any weather conditions. The current model of the bark collar is designed to be waterproof. - Is the collar rechargeable or do I need batteries?
The current model of the bark collar is rechargeable. Use the USB cable that comes with the device and charge it via PC, laptop, or adapter - I’ve got two dogs. If I use the bark collar with one dog, will it get activated when the other dog barks?
No, it won’t. The bark collar has a special protection system from false detection. The sensor detects and recognizes the throat vibration of the dog which it is initially set to. - Why doesn’t the collar activate when my dog barks?
Make sure the icon
 button, level up the sensitivity, or check if the collar is tight enough around the dog’s neck, it should not be loose.