
TACKLIFE Stud Finder User Manual
INTRODUCTION
Thank you for purchasing TACKLIFE DMS05 Stud Finder. To achieve the best performance of detection, please read this user’s manual carefully and thoroughly before using the instrument. The scope of application of this product is: 1. Detect metals (ferrous and non-ferrous metals), wood studs, and “live” AC wires in walls, ceilings and floors. 2. Measure the moisture content of wood and building materials.
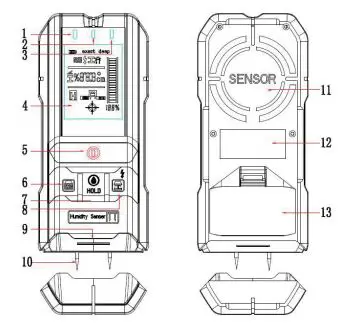
PRODUCT OVERVEIW
- Red light
- Yellow light
- Green light
- Display
- On/Off button
- Wood detection mode button
- Moisture measurement mode and HOLD button
- Metal detection and “live” AC wire detection mode button
- The position of removing pin cap (press down to remove pin cap)
- Test pins with red rubber sleeves(sleeves not shown)
- Sensor area
- Label
- Battery lid NOTE: Press and hold the wood detection button 6 and the metal detection button 8 at the same time to turn the sound off or on.

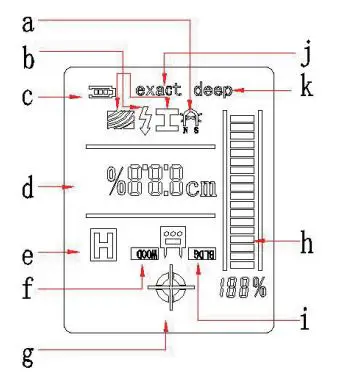
DISPLAY ELEMENTS
- a. Magnetic metal or non-magnetic metal indicator
- b. Detection mode indicator (Wood/”live” AC wire/Metal)
- c. Battery indicator
- d. Metal detection depth and moisture measurement value display area (this depth refers to: the distance from the center of the detection area to the measured object)
- e. Moisture measurement HOLD indicator
- f. Wood moisture measurement mode
- g. The detected object in the center of the detection area indicator
- h. Detection signal strength indicator
- i. Building material moisture measurement mode
- j. Exact mode for detecting wood Maximum detection depth:20mm
- k. Deep mode for detecting wood Maximum detection depth:38mm
TECHNICAL DATA
NOTES:
- The detector’s ability to detect objects is affected by the proximity of other equipment that produce strong magnetic or electromagnetic fields, and by moisture, metallic building materials, foil-laminated insulation materials and conductive wallpaper.
- Detection results depend on material and size of objects as well as material and condition of structure.
OPERATION
- Protect the tool against moisture and direct sunlight.
- Do not expose the tool to extreme temperatures or variations in temperature. In case of large variations in temperature, allow the measuring tool to adjust to the ambient temperature before switching it on, Extreme and variations in temperature can impair the display and accuracy of the tool.
- Use or operation of wireless transmitter in the close proximity can influence the measuring function.
- Avoid wearing jewelry such as rings or watches when using the detector. The metal may cause inaccurate detection.
- Always detect slowly to achieve maximum accuracy and sensitivity.
WARNING:
- Do not rely exclusively on the detector to locate items behind the scanned surface. Use other information sources to help locate items before penetrating the surface. Such additional sources include construction plans, visible points of entry of pipes and wiring into walls.
- Before penetrating surface (such as with a drill, router, saw or nail), always shut off the electrical power, gas and water supplies. Cutting, drilling, etc. into these items when operational can result in personal injury.
Inserting the battery
- Use only new “9V” batteries. To open the battery lid 13, insert the supplied battery. Pay attention that the polarity is correct, according to the + and – symbols on the inside of the battery compartment.
- If the tool is not used for a long period of time, the battery must be removed. The battery can corrode or discharge itself over long periods.
Switching On and Off Before switching the detector on , make sure that the sensor area 11 is not moist. If required , wipe the detector dry using a cloth. To switch the toll on/off by pressing the button 5 briefly. The instrument enters the metal detection mode automatically, At this time, if there is a signal on the display h without metal interference, it means that calibration is needed. The calibration method is to place the instrument in an environment without metal and strong magnetic field interference (e.g. Lift the instrument into the air, etc. ), Press and hold the detect metal button 8 until the display h signal shows zero and the green light is on. The calibration is completed. At this time, release the button to detect the metal.
Metal Detection
Press button 8 briefly to enter the metal detection mode, at this moment, the will show on the display, and the green light will on. if there is a signal on the display h without metal interference, it means that calibration is needed. The calibration method is to place the instrument in an environment without metal and strong magnetic field interference (e.g. Lift the instrument into the air, etc. ), Press and hold the detect metal button 8 until the scale h shows zero and the green light is on. The calibration is completed. At this time, release the button to detect the metal:
Position the detector then move it uniformly across the surface. When the instrument approaches a metal object gradually, the scale h will increase gradually, and the percentage of intensity will also increase gradually. As the signal strengthens, the detector’s yellow or red indicator will light and the buzzer will ring. When the instrument moves away from the object slowly, the scale h and the percentage of intensity will decrease gradually, and the buzzer will stop ringing. When you detected back and forth repeatedly, the cross in icon g will appear at the strongest point of the signal, indicating that the metal object is located near the bottom of the center of the detector.
NOTES:
- To detect the object more precisely, move the detector repeatedly back and forth over the object.
- When the metal is detected, the d-zone on the display will show the depth value synchronously. The accuracy of the depth is related to the shape and material of the metal to be measured, the distribution of the measured object to the detector, and the surroundings of the measured object. When the measured object is a standard rebar with a diameter of 18mm, the accuracy of the depth value is the best; otherwise it is poor, and the depth value can only be used as a rough reference value.
- The ability to detect nails, screws, rebar and other metal objects is somewhat dependent on their orientation. For example, at any given depth it is easier for the unit to detect the length of a screw or nail than it is to detect the end of a screw or nail.
- “live” AC wire will be also indicated in metal detection mode. If the wire is detected, the sign will flash and the buzzer will beep.
Wood Detection
- Wood detection mode is for use on dry interior walls only.
- Sensing depth and accuracy can vary due to moisture , content of materials, wall texture, and paint.
- Wood detection can scan effectively through sheet materials, including: Gypsum drywall, plywood sheathing, bare wood flooring, coated wooden wall.
- Wood detection is not designed to scan materials such as: Ceramic floor tile, carpeting and padding, metal or concrete wall, wallpaper with metallic fibers or conductivity, Freshly painted walls that are still damp, lath and plaster walls, Foil covered insulation board, Glass or any other dense material.
For optimum scanning results:
- Hold the tool straight up and down, parallel to the studs, and do not rotate the tool.
- Keep tool flat against the wall and do not rock, tilt, or press hard when slowly sliding across the surface being scanned.
- Make sure that your fingers of the hand holding the detector do not touch the surface being scanned.
- Do not touch the surface being scanned or detector with your other hand or any other part of your body.
If you are receiving erratic scanning results, it may be a result of humidity, moisture within the wall cavity or drywall, or recently applied paint or wallpaper that hasn’t fully dried. While the moisture may not always be visible, it will interfere with tool’s sensors. Please allow a few days for the wall to dry out. Press the button 6 briefly to enter the wood detection “exact” mode, the display will show the and exact symbol. In this mode, it can be calibrated by pressing the wood button briefly; Press the wood button for a long time to switch between the exact mode and deep mode. Select sensing mode according different wall thickness. Exact mode for detecting wood less than 3/4″ / 20mm or deep mode for detecting wood studs behind walls more than 3/4″ / 20mm thick (Maximum detection depth:1-1/2″ / 38mm).
When you detect the wood, first of all, you have to make sure to stick to the wall, and then press the button 6 briefly(such as in the left figure). Keep the instrument still and wait for the green light to be turned on again. Then the instrument calibration is completed and the wood detection operation can be performed. Position the detector onto the surface to be scanned. Move the detector uniformly over the surface without lifting it off or changing the applied pressure (During the scan, the detector must cling to the wall). As the detector begin to approach a stud, the scale h will increase,, and the percentage of intensity will also increase, the yellow or red light will be on. When the red light is on, the buzzer will sound, and the cross in icon g will appear, the edge of stud is located. At this time, make a mark below the top groove of the detector, and then keep moving in the same direction. When it is found that the scale h decreases, moves the detector in the opposite direction. When the red light is on again, the buzzer rings, and the cross in icon g appears, the bottom of the top groove of the detector is the another edge of the stud. Mark this spot, the middle point of the two marks is the middle point of the Stud.
NOTES:
- During wood detection mode, metal objects may also be detected, To help distinguish between wood and metal objects, switch to metal detection mode. When an object is indicated at the same location in the metal detection mode, then it is likely a metal object, wood stud or joist with nails or screws in it. To continue searching for wood objects, switch back to the wood detection mode.
- Depending on the proximity of electrical wiring or pipes to the wall surface, the scanner may detect them in the same manner as studs. Caution should always be used when nailing, cutting, or drilling in walls, floors, and ceilings that may contain these items.
- When the detector is in wood detection mode, if the humidity in the air is very high and the instrument is placed in the air, the scale h may increase. In this case, just press the wood detection button 6 briefly, and then the scale h will return to zero, it does not affect the normal use of the product; 4. “live” AC wire will be also indicated in wood detection mode. If the wire is detected, the sign will flash and the buzzer will ring.
“live” AC wire Detection
- The wire detection mode is suitable only for detecting “live” AC Wires (110V-250V / 40Hz- 60Hz).The maximum detection depth is 50mm. Press the “live” AC wire Detection button 8 briefly, enter “live” AC wire detection mode. The will be show on the display. At this time, if there is a signal on the scale h, but you are sure there is no “live” AC wire, it means that need to return to zero. The zeroing method is pressing and holding the “live” AC wire Detection button 8 at the current position until the scale h returns to zero, then the calibration is completed. At this time, release the button to detect the “live” wire.
Position the detector then move it. When a “live” AC wire is detected, the scale h will increase gradually, and the percentage of intensity will also increase gradually. When the yellow light is on, the buzzer will make a continuous sound. When the red light is on and flashes, the buzzer will beep. Move the detector over the surface repeatedly in order to localize the “live” AC wire more precisely. When the wall thickness is thin or the humidity is high, in order to improve the “live” wire detection accuracy, the sensitivity of “live” wire detection can be reduced according to the actual situation in the “live” wire detection mode. The sensitivity of “live” wire detection is divided into four levels from low to high(1~4). The default is the highest sensitivity level (4). The sensitivity adjustment method is to press and hold buttons 7 and 8 at the same time. The specific number of level will be displayed on the screen. The sensitivity of “live” wire detection of the other mode will change at the same time.(Sensitivity will be restored to default after restart)
NOTES:
- “live” AC wire can be detected more easily when power consumers (e.g., lamps, appliances) are connected to the wire being sought and switched on.
- Under certain conditions(such as when behind metalized or conductive surfaces, behind concrete or other surfaces with shielding effect on electricity, shielded in metal conduit or behind surfaces with high moisture), “live” AC wires may not be detected . The signal strength of a “live” AC wires depends on the position of the cable. Therefore, apply further measurements in close proximity or use other information sources to check if a “live” AC wires exists.
- Three-phase wiring is possibly not detected as “live” conductor.
- Wires that are not “live” may be detected as metal objects or may not be detected. This includes solid copper cables, however stranded copper cables are not detectable.
- Static electricity can lead to inaccurate detection of electrical wires. It may help to put a hand on the wall next to the detector and measure again in order to help remove the static electricity.
- DO NOT ASSUME THERE ARE NO LIVE ELECTRICAL WIRES IN THE WALL. DO NOT TAKE ACTIONS THAT COULD BE DANGEROUS IF THE WALL CONTAINS A LIVE ELECTRICAL WIRE. ALWAYS TURN OFF THE ELECTRICAL POWER, GAS, AND WATER SUPPLIES BEFORE PENETRATING A SURFACE.
Moisture measurement
Press the button 7 to enter the wood moisture measurement mode. The display shows the icon “f” . Press and hold the button 7 at this time to enter the building material moisture measurement mode. The icon “i” will be shown on the display. Press the button 7 in the moisture measurement mode to switch the moisture measurement mode of wood or building materials. Press the button 7 briefly to lock the data and the icon “e“will appear on the display. Press down from 9 to remove the pin cap, and then hold the instrument in an inverted position to pierce the pin into the target to be measured. The measured data will be displayed in the d area on the display. Press the button 7 again to lock the measurement value. At this time, “e” on the screen will show and moisture measurement is completed.
WARNING:
- Detection values can be impaired through certain ambient conditions. These include, but are not limited to , the proximity of other equipment that produces strong magnetic or electromagnetic fields, moisture, metallic building materials, foil-laminated insulation materials or conductive wallpaper or tiles. Therefore, please also consult other information sources(e.g. construction plans) before drilling, sawing or routing into walls, ceilings or floors.
- Before penetrating surface (such as with a drill, router, saw or nail), always shut off the electrical power, gas and water supplies. Cutting, drilling, etc. into these items when operational can result in personal injury.
FCC Part 15 Class B Registration Warning
This device complies with Part 15 of FCC Rules. Operation is subject to the following two conditions:
(1) this device may not cause harmful interference, and
(2) this device must accept any interference received, including interference that may cause undesired operation.
Shenzhen Take Tools Co., Ltd.
Web: www.tacklifetools.com
Facebook: www.facebook.com/Tacklife.US
E-mail: [email protected]
ADD: No.B714,Niulanqian Building, Minzhi Road,
Longhua District, Shenzhen, Guangdong, China 518000
![]()