
![]()
Quick Start Guide
PRESTIGE GR KENSINGTON GR-OW
2 Way Floorstanding 10″ Dual Concentric
HiFi Loudspeaker (Oiled Walnut)
2 PRESTIGE GR KENSINGTON GR-OW
Important Safety Instructions
CAUTION
![]() RISK OF ELECTRIC SHOCK!
RISK OF ELECTRIC SHOCK!![]()
DO NOT OPEN!
![]() Terminals marked with this symbol carry electrical current of sufficient magnitude to constitute risk of electric shock. Use only high-quality professional speaker cables with ¼” TS or twist-locking plugs pre-installed. All other installation or modifications should be performed only by qualified personnel.
Terminals marked with this symbol carry electrical current of sufficient magnitude to constitute risk of electric shock. Use only high-quality professional speaker cables with ¼” TS or twist-locking plugs pre-installed. All other installation or modifications should be performed only by qualified personnel.
![]() This symbol, wherever it appears, alerts you to the presence of uninsulated dangerous voltage inside the enclosure – voltage that may be sufficient to constitute a risk of shock.
This symbol, wherever it appears, alerts you to the presence of uninsulated dangerous voltage inside the enclosure – voltage that may be sufficient to constitute a risk of shock.
![]() This symbol, wherever it appears, alerts you to important operating and maintenance instructions in the accompanying literature. Please read the manual.
This symbol, wherever it appears, alerts you to important operating and maintenance instructions in the accompanying literature. Please read the manual.
![]() Caution To reduce the risk of electric shock, do not remove the top cover (or the rear section). No user-serviceable parts inside. Refer servicing to qualified personnel.
Caution To reduce the risk of electric shock, do not remove the top cover (or the rear section). No user-serviceable parts inside. Refer servicing to qualified personnel.
![]() Caution To reduce the risk of fire or electric shock, do not expose this appliance to rain and moisture. The apparatus shall not be exposed to dripping or splashing liquids and no objects filled with liquids, such as vases, shall be placed on the apparatus.
Caution To reduce the risk of fire or electric shock, do not expose this appliance to rain and moisture. The apparatus shall not be exposed to dripping or splashing liquids and no objects filled with liquids, such as vases, shall be placed on the apparatus.
![]() Caution These service instructions are for use by qualified service personnel only. To reduce the risk of electric shock do not perform any servicing other than that contained in the operation instructions. Repairs have to be performed by qualified service personnel.
Caution These service instructions are for use by qualified service personnel only. To reduce the risk of electric shock do not perform any servicing other than that contained in the operation instructions. Repairs have to be performed by qualified service personnel.
- Read these instructions.
- Keep these instructions.
- Heed all warnings.
- Follow all instructions.
- Do not use this apparatus near water.
- Clean only with a dry cloth.
- Do not block any ventilation openings. Install in accordance with the manufacturer’s instructions.
- Do not install near any heat sources such as radiators, heat registers, stoves, or other apparatus (including amplifiers) that produce heat.
- Do not defeat the safety purpose of the polarized or grounding-type plug. A polarized plug has two blades with one wider than the other. A grounding-type plug has two blades and a third grounding prong. The wide blade or the third prong are provided for your safety. If the provided plug does not fit into your outlet, consult an electrician for the replacement of the obsolete outlet.
- Protect the power cord from being walked on or pinched particularly at plugs, convenience receptacles, and the point where they exit from the apparatus.
- Use only attachments/accessories specified by the manufacturer.
- Use only with the cart, stand, tripod, bracket, or table specified by the manufacturer, or sold with the apparatus. When a cart is used, use caution when moving the cart/ apparatus combination to avoid injury from tip-over.
- Unplug this apparatus during lightning storms or when unused for long periods of time.
- Refer all servicing to qualified service personnel. Servicing is required when the apparatus has been damaged in any way, such as power supply cord or plug is damaged, liquid has been spilled or objects have fallen into the apparatus, the apparatus has been exposed to rain or moisture, does not operate normally, or has been dropped.
- The apparatus shall be connected to a MAINS socket outlet with a protective earthing connection.
- Where the MAINS plug or an appliance coupler is used as the disconnect device, the disconnect device shall remain readily operable.
- Correct disposal of this product: This symbol indicates that this product must not be disposed of with household waste, according to the WEEE Directive (2012/19/EU) and your national law. This product should be taken to a collection center licensed for the recycling of waste electrical and electronic equipment (EEE). The mishandling of this type of waste could have a possible negative impact on the environment and human health due to potentially hazardous substances that are generally associated with EEE. At the same time, your cooperation in the correct disposal of this product will contribute to the efficient use of natural resources. For more information about where you can take your waste equipment for recycling, please contact your local city office or your household waste collection service.
- Do not install in a confined space, such as a book case or similar unit.
- Do not place naked flame sources, such as lighted candles, on the apparatus.
- Please keep the environmental aspects of battery disposal in mind. Batteries must be disposed of at a battery collection point.
- This apparatus may be used in tropical and moderate climates up to 45°C.
LEGAL DISCLAIMER
Music Tribe accepts no liability for any loss which may be suffered by any person who relies either wholly on or in part upon any description, photograph, or statement contained herein. Technical specifications, appearances and other information are subject to change without notice. All trademarks are the property of their respective owners. Midas, Klark Teknik, Lab Gruppen, Lake, Tannoy, Turbosound, TC Electronic, TC Helicon, Behringer, Bugera, Oberheim, Auratone, Aston Microphones and Coolaudio are trademarks or registered trademarks of Music Tribe Global Brands Ltd. © Music Tribe Global Brands Ltd. 2021 All rights reserved.
LIMITED WARRANTY
For the applicable warranty terms and conditions and additional information regarding Music Tribe’s Limited Warranty, please see complete details online at musictribe.com/warranty.
Introduction
Music is an art form that needs to be experienced in all its beauty, detail, and nuance without the slightest coloration that can instantly detract from its purest essence. A truly great loudspeaker design enables the speaker system to remove itself from the soundscape and present the music in a manner that envelopes you in the same way as a live performance. In the 1970s Tannoy created a range of monitors that forever changed the way studio engineers and audiophiles alike chose to experience high-quality audio. The Tannoy HPD Series quickly became some of the most beloved Hi-Fi loudspeakers of all time.
More than just an homage its predecessor, the KENSINGTON Dual Concentric Hi-Fi Loudspeaker further elevates the Tannoy HPD heritage of outstandingly transparent performance via the implementation of new, upscaled drivers and components technology that was unavailable at the time. Simply put, the KENSINGTON delivers legendary HPD performance to a new generation of music aficionados.
Unpacking
Examine all pieces of packing material and inspect the carton for signs of external damage. If there is evidence of excessive damage to the packaging and resulting damage to the loudspeaker, inform the carrier and supplier immediately. Always keep the packing in such circumstances for subsequent examination.
Check the contents of the accessories pack for the pair of loudspeakers as follows:
- Bi-wire links (x4)
- Carpet spikes (x8)
- Tin of wood wax (x1)
- Grille key (x1)
- Metal feet (x8)
- Welcome pack documentation
Unfasten the bottom of the carton. Fold the end leaves out of the way and remove the 4 corner packing pieces to reveal the plinth and bottom of the loudspeaker cabinet. Locate and carefully remove the accessories pack from the carton.
 Turn the carton and loudspeaker over so that the cabinet now stands on the floor inside the carton. Lift the carton upwards to reveal the loudspeaker.
Positioning
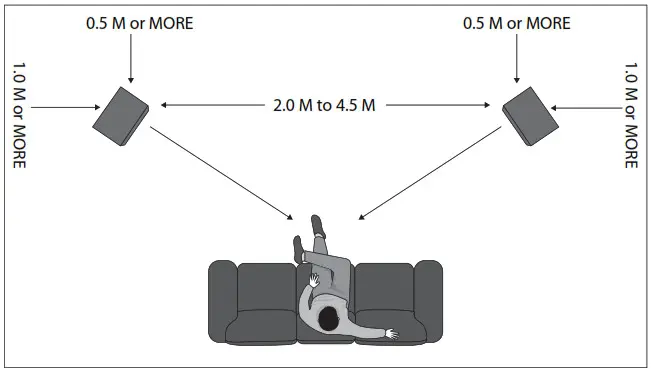
Locate the loudspeakers so that the favourite listening position is approximately 15° from the axes of the cabinets. The axes of both cabinets should intersect at a point slightly in front of the listening position. Remember that the proximity of the loudspeakers to walls and corners will affect the sound. Some experimentation will probably be needed to fine-tune the stereo image depth and low-frequency sound quality. Close-to-wall positions and room corners have the effect of increasing very low-frequency sound energy. Reflective adjacent walls may upset the stereo image by causing unwanted reflections.
In order to experience the best acoustic performance and fully realise their exceptional stereo image depth capabilities, the loudspeakers should ideally be used at least 1m from any sidewall or reflective surface and at least 0.5 m away from a rear wall.
Inserts are provided in the base of the speakers for down spikes that give maximum stability. The spikes provided should be screwed into the base of the loudspeakers. When the loudspeaker is installed in its upright position, the spikes should pass between the weave of your carpet to contact the floor beneath.
Adjust the spikes for maximum stability, then tighten the lock nuts firmly, but without using undue force.
For polished wooden floors and other delicate surfaces, metal cups are provided to place under the spikes.
Connection
Consult the product specification section within this manual as this clearly shows the acceptable power range for amplifier matching to your speakers. As with all loudspeaker systems, the power handling is a function of voice coil thermal capacity. Care should be taken to avoid overdriving any amplifier, as this will cause output overload resulting in `clipping’ or distortion within the output signal. This can cause damage to the speakers if done for any extended period. Generally an amplifier of higher power that is running hard, but free of distortion will pose less risk of damage to the loudspeaker than a lower power amplifier continually clipping. Remember also that a high powered amplifier running at less than 90% of output power generally sounds a great deal better than a lower powered example struggling to achieve 100%.
Always use the best quality of cable available within your budget. High-quality audio signals passing from the amplifier to the loudspeaker are unusual in their demands on the cable. Wide dynamic range and wide bandwidth information has to coexist with the ability to transmit peak currents of at least 10 amps, without incurring any loss or signal impairment. We would recommend that you always keep the cable runs the same length for each speaker. Remember that cable construction can affect the sound quality so be prepared to experiment to find a cable that suits your ear and audio system.
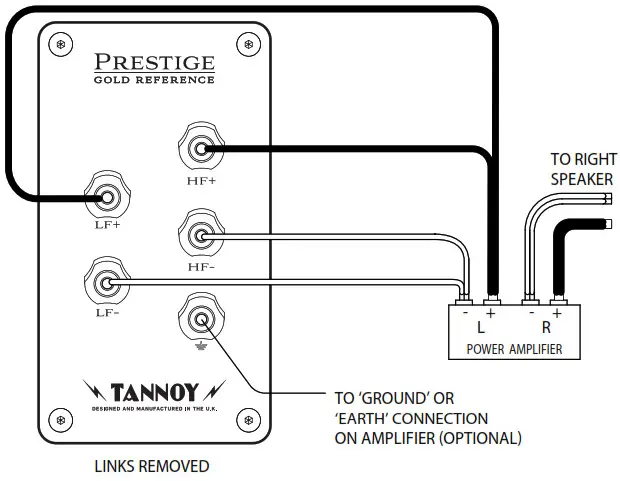
Single Wire Mode

First link the HF+ terminal to the LF+ terminal and HF- terminal to the LF- terminal, using the links provided in the accessories pack. The positive (plus) terminal on the amplifier left channel (marked + or coloured red) must be connected to the positive HF terminal on the left speaker. The left speaker is the one on the left as you look at the stereo pair from your listening position. The negative (minus) terminal on the amplifier left channel (marked – or coloured black) must be connected to the negative HF terminal on the left speaker. Repeat this connection process for the right speaker.
Remember that the positive (+ or red) on the amplifier must be connected to the positive (+ or red) on the speaker and the negative (- or black) to negative. Select a signal source, such as a CD player, switch on the amplifier and slowly turn up the volume control to check that both loudspeakers are reproducing bass and treble information.
Earth Connection:
To optimise performance further, use a shielded or screened loudspeaker cable in order to reduce unwanted radio frequency interference. The screening termination should be connected to the earth or ground (white) terminal on the loudspeaker and to the ground or earth connection on the amplifier. Alternatively, if you are not using a screened loudspeaker cable but wish to utilise the earthing facility, run a single cable between the loudspeaker and amplifier earth terminals.
Bi-wire Mode

Please note in bi-wire mode that the link cables should not be used. Best results will be obtained with a specially designed bi-wire speaker cable.
If your amplifier is not equipped with two sets of output terminals, twist the Left LF+ (positive) and the Left HF+ (positive) together at the amplifier end of the cables. Connect these to the amplifier Left channel positive terminal marked + (plus) or coloured red. Twist the Left LF- (negative) and the HF- (negative) cables together and connect them to the amplifier Left channel negative terminal marked – (minus) or coloured black.
At the loudspeaker end, connect the cables labelled Left LF+ and Left LF- to the left-hand loudspeaker LF terminals, ensuring that you note the polarity markings on the cable sheathing. Then proceed to connect the Left HF+ and Left HF- to the HF terminals on the same loudspeaker.
Repeat this process to connect the right hand loudspeaker to the amplifier right channel output, once again ensuring that polarity is correct throughout.
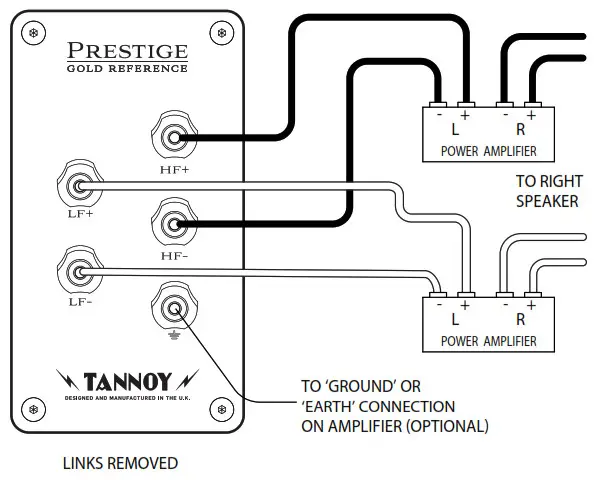
Bi-amp Mode
 Bi-amping extends the principle of bi-wiring one stage further. In this connection option, separate power amplifiers are used for bass and treble signals in each loudspeaker. Four mono (or two stereo) amplifiers of the same type are required for a stereo pair of loudspeakers.
If two stereo amplifiers are used, it is recommended that one amplifier supply bass information to left and right loudspeakers and the other, the treble information. It is important not to use the link cables on the terminal panel, otherwise, amplifier damage may result.
Treble Adjustment
Each loudspeaker is fitted with two controls located on the front baffle beneath the detachable grille. These high current switch blocks are labelled ROLL OFF and ENERGY. They can be used to compensate for the varied acoustic characteristics of listening rooms. The controls should be adjusted with the amplifier tone controls in the `flat’ or uncompensated position. Each loudspeaker should be adjusted individually. Rotating the amplifier balance control, to select first one loudspeaker and then the other, most easily achieves this.
The Energy control has five positions. It allows the output of the high frequency compression drive unit to be increased or decreased from the linear or `flat’ position over a frequency band from approximately 1 kHz to 27 kHz. The Roll Off control has five positions (+2, level, -2, -4 and -6 dB per octave) and provides adjustment at extreme high frequencies from 5 kHz to 30 kHz.
The Energy control has a shelving effect whereas the roll off control increases or decreases the slope of the extreme high frequency response. The flattest, most linear response from the loudspeaker will be obtained with both controls set at the LEVEL position, and this position should be used for initial listening tests. If the overall quality of the high frequency sound seems too prominent the 1.5 or 3 positions for the Energy control should be tried. If the sound appears subdued in the treble region +1.5 or +3 settings may be preferred. Once the energy control setting has been established the Roll Off control can be adjusted to reduce or slightly increase the extreme high frequency content if necessary.
Remember the changes that can be made by moving either control from one position to another are subtle. They may not easily be heard if the programme material has very little content in the frequency band under consideration. Choose a well-balanced piece of music with a full spectrum of sound. The correct setting will be found when the loudspeakers are no longer evident and only the musical performance is heard.
Cabinet Care
The cabinet is finished to exacting standards utilising carefully selected solid hardwood mouldings and matching real wood veneers. The wood should only be cleaned with a dry cloth or with a light application of quality non-silicone furniture polish such as the specialist Tannoy wax supplied in the accessory pack. Take care not to get polish on the grille cloth or lacquered front baffle.
In common with all solid wood furniture, exposure to extremes of heat, cold and varying humidity will cause the wood to ease slightly. Therefore it is recommended that the loudspeaker is protected from environmental extremes to guard against any such occurrence. Any wood will change colour when subjected to the UV content of ambient light and dry out over time, hence the need to `feed’ the wood with the wax provided periodically.
Grille Removal
Special acoustically transparent cloth is used in the grilles. However, for ultimate fidelity, the enthusiast will find it is best to use these loudspeakers with their grilles removed during listening. Grille removal is also necessary for access to the front panel controls.
The front grille is removed using the key provided. Turn the key in the key slot and pull the bottom of the grille away from the cabinet. The grille will drop down from its upper location. Take care not to damage the wooden lower part of the cabinet. To replace the grille engage the top of the grille into the slot in the cabinet and push the grill into the recess and lock in position.
Technical Specifications
| System | |
| Frequency response 1 | 29 Hz – 27 kHz (-6 dB) |
| Recommended amplifier power | 20 – 250 W RMS |
| Power handling (IEC) | 125 W continuous, 500 W peak |
| Nominal dispersion | 90 degrees conical |
| Sensitivity 2 | 93 dB (1 W @ 1 m) |
| Impedance | 8 Ω |
| Maximum SPL 2 | 114 dB continuous, 120 dB peak |
| Components | |
| Low frequency dual concentric | 250 mm (10″) with paper pulp cone with twin roll impregnated fabric surround, 52 mm (2″) round wire voice coil |
| High frequency dual concentric | 52 mm (2″) aluminium/magnesium alloy dome with round wire voice coil |
| Crossover | |
| Frequency | 1.1 kHz |
| Type | Bi-wired, hard-wired passive, low loss. Time compensated. 2nd order low pass, 2nd order high pass |
| Adjustment | ±3 dB over 1.1 kHz to 27 kHz shelving, +2 dB to -6 dB per octave over 5 kHz to 27 kHz slope |
| Enclosure | |
| Type | Distributed port |
| Connectors | 5 x 4 mm 24 ct Tannoy customized binding posts |
| Dimensions (HWD) | 1100 x 406 x 338 mm (43.3 x 16.0 x 13.3″) |
| Net weight | 41 kg (90.2 lbs) |
| Construction | 19 mm (3/4″) MDF with plywood internal bracing, heavily damped |
| Finish | Walnut veneer and high acoustic transparency nylon grill cover |
| Accessory pack (included) | |
| Bi-wire bridge connectors Prestige wood wax Carpet protectors Grille key Metal feet Welcome pack documentation |
|
Other important information
- Register online.
Please register your new Music Tribe equipment right after you purchase it by visiting musictribe.com. Registering your purchase using our simple online form helps us to process your repair claims more quickly and efficiently. Also, read the terms and conditions of our warranty, if applicable. - Malfunction.
Should your Music Tribe Authorized Reseller not be located in your vicinity, you may contact the Music Tribe Authorized Fulfiller for your country listed under “Support” at musictribe.com. Should your country not be listed, please check if your problem can be dealt with by our “Online Support” which may also be found under “Support” at musictribe.com. Alternatively, please submit an online warranty claim at musictribe.com BEFORE returning the product. - Power Connections.
Before plugging the unit into a power socket, please make sure you are using the correct mains voltage for your particular model. Faulty fuses must be replaced with fuses of the same type and rating without exception.
![]()
Hereby, Music Tribe declares that this product is in compliance with Directive 2011/65/EU and Amendment 2015/863/EU, Directive 2012/19/EU, Regulation 519/2012 REACH SVHC and Directive 1907/2006/EC, and this passive product is not applicable to EMC Directive 2014/30/EU, LV Directive 2014/35/EU.
Full text of EU DoC is available at https://community.musictribe.com/
EU Representative: Music Tribe Brands DK A/S
Address: Ib Spang Olsens Gade 17, DK – 8200 Aarhus N, Denmark