![]() 3160343 Electric High Pressure Washer
3160343 Electric High Pressure Washer
Instruction Manual

SPECIFICATIONS
| Model Number | TE5276 |
| Motor | 120V. 60Hz. 2000W |
| Rated Pressure | 3000 PSI |
| Maximum Pressure | 3800 PSI |
| Water Temperature Range | 40° F (4° C) – 104° F (40° C) |
| Max Flow Rate | 3.0GPM |
| Maximum Inlet Water Temperature | 104° F (40° C) |
| Hose Length | 16.4 ft (5m) |
| Power Cord Length | 35 ft (10.6 m) |
| Soap Tank Capacity | 0.26 gal. (1.0 L) |
INTRODUCTION
Thanks for purchasing the Pressure Washer. We know you are excited to put your tool to work, but first, please take a moment to read through the manual. Safe operation of this tool requires that you read and understand this operator’s manual and all the labels affixed to the tool. This manual provides information regarding potential safety concerns, as well as helpful assembly and operating instructions for your tool.

Keep this manual available to all users during the entire life of the tool and review it frequently to maximize safety for both yourself and others.
GENERAL SAFETY RULES
Safety is a combination of common sense, staying alert, and knowing how your item works.
SAVE THESE SAFETY INSTRUCTIONS.
WORK AREA SAFETY
- Keep the work area clean and well-lit. Cluttered or dark areas invite accidents.
- Do not operate power tools in explosive atmospheres, such as in the presence of flammable liquids, gases, or dust. Power tools create sparks that may ignite dust or fumes.
- Do not expose power tools to rain or wet conditions. Water entering a power tool will increase the risk of electric shock.
- Keep children and bystanders away while operating a power tool. Distractions can cause you to lose control.
ELECTRICAL SAFETY
- Power tool plugs must match the outlet. Never modify the plug in any way. Do not use any adapter plugs with earthed (grounded) power tools. Unmodified plugs and matching outlets will reduce the risk of electric shock.
- Avoid body contact with earthed or grounded surfaces such as pipes, radiators, ranges, and refrigerators.
There is an increased risk of electric shock if your body is earthed or grounded. - Do not abuse the cord. Never use the cord for carrying, pulling, or unplugging the power tool. Keep cord away from heat, oil, sharp edges, or moving parts. Damaged or entangled cords increase the risk of electric shock.
- If operating a power tool in a damp location is unavoidable, use a ground fault circuit interrupter (GFCI) protected supply. The use of a GFCI reduces the risk of electric shock.
PERSONAL SAFETY
- Stay alert, watch what you are doing, and use common sense when operating a power tool. Do not use a power tool while you are tired or under the influence of drugs, alcohol, or medication. A moment of inattention while operating power tools may result in serious personal injury.
- Use personal protective equipment. Always wear eye protection. Protective equipment such as a dust mask, non-skid safety shoes, and hearing protection used for appropriate conditions will reduce the risk of personal injury.
- Dress properly. Do not wear loose clothing or jewelry. Keep your hair and clothing away from moving parts.
Loose clothes, jewelry, or long hair can be caught in moving parts. - Prevent unintentional starting. Ensure the switch is in the off-position before connecting to a power source and/or battery pack, picking up or carrying the tool. Carrying power tools with your finger on the switch or energizing power tools that have the switch on invites accidents.
- Remove any adjusting key or wrench before turning the power tool on. A wrench or a key left attached to a rotating part of the power tool may result in personal injury.
- Do not overreach. Keep proper footing and balance at all times. This enables better control of the power tool in unexpected situations.
- If devices are provided for the connection of dust extraction and collection facilities, ensure these are connected and properly used. The use of dust collection can reduce dust-related hazards.
POWER TOOL USE AND CARE
- Do not force the power tool. Use the correct power tool for your application. The correct power tool will do the job better and safer at the rate at which it was designed.
- Do not use the power tool if the switch does not turn it on and off. Any power tool that cannot be controlled with the switch is dangerous and must be repaired.
- Disconnect the plug from the power source and/or the battery pack from the power tool before making any adjustments, changing accessories, or storing power tools. Such preventive safety measures reduce the risk of starting the power tool accidentally.
- Store idle power tools out of the reach of children and do not allow persons unfamiliar with the power tool or these instructions to operate the power tool. Power tools are dangerous in the hands of untrained users.
- Maintain power tools. Check for misalignment or binding of moving parts, breakage of parts, and any other condition that may affect the power tool’s operation. If damaged, have the power tool repaired before use. Many accidents are caused by poorly maintained power tools.
- Use the power tool, accessories and tool bits, etc. in accordance with these instructions, taking into account the working conditions and the work to be performed. Use of the power tool for operations different from those intended could result in a hazardous situation.
SERVICE
Have your power tool serviced by a qualified repair person using only identical replacement parts. This will ensure that the safety of the power tool is maintained.
SPECIFIC RULES FOR PRESSURE WASHERS
BEFORE OPERATION
- KNOW YOUR TOOL. Be thoroughly familiar with the controls of your pressure washer. Know how to stop the water pressure quickly by releasing the trigger, shutting off the unit, and turning off the water supply.
- OPERATING ENVIRONMENT. Keep bystanders, children, and animals at a safe distance away from the work area. Do not operate near flammable materials or explosive vapors.
- WEAR SAFETY EQUIPMENT. For protection against injury, wear safety goggles and ear protection. Wear rubber-soled shoes during operation to reduce the risk of electric shock.
- PRELIMINARY UNIT INSPECTION. Thoroughly inspect the unit and accessories prior to operation. Make sure all the parts are secured and installed correctly. Do not use plugs or cords that show signs of damage such as broken or cracked insulation. Have damaged items been repaired or replaced as necessary? Always perform a test run the first time you use the tool or after replacing parts to ensure that the unit is functioning properly.
- MALFUNCTIONING SWITCH. Do not use the tool if the switch does not turn on and off. Any electrical appliance that cannot be controlled by the switch is not safe to use and must be repaired.
- DETERGENT SAFETY. Always be aware of the dangers associated with the detergents and chemicals that you are working with. Follow the warnings and instructions that come with your detergent for proper use.
WATER SUPPLY REQUIREMENTS
- COLDWATER ONLY. Use the pressure washer with cold water only. The water supply temperature must not exceed 104°F/40°C.
- POTABLE WATER RESTRICTIONS. When connecting the water inlet to the water supply mains, local regulations of your water company must be observed. In some areas, the unit must not be connected directly to the public drinking water supply. This is to ensure that there is no feedback of chemicals into the water supply. If the connection is made to a potable water system, the system MUST be protected against backflow. Direct connection via a receiver tank or backflow preventer, for example, is permitted.
- AVOIDING DIRT. Always prevent debris from being drawn into the unit by using a clean water source. Dirt in the feed water will damage the unit. Your washer is pre-installed with a water filter inside the water inlet. Inspect and clean the filter regularly. Never use the pressure washer to draw in water contaminated with solvents, e.g. paint thinners, gasoline, oil, etc.
- WATER FLOW. The garden hose must be at least 5/8 inch in diameter. The flow rate of the water supply must not fall below 2 GPM (gallons per minute).
OPERATING THE PRESSURE WASHER
- STAY ALERT. Watch what you are doing and use common sense when operating your tool. Do not use the tool while you are tired or under the influence of drugs, alcohol, or medication. A moment of inattention during an operation may result in serious bodily injury.
- INJECTION HAZARD. The high-pressure stream of water can cut through the skin and cause serious injury. Keep clear of the nozzle. Never direct the discharge stream at any bystanders, animals, or your foot.
- RISK OF EXPLOSION. Do not operate power tools in explosive atmospheres, such as in the presence of flammable liquids, gases, or dust. Do not spray flammable liquids.
- Risk of electric shock. Do not spray electrical apparatus and wiring. Do not spray the power source or the outlet. Don’t pressure wash the pressure washer.
- TOOL PURPOSE. Learn your tool’s applications and limitations as well as the specific potential hazards related to this machine. Only use the pressure washer for its intended purposes. Otherwise, you may cause mechanical defects, serious damage or personal injury.
- DO NOT OVERREACH. Keep proper footing and balance at all times. This enables better control of the unit in unexpected situations and will also prevent you from falling down and embarrassing yourself in front of your cool neighbor Greg. When stepping backward, be cautious about any obstacles beneath your feet or behind you in order to avoid falling.
- AVOID ACCIDENTAL START-UPS. Make sure the power switch is in the OFF position before connecting the plug to a power source or carrying the tool. Engage the gun safety lock whenever the machine is not in use.
- GUN KICKS BACK. Hold the gun firmly with both hands. Kickback from the operation can cause the user to fall down. Always operate the pressure washer on a level and non-elevated surface to prevent the risk of falling.
- SHUT DOWN THE UNIT. Never leave your unit running while unattended. Unplug the unit before leaving for extended periods of time.
- MAINTENANCE. Before cleaning, changing accessories, or performing any maintenance, shut off and disconnect the unit from the electrical supply, then relieve pressure in the washer by squeezing the trigger to empty the washer of any residual water.
- STORAGE. Store your machine and accessories indoors. Never store the pressure washer outdoors. If the pump freezes, permanent damage may result. Always keep tools clean and in good working order.
- REPLACEMENT PARTS. Use only identical replacement parts. The use of any other part can cause personal injury and damage to the tool. Only have your power tool serviced by a qualified repair person.
Safety is a combination of common sense, staying alert, and knowing how your tool works.
SAVE THESE SAFETY INSTRUCTIONS.
ELECTRICAL SAFETY RULES
OPERATING THE PRESSURE WASHER
- STAY ALERT. Watch what you are doing and use common sense when operating your tool. Do not use the tool while you are tired or under the influence of drugs, alcohol, or medication. A moment of inattention during an operation may result in serious bodily injury.
IMPORTANT: Servicing a double-insulated product requires extreme care and knowledge of the system, and should be done only by qualified service personnel using identical replacement parts. Always use original factory replacement parts when servicing. - POLARIZED PLUGS. To reduce the risk of electric shock, this equipment has a polarized plug (one blade is wider than the other). This plug will fit in a polarized outlet only one way. If the plug does not fit fully in the extension cord, reverse the plug. If it still does not fit, use a correct polarized extension cord or contact a qualified
electrician to install the proper outlet. Do not modify the machine plug or the extension cord in any way. - GROUND FAULT CIRCUIT INTERRUPTER PROTECTION (GFCI). This pressure washer is provided with a ground-fault circuit-interrupter (GFCI) built into the plug of the power-supply cord. This device provides additional protection from the risk of electric shock. Should replacement of the plug or cord become necessary, use only identical replacement parts that include GFCI protection.
- SERVICE AND REPAIR. To avoid danger, electrical appliances must only be repaired by a qualified service technicians using original replacement parts.
GUIDELINES FOR EXTENSION CORDS
Use of an extension cord with this product is NOT RECOMMENDED. If an extension cord must be used, use only a UL -, CSA – or ETL-rated extension cord that are intended for outdoor use to prevent electric shock. These cords are identified by a marking, “Acceptable for use with outdoor appliances, store indoors while not in use.”
- Only use extension cords that can handle the voltage and amperage rating of this product. The extension cord must be 14 gauge or heavier, and the length must not exceed 25 feet.
- Examine the extension cord before use. Make sure your extension cord is properly wired and in good condition. Always replace a damaged extension cord or have it repaired by a qualified person before using it.
- Do not abuse the extension cord. Do not pull on the cord to disconnect from the receptacle; always disconnect by pulling on the plug. Disconnect the extension cord from the receptacle before disconnecting the product from the extension cord. Protect your extension cords from sharp objects, excessive heat, and damp/ wet areas.
- Use a separate electrical circuit for your tool. This circuit must not be less than a 12-gauge wire and should be protected with a 15A time-delayed fuse. Before connecting the motor to the power line, make sure the switch is in the OFF position and the electric current is rated the same as the current stamped on the motor nameplate. Running at a lower voltage will damage the motor.
Keep all connections dry and off the ground. Wear rubber boots to reduce the risk of electric shock. Do not touch the plug with wet hands. Do not immerse the unit in water.
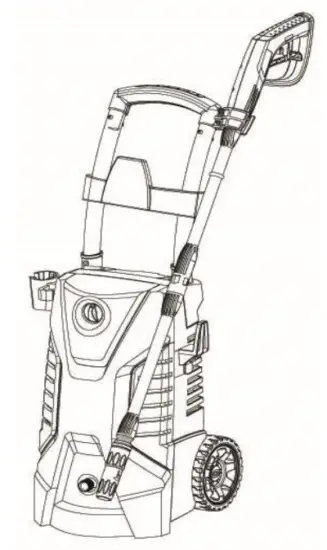
KNOW YOUR PRESSURE WASHER

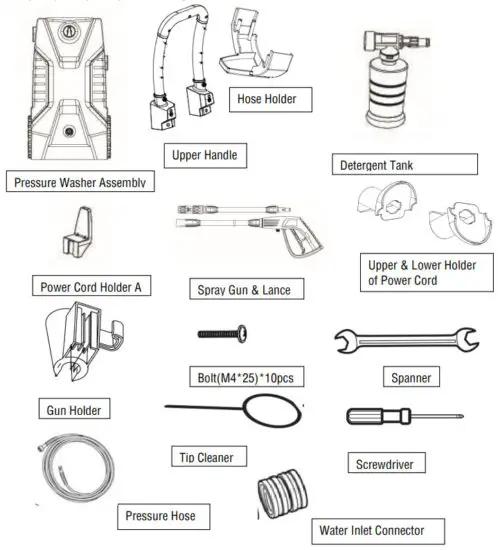
PACKING LIST
Check your packing list against the diagram below.
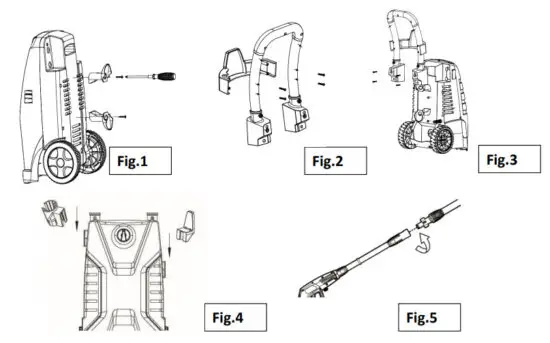
ASSEMBLY
- ASSEMBLING THE UPPER&LOWER POWER CORD HOLDER(Fig.1)
Use the Screwdriver(provided) to assemble the two power cords holder on the washer body with 2 bolts - ASSEMBLING THE HOSE GUN ON THE UPPER HANDLE (Fig.2)
Use the Screwdriver(provided) to assemble the hose holder on the washer body with 4 bolts. - ASSEMBLING UPPER HANDLE ON THE WASHER BODY(Fig3)
Use the Screwdriver (provided) to fix the upper handle on the washer body with 4 bolts. - ASSEMBLING THE GUN HOLDER (Fig.4)
- ASSEMBLING THE SPRAY GUN (Fig.5)
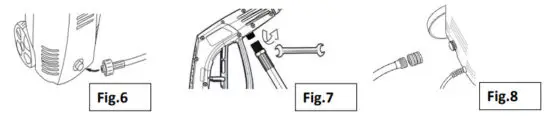
Insert the spray lance into the spray gun and lock them in position. - COLLECT THE PRESSURE HOSE WITH THE WASHER (Fig.6)
Twist on tight to avoid leakage. - COLLECT THE PRESSURE HOSE WITH THE WASHER (Fig.7)
Fasten the hose on the gun using the spanner provided to avoid water leaking. - ASSEMBLE THE WATER INLET CONNECTOR (Fig.8 )
OPERATION
PREPARING THE PRESSURE WASHER
- Place the pressure washer on a secure, stable surface to prevent it from tipping during operation.
- Check that all connections have been properly installed and secured.
• The high-pressure hose is properly fastened to the gun hose connector.
• The spray lance is properly attached to the spray gun.
• The garden hose is properly fastened to the pressure washer’s water inlet adapter.
CAUTION: This unit is intended to be used with cold water only. Do not use hot water in this pressure washer. - Turn on the water supply.
- Release the trigger safety lock and pull the trigger for a few seconds until the water flow is steady. This will allow air to escape and discharge any pre-existing pressure from the gun and the hose. Then turn off the water.
OPERATING THE PRESSURE WASHER
- Make sure the ON / OFF switch is in the OFF position. Plug the Ground Fault Circuit Interrupter (GFCI) into a matching receptacle (see page 8 for important electrical information). We recommend that you test the GFCI as part of your startup procedure each time you use your pressure washer as instructed below.
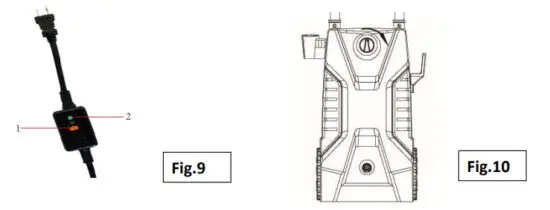
- Press the RESET button (Fig. 9 – 1), and the power indicator light should turn on. Press the TEST button (Fig. 9 – 2), and the power indicator light should turn off. Do not use it if the test fails. Press the RESET button again after completing the test to enable operation.
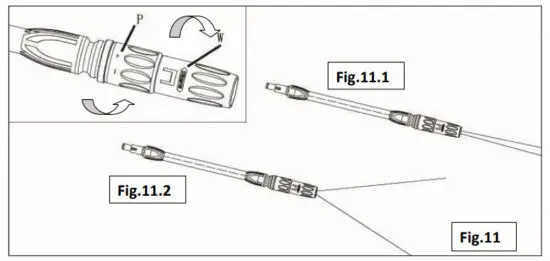
- Point the gun in a safe direction, aimed away from any bystanders or animals. Set the ON / OFF switch to ON (Fig. 10).
- Hold the gun firmly and pull the trigger to begin pressure washing. Beware of kickback when pressing the trigger.
Adjustable Spray Nozzle
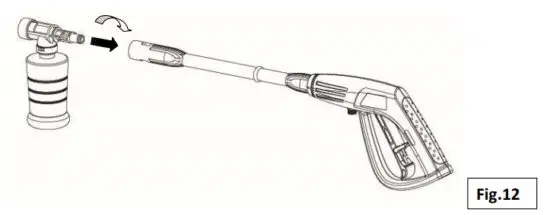
When rotating the middle part of the gun head (part P in Fig. 11), the output pressure will change accordingly. When rotating the frontest part of the gun head (part W in Fig. 11), the shape of sprayed water will change. The adjustable nozzle will allow you to use any variety of spray patterns from a full fan spray (Fig.11.2) to a direct stream spray (Fig. 11.1). When using the pressure washer to clean wood decks, siding, vehicles, etc., always start using the fan spray and begin spraying from a minimum of 36” away to avoid damaging the surface of the material you are cleaning. Always begin by spraying in a testing area free and clear of people and objects.
AUTOMATIC PUMP SHUTOFF / TSS (TOTAL STOP SYSTEM)
The pressure washer is equipped with an automatic pump shutoff function that senses the water flow in the pump.
The pump will only run when the power switch is in the ON position and the trigger is pulled. When the trigger is released and no water is flowing through the pump, the motor will automatically shut off to protect the pump from overheating, thus saving energy and prolonging pump life.
THERMAL SENSOR
The pressure washer is equipped with a thermal sensor that protects the motor from overloading.
When overloaded, the machine will shut down and restart after a few minutes once the motor has cooled.
USING PRESSURE WASHER DETERGENT
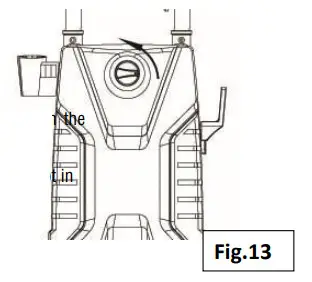
- Open the cap and fill the reservoir with your preferred pressure washer detergent. Assemble the detergent bottle on the spray gun.(Fig. 12).
CAUTION: Use only detergents designed for pressure washers. Follow the instructions included with your detergent about how it should be prepared and used. - To drain detergent from the unit, take out the detergent tank and dump the contents out. Afterward, spray the gun to flush out all of the soap remaining in the unit. 13
SHUTTING DOWN THE UNIT
- Turn off the ON / OFF switch (Fig. 13) and unplug the power plug from the outlet.
- Turn off the water supply.
- Pull the high-pressure gun trigger to relieve all the built-up pressure in the machine. Release the trigger and engage the gun safety lock.
NOTE: To maximize safety, always engage the safety lock when the gun is not in use. - Disconnect the garden hose from the water inlet on the back of the unit.
MAINTENANCE and STORAGE
HIGH-PRESSURE HOSE
The high pressure hose can be damaged easily and should be carefully stored. Do not kink the hose. Do not drive vehicles or place heavy objects over the hose. Do not expose the hose to sharp objects. Don’t chew on it either.
Regularly inspect the hose for cuts, bulges, or leaks which can develop from kinking or wear. If damage is found, replace the hose immediately to prevent serious injuries.
WATER INLET ADAPTER
Routinely check and clean the water inlet adapter. Remove the water inlet adapter and rinse with warm water to clean out debris and buildup before operating the pressure washer.
SPRAY NOZZLE
Regularly clean the spray tip on the spray lance and detergent bottle to prevent the nozzle from clogging.
Make sure the power plug is disconnected, the water is turned off, and all pressure is relieved from the unit.
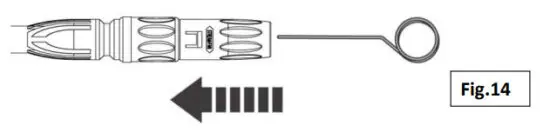
Use the included nozzle cleaner (Fig. 14) or a needle to dislodge any debris that’s clogging the spray tip.
STORING THE PRESSURE WASHER FOR EXTENDED PERIODS
- Clean the spray nozzle and water inlet filter before storing the unit.
- To protect and extend the life of your pressure washer, we recommended running the unit with a pump antifreeze, pump conditioner, or another pump protector before storing the unit for long periods of time. Follow the directions on your preferred pump protector for proper use.
- Store your pressure washer and accessories indoors where the temperature will stay above freezing (32°F/0°C).
Do not store it near the furnace or other sources of heat, as excessive heat may dry out the pump’s seals. - Keep the pressure washer upright on a level surface. Cover the machine to protect it from dust. Do not allow the high-pressure hose to become kinked during storage.
PRODUCT DISPOSAL
Used pressure washers should not be disposed of with household waste. This product contains electric components that should be recycled. Please take this product to your local recycling facility for responsible disposal and to minimize its environmental impact.
TROUBLESHOOTING
| Symptom | Cause | Solution |
| The motor will not start | OniOff switch is in the ‘OFF pennon. | Turn smith to the ‘ON- position |
| The power cord is not plugged | Plug-in power cord. | |
| The electrical outlet does not supply adequate power. | Try a different outlet | |
| Tripped Oran breaker. | &Ad., off the pressure washer. The reset comes automatically once the temperature of the unit drops. |
|
| the unit does not reach high pressure. | The diameter of the garden Wee is too small. | Replace with a suitable garden hose. |
| The water supply is restricted. | Check the garden hose for kinks, leaks, and blockage. | |
| Not enough net water pl supply |
Open water source the brew | |
| The water net flier is cloned. | Remove the filter and rinse it out in warm water. | |
| The spray wand is in a loot pressure position. | Draw spray wand to high-pressure position | |
| Output pressure vanes high and. low |
Not enough net water supply. | Turn water on full force. Check the garden hose for kinks. leaks or blockage. |
| The pump is sucking air. | Check that hoses and fittings we airtight. Turn off the machine and purge the pump by squeezing the trigger gun until a steady flow of water emerges through the nozzle. | |
| The water net filter is cloned. | Remove the filter and rinse it out in warm water. | |
| Lance is obstructed. | The blow cut or remove debris with a fine needle. | |
| Calcified gun hose or spray wand. | Run distilled vinegar hough a detergent suction tube | |
| No detergent | A detergent suction tube is not properly connected to the machine. | Check comet:aon |
| Filter on the detergent suction tube is dogged. | Run warm water through Vier to remove debris. | |
| Damaged or clogged detergent suction tube. | Remove reduction or replace the detergent suction tube | |
| The spray wand is in a high-pressure position. | Turn spray wand M to a low-pressure ovation. | |
| The discharge nozzle is obstructed. | Slow out or remove debts with Me needle. | |
| Garden hose connection leaks. | Tighten langs. | |
| Loose Menge | ||
| Spray wand leaks. | The spray wand is not properly attached. | Insert the spray viand into the trigger gun. Carefully press In against the spring tension and twist no the locked position. |
| Broken 0-ring or plastic | Cal Customer Supped | |
| The pump is nosy. | Pomp is sucking sit | Check that hoses and fittings we airtight. Turn off the scene and purge the pump by squeezing the trigger gun until a steady ow of water emerges through the nozzle. |
| Water leaks from the pump (up to 10 drops per minute is permissible). | Loose fittings. | Check that all fittings are wire. |
| Water seats are damaged Of worn. | Customer Support |
Note: Operating water pressure and maximum water pressure are obtained in the experimental test environment, which may be different from the actual use environment.