teleportz Remote Spray Trainer User Guide
Remote Spray TrainerOperation Guide
Thank you for choosing SP13 Remote Spray Trainer. Our mission is to offer the best electronic training solutions. We want to ensure your dog’s safety by providing you with the tools and techniques to successfully train your pet. Please feel free to contact us if you have any problems and we will resolve them immediately.
Please read the complete operation guide carefully before starting to train your dog including the FAQ.
This instruction is suitable for Remote Spray TrainerSP13.
IMPORTANT SAFETY INFORMATION
Not for Aggressive Dogs. Do not use this product if your dog is aggressive, or if your dog is prone to aggressive behavior.Aggressive dogs can cause severe injury or even death to their owners and others. If you are unsure if this product is appropriate for your dog, please consult your veterinarian or certified trainer.
CAUTION : Please read and follow the instructions in the manual. Proper fit of the collar under the dog’s neck is important. A collar worn for too long or made too tight on the pet’s neck may cause skin damage. Ranging from redness to pressure ulcers; this condition is commonly known as bed sores.
- Avoid leaving the collar on the dog for more than 8 hours out of every 24 hours and try to reposition the collar on your dog’s neck every 1 to 2 hours if possible.
- Check the fit of the collar to prevent excessive pressure..
- Examine the contact area daily for signs of a rash or a sore. Brushing the coat daily may help.
- If a rash or sore is found, discontinue use of the collar until the skin has healed.
Do not expose the device to freezing temperatures -32°F or 0°C or to conditions warmer than 113°F or 45°C. Do not leave the unit in direct sunlight. Never leave the unit in a car where the device can heat up to high temperatures 113°For 45°C.
AEROSOLS:
- Keep out of reach of children.
- Contents of the refill can and the spray collar are under pressure.
- Use only in a well ventilated area. Use only as directed.
- May explode if heated, do not heat. Do not expose to temperatures over 113°F or 45°C
- Do not burn. Do not dispose of in fire, even when empty.
- Keep out of direct sunlight.
- Do not leave the aerosol can in a vehicle where temperature could exceed 113°F or 45°C.
- Store in a cool location.Keep away from sparks or flame. Do not smoke while refilling.
- Do not puncture. Contact of liquid propellant with skin may cause frostbite.
- Do not ingest. In case of accident, seek medical care. If swallowed, call a poison control center immediately.
The Remote Spray Trainer is not a toy. Keep it away from the reach of children. Use it only for its pet training purpose.
These steps will help keep your pet safe and comfortable. Millions of pets are comfortable while they wear spray collar.
Training sessions which are shorter and more positive (10-15 minutes) are often the most effective.
Do not use the collar on a dog that is under 6 months old.
Improper or inappropriate use of a training collar system can be harmful. Please use this product correctly and pay attention when training your dog.
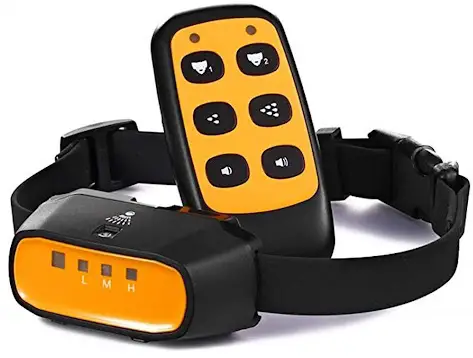
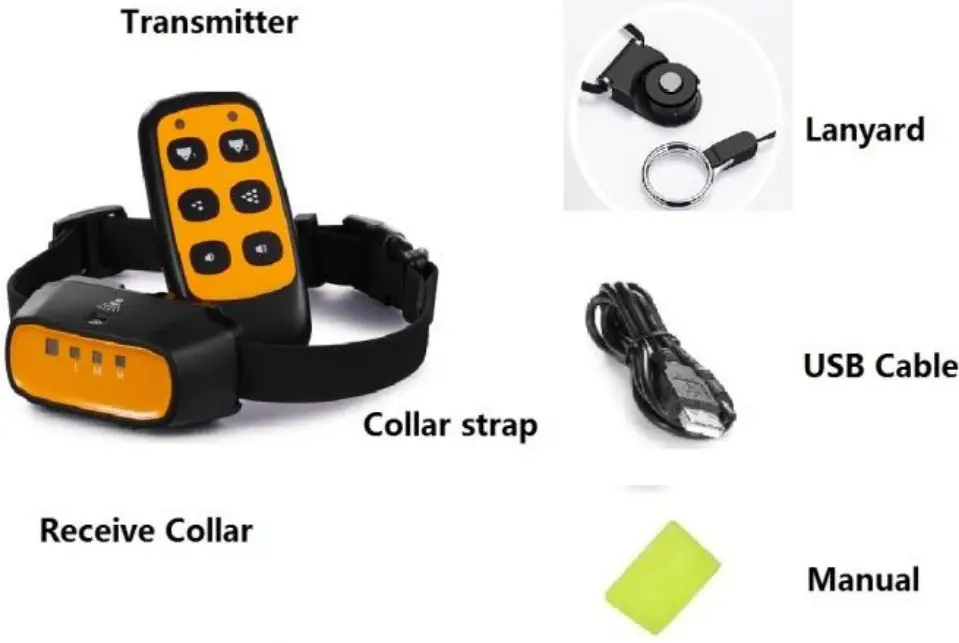
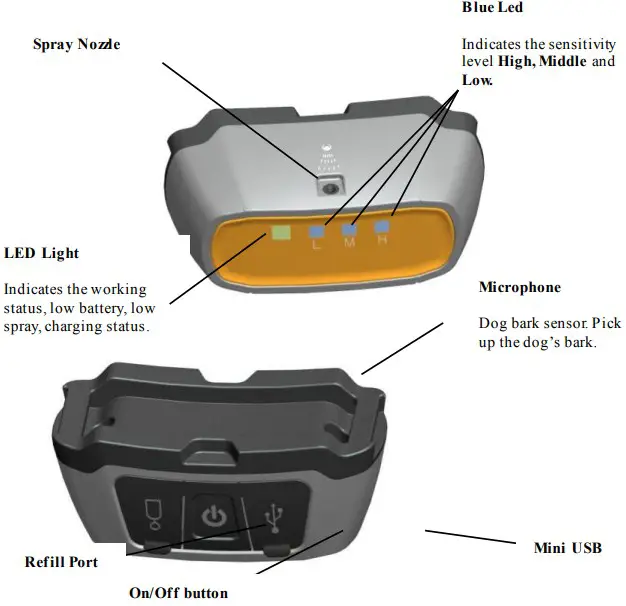
Components

How the System Works
The SP13 Remote spray collar has been proven safe, comfortable, and effective for all pets over 6 months old. This system assists you in controlling your pet without a leash in a long distance range. At the push of a button, the remote transmitter sends a signal, activating the receive collar and emitting safety spray or warning beep . Using the remote trainer consistently and correctly, many misbehavior that your pet exhibits can be corrected or any basic obedience commands can be taught.
Also, The SP13 Remote Spray Trainer has anti bark function .When you don’t use remote control in the first 1 minute after turning on the collar , the receive collar will enter anti bark mode automatically. The microphone will be activated by dog’s bark then the receive collar will emit warning beep and safety spray to stop barking.
Important: The actual distance of remote trainer is dependent on the way you hold the remote transmitter, the range may vary. Hold the remote transmitter in a horizontal position away from your body to achieve optimum range. Terrain, weather, vegetation, vehicles, buildings, transmission from other radio devices, and other factors will affect the range of your remote trainer.
Main Features
- Combine remote training function and auto anti bark function.
- Range up to 500feet in open field.
- Auto anti bark function.
- Suitable for all dogs.
- Train up to 2 dogs with the same transmitter.
- Long and Short spray.
- High and Low warning beep.
- Select your dog with dog selection button.
- Rechargeable 3.7V Li-ion battery for receiver.
- 2 PCS of 3AAA battery for remote controller.
- Soft Silicon Collar Strap.
- LED low power indication. Red light will flash 1 time per second when battery level is low.
- LED low spray indication. Red light will flash 1 time per five seconds when low spray.
- Comes with warranty.
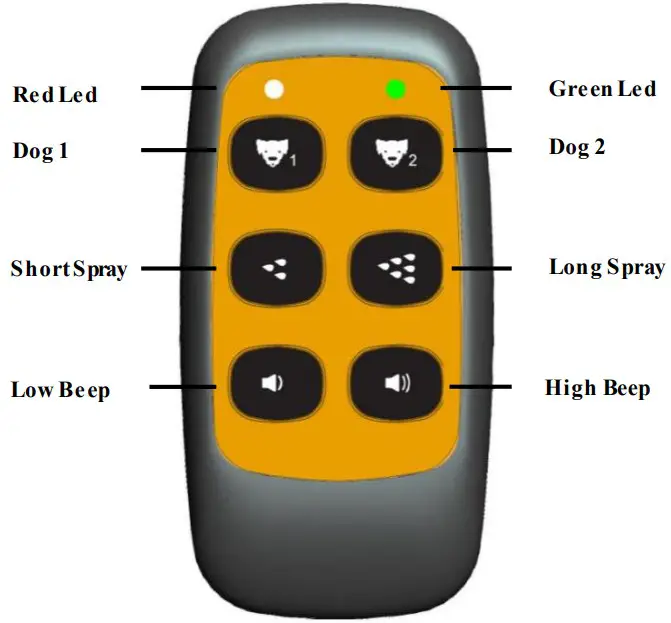
Transmitter
- Indicates the first dog and low battery. Press the Dog1 button or Spray button or beep button one time, the Red led light will flash one time after choosing the first dog. When low battery , the Red led will flash 1 time per second.
- Indicates the second dog. Press the Dog 2 button or Spray button or beep button one time, the green led light will flash one time after choose the second dog.
- Dog 1 button: Select the first dog and match the first dog collar; Press this button to control the first dog .
- Dog 2 button: Select the second dog and match the second collar ;Press this button to control the second dog.
- Short Spray button: Spray shot. Press 1 time receive collar emit 1 short spray.
- Long Spray button: Spray long. Press 1 time- receive collar emit 1 long spray.
- Low Beep button: Warning beep.Press 1 time- receive collar emit 1 low warning beep.
- High Beep button: Warning beep , Press 1 time- receive collar emit 1 high warning beep
Receive Collar
Press and hold on 1 seconds to turn the collar on. Two confirming tones will sound and the green LED light will flash 1 time per 5 seconds. Press and hold on 1 seconds to turn the collar off. One long tone will sound and the green LED light will stop flashing and turn off.
Function and Response Table
| Function | LED Light Response |
| Unit is on | Green light flash 1 time per 5 seconds |
| Low battery | Red light flash 1 time per second |
| Low spray | Red light flash 1 time per 5 seconds |
| Charging | Red light is on |
| Full charge | Green light is on |
Charge the Receive collar
- The receiver can be charged rapidly in about 2 hours. Though 3-4hours is better for the battery life.
- The receive collar can be charged by connecting USB cable and 5V DC power supply, such as cell phone adapter, notebook, or computer.
- Do not charge battery in hot areas. keep far away from fire.
- The red LED light is on when charging.
- The green LED light is on and the red LED light is off when the receive collar is full charged.
- The receiver’s red LED light will flash one time per second when the battery is low power. Please recharge the battery immediately.
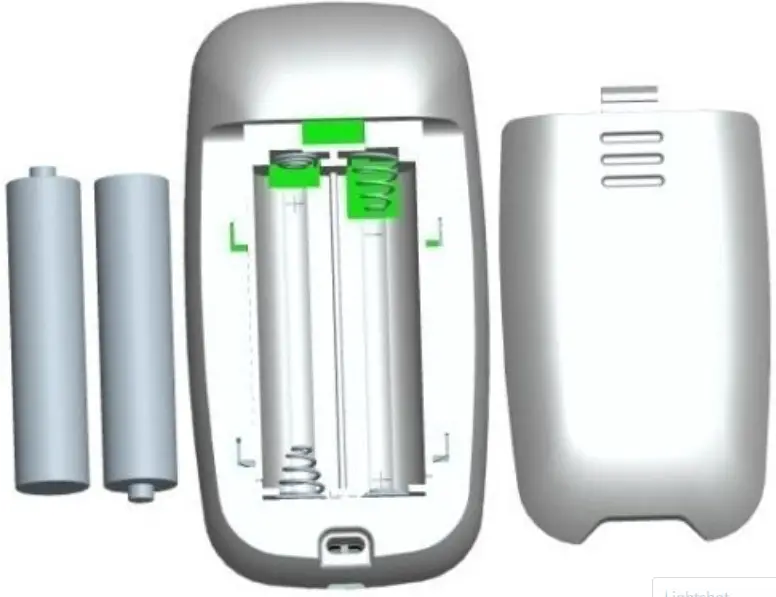
Insert the Transmitter battery
- Hold the Remote Transmitter face down. Gently push on the lower door, slide down and remove the battery cover.
- Insert 2 pieces of 1.5-Volt alkaline batteries according to the correct “+” and“-“ polarity.
- Close the battery cover.
- Test the transmitter.
Press any one button of transmitter. The Red led or Green led flash indicates that inserting transmitter battery correctly.
Match a Receive Collar
To add a receive collar to your remote dog training system, please follow below steps. Only turn on 1 collar at a time to connect then follow below steps for the 2nd collar if required.
- Step 1:Take out 1 unmatched receive collar. Press and hold “ON/OFF” button. After two “beep” sounds, release the button, the power of receiver is on.
- Step 2: Take out the transmitter. Press and hold on the Dog 1 button (within 10 seconds after turn on the unmatched collar ) until hearing 5 “beeps” sound from the receiver then release . If you want to match the second dog collar , press and hold on the Dog 2 button.
Note: You should press and hold on Dog 1 button or Dog2 button within 10 seconds after turn on the unmatched receive collar . Otherwise you have to turn off receive collar then turn it on again to match . - Step 3: Test matched Receiver
- press Dog1 button one time, if you can see the red led flash 1time from the matched receive collar then congratulations, you have matched the first receive collar.
- You can also press Beep button1time to test , will hear 1 sound warning beep from the matched receive collar .
TRAINING GUIDE
Fitting Collar on the Dog
Make sure your dog is standing then place the collar strap on the middle of the dog’s neck. The receiver should be on the underside of his/her neck, with the Spray Nozzle towards the dog’s nose.
The Receive Collar should fit snugly, yet loose enough to allow one finger to fit under the strap.
Ensure a Proper Spray Pattern
For the Receive Collar to perform properly, the nozzle must be positioned correctly and there must be a clear path from the Spray Nozzle to your dog’s snout.
- Make sure the Spray Nozzle is angled out and pointing up towards the dog’s snout.
- For long-haired dogs, it may be necessary to trim the neck hairs along the path of the spray. It is important that the spray reach the dog’s snout to be effective.
- For optimal performance, the Receive Collar should be refilled before each use.
General Training Tips
- Make training sessions short and positive (each session between 10-15 minutes.)
- Train one dog at a time.
- During the first initial training session, keep the dog in a familiar outdoor environment.
- Use a long leash fastened to a non-metallic collar to help thedog’s learning.
- Be consistent. Give your dog a tone and/or spray with each misbehavior.
- Teach the dog a command first before reinforcing the command with the remote transmitter.
- Issue one obedience command at a time. Do not use the training system for commands that the dog has not learnt.
- Do not over correct your dog. Use as few spray as possible to train your dog.
- During training, look for all the positive changes in the dog’s
behavior and remember to reinforce them promptly with ample praise and reward - If you notice one situation in which your dog misbehaves repeatedly, set up this situation as a training session. This will dramatically increase your chances of success.
- If your dog has a timid reaction to the tone or spray (especially the first couple of times), do not be alarmed. Redirect his attention to a simple and appropriate behaviour (i.e. a known command such as “sit”).
- Please keep in mind, that you should keep training sessions short and end every session on a high note. Stop training and play with the dog as soon as the dog has accomplished a new level of proficiency.
- Never use the SP13 Remote Spray Trainer to correct or eliminate any form of aggressive behaviour. If your dog exhibits such behaviour, contact a professional trainer. Aggression in dogs is the result of many factors- it may be a learned behaviour or it may be brought on as a result of fear. Another factor contributing to aggression in dogs is social dominance. Every dog is different.
HOW DOGS LEARN
Here are some basic guidelines that cover all your remote trainer work on obedience commands.
Follow a step-by-step introduction process on each command.
Don’t assume that your dog will understand a remote trainer correction in connection with a command. The stimulus can confuse them initially, even if they knows the command.
Don’t introduce remote training around distractions.
Keep things simple for your dog in their first sessions. They can’t learn well when there’s too much going on.
Remote control mode and Auto anti bark mode
- Auto anti bark mode : The receive collar will enter auto anti bark mode automatically 1minute later when you turn on the receive collar and don’t use the transmitter to get any signals within first 1minute.
- Remote control mode: The receive collar get a signal from the Transmitter within 1 minute after turn on the receive collar . The Receive collar will keep the remote control mode until you turn it off then turn on again.If don’t get any signals from the transmitter within 1 minute the receive collar will enter Auto anti bark mode .
How to work with Auto anti bark
- The collar will issue one beep audio warning when the device detects the first barking.
- The collar will begin to emit spray shot automatically if the collar continue to detect the barking in 1 seconds.
- The collar will return to the original status if it can’t detect the barking in 120 seconds.Then it will start to issue warning beep again.
Adjust the Sensitivity Level
- The receive collar has 3 levels of sensitivity : Low , Middle and High.
- You can adjust the correct sensitivity level according to the dog type and loudness of dog’s barking.
- You can press the On/Off to adjust the sensitivity level when the receive collar is power on . Press On/Off button one time , the sensitivity level will change to the level which the blue Led light on .
Frequently Asked Questions
- Is the spray safe for my dog?
Though the spray is unpleasant,it is harmless to your dog. - Is the collar rainproof?
Yes - How old should my dog be before I use this device?
It is recommended that your dog be 6 months old to use a training collar. Your dog should have learned the basic commands such as “sit” or “stay”. - The collar is too long, is it ok to cut off the excess collar?
Yes. - Can I use this on my aggressive dog?
We do not recommend any of our products to be used on aggressive dogs. In this situation please contact your local veterinarian or professional to trainer to determine if your dog might be aggressive. - Will I get exactly the 500 feet range as advertised?
Testing for the 500 feet range is performed in perfect conditions. The range you get will vary according to terrain, weather, vegetation, as well as, transmission from other radio devices. For best results make sure the collar has the light closest to the dogs nose and you hold the remote horizontally and away from your body. - Does the spray need to hit my dog’s nose ?
No. The spray is very fine and simply creates a mist in the region of the snout. - Will this work automatically when my dog barks?
Yes, you need to confirm the receive collar is Auto anti bark mode. - How many dogs can I set up on this system?
2.Please purchase extra collars if needed. - When will I know to refill the spray?
We suggest that full refill the spray before use every time. When the red Led of receive collar flash 1 time per 5 seconds, please refill the spray. - Can I refill spray while the dog wears the receive collar ?
No . Please take off from your pet , turn off the receive collar , then refill the spray .
Troubleshooting Guide
Problem#1: No spray or beep when a transmitter button is pressed.
- The receiver has not been activated. The receiver must be turned on otherwise it won’t work at all.
- The receiver has not been matched to your transmitter. Follow the instructions to match.
Problem#2: The beeper of receiver doesn’t make any sound when the receiver is turned on.
- Press dog selection button to choose correct dog ID before pressing
- The batteries are dead. Recharge as needed.
Problem#3: The receiver light changes color to indicate low battery very quickly.
- The unit has been left turned on in between training session. Make sure the receiver is turned off after use.
- You are training in very cold weather
Problem#4: The remote trainer doesn’t have range or the range is significantly reduced.
- Either you or the dog is shielded by a metal structure. Operate it far away from these structures.
- The receiver is on backwards. For best range, position the receiver so that the light face toward the dog’s nose.
- Radio interference. Wait a short while then try again, or move to another area.
Problem#6: The receiver can’t receive any signal or cannot work at all.
- Check the receiver on/off button, make sure the receiver is turned on.
- Check the transmitter, if it has a low battery, replace battery first.
- The charger is broken, please try in your computer.
- Cancel the receiver match, then re-match it with the transmitter.