![]()
Air Quality Detector
User Manual
Overview
The hand-held air quality detector can accurately detect indoor air quality. By adopting high-precision electrochemical formaldehyde sesor and American “TEMTOP” laser particle sensor and carbon dioxide sensor based on NDIR detection theory, it can transform the concentration of air pollutants to visualized data directly, providing air quality warning to protect the health of your family effectively.
Application
At home, cab or in public buildings etc.
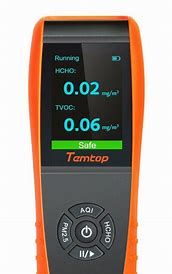
Appearance
- Buzzer status: “
 ” indicates the buzzer is on. When measured polluant concentration exceeds the upper alarm limit, the buzzer beeps. “
 ” indicates the buzzer is off. When an alarm is triggered the buzzer will not beep.
 - Display the two states of the detector: Pause or measuring. “Measuring” indicates data is being detected. “Pause”indicates measurement pauses.
- Date and time: Current date and time is displayed.
- Battery power: Display the remaining battery power and the charging status of the detector.
 : Battery is empty, please charge.
  Battery is full.
  : Charging.
 - Main display area: Display measured data, curve, menu options.
- Menu button: Press to pop up the menu options or shift the cursor position.
- Up button: Press to increase setting values or shift up to select menu option.
- Return button: Press to close the current pop menu or return to the previous interface.
- Power on/off or confirm: Press
 for 2 seconds to turn on/off the instrument. It can also be used to confirm certain operation.
 - Down or run/pause button: Press to decrease setting values or move down to select menu option. It can also be used to continue or suspend detection on the detection interface.
Notice
- The sensor adopts laser and NDIR (Non-Dispersive Infrared) detection theory, please keep the detector away from substances like fluff and hair to guarantee the accuracy of measured data.
- Please do not place the detector in an environment where particle concentration is more than 500ug/m3 and that of formaldehyde (HCHO) is over 1.0mg/m3 for long time. Long-time exposure to high-concentration air pollutants will damage the sensor and make it work improperly.
- Please do not bump, strike or drop the detector.
- Please do not cover the detection port or air outlet during use.
- Avoid contact with organic solvents which include silica gel and other adhesives, paintings, drugs, oil and high-concentration gases.
- Avoid using the detector in humid environment to ensure the accuracy of measured data.
Operation
(1): Main menu interface
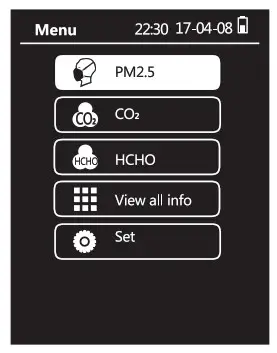
After the detector is turned on, it will display the main menu automatically including the following options:
- PM2.5
- CO2
- HCHO
- View all info
- Settings
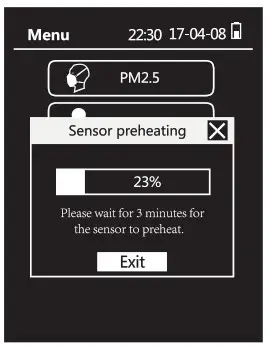 Press
Press![]() or
or ![]() to choose an option and then press
to choose an option and then press ![]() , a window will popup, showing “Sensor preheating” if the detector is turned on for less than 3 minutes. After the sensor is preheated, the interface can be entered.
, a window will popup, showing “Sensor preheating” if the detector is turned on for less than 3 minutes. After the sensor is preheated, the interface can be entered.
Real-time concentration display
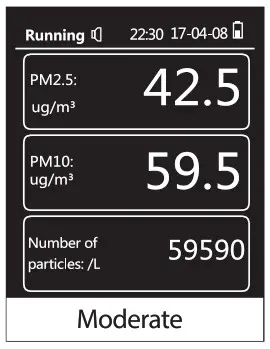 After switching from the main menu to PM2.5 concentration interface, the detector will display the real-time concentration of PM2.5, PM10 and particle numbers as well as the level of polluant concentration.
If the value goes out of the set concentration’s upper limit, the buzzer will beep.
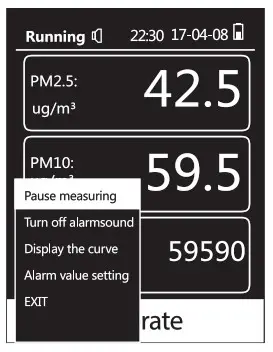
Press ![]() to pause or start the measurement.
to pause or start the measurement.
Press ![]() to return to the interface of main menu.
to return to the interface of main menu.
Press ![]() , the following 5 options will show.
, the following 5 options will show.
Use ![]() or
or ![]() to shift.
to shift.
Press ![]() to enter corresponding functions:
to enter corresponding functions:
- ‘Suspend/Continue measuring”
- “Mute/Unmute the buzzer”
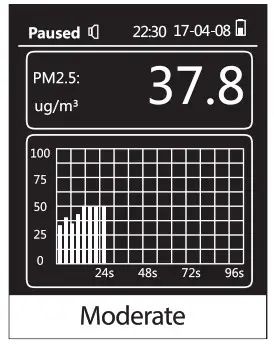
- “Display/Not display the curve”
- “Alarm settings”
- “Exit”
 The functions of above menu items are as follows:
- “Suspend/Continue measuring’: The detector pauses or starts measuring the concentration of PM2.5, PM10, etc.
- “Mute/Unmute the buzzer”: When the detected concentration is higher than the pre-set alarm limit, the buzzer will beep. Select this option to mute the beep.
- “Display/Not display the curve”: Select this option to display the curve of measured data visually. If you choose ‘ot display the curve’, the curve will be shifted to data.
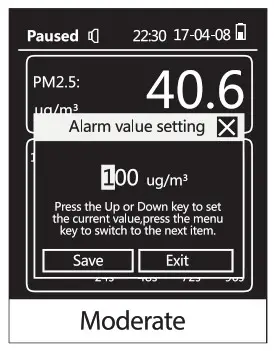
- “Alarm setting”:
A window showing “Alarm settings” will pop up to remind you of setting the upper-limit alarm value. Use to shift,
  or
or  to adjust the value. Then press to select ‘Save” or “Cancel”. Press to confirm the value.
 - ” Exit “: Exit from the settings and back to the interface of concentration display.
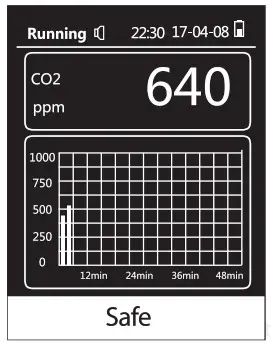
(3): Interface: Co2 conecentration
 After switching from the main menu to CO2 interface, the detector will display the real-time concentration of CO2 and its level; if the value is beyond the set concentration’s upper limit, the buzzer wil beep.
 Press
Press ![]() to suspend or continue measurement.
to suspend or continue measurement.
Press ![]() to return to the interface of main menu.
to return to the interface of main menu.
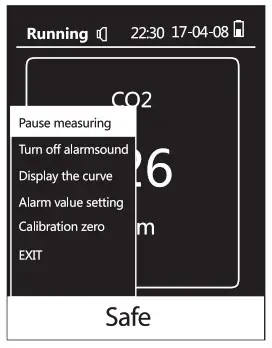
Press ![]() to pop up the 6 options below.
to pop up the 6 options below.
Press ![]() to enter corresponding functions.
to enter corresponding functions.
- “Suspend/Continue measuring”
- “Mute/Unmute the buzzer”
- “Display/Not display the curve”
- “Alarm settings”
- “Zero calibration”
- “Exit”
 The functions of above menu items are as follows:
- “Suspend/Continue measuring”: The detector pauses or continues measuring CO2 concentration and its level.
- “Mute/Unmute the buzzer”: When the detected concentration is higher than the pre-set value, the buzzer will beep. Select this option to mute the beep.
- “Display/Not display the curve: Select this option to display the curve of measured data visually. If you choose “Not display the curve”, the curve will be shifted to data.
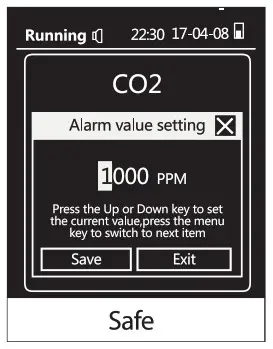
- “Alarm settings” Press or to select this option and then press to enter the interface. Press or , to adjust the upper-limit alarm value of CO2 concentration. Press to shift. After switching to “Save° or “Cancel’. press to confirm the settings and back to the interface of settings.
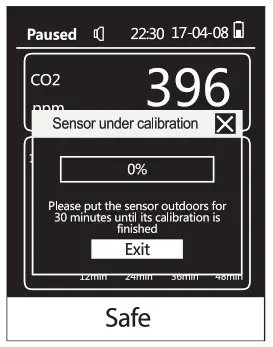
- “Zero calibration”: It pops up a window showing “Calibrating sensor”. Please place the detector outdoors for 30 minutes until Zero point calibration of CO2 sensor is finished. Press
 or to exit.
 - “Exit”: Exit the menu options and then return to the interface of CO2 concentration.
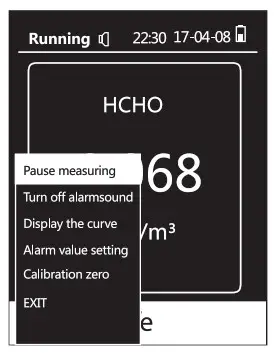
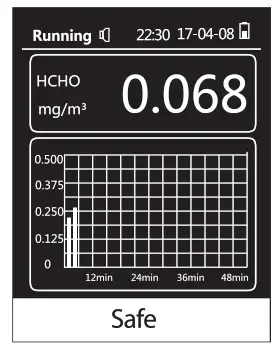
(4): Interface: formaldehyde (HCHO) concentration
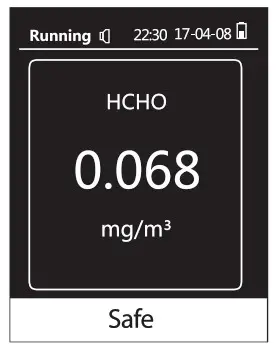 After switching from the mein menu to HCHO Interface, the detector will display the real-time concentration of ECHO and its level; if the value is beyond the set concentration’s upper limit, the buzzer wil beep.
 Press
Press ![]() to suspend or continue measurement
to suspend or continue measurement
Press ![]() to return to the interface of main menu.
to return to the interface of main menu.
Press ![]() to pop up the 6 options below.
to pop up the 6 options below.
Press ![]() to enter corresponding functions.
to enter corresponding functions.
- “Suspend/Continue measuring”
- “Mute/Unmute the buzzer”
- “Display/Not display the curve”
- “Alarm settings”
- “Zero calibration”
- “Exit”
 The functions of above menu items are as follows:
- “Suspend/Continue measuring”: The detector pauses or continues measuring HCHO concentration and its level.
- “Muteftinmute the buzzer”: When the detected concentration is higher than the pre-set value, the buzzer will beep. Select this option to mute the beep.
- “Display/Not display the curve” : Select this option to display the curve of measured data visually. If you choose “Not display the curve”, the curve will be shifted to data.
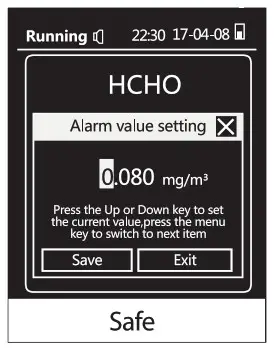
- “Alarm settings”: Press or , to select this option and then press , to enter the interface. Press or. to adjust the upper-limit alarm of HCHO concentration Press to shift. After switching to “Save or ‘Cancel’. press to confirm the settings and back to the interface of settings.
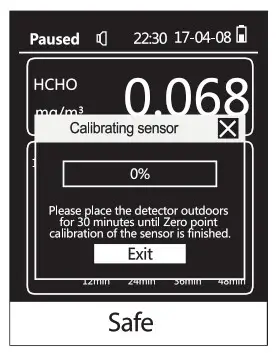
- “Zero calibration’: It pops up a window showing “Calibrating sensor’. Please place the detector outdoors for 30 minutes until Zero point calibration of the sensor is finished. Press or to exit.
- “Exit”: Exit from calibration and return to the interface of CO2 concentration.
(5): Interface: View all data
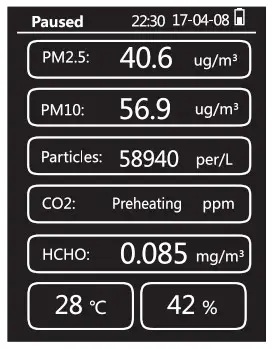 In the main menu, select “view all data” and press
 ![]() to enter this interface, it will display the concentration of PM2.5, PM10, CO2 and HCHO, particle numbers, as well as the temperature and humidity.
to enter this interface, it will display the concentration of PM2.5, PM10, CO2 and HCHO, particle numbers, as well as the temperature and humidity.
Press ![]() to suspend or continue the measurement.
to suspend or continue the measurement.
Press ![]() to return to the interface of main menu.
to return to the interface of main menu.
(6): Interface: Settings
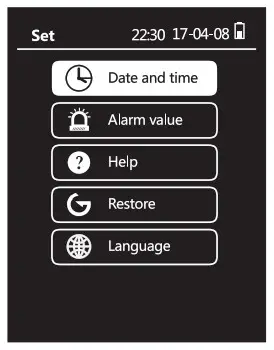 In the main menu, select “Settings” to and press
 ![]() to enter this interface. It will display the 5 options below. Press
to enter this interface. It will display the 5 options below. Press ![]() or
or ![]() to select a desired option. Then Press
to select a desired option. Then Press ![]() to enter the corresponding interface or press
to enter the corresponding interface or press ![]() to retum to the main menu.
to retum to the main menu.
- “Date and time”
- “Alarm’
- “Help”
- “Reset to default”
- “Language”
 The functions of above menu items are as follows:
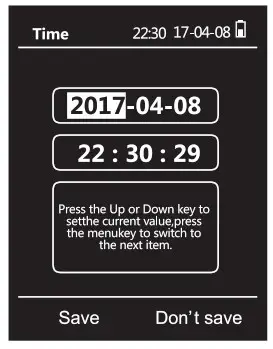
- “Date and time”: In settings interface, select this option and press to enter the interface and then press or to set the date. Press to shift. After switching to “Save” or “Cancel”, press to confirm the settings and back to the interface of settings.
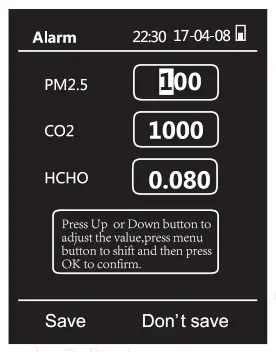
- “Alarm settings”: In settings interface, select this option and press to enter the interface and then press or to set the upper-limit alarm value of PtiA2.5 or CO2 concentration. Press to shift. After switching to “Save” or “Cancer, press to confirm the settings and back to the interface of settings.
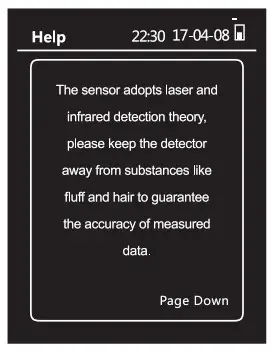
- “Help’: Press to enter the interface and then press “ or . to view instructions and notices, then press to back to the interface of settings.
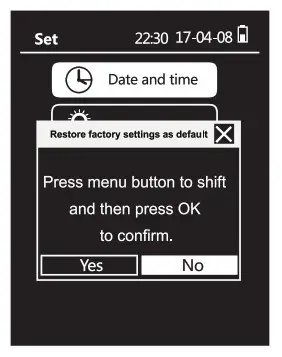
- “Reset to default’: Press , a window will pop up, showing Reset to default” . Press to shift between -Yes-or “No”, press to confirm whether to reset or not, and then return to the interface of settings. If reset, settings like the upper-limit alarm values of polluants’ concentration and language are recovered to factory default.
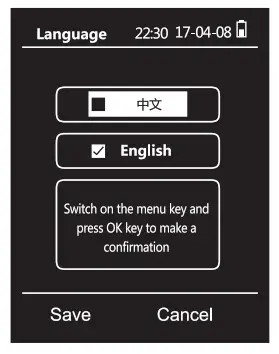
- “language”: Select “Language” and press to enter this interface and then press to shift. Press . to confirm the language option. Use to shift between “Save” or “Cancel”. Press and return to the interface of settings.
• Note:
In the curve display interface, the data updates every 2s if the abscissa is 0-96s; it updates very 1 min if the abscissa is 0-48 min;
Specifications
- Name: Hand-Held Air Quality Detector
- Model: M2000
- Display: TFT color LCD screen
- Battery voltage: 3.7VDC
- Overall dimension: 73.5 x 139 x 37.5 mm
- Power adapter:
Output voltage: 5VDC
Output current: 1A - Operating environment:
Temperature range: 0-50 C
Humidity range: 0-90%RH
Atmospheric pressure: latm - Measurement specification and range:
o PM2.5 measurement technical specification Measurement range: 0-999ug1m3 Resolution: 0.1 ug/m3
o PM10 measurement technical specification Measurement range: 0-999ug/m3 Resolution: 0.1ug/m3
o CO2 measurement technical specification Measurement range: 0-5000PPM Resolution: 1 PPM
o Formaldehyde measurement technical specification Measurement range: 0-5mg/m3 Resolution: 0.001 mg/m3
Health Standard Index
| Pollutant/Level | vvBetter | Good | Bad |
| PM2.5 (China) ) | <75 | 75-150 | >150 |
| PM2.5 (USA) | <35 | 35-150 | >150 |
| CO2 | <1000 | 1000-2000 | >2000 |
| HCHO | <0.08 | 0.08-0.3 | >0.3 |
Note: PM2.5(USA) is the USA standard calibration value.
Warranty Agreement
The validity period is dated from the day when the user purchases the product. The valid purchase invoice is the certificate. It is customers who need send products back to repair. Manufacturer provides warranty services within the scope of the national regulations.
- Since the date of purchasing the product, customers can return or exchange the product for any problem of quality within 7 days.
- Since the date of purchasing the product, customers can exchange the product for any problem of quality within 30 days.
- Remark
• Since the date of purchasing the product, it will be provided with one year’s warranty.
• After-sales guarantee card and invoice are the certifications of enjoying after-sales service. - No warranty service in the following cases
• After-sales support card is altered or the information is not consistent with the actual product.
• Damaged by self-dismantling or self-modification.
• Damaged deliberately by other human behaviors.
• Not included in the scope of the national regulations.
Model: M2000
Elitech Technology, Inc (US)
1551 McCarthy Blvd, Suite 112
Milpitas, CA 95035
www.elitechustore.com
[email protected]
Made in China