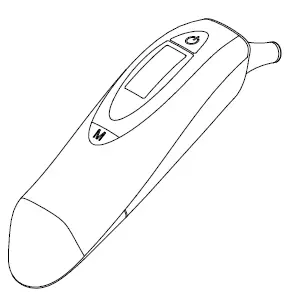
Instruction Manual
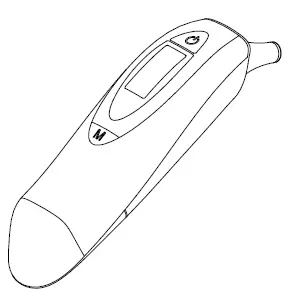
2 in 1 Infrared Thermometer Ear and Object
Model : KI-8171L
Precautions
- Please consult your physician to verify your body temperature.
- DO NOT scrape or scratch the lens as it will hamper the effectiveness of the device.
- The device is intended for consumer use only.
- Do not drop or expose thermometer to electric shock as this may adversely affect its performance.
POWER SOURCE SIZE AAA(1.5V)x 2
WARRANTY: ONE YEAR FROM THE DATE OF PURCHASE
Parts Identification
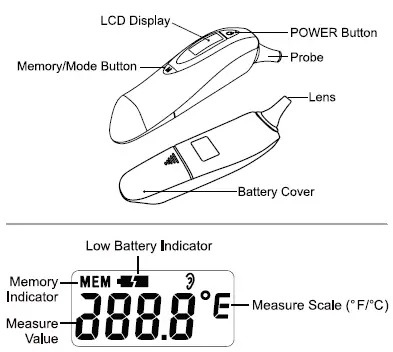
About IR and Body Temperature
Why an IR ear thermometer?
The tympanic membrane (eardrum), and the hypothalamus, the part of the brain which controls body temperature, share a common blood supply so tympanic readings rise and fall rapidly with core temperature (deep body temperature). This makes the ear temperatures one of the best indicators of internal body (core) temperature.
What are normal temperature values?
Human body temperature varies from person to person, some run in the lower range (96-97°F) and some run in the higher range (98-99°F). Also, your normal body temperature changes throughout the day and can vary at different times of the year. It is very important to know your normal body temperature range. We recommend measuring yourself when healthy to establish reference temperatures. This will help you feel more confident of the measured temperature readings when ill.
Information You Should Know Before Operating the IR Ear Thermometer
How to correctly use the IR ear thermometer
- It is useful to try this thermometer on yourself first to become familiar with it’s operations.
- Do not take the temperature immediately upon waking. Sleeping on the ear can cause the temperature to be higher than normal.
- It is common for the readings to be slightly different between the right and left ear. We suggest using the same ear to obtain temperature readings.
- Straighten the ear canal for measuring: Children under 12 months: Straighten ear canal by gently pulling the ear back.
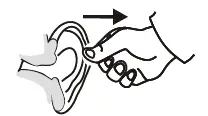
Children over 12 months and Adults: Straighten the ear canal by gently pulling the ear back and up.
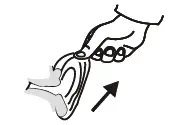
6. Make sure the ear canal is dry, clean and free of was or particulates.
Preparation for Use
Installing/Replacing the Battery:
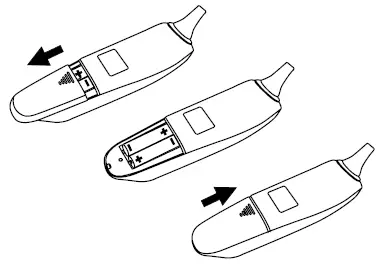
- Slide the battery cover off in the direction shown below.
- If replacing, carefully remove batteries.
- Clean the battery ends as well as the contacts in the device prior to reinstalling batteries.
- Install two new AAA batteries into the battery compartment making sure to match the correct polarities (+ and -).
- Replace and securely fasten the battery cover as shown below.
WARNING:
Batteries Contain Mercury. DO NOT PUT IN REGULAR TRASH, dispose of in recycling trash only. Recycle or manage as hazardous waste. Never dispose of batteries in fire. Do not recharge (unless rechargeable), put in backwards or disassemble. This may cause explosion, leakage and injury.
CAUTION:
When replacing batteries, do not mix old ones and new ones. Never mix alkaline, standard (carbon-zinc) or rechargeable (nickel-cadmium) batteries.
How to Operate the Thermometer
NOTE: Each time you turn on the unit, it will automatically run a diagnostic check and the screen will show colors and all symbols:

QUICK START
- Press and release the POWER button. You will hear a short beep and the memory will show the last temperature taken.
- Place the Probe inside the ear canal or aim toward the object approximately – 1 ‘/x inches (1- 3 cm) from surface.
- Press and release the POWER button to record new measurement.
- Two short beeps let you know the measurement is complete/ready to read.
- The temperature and back light color shows on the display. The back light color will light according to the reading:

6. Turn the unit off by pressing and holding the POWER button for about 5 seconds until the display shows OFF and a long beep is heard.

7. The device will automatically shut off after about 1 minute of non-use.
SETTING THE SCALE °C or °F
- Press and release the POWER button to turn on the device.
- Immediately press it again and hold down until you see the °C or °F change. Release the button as soon as change occurs.
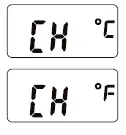
3. The device is now ready to take a measurement.
CHANGING MODES
This device has two modes: (1)Ear (2)Object
- Ear mode is for measuring temperature of the tympanic membrane (eardrum) to determine body temperature.
- Object mode is for measuring temperature of an object or surface. This mode is not intended for measuring human body temperature.
*Device will always power on in Ear Mode*
- Press and release the POWER button to turn on the device.
- Immediately press and hold the Memory/Mode button until you see either

then release button.
3. You may toggle between modes simply by following step 2.
RECALL MEMORIES
This device will hold 10 temperature readings in memory (Ear and Object readings combined).
• Ear memories will show the small .111 ear icon in the top right side of display.
• Object memories show nothing in that area.
- The device must be powered OFF in order to recall memories.
- Simply press and release the Memory/Mode button to show stored temperature readings.
- The most recent temperature reading will be the first to show.
- When viewing memory, the device will automatically shut off after 3 seconds of non-use.
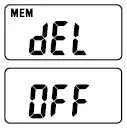
DELETE MEMORIES
- Repeat steps land 2 in “Recall Memories”
- Press and hold the Power button until “dEL” is displayed.
- Release button. All stored memories are now deleted Device will automatically shut off.
IMPORTANT THINGS TO KNOW
- Allow at least 1-3 minutes between each measurement in order to obtain the most accurate result.
- The default mode is Ear mode. Any time the unit is powered off, it will power on in ear mode.
- Make sure the probe lens is clean and clear before use. It should be ‘mirror like’ or reflective. A dirty, blocked or scratched lens will cause incorrect results.
- Do not store the device in extreme conditions or temperatures (ie., direct sunlight, very hot/cold or high moisture like a bathroom). Unit is not waterproof.
- If it has been stored in extreme conditions, wait at least one hour for it to return to a normal room temperature before using.
- Wait at least thirty minutes after bathing, exercising or eating before taking a measurement. . Do not dismantle or modify the device other than changing the batteries.
- This device has no user serviceable parts. Do not dismantle or modify other than changing the batteries.
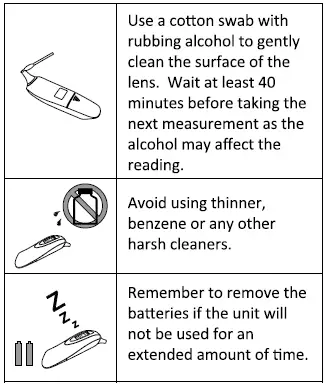
CLEANING AND CARE
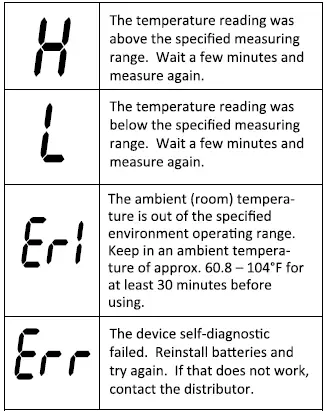
ERROR MASSAGE
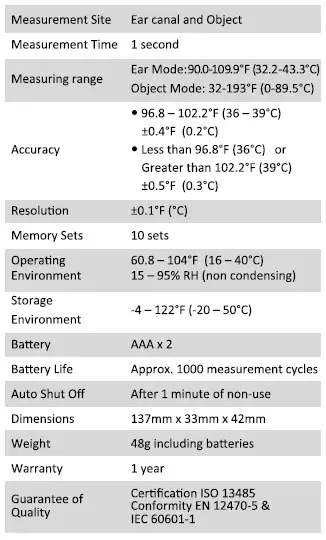
SPECIFICATIONS
LIMITED WARRANTY
This device (batteries excluded) is guaranteed for one year from the data of purchase against manufacturer’s defect under normal use and without evidence of tampering.
WARRANTY EXCLUSIONS:
• Device is not properly operated according to the instructions as described in this manual.
• Device shows any signs of tampering or attempted modification.
• Evidence of improper handling or storing, such as dropping, heat, liquid or cleaner damage.
• Natural disasters (such as fire, flood, earthquake, lightening).
• Na receipt or proof of purchase showing dote of purchase
Following the instructions closely will ensure years of dependable operation.
FCC STATEMENT
POTENTIAL FOR RADIOS/TELEVISION INTERFERENCE (For USA Only)
Operation is subject to the following two conditions:
1) This device may not cause harmful interference, and
2) this device must accept any interference received, including interference that may cause undesired operation.
This product has been tested and found to comply with the limits for a Class B digital device, pursuant to part 15 of the FCC rules.
These limits are designed to provide reasonable protector against harmful interference in a residential The product generates, LISPS, and ran radiate radio frequency energy and, T not installed and used in accordance with the Instructions, may cause harmful Interference to tad e communicator, However, there is no guarantee that Interference will not occur In a particular installation, If the product does cause harmful Interference to radio or television receptor, which can be determined by turnings the product on and oft the user is encouraged to try to correct the interference by one or more of the following measure:
• Reorient or relocate the receiving antenna.
• Increase the separation between the product and the receiver.
• Consult the dealer or an experienced radio / TV technician for help.