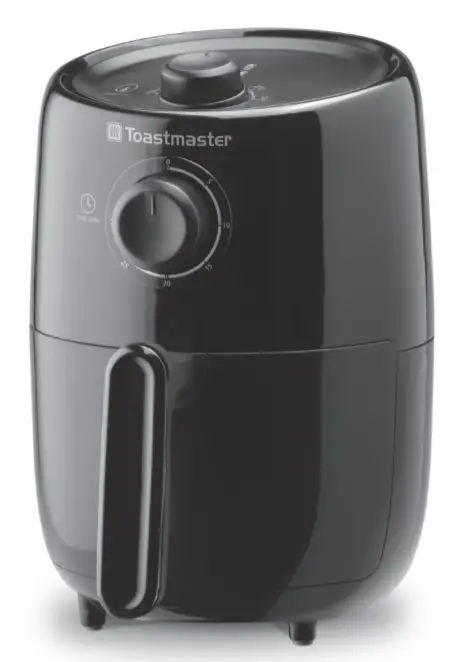
Toastmaster TM-200AF 1.9L 2 Quart Air Fryer Instruction Manual

IMPORTANT SAFEGUARDS
When using electrical appliances especially when children are present, basic safety precautions should always be followed to reduce the risk of fire, electric shock, and/or injury to persons, including the following:
- READ ALL INSTRUCTIONS.
- Do not touch hot surfaces. Use any handles or knobs.
- To protect against electrical shock, do not place cord, plug or appliance in water or other liquid.
- Close supervision is necessary when any appliance is used near children.
- Do not leave appliance unattended while in use.
- Unplug from outlet when not in use and before cleaning or storing. Allow to cool before cleaning and putting on or removing parts.
- Do not operate any electrical appliance with a damaged cord or plug or after appliance malfunctions or has been dropped or damaged in any manner. Return appliance to nearest authorized service facility for examination, repair or adjustment.
- The use of accessory attachments not recommended by the appliance manufacturer may result in fire, electrical shock or injury.
- Do not use outdoors or for commercial purposes.
- Do not let cord hang over edge of table or counter, or touch hot surfaces.
- Do not place appliance on or near a hot gas or electric burner, or in a heated oven or microwave.
- Extreme caution must be used when moving a Fryer containing hot oil or other hot liquids.
- To switch off the appliance, turn the TIME control dial to OFF, then remove plug from the outlet.
- Do not use the appliance for other than its intended use.
- Never leave the appliance unattended during operation.
- CAUTION-Risk of electric shock. Cook only in removable container.
- Oversized foods or metal utensils must not be inserted in the appliance as they may create a fire or risk of electric shock.
- During use and when removing the basket, hot steam is released. Keep hands and face clear. Use extreme caution when removing the basket.
- Ensure a minimum distance around the appliance of at least 4 inches to other objects, cupboards and walls when in operation. Do not store any item on top of the appliance when in operation.
- Do not clean with metal scouring pads. Pieces can break off the pad and touch electrical parts involving a risk of electric shock.
- Do not store any materials, other than manufacturers recommended accessories, in this appliance when not in use.
- Do not place any of the following materials in the appliance: paper, cardboard, plastic.
- Do not cover the basket or any part of the appliance with metal foil. This will cause overheating of the appliance.
- A fire may occur if the appliance is covered or touches flammable material, including curtains, draperies, walls, and the like,
- FOR HOUSEHOLD USE ONLY.
SAVE THESE INSTRUCTIONS
OPERATING INSTRUCTIONS
PRODUCT MAY VARY SLIGHTLY FROM ILLUSTRATIONS

This appliance is for HOUSEHOLD USE ONLY. It may be plugged into an AC electrical outlet (ordinary household current). Do not use any other electrical outlet.
CORD PLUG
This appliance has a polarized plug (one blade is wider than the other). To reduce the risk of electric shock, this plug is intended to fit into a polarized outlet only one way. If the plug does not fit into the outlet, reverse the plug and try again. If it still does not fit, contact a qualified electrician. Do not attempt to modify the plug in any way.
SHORT CORD INSTRUCTIONS
A short power supply cord is provided to reduce the hazards resulting from entanglement or tripping over a longer cord.
Longer detachable power-supply cords or extension cords are available and may be used if care is exercised in their use. If a longer detachable power-supply cord or extension cord is used:
- The marked electrical rating of the cord set or extension cord should be at least as great as the electrical rating of the appliance, and
- The cord should be arranged so that it will not drape over the countertop or tabletop where it can be pulled on by children or tripped over unintentionally.
LINE CORD SAFETY TIPS
- Never pull or yank on cord or the appliance.
- To insert plug, grasp it firmly and guide it into outlet.
- To disconnect appliance, grasp plug and remove it from outlet.
- Before each use, inspect the line cord for cuts and/or abrasion marks. If any are found, this indicates that the appliance should be serviced and the line cord replaced.
- Never wrap the cord tightly around the appliance, as this could place undue stress on the cord where it enters the appliance and cause it to fray and break.
DO NOT OPERATE APPLIANCE IF THE LINE CORD SHOWS ANY DAMAGE, OR IF APPLIANCE WORKS INTERMITTENTLY OR STOPS WORKING ENTIRELY.
IMPORTANT
During the first few minutes of initial use, you may notice smoke and/or a slight odor. This is normal and should quickly disappear. It will not recur after appliance has been used a few more times. Operate the unit on the highest setting for 15 minutes until no odor or smoke is present.
BEFORE USING
Solid surface countertops can be easily scratched, cracked, scorched, or damaged, especially when exposed to heat. To prevent damage, the following precautions should be observed when using this product:
- Always use a trivet under heat generating sources such as Air Fryers, etc.
Carefully unpack the air fryer and all parts. Remove all packaging materials, including any stickers or labels. Clean the interior and exterior surfaces of the air fryer with a damp cloth or sponge. Wipe dry with a soft cloth. NEVER IMMERSE THE AIR FRYER OR CORD IN WATER OR ANY OTHER LIQUID. Position the air fryer on a dry, level, heat-resistant surface. It is recommended to operate this appliance on a separate outlet and circuit from other appliances to avoid overloading the circuit.
USING YOUR AIR FRYER
- Place your air fryer on a clean, dry, level, stable, and heat-resistant surface in the center of the countertop.
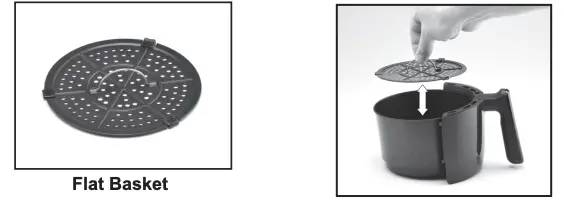
- Insert the flat basket into the removable basket and slide into the air fryer. This will prevent residue build up at the bottom of the pan. (See image below for reference)
- Plug cord into a 120 volt wall outlet.
- Preheat the appliance by turning the time control dial to 3 minutes and the temperature control dial to the required cooking temperature. The POWER light will remain lit until the set time has elapsed.
NOTE: This appliance will shut off automatically if the cooking basket is not placed correctly in the air fryer or if removed during use. CAUTION: Escaping steam can burn, take precautions to avoid contact with the steam during use.
NOTE: For shorter cooking times, it is recommended to turn the time control dial 10 minutes past the required cooking time and then back to the required cooking time. This will ensure better timer accuracy. - Once the selected time has elapsed, the air fryer timer will ding indicating the cooking is finished and the appliance will switch off. The POWER light will turn off.
- Remove the removable basket and place on a hot pad or heat-resistant surface. Place food in the basket and slide pan into the air fryer. DO NOT overload the basket.
WARNING: Do not use the appliance to cook greasy or fatty food, such as sausages, as the grease could catch on fire. - Turn the time control dial to the required time and the temperature control dial to the required temperature. The POWER light will be illuminated.
NOTE: If food needs to be stirred, using the handle slide out the basket and gently shake to toss food. NOTE: The appliance will switch off when the basket is removed and will switch back on once it is placed back inside. The appliance can also be switched off manually by turning the time control dial to OFF. Slide the basket back into the air fryer and cooking will resume. - Once the selected cooking time has elapsed, the air fryer timer will audibly indicate that the cooking is finished and the appliance will switch off. The POWER light will turn off.
- Remove the removable basket and place on a hot pad or heat-resistant surface.
WARNING: Never place the hot cooking basket directly on a tabletop or counter top to avoid damage to surfaces. It is recommended to use the heat-resistant trivet or cutting board. - It is recommended to NOT turn the basket upside down to empty it any time to avoid spilling hot oil, liquids and/or food residues collected at the bottom of the removable basket. Burns can result from hot oil and liquids.
- Carefully remove the food from the basket into your desired serving dish.
- If cooking is complete, unplug the cord plug from the wall outlet and allow the air fryer and all parts to cool completely before moving or cleaning.
NOTE: If a second batch of food is desired, immediately place the food in the air fryer basket and continue cooking. The air fryer is ready for a second batch of food as soon as the first one is done.
CAUTION: FOOD AND BASKET WILL BE VERY HOT. DO NOT ATTEMPT TO REMOVE FOOD FROM THE BASKET WITH YOUR HANDS.
TIPS AND SUGGESTIONS
- This air fryer can be used to prepare a variety of food that can also be prepared in a traditional oven.
- It is recommended to defrost frozen food prior to cooking to shorten the cooking time.
- For shorter cooking times, it is recommended to turn the time control dial 10 minutes past the required cooking time and then back to the required cooking time. This will ensure better timer accuracy.
- Place a baking tin or oven-safe dish in the basket to try baking foods such as quiche or cake.
- You can use the air fryer to reheat food. Place your food in the air fryer and turn the temperature control dial to 300° and the time control dial to 10 minutes.
- Do not overfill the basket.
- Do not use the removable pan without the basket.
- Do not add oil directly into the basket or removable pan.
- Always use nylon, heat-proof plastic or wooden cooking utensils as metal utensils may damage the non-stick surface.
CARE AND CLEANING
This appliance requires little maintenance. It contains no user serviceable parts. Do not try to repair it yourself. Any servicing requiring disassembly must be performed by a qualified appliance repair technician.
- Before cleaning, unplug from outlet and allow air fryer and all parts to cool completely.
- The removable basket and flat basket can be washed in hot soapy water. ONLY the flat basket may be washed in a dishwasher. Wipe the inside and outside of the air fryer with a slightly damp, soft cloth and mild detergent if needed. NEVER IMMERSE THE AIR FRYER OR CORD IN WATER OR ANY OTHER LIQUID.
- NEVER USE ABRASIVE CLEANERS OR SCOURING PADS TO CLEAN THE AIR FRYER, AS THOSE MAY DAMAGE THE SURFACES.
To store, be sure all parts are clean and dry. Store appliance in its box or in a clean, dry place. Never store it while it is hot or wet. Never wrap cord tightly around the appliance; keep it loosely coiled.
RECIPES
Basic Chicken
2 – 4 medium chicken breasts
2 tbsp all purpose flour
1 tsp paprika
1 tsp salt
¼ tsp black pepper
– melted butter or cooking oil
Preheat the air fryer to 400°F. Combine all dry ingredients in a small bowl. Lightly brush the chicken with the melted butter or cooking oil and roll the chicken in the mixture of flour and spices. Cook for 8-10 minutes. Turn and cook for another 8-10 minutes.
Garlic French Fries
2 – 3 medium sized potatoes
1 tbsp cooking oil
1 tsp garlic powder
1 tsp salt
Preheat air fryer to 400°F for 3-5 minutes Wash and peel potatoes. Cut potatoes into even sized ¼ inch strips. TIP: Soak cut potato in cold water for at least 10 minutes for fries tender inside and crispy on the outside. Remove fries from water, pat dry with paper towel. Place cut potato, cooking oil, garlic powder and salt into a plastic freezer bag and toss until all strips are well coated. Pour the potato strips out of the bag and into the hot basket. Ensure the potato strips are spread evenly at the bottom. Cook for 10 minutes. Shake the basket or stir fries and cook for an additional 10 minutes.
Mixed Vegetables
1 green pepper
1 small onion
1 sliced garlic clove
– sliced mushrooms
1 tbsp cooking oil
¼ tsp salt as desired
Preheat the air fryer to 320°F. Chop of slice green pepper and onion into equal size strips. Place all ingredients into a plastic freezer bag and toss. Pour the vegetables out of the bag and into the hot basket. Cook for 10-15 minutes. Add salt to taste.
Breaded Tilapia
2-4 medium Tilapia fillets
2 tbsp all purpose flour
¼ tsp pepper
2 tbsp corn meal
1 tbsp cooking oil
¼ tsp salt as desired
Preheat the air fryer to 400°F. Make sure fillets are well thawed. Rinse and pat dry. Mix flour, corn meal, salt and pepper in a shallow bowl. Lightly brush each fillet with cooking oil. Coat the fillets with the flour and corn meal mixture. Cook for 8-10 minutes. Turn the fillets over and cook an additional 8-10 minutes.
Corn Meal Muffins
¼ cup corn meal
¼ cup all purpose flour
¼ cup milk
1 tbsp sugar
1 tbsp cooking oil
½ tsp baking powder
1 egg
¼ tsp salt
Preheat the air fryer to 350°F. Mix corn meal, flour, sugar, baking powder and salt together in a bowl. Add egg, oil and milk; stir gently to combine. Spoon batter into cupcake liners. Cook for 10-15 minutes.
Easy Ribs
1 lb ribs (beef or pork)
– favorite dry rub or rib sauce
Marinate or apply the dry rub to your selected rib at least 1 hour before you plan to cook them. Cook the ribs at 400°F for 10-15 minutes. Gently turn them and cook for another 10-15 minutes. Make sure the ribs reach an internal temperature of 160°F before removing from the air fryer.
Breaded Shrimp
4-6 oz shrimp
2 tbsp melted butter
¼ cup fine bread crumbs
1 tsp garlic powder
1 egg
– salt as desired
– pepper as desired
Preheat the air fryer to 355°F. Beat the egg in a bowl. Place the shrimp in the bowl and stir gently to coat evenly. Combine butter, bread crumbs and garlic in a shallow bowl. Coat the shrimp with the breading mixture then sprinkle on salt and pepper. Cook for 8-10 minutes. Flip and cook another 5 minutes.
ONE YEAR LIMITED WARRANTY
SELECT BRANDS, INC. warrants, subject to the conditions stated below, that from the date of purchase, this product will be free from mechanical defects for a period of one (1) year. SELECT BRANDS, INC., at its option, will repair or replace this product found to be defective during the warranty period. Should this product become defective by reason of improper workmanship or material defect during the specified warranty period, Select Brands, Inc. will repair or replace the same effecting all necessary parts replacements for a period of one year from the date of purchase.
Transportation charges on parts, or products in whole, submitted for repair or replacement, under this warranty, must be borne by the purchaser.
CONDITIONS: This warranty is valid for the original retail purchaser from the date of initial retail purchase and is not transferable. This warranty does not apply to product sold by third party resellers. Keep the original sales receipt. Proof of purchase is required to obtain warranty service or replacement. Dealers, service centers, or retail stores do not have the right to alter, modify or in any way, change the terms and conditions of this warranty.
Warranty registration is not necessary to obtain warranty on Select Brands, Inc. products. Save your proof of purchase receipt.
ABOUT YOUR PRODUCT WARRANTY: Most warranty repairs are handled routinely, but sometimes requests for warranty service may not be appropriate. For example, warranty service would NOT apply if the product damage occurred because of misuse, lack of routine maintenance, shipping, handling, warehousing or improper installation. Similarly, the warranty is void if the manufacturing date or the serial number on the product has been removed or the equipment has been altered or modified. During the warranty period, the authorized service dealer, at its option, will repair or replace any part that, upon examination, is found to be defective under normal use and service.
NORMAL WEAR: This warranty does not cover normal wear of parts or damage resulting from any of the following: Negligent use or misuse of the product; Improper voltage or current; Use contrary to the operation instructions; Deviation from instructions regarding storage and transportation; Repair or alteration by anyone other than SELECT BRANDS, INC. or an authorized service center. Further, the warranty does not cover Acts of God, such as fire, flood, hurricanes and tornadoes.
SELECT BRANDS, INC. shall not be liable for any incidental or consequential damages caused by the breach of any express or implied warranty. Except to the extent prohibited by applicable law, any implied warranty of merchantability or fitness for a particular purpose is limited in duration to the duration of the above warranty. Some states, provinces or jurisdictions do not allow the exclusion or limitation of incidental or consequential damages or limitations on how long an implied warranty lasts, so the above limitations or exclusion may not apply to you. This warranty gives you specific legal rights, and you may also have other rights that vary from state to state or province to province.
HOW TO OBTAIN WARRANTY SERVICE: You must contact SELECT BRANDS, INC. Customer Service at 1-913-663-4500. A Customer Service representative will attempt to resolve warranty issues over the phone. If telephone resolution is not possible, the Customer Service representative will require your assistance in performing routine diagnostic procedures. This warranty is effective for the time periods listed above and subject to the conditions provided for in this policy.
TOASTMASTER is a Registered Trademark of Spectrum Brands, Inc., and used under license by Select Brands, Inc.
042320