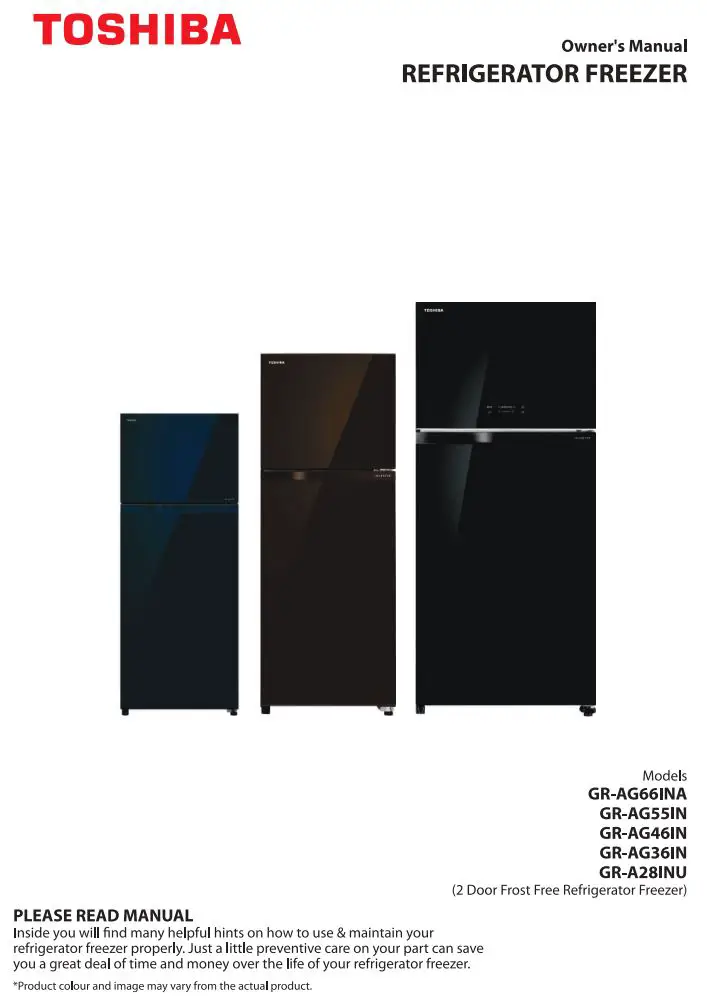
The TOSHIBA Refrigerator Freezer Owner’s Manual is a comprehensive guide to the proper usage and operation of the GR-A28INU, GR-AG36IN, GR-AG46IN, GR-AG55IN, and GR-AG66INA models. Toshiba takes pride in ensuring that all its products are delivered safely and in good condition. The manual provides instructions on how to check for any visible loss or damage of the product upon delivery and what to do if any such issues are found. It also emphasizes the importance of following the instructions carefully to ensure personal safety and proper operation of the product. While the manual provides a guide to good usage and operating instructions for the refrigerator freezer, it does not contain all product service-related procedures required for continued successful operation of the product. Therefore, it is recommended to employ the services of a Toshiba Authorized Service Person on a periodical basis for the same. The manual covers various aspects of installation, safety precautions, and operations, including temperature control, moisture control, and air flow control. It also includes detailed instructions on how to level the refrigerator and its door. Users are advised to store this user manual carefully for future reference.
TOSHIBA Refrigerator Freezer Owner's Manual
Check on Receiving
On receiving your Toshiba Refrigerator Freezer
Toshiba adopts a stringent policy to ensure safe delivery of all it’s products. All product shipments are thoroughly checked, packed and quality certified before leaving our manufacturing. Please don’t accept any product if there is any visible loss or damage of the Good and ask delivery person to make the note on the freight bill or receipt
On Opening the box
When a shipment has been delivered to you in apparent good conditions, but upon opening the box, if there is any loss or damage that has taken place due to transit, please inform the Toshiba Service Centre immediately.
About your instruction/usage manual
This manual is a guide to good usage and operating instructions for your new Toshiba Refrigerator Freezer.
This manual does not contain all product service related procedures required for continued successful operation of this product. The services of Toshiba Authorized Service Person must be employed on periodical basis for the same.
Do not operate the product before reading the manual supplied with this product and follow instructions to ensure personal safety and proper operations.
Carrier Medea India Limited assumes no liability for installation performed by any unauthorized person.
Always install, operate, inspect and maintain this product in accordance with the applicable standards.
Please store this user manual carefully for any future reference.
Key Features
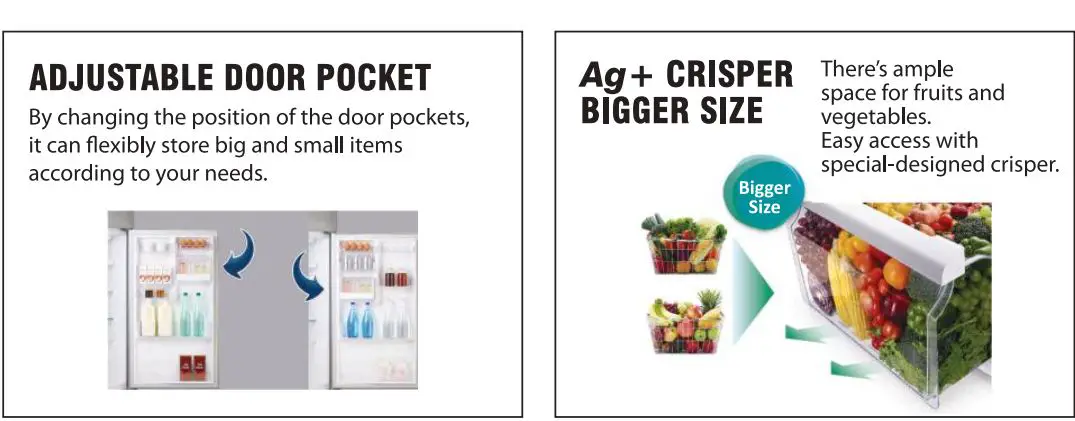
Know Your Refrigerator Freezer
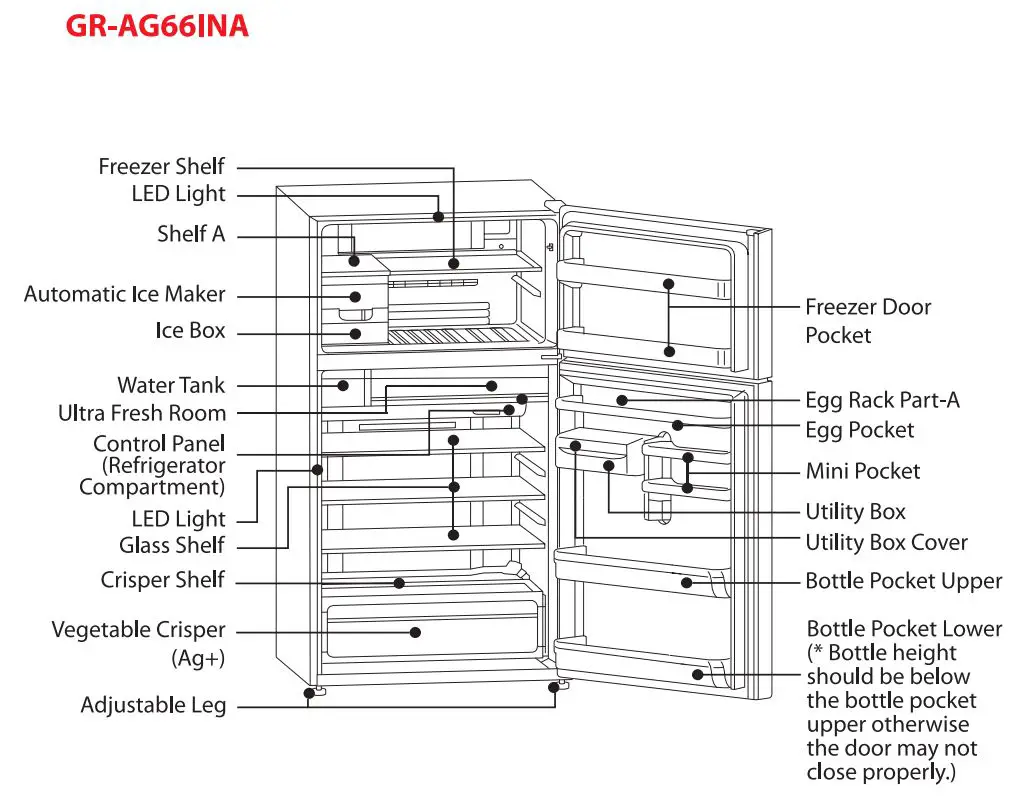
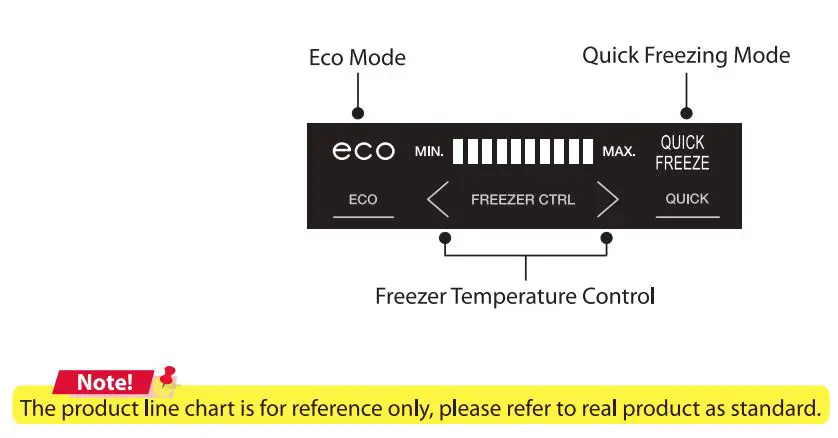
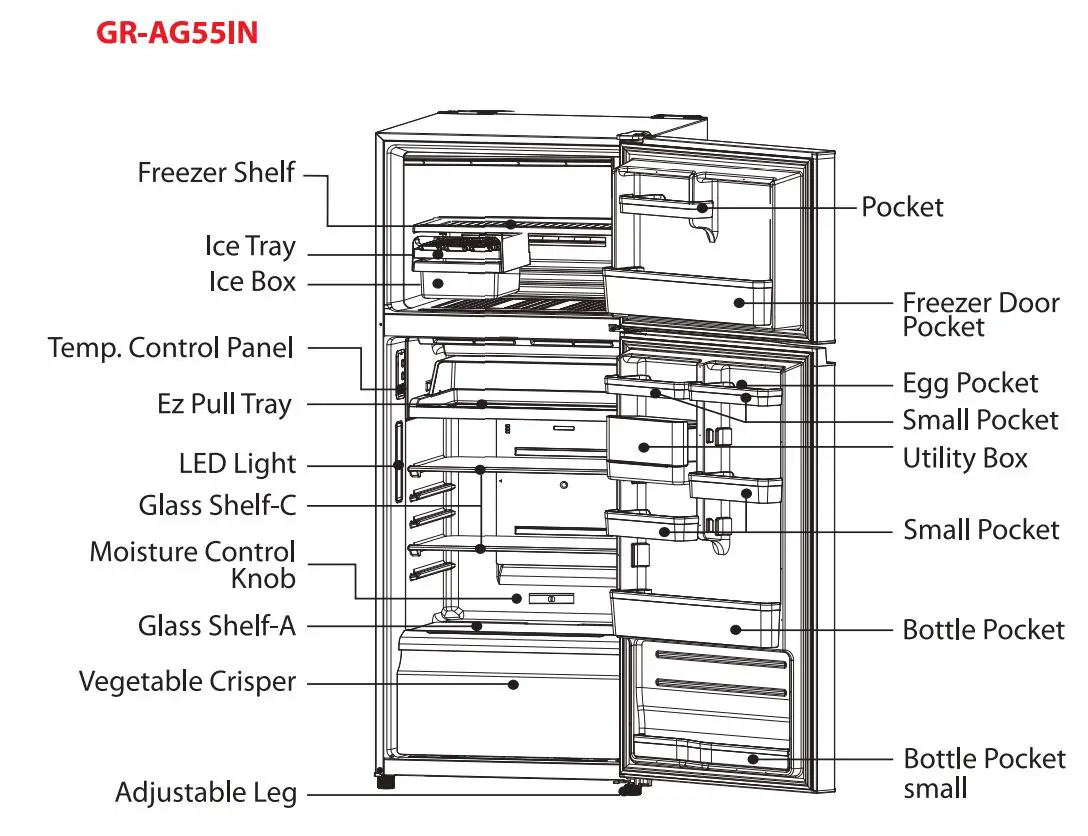
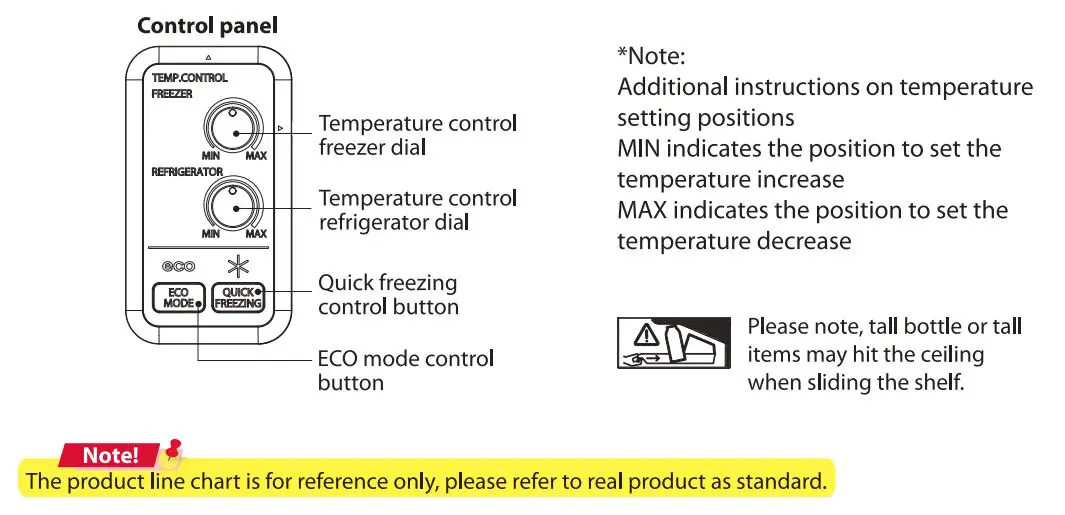
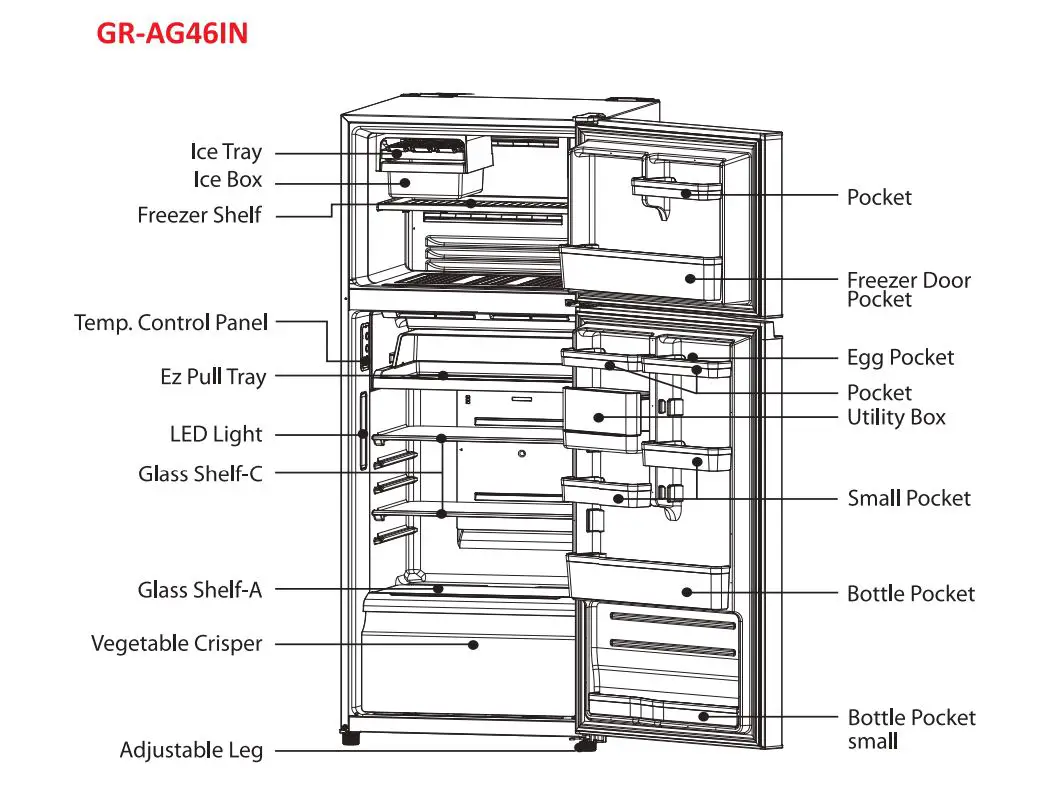
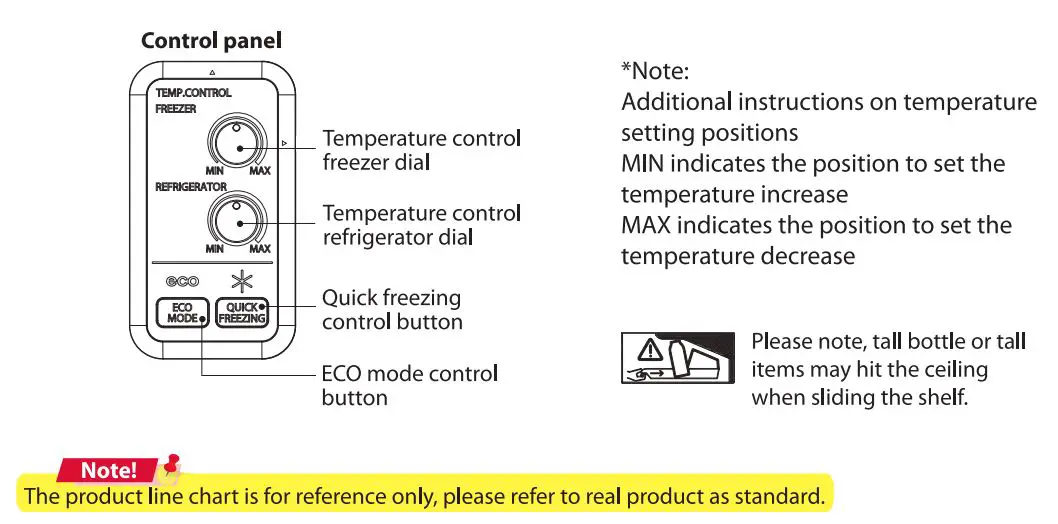
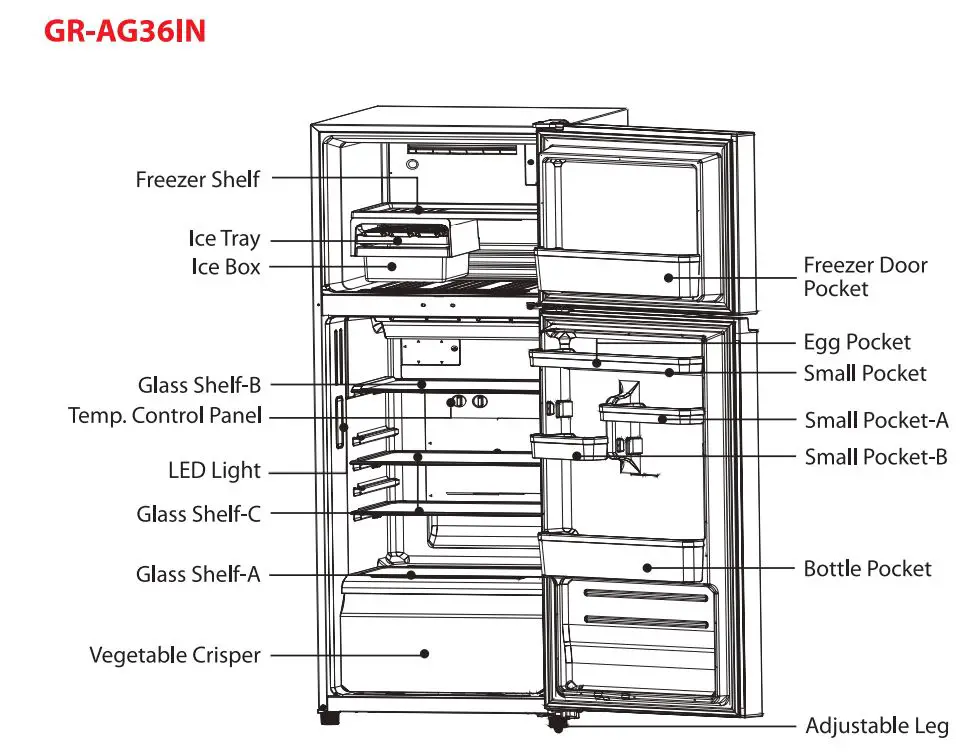
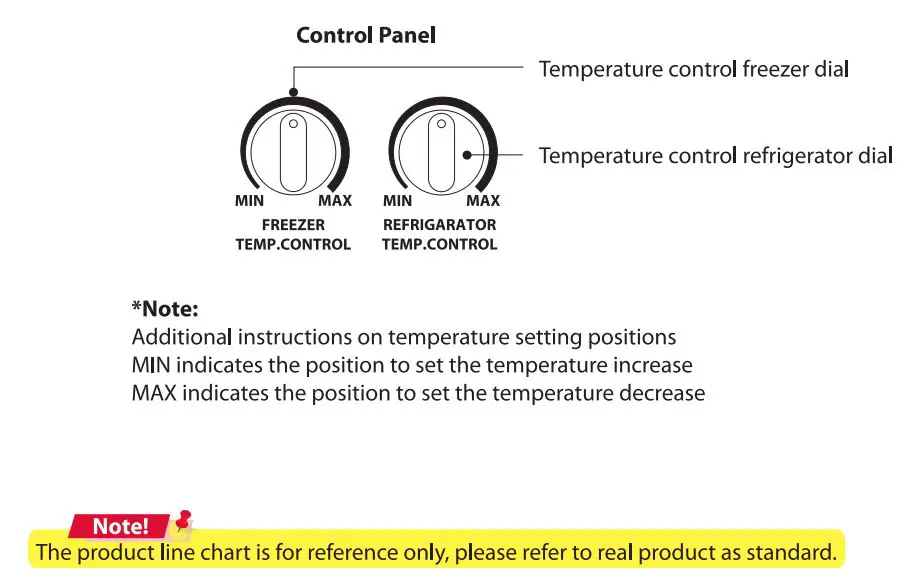
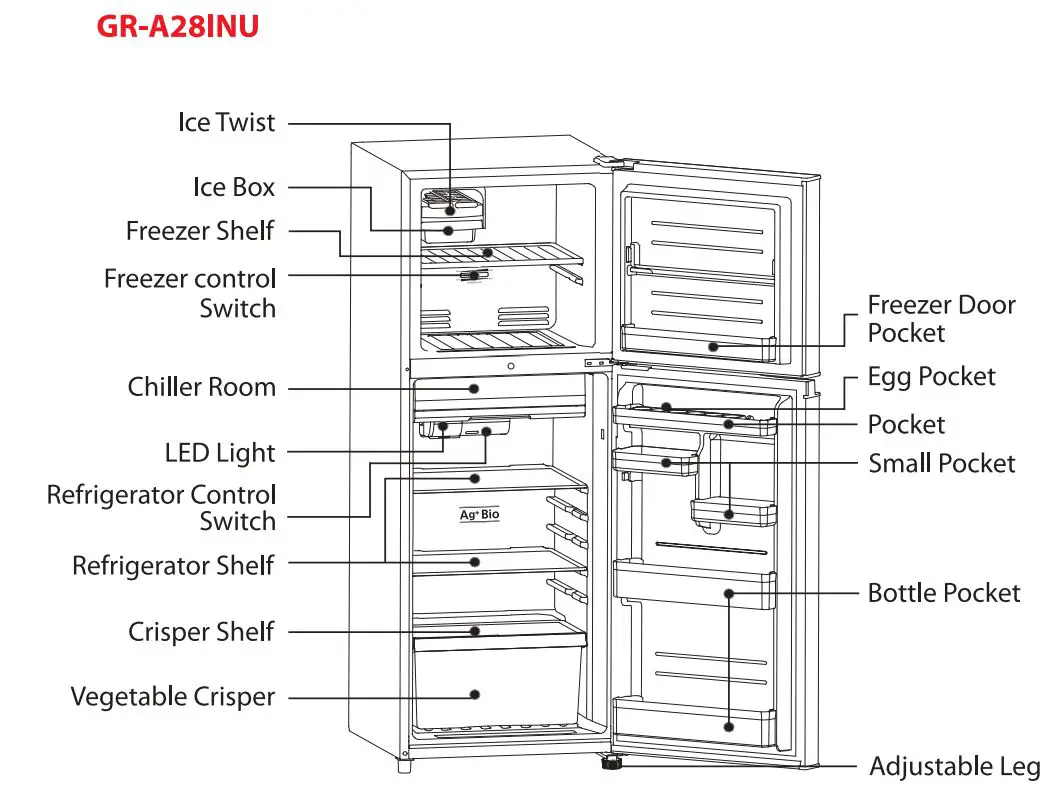
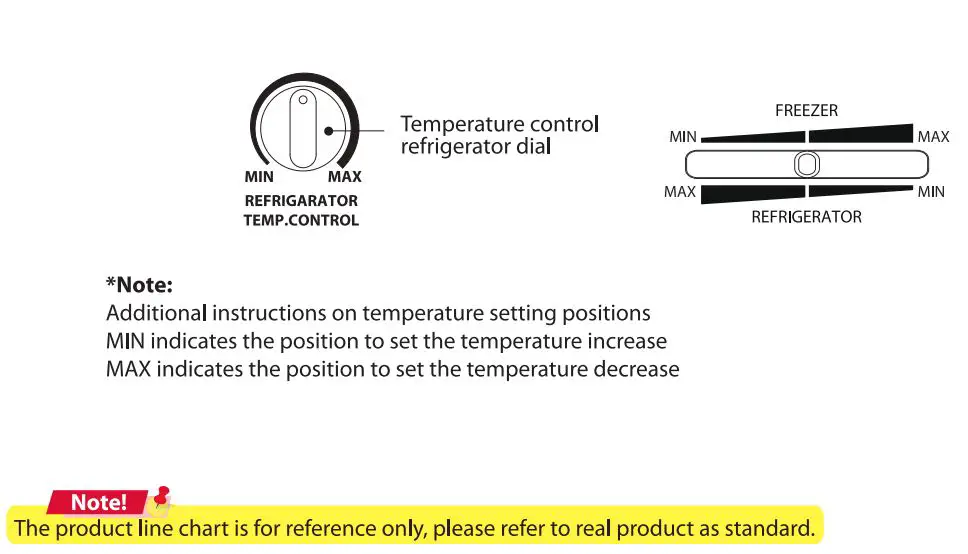
User Interface Control Panel
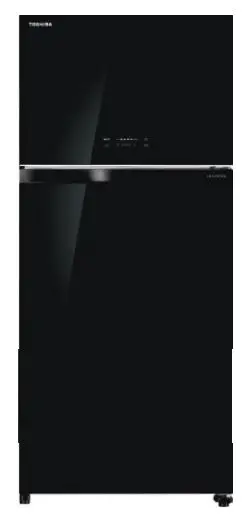
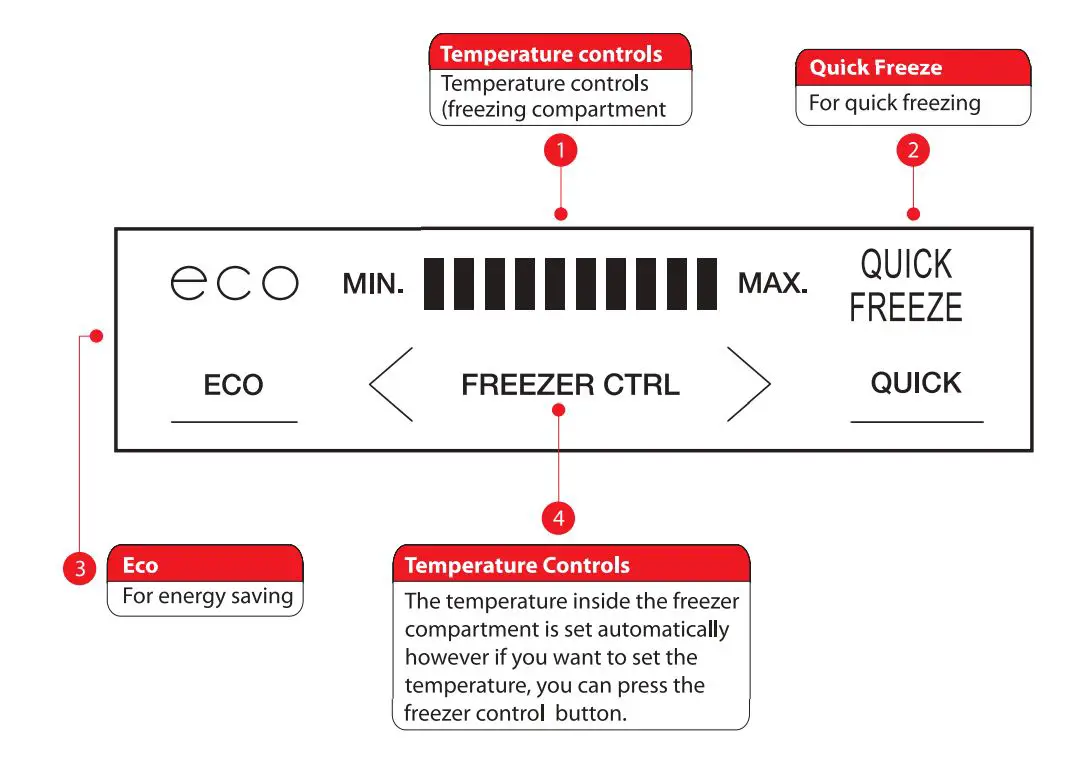
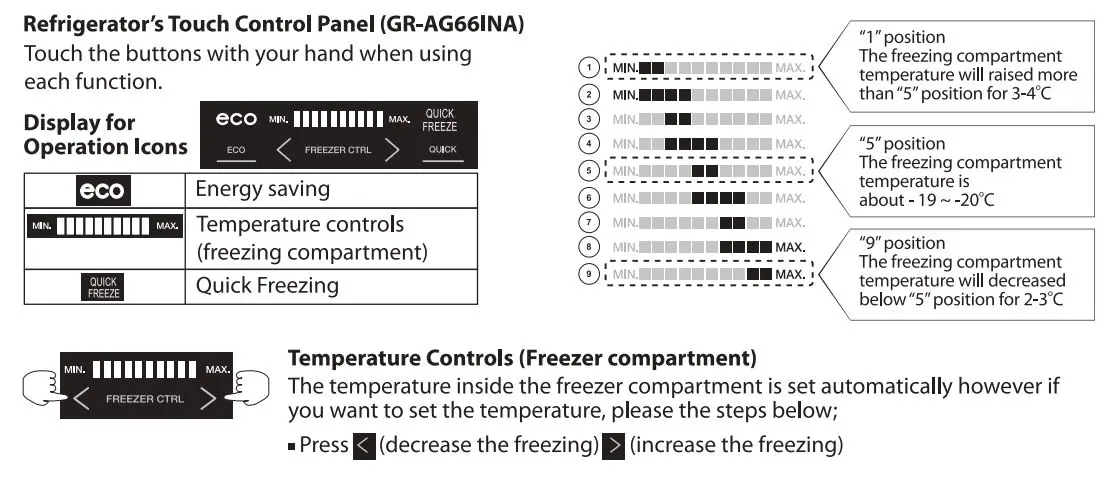
Refrigerator’s Touch Control Panel (GR-AG661NA)
Touch the buttons with your hand when using each function.
Safety and Precautions
All instructions described should be carefully read and followed.
– These instructions are precautions to prevent the risks of serious injury or death of the user, and any damages to property.
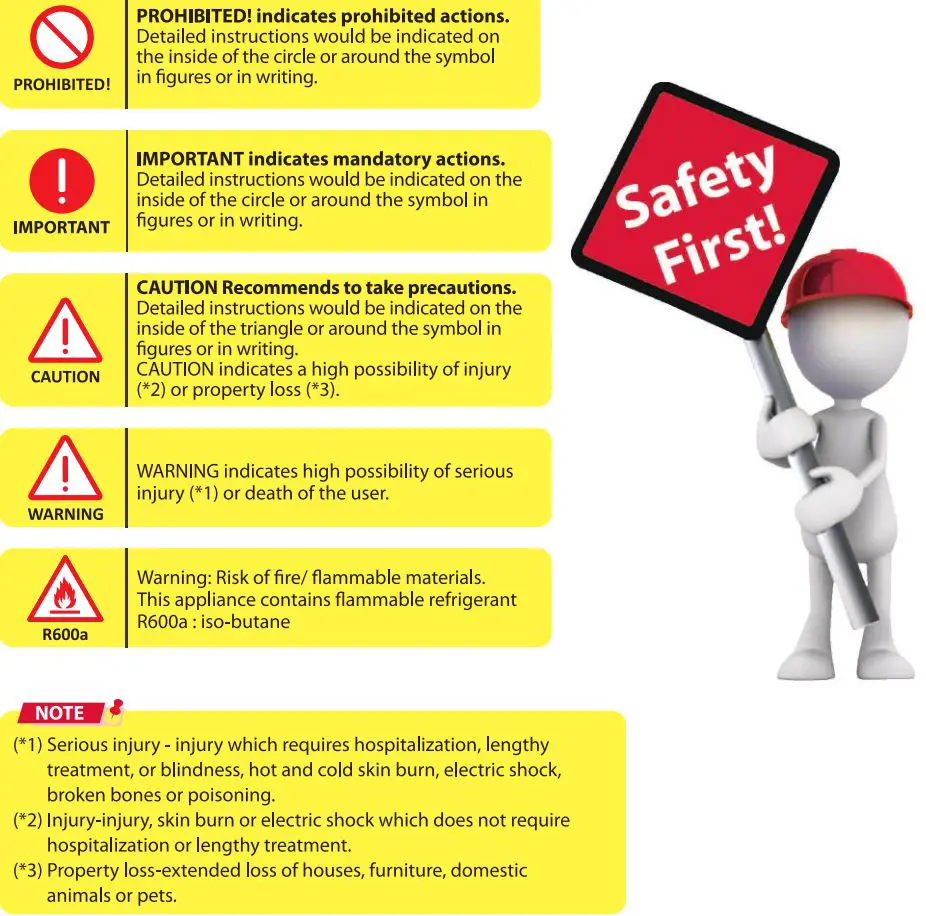
Safety Instructions
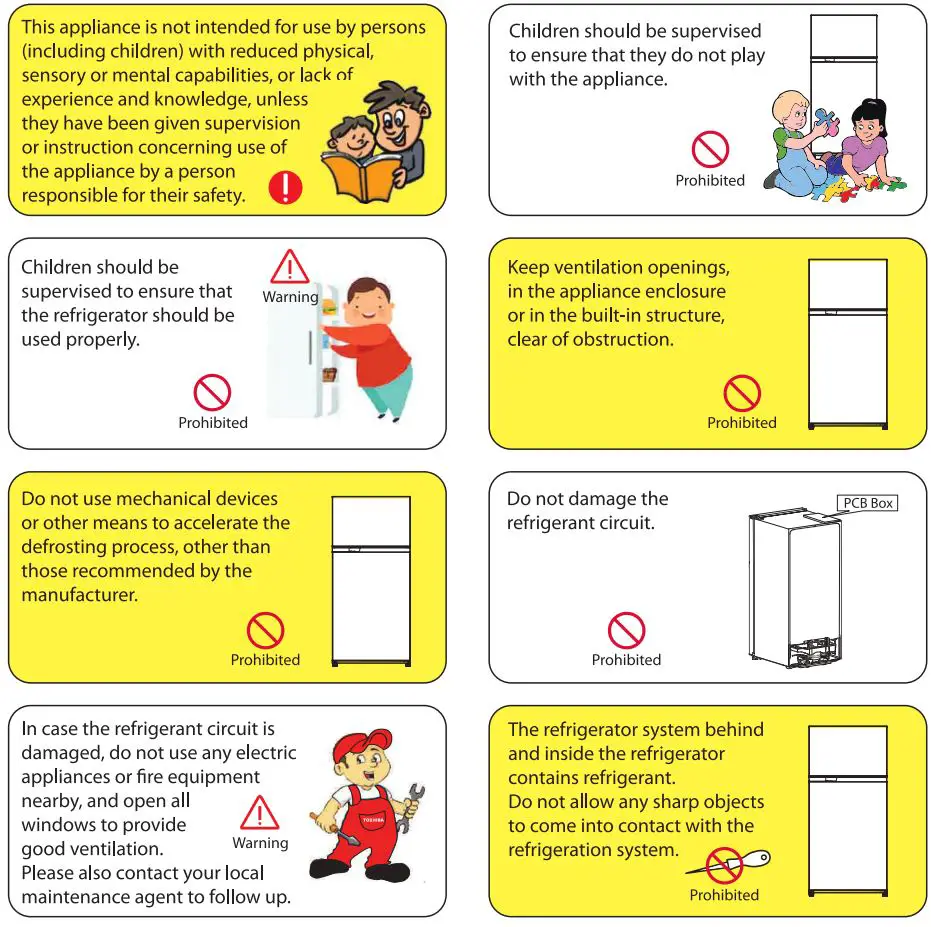
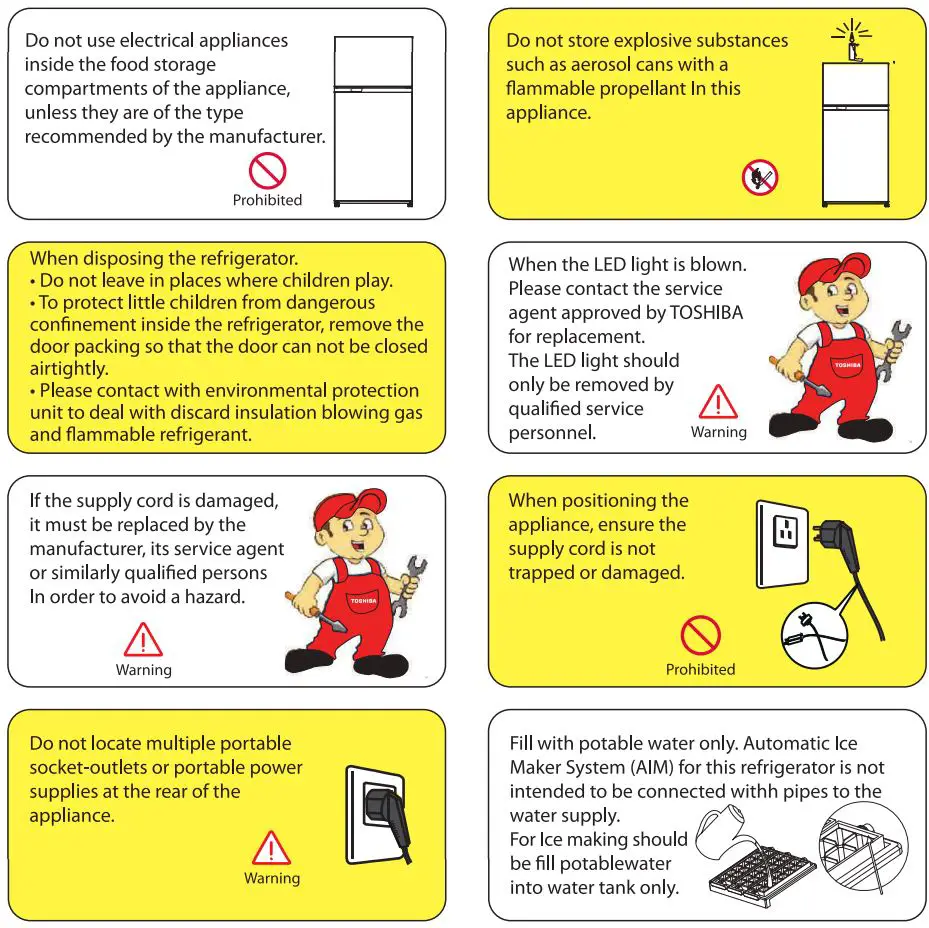
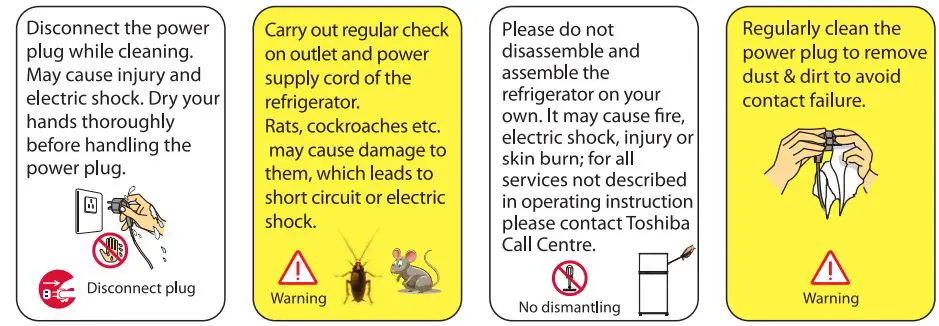
![]() Operations
Operations
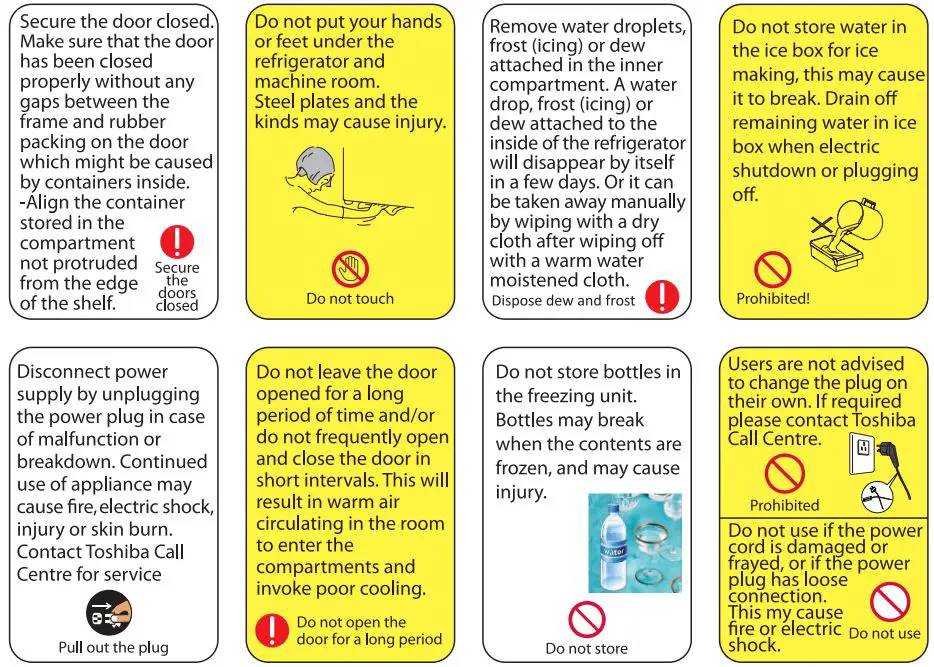
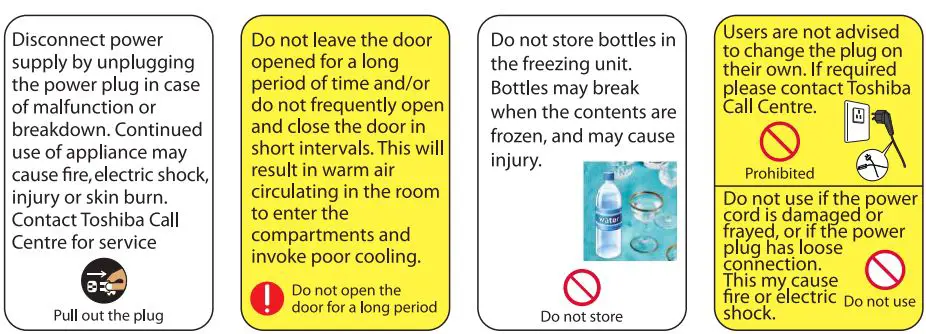
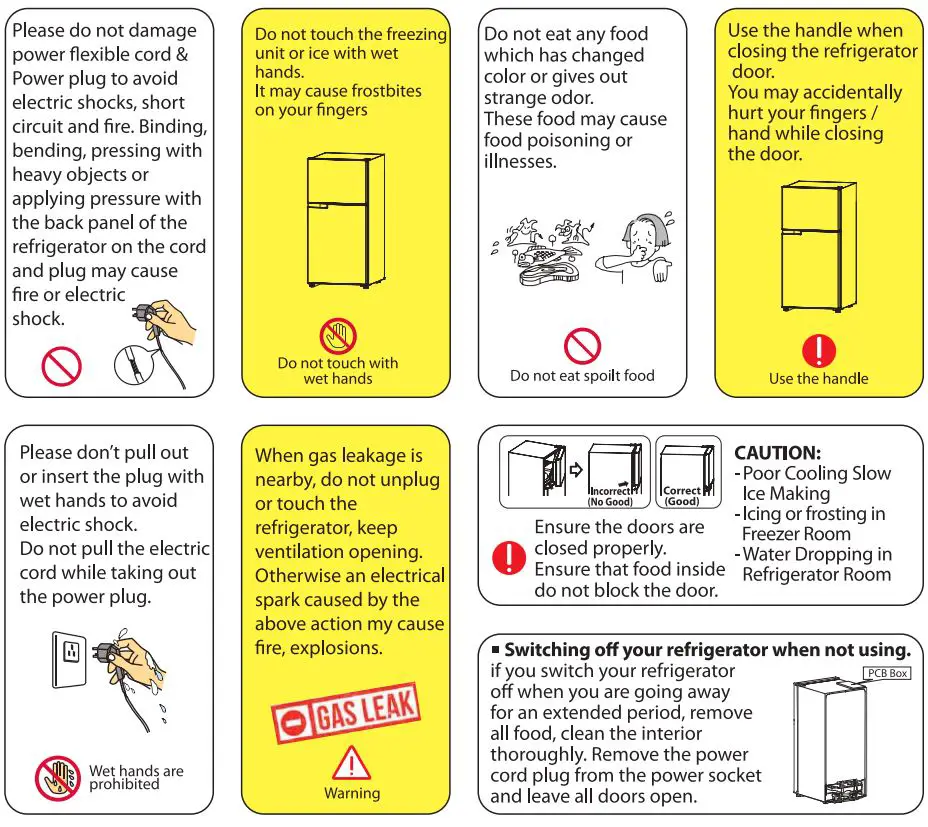
Installation
1 Unpacking the Refrigerator
WARNING
- Packing material {e.g. Films, Styrofoam) can be dangerous for children.
- There is a risk of suffocation. Keep packaging materials away from children.
• Remove the cardboard box and Styrofoam packing.
2. Lift the refrigerator and remove the base packing.
3. Remove the tape securing the power supply cord
2 Installation Area
WARNING
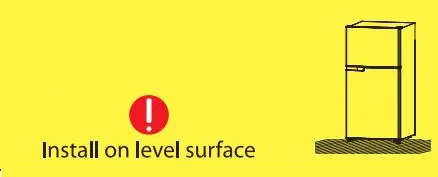
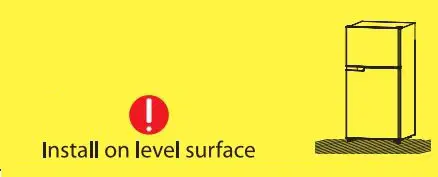
- Even and flat surface should be selected for stable and trouble free operation of the refrigerator
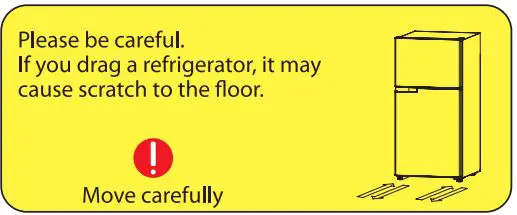
- Once the refrigerator is in its final position, do not move it unless necessary to protect the floor. If you have to, use a thick paper or cloth such as old carpets along the movement path.
Make sure installation is done at:
- Rigid, dry and leveled surface.
- Avoid direct sunlight.
- Sufficient ventilation.
- Suggested Temperature range: between 10°C and 43°C.
- Keep it far away from heat sources such as coal or gas.
- Solid, level surface without carpeting or flooring that may obstruct ventilation
- The surface to install the refrigerator must support a fully loaded refrigerator, or approximately 100 kg
■ Installation position for refrigerator.
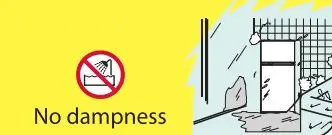
Avoid any humid or wet place, for example, the neighborhood of a kitchen sink. Such a place could cause corrosion or electric leakage in the refrigerator. If installed directly on the ground, your refrigerator will be liable to damage. Place a board under the refrigerator in such a case.
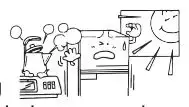
■ Keep the refrigerator away from the sunlight, a gas range or heater.
Placed in the sunlight or near a heat emitting object, the refrigerator will have its cooling effect reduced and a failure might be occurred
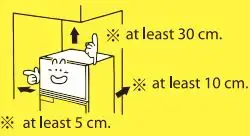
For 281NU: Leave space around the refrigerator.
Select a well-ventilated place. Provide at least 30 cm (12 inches) at top, 10 cm (4 inches) at rear side and 5 cm (2 inches) on the left and right of the refrigerator for proper air circulation.
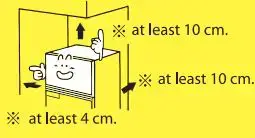
For other models: Leave space around the refrigerator. Select a well-ventilated place. Provide at least 10 cm (4 inches) at top, 10 cm (4 inches) at rear side and 4 cm (1.6 inches) on the left and right of the refrigerator for proper air circulation.
■ Ensuring the clearance between rear side and wall.
Please fix drain evaporator pan stopper into its position follow the picture.

■ When you open the door of the refrigerator, there may be a smell of plastics. This signifies nothing unusual.
■ Be careful before moving or installation.
if you have moving or installation, maybe impact around PCB Box at rear side which have a damage to refrigerator.
INFORMATION
- Heat Generation by the Compressor
The refrigerator compressor will generate heat during normal operation. Note that this is not a malfunction. - Heat on Refrigerator Walls
The condenser is build on the outer shell and radiates heat into the room air.
The temperature of the outer shell may reach high temperature during normal refrigerator operation. This is not a malfunction. - Refrigerator Operation
When the power is first turned on or ambient temperature becomes high, it may happen that the refrigerator surface getting warm or noise from the compressor. When the refrigerator enters stable state, it will run normally.
3 Checkpoint while doing installation
The warning labels mentioned above should be kept throughout the life of the refrigerator. The user manual should be handed over to any person who would use or handle the refrigerator whenever the refrigerator would be transferred to another location and delivered to a recycling plant.![]()
Install on a strong and even floor. The refrigerator may overturn if set on uneven or unstable surface, which may lead to injury.
Do not place any heavy objects or liquid containers on the refrigerator. Spillage may affect the electric insulation, and cause fire or electric shock. “‘Falling objects may also cause injury.

Please do not install the refrigerator in damp & rainy environment to avoid electric shock, fire, faults & distortion accidents.
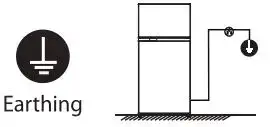
Make sure the earthing line of socket is connected to earth to prevent any electric shock or accident caused by leakage of current.
Install on a strong and even floor. The refrigerator may overturn if set on uneven or unstable surface, which may lead to injury.
Levelling the Refrigerator
WARNING
- Before levelling of the refrigerator please ensure that refrigerator is disconnected from power supply.
- Before adjusting the level of refrigerator, precautions need to be taken to prevent any personal injury.
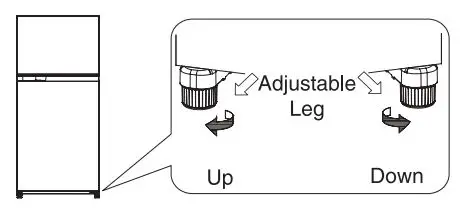
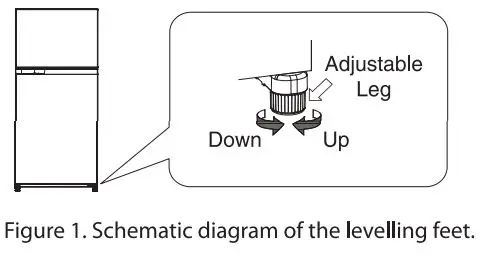
- Install your refrigerator on a strong and level floor. Turn the adjustable leg and stabilize the refrigerator horizontally.
Procedures for levelling feet :
- Turn the feet clockwise to raise the refrigerator;
- Turn the feet counterclockwise to lower the refrigerator;
- Adjust the right and left feet based on the procedures above to a horizontal level.
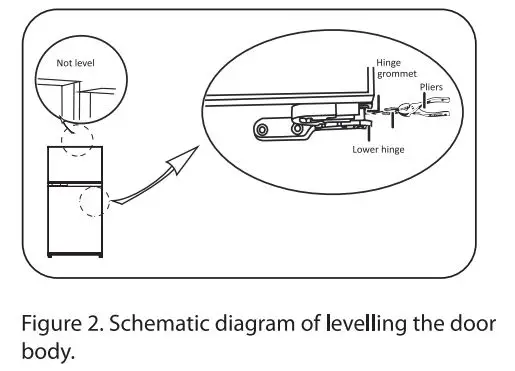
Levelling the Refrigerator Door
- Raise the lower door up to the level of the higher door.
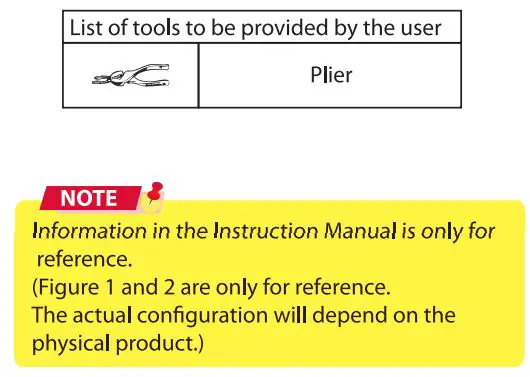
- Insert the supplied fastener-ring by using plier in the gap between the hinge-grommet and the lower hinge.
GR-AG661NA, GR-AG55/461N
GR-AG361N, GR-A281NU
Operation: How to use your refrigerator correctly and effectively
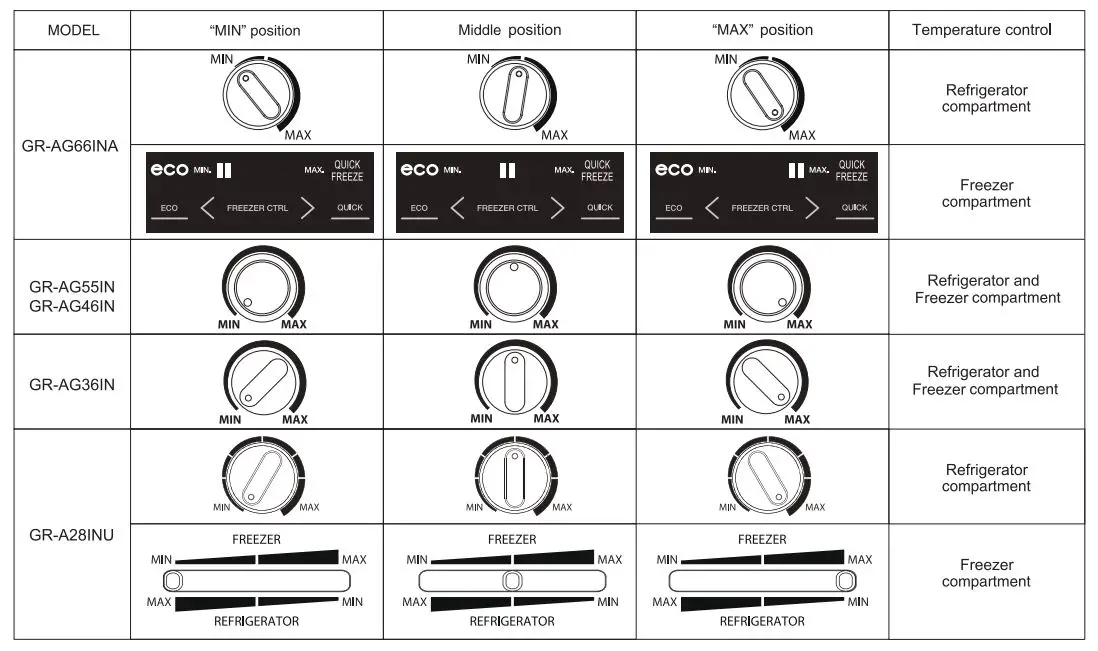
Temperature Control
- For both the Freezer and Refrigerator Compartments
Normally set the temperature control switch to the Middle Position. If the refrigerator does not seem cold enough, turn the dials toward “MAX”. if it seem too cold, turn the dial toward “MIN”. - Food may freeze in the refrigerator compartment
When the ambient temperature decreases excessively such as in the winter, set the refrigerator Control Switch to “MIN” position to prevent from food freezing. Food has a high moisture content (e.g., tofu, vegetables) may freeze when it is placed at the back of the refrigerator compartment. - For the freezer, when storing ice cream, the temperature should be set between Middle position and “MAX” position of the Freezer Control Switch.
- Changing the refrigerator compartment temperature control also varies the temperature in the vegetable crisper.
- Do not obstruct the outlet and inlet of the cooled air circulation with food or containers, otherwise the food will be frozen or will not be cooled consistently throughout refrigerator.
Control temperature in the Ultra Fresh room (GR-AG661NA)
Pull ultra fresh room to the front direction and adjust the lever which is inside that.
Because of outside temperature change, dew may appear on the room surface and ice can appear on food. In this case, please set lever to “CLOSE” after having setting to “CLOSE’; the temperature in ultra fresh room will be increased about 1-3°C. So, it can prevent dew and ice
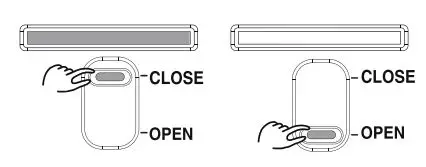
Vegetable crisper moisture control (GR-AGSSIN)
You can control air flow by changing the position of slide knob.
- When knob is in;” Moisture Keeping position, cold air goes around vegetable crisper and it gets cold indirectly keeping the moisture content for long.
- When slide knob is in “Speedy Cooling” position, cold air goes into the crisper directly. This direct air cool the crisper quickly and its temperature
will decrease approximately 1-2°C than moisture keeping mode

Warning
- In case dew generating in vegetable crisper due to excessive humidity, slide lever to the left position.
- Due to the large size of vegetable crisper, children should be supervised to ensure they will not play or climb inside the vegetable crisper.
Self-defrosting
This refrigerator is self-defrosting, eliminating the troublesome chore of manual defrosting. Any frost which forms on the evaporator (externally invisible) is automatically removed by the time-controlled heater.
Ice Maker : Usage and Maintenance
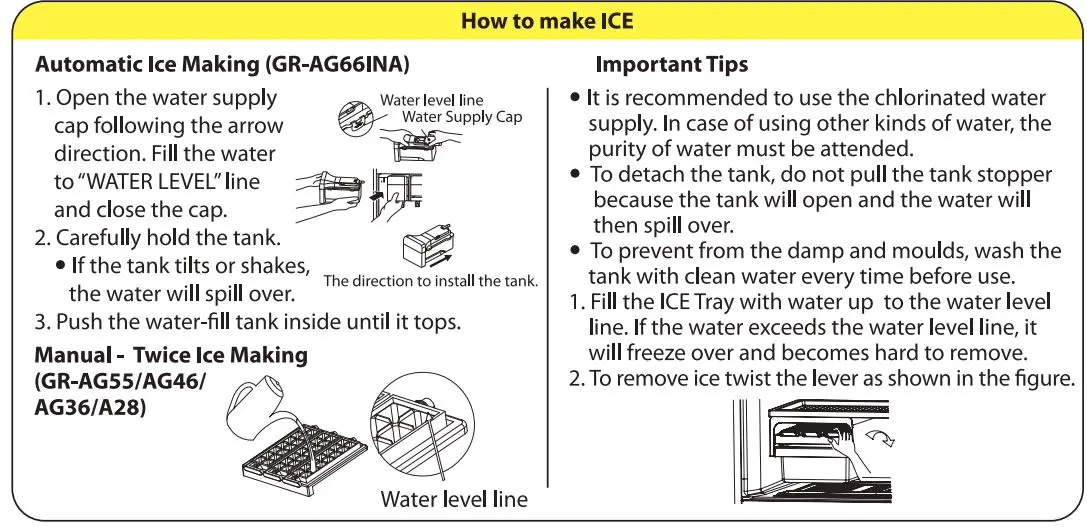
Care during usage
Do not touch the producing parts (the upper part of the ice box) of the automatic ice maker. If the ice maker tray is rotating, you may get hurt.
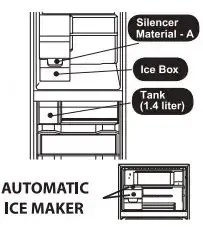
- To prevent from the damp and molds, wash the tank with clean water every time before use.
- For the first time use or when not in use within a week or more, throw all of the first-time ice away (about 30 cubes). Sometimes, the ice cubes may be smelly and contaminated with some particles.
- Do not fill any other things such as hot water (above 60°C) or fruit juice, except water into tank.
- When there are some foreign matters falling into the tank, carefully check if the tank leaks or breaks.
- Fill with potable water only.
Care when not in use for long time /moving refrigerator
- Detach the tank and pour out all water.
- Press ≺ and QUICK in the same time about 5 seconds. After that, The LED will light up at MIN and MAX 2 times. the ice maker tray will turn upside down and the ice cubes will drop into the ice box inside the freezer.
• Please do not open the freezer door until the operation finished. - Open the freezer and throw away the water or the ice cubes inside the ice box.
- After cleaning the freezer and the tank, dry it and reinstall

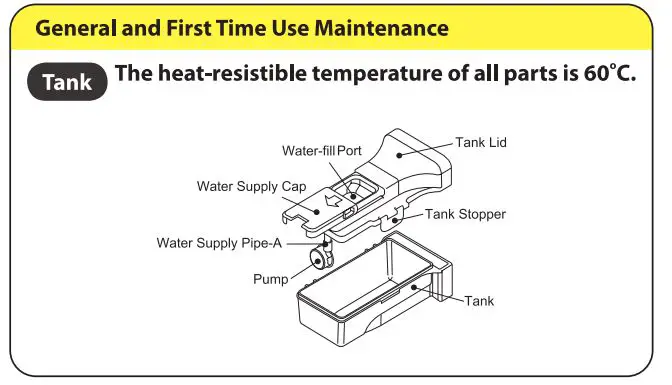
Maintenance / Weekly Maintenance
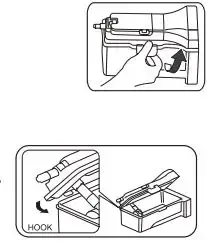
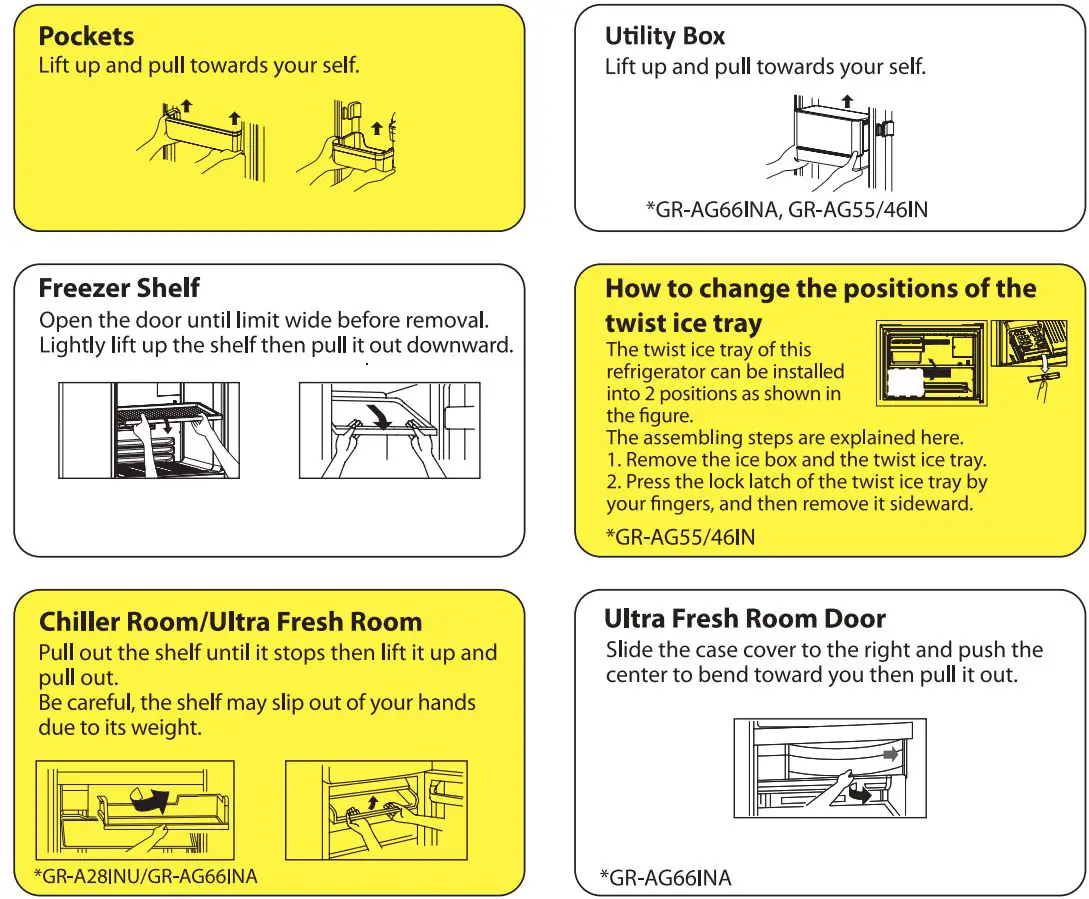
Tank and lid-Pull the tank stopper upwards and detach the cover.
Note-
- Do not use bleach, cleanser, hot water (the heat-resistible temperature of the equipment is 60°C), a scrubbing brush, thinner, benzene, etc. (Such materials can cause smell and damages.)
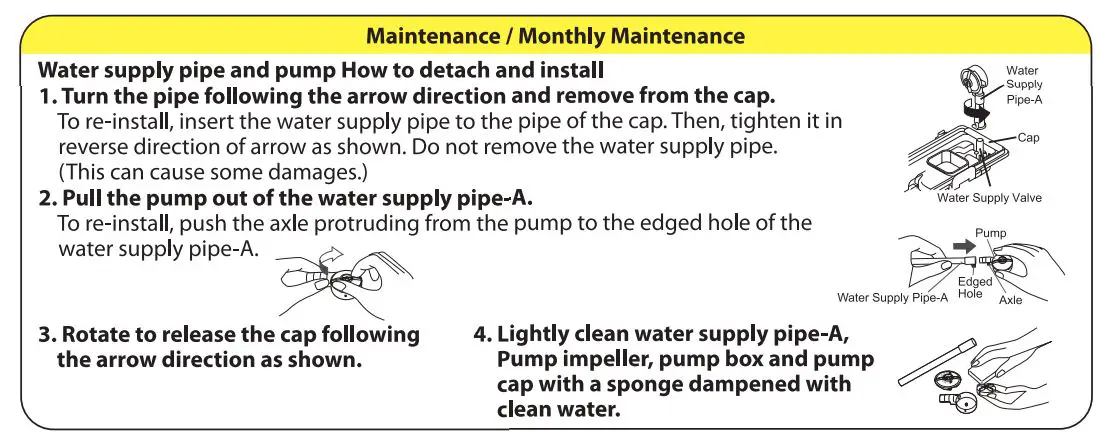
- Do not pour out the washed water on the area of water inlet valve installation. (Parts side) This can damage the ice maker assembly.
- Detach the assembly for maintenance only and re-install into place every time. Unless the parts are re-installed, the water will spill over or the ice cannot be made.
- After maintenance, hang the “hook” of the cover to the inside of the tank and fasten it “00” with the tank stopper being towards you. If the cover is not completely closed, the ice cannot be made
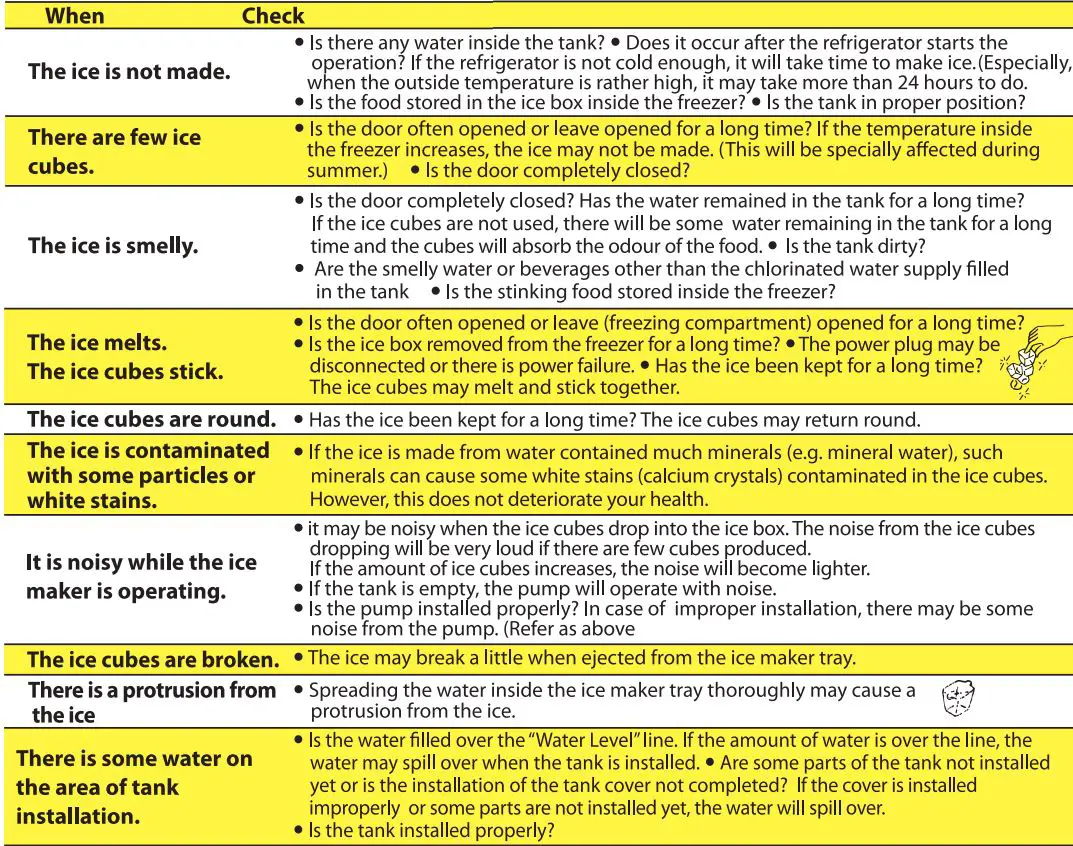
Trouble Shooting for Automatic Ice Maker
Deodorizer
INFORMATION
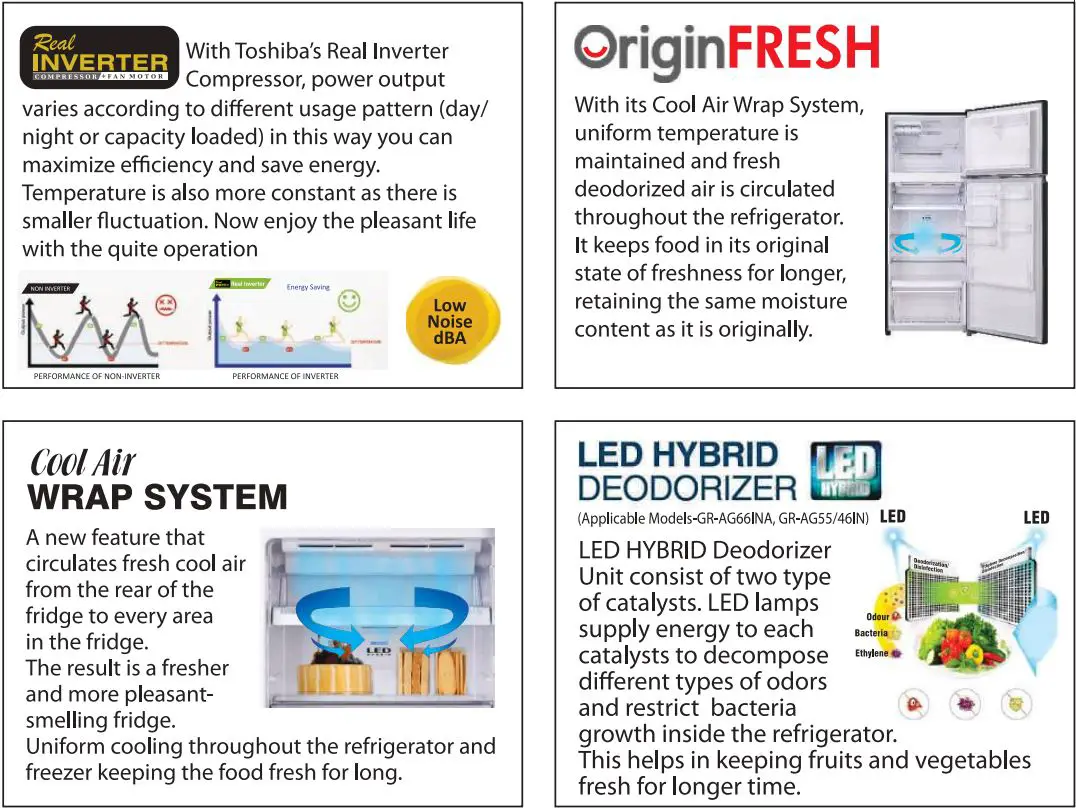
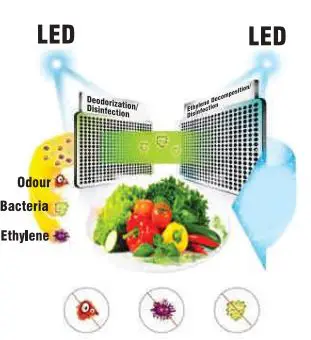
- Your refrigerator has built-in Deodorizing device which is there in cold air passage (It can’t be seen from outside) This device effectively remove unpleasant Odour from various compartments in order to keep freshness inside the refrigerator

(Applicable Models-GR-AG661NA, GR-AG55/461N)
• LED HYBRID Deodorizer Unit is installed behind sliding shelf. This unique device has following construction:
- Photocatalyst effective for bacteria elimination and deodorization. Odour
- Photocatalyst for bacteria elimination and disintegration of ethylene gas. Bacteria
- LED built-in unit which transmits LED rays due to which the above photocatalysts generate hydroxyl radicals from moisture in the cold air.
Hydroxyl radicals deactivate bacteria, disintegrate ethylene gas which promotes vegetables aging, and deodorize odors inside the refrigerator.

- This HYBRID BIO deodorizer unit is installed at the cool air circulation for bacteria elimination, deodorization and refreshing vegetables and fruits. It consist of silver ion catalyst which decomposes different types of odors and can restrain bacteria growth inside the refrigerator.

Ag+ Bio Deodorizer (GR-A2INU)
- It removes bad odors and also restrain bacteria growth thus keeping food fresh for long. This deodorizing device is built into the cold air passage (the device cannot be seen from the outside) to effectively remove unpleasant odors from compartments. Store strong smell food in tightly sealed containers.
Cooling Modes
ECO Mode (GR-AG461N/551N/661NA)
Use this operation when you want to switch the operation of this refrigerator to an energy saving mode.
- Press ECO MODE to enter energy saving mode, the eco icon appears.
- To disable this operation, press ECO MODE again, the eco icon disappears.
Note
- While entering the energy saving mode, the temperature inside the freezer compartment will raise over the preset temperature for approximately 1 ~ 2°c.
- The performance of energy saving depends on the application conditions. (temperature control, outside temperature, the frequency of opening/closing the door, food amount.
- This function should be disable if you feel that the beverage is not cool enough or ice making takes to long time.
Quick Freezing Mode (GR-AG461N/551N/661NA)
Use this operation when you want the beverage or other to be cooled quickly.
- Press QUICK FREEZING to enter quick freezing mode, the* icon appears.
- To disable the operation, press QUICK FREEZING gain, the * icon disappears.
- While entering the quick freezing mode, the freezing compartment will operate at low temperature for 150 minutes continually then enters into normal operation of the refrigerator.
- You can deactivate the quick freezing mode immediately after the temperature inside the freezer compartment reach the application requirement.
- The performance of quick refrigeration depends on the application conditions. (outside temperature, the frequency of opening/closing the door, food amount.
Energy Saving
Guidance for Energy Saving
- Keep ventilation openings, in the appliance enclose or in the built in structure, clear of obstruction.
- To get the most efficient use of energy for this refrigerator, the interior part such as shelfs, crisper, pockets should be set following to its position mention in this instruction booklet.
- Leave space around the refrigerator.
-Provide at least 1 O cm (4 inches) at top, 1 O cm (4 inches) at rear side and 4 cm (1.6 inches) on the left and right. Leave space around the refrigerator. (GR-A28)
-Provide at least 30 cm (12 inches) at top, 10 cm (4 inches) at rear side and 5 cm (2 inches) on the left and right. - Use in a cool place.
- Keep the refrigerator away from the sunlight, a gas range or heater.
- Do not obstruct the outlet and inlet of the cool air circulation with food or containers, otherwise the food will not be cooled consistently throughout refrigerator.
- Do not put in too much food. Should provide enough space for internal cool air circulating.
- Do not set the temperature of refrigerator lower than needed.
- Hot food should be cooled to room temperature before storing.
- Open your refrigerator door as briefly as possible.
Periodic Maintenance
To ensure the maximum life of your Toshiba Refrigerator, periodically clean its parts. (For proper instructions, read the following directions carefully) When cleaning them, be sure to pull out the refrigerator’s plug from the power socket and be careful not to pull the cord or get it caught under the machine. Do not pour water directly on the refrigerator.
Outside Surfaces
Polish them with a soft rag. A heavy stain should be wiped off with a rag soaked in a natural detergent. The door handle should be wiped with a dry cloth (Using cleanser solution will cause the external finishes to change colors and scratch).
Door Packing
The packing on the doors will be short-lived if stains are not removed. Occasionally, inspect the packing on the doors, and remove any stain with a nature detergent.
Interior Plastic Units
If they are stained or have any odor, the interior plastic units should be cleaned with a natural detergent. When smeared with any kind oil, the interior plastic unit may crack. Wipe such smears off.
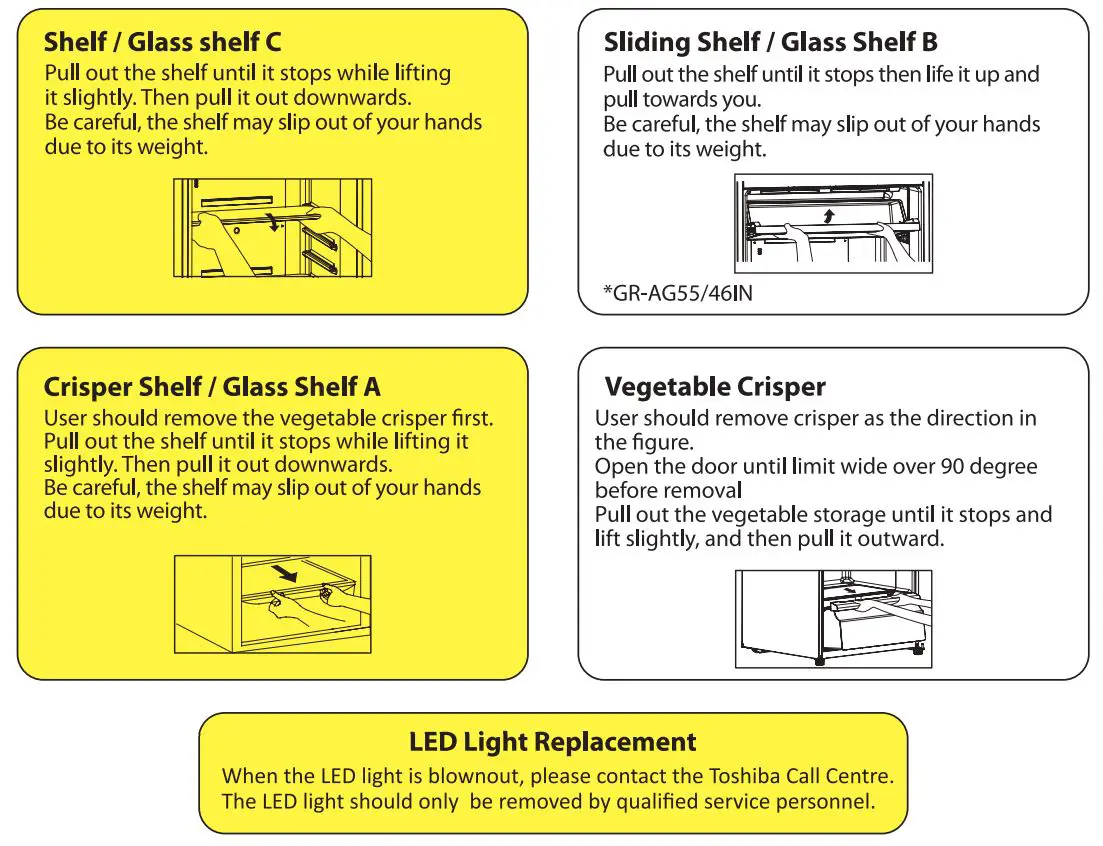
Maintenance
Cautions for Operation
When Moving and Transporting
- Firstly, remove the food.
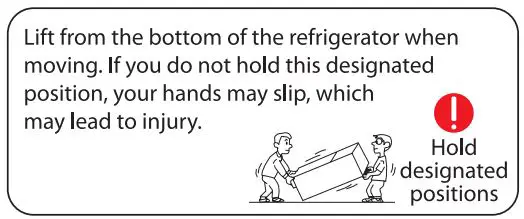
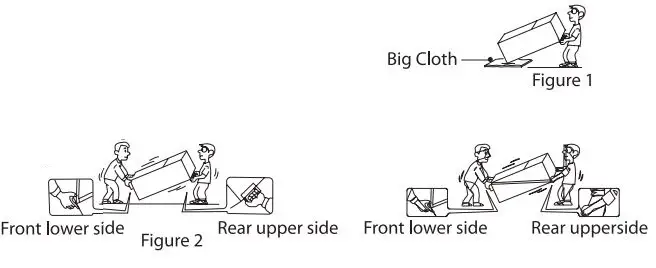
- Put a piece of big cloth under the refrigerator, and lean the refrigerator backwards to remove water from drain pan. (as figure 1)
- When carrying, hold the positions shown as figure 2
(Never hold by the door or the handle.)
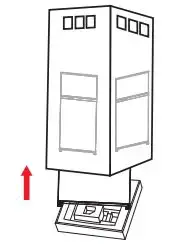
-Please lift from the bottom of the refrigerator when moving.
When Transporting while relocating
- Do not lay the refrigerator on its side. Doing so may cause it to malfunction.
After disconnecting the plug from the outlet, wait at least 8 minutes before reconnecting it. - If the plug is quickly reconnected, the compressor may not run properly and produce a rattling noise.
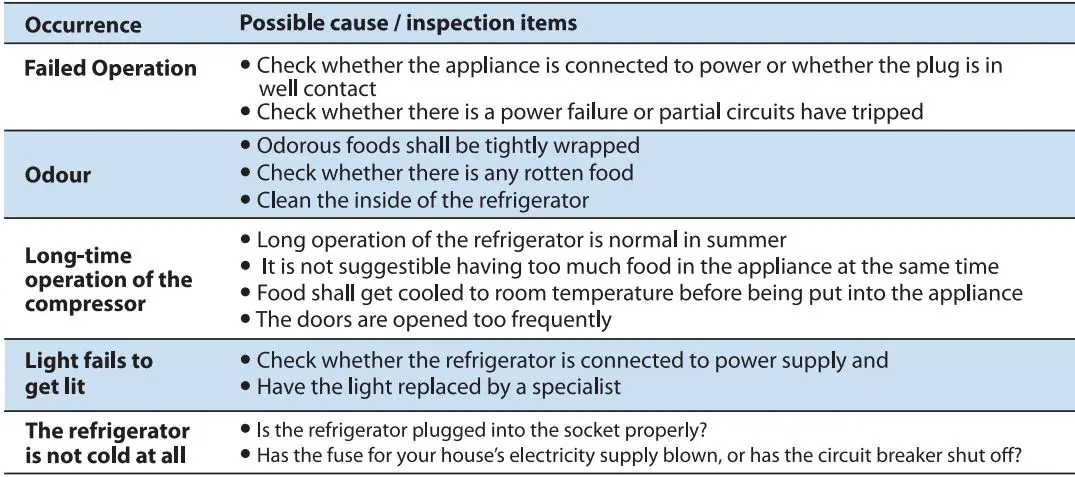
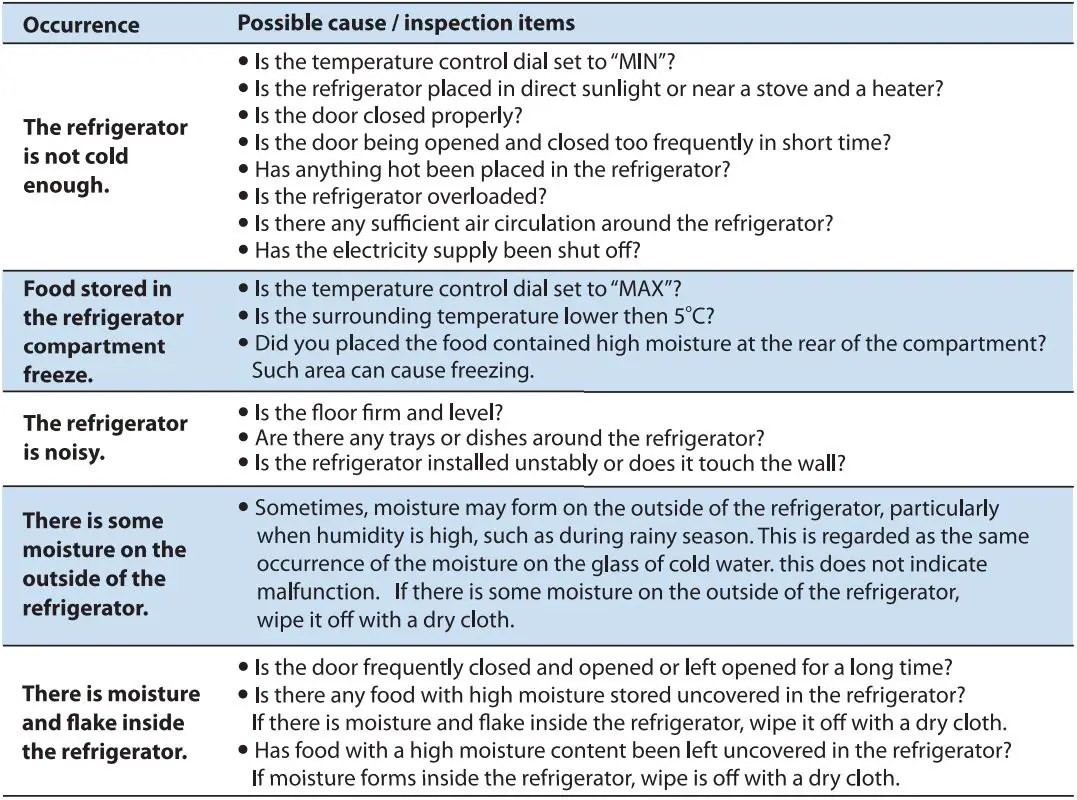
Your Toshiba refrigerator may not function at its desired capability if used incorrectly. This may not necessarily mean that the product is faulty. For instances like this, please follow the steps below to troubleshoot the problem without the help from certified technician if the problem still persists, please call Toshiba Call Centre immediately.
CAUTION: Dewing on refrigerator compartment
– Please wipe off the dews by using dry clothes to prevent the accumulation.
– To prevent the excessive dews in the compartment, please pay attention.
Do not open the door often in a short interval.
Do not leave the door opened for a long period.
Please ensure the door is closed properly.
(*) Due to colder cooling air duct in compartment, dewing may be generated on duct surface by invasion of outside air when opening the door or water evaporation from food kept in the compartment.
(*) This dews will disappear naturally while keeping the door closed continuously.
Please wipe off it by dry clothes while you care to take the dews out.
E-waste Management Guidelines
PERTAINING TO THE E-WASTE RULES
Proper Handling and / or Recycling of the Refrigerators
Under the E-Waste (Management) Rules, 2016 (hereafter referred to as the “E-Waste Rules”), it is incumbent for all consumers, including the purchaser of this refrigerator, to properly recycle and dispose of all electrical and electronic equipment through authorized recyclers.
E-Waste has been defined as “waste electrical and electronic equipment, whole or in part or rejects from their manufacturing and repair process, which are intended to be discarded”.
E-Waste contains various hazardous materials like lead, mercury, cadmium, hexavalent chromium, polybrominated biphenyls and polybrominated biphenyls ethers. Hence, improper handling and disposal of e-waste releases these hazardous material in the environment causing pollution, contamination of soil and water and various health hazards.
Though, the product purchased by you is ROHS complaint & does not contain any hazardous material above the prescribed limit under the E-Waste Rules, it is imperative that the product should be handled with utmost caution and as per the guidelines mentioned in this manual including the following Do’s and Don’ts:-
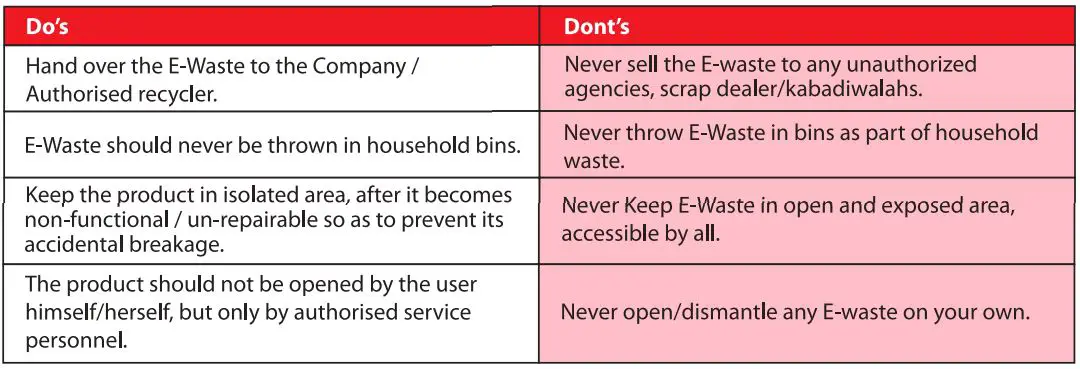
![]()
The above marking/symbol on the product or carton indicates that the product and its accessories/parts (e.g. remote controller, batteries, spare parts etc.) should not be disposed off with other household waste at the end of their working life.
Please separate these items from other types of waste and recycle them responsibly for conservation of the environment and collective well-being.
E-Waste Recycling Program
We have tied up with government approved E-waste recycler for facilitating the collection of E-waste from our channel partners and customers for recycling. You are simply required to call our toll free number 1800 1039 119 and register your request for collection of E-waste. Once your request is received, the representatives of the authorized recycler would collect the E-waste from your house/premises after paying the value of the same to you. For more details and information on our E-Waste Recycling Program kindly visit our website.
Product Warranty Terms and Conditions
(Refrigerator Freezer)
CARRIER MIDEA INDIA PRIVATE LIMITED (hereinafter referred to as the “Company’; hereby warrants to the original domestic purchaser (here in after called the “Purchaser”) of the product (as detailed within the Warranty Registration Card and here in after referred to as the” said unit”) that the said unit is free from defects in materials and workmanship under normal use and service and under specified voltage conditions, and that during a period of twelve (12) months commencing from the date of invoice, as provided in the Warranty Registration Card, the Company undertakes to repair or to replace as it deems fit in sole discretion, free of charge, any part or parts of the said unit (including accessories) which proves to be defective in materials or workmanship.
CONDITIONS OF WARRANTY
- The warranty shall be valid and that the Purchaser can have the benefit of this warranty, if and only if the Purchaser has duly intimated the fault to the Company or its authorized dealer and that the unit in the possession of and is used by the Purchaser.
- The Warranty will shall be valid only for the said period as specified above, irrespective of whether the said unit has been in use or not for any reason whatsoever, or the unit is moved from one location to another. The warranty period specified above shall include time taken for repairs, replacement, testing of unit, technical breakdowns, transit time etc. This warranty shall automatically expire by efflux of time on completion of the period indicated herein above and no notice of such expiry will be given by the Company.
- This warranty shall stand automatically terminated in the event of the said unit being serviced, repaired, installed, reinstalled, re-installed or otherwise attended to by and person or organization or agency or by the Purchaser himself (by whatever name called), other that the authorized representative/ Dealer of the Company.
- Extended Warranty (Applicable on select Model): 1) (4 or 9) years (depending on models) additional warranty on Compressor will continue even after the expiry of 1 year basic warranty period from the date of purchase. This warranty covers Compressor only. Gas/Gas Charging will be charged to the customer. Gas charging is included only when compressor is defective & inoperative. During the additional warranty period, it does not cover any part such as condenser, freezer, capillary, suction line, overload protector, relay, thermostat etc. Standard visiting charges will be applicable within the municipal limit of town where company has its Authorized Service center. Service outside municipal limit will attract to and for traveling, other incidental expenses in addition to standard visiting charges, as prevailing policy from time to time. During the warranty period, only the parts replaced or repaired shall be free of costs, but service charges shall always be payable by the customer.2) If any colored internal or external components are replaced, there will be commitment to ensure that the shades match with the original or other components. The replaced shades, patterns, tints may vary from the customer’s unit due to continuous usage of the unit. Any matching components changed at customer’s request will be on chargeable basis except the component which is actually needed. 3) Special Warranty or Extended Warranties for certain parts of products (Compressor) does not include labor, only parts.
- For attending any service call under this warranty beyond the Municipal limits of the locality in which the authorized representative I dealer is situated (outstation locations), all to and for traveling and other incidental expenses as prevailing from time to time incurred in connection with the visit of the service personnel, technicians etc., shall be borne by the Purchaser and shall be payable in advance. Additionally, all expenses incurred by the authorized representative I dealer in collecting the unit or any part thereof from such outstation locations and its return to the original location shall be borne exclusively bye the Purchaser.
- Any damage / fault caused due to sabotage, improper handling or treatment, carelessness, accident, fire, flood, earthquake or any act of God, or any corrosive action on the original fitting, valves etc. for whatever reason, shall not be covered under this warranty.
- While the Authorized Dealers I Company will make every effort to carry out repairs / replacement of parts under this warranty as soon as the complaint is received, it is expressly made clear that the Authorized Dealer I Company shall not be liable to do so within any specified period of time.
- It shall be absolute discretion of the Company to (a) effect the repairs or replacement of parts whether at the site of installation or at any service center; and (b) have the job attended to either by the Company’s service personnel or of its authorized dealers. (c) This warranty shall be strictly limited to the repairs or replacement of defective parts specified in the warranty. This warranty shall not cover any consequential of resulting liability. (d) This warranty shall not, in any case, extend towards payments of an monetary consideration whatsoever of replacement or return of the product. (e) The company may repair/ supply parts free of cost during the warranty period. This warranty does not cover any Excise Duty, Central or Sales Tax, Octroi and other local taxes or levies on the components/ parts. (f) The parts shall be replaced by functionally operating equivalent material only and not necessarily brand new ones and are to be different from the one originally fitted. The parts thus removed shall be taken back by the company. (g) The company reserves the right to retain any part of components replaced at its sole discretion during the warranty period.
- This warranty is in the nature of and for the purposes as set forth herein above and in particular, the Company shall not in any event be liable for any direct, indirect, incidental or consequential loss or damages to either the said purchaser and I or his property or any other third party in course of attending to any complaint.
- Limitation of Warranty: Company shall not be responsible for providing any warranty under the following situations:
I. If the appliance is not used in accordance with manufacturer’s instruction given in the” User’s Manual”.
ii. Service engineers visits to place of product installation to teach/instruct on how to use the product.
iii. Noise or vibration that is considered normal for product operations like warning beeps, etc.
iv. Correcting the installation, for example leveling the product, adjustment of door, shelves, door pockets, vegetable tray etc.
v. Normal maintenance which is recommended by the user’s manual.
vi. Removal of foreign object/ substances from the machine for example grit, nails, buttons etc.
vii. Replace fuses in or correct house wiring or correct house plumbing
viii. If the product is used for commercial purpose, it is not warranted (example :; Public places such as public kitchen, lodging house, dormitory etc.).
ix. Any damage caused by accident, mishandling, tampering with installation, or negligent in following instructions of the user manual issued by the Company. If the products has been installed / serviced / repaired / opened or tampered by any unauthorized personnel.
x. Any damage caused by power surges and dips, improper electrical circuit outside the unit or aby any defective electrical supply. If defects arise/ caused by accidents, alteration, misuse, substitution of original components with spurious / nongenuine components attacked by household pest/ rodent, fire, flood, earthquake, lighting and / or any other act of God I natural calamities.
xi. At any time, during the period of the warranty, if any part of the unit is tampered with, altered, repaired or serviced by any unauthorized person, not being the authorized
xii. If defects arising with optional accessories like shelves, door pockets, vegetable tray, extended power supply cable, adjustment feet cover, etc. thereof
xiii. The serial number on the unit or any part thereof is damaged, defaced, altered, obliterated, or tampered with or removed for any reason whatsoever.
xiv. Goods(products) that are not distributed within the region of company.
xv. The product is shifted outside India.
xvi. Damage to the product due to operation in an abnormally corrosive alkaline /acidic atmosphere. Product/ Parts is found defective if the product is installed / operated in abnormally corrosive alkaline/ acidic atmosphere or near muddy sewages because toxic gases are harmful for the product.
xvii. The warranty does not cover any type of painting, plating including rusting etc., or defects thereof.
xviii. Plastic & Glass parts such as shelves, door pockets, vegetable tray etc., are also not covered in warranty. - None of the employees and/ or Authorized dealers of the Company have the authority whatsoever to vary the terms and conditions of this warranty.
- This warranty shall be deemed to have been issued at Gurgaon in the State of Haryana, and Courts at Gurgaon shall have exclusive jurisdiction on matters covered by or following from this warranty and the Purchaser alone shall have cause of action arising out of the transaction.
Notes
THIS WARRANTY IS NOT TRANSFERABLE AND
APPLIES TO ORIGINAL PURCHASER ONLY.
COMPLETE THIS RECORD AND KEEP IT
TOGETHER WITH YOUR PURCHASE DOCKET IN
A SAFE PLACE. YOU WILL HAVE TO PRODUCE THIS
WARRANTY CARD TO AVAIL THE WARRANTY.
SHOULD YOU REQUIRE SERVICE UNDER THE
TERMS OF THIS WARRANTY,
PLEASE CONTACT US.

Warranty Card
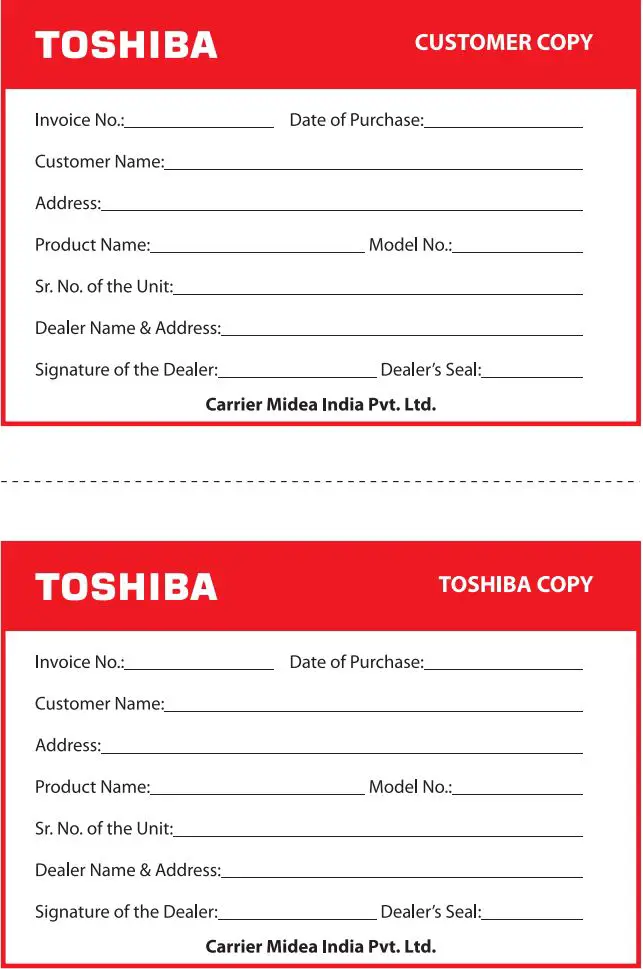
Carrier Midea India Pvt. Ltd.
1st Floor, Pearl Tower, Plot No. 51, Institutional Area,
Sector-32, Gurugram-122 001, (Haryana)
Ph.:- 0124 6144300 CIN No. U74140HR2011 FTC044006
Helpline: 1800 4191 111
SPECIFICATION
| Product Name | Toshiba Refrigerator Freezer |
| Models | GR-A28INU, GR-AG36IN, GR-AG46IN, GR-AG55IN, and GR-AG66INA |
| Check on Receiving | Thoroughly checked, packed, and quality certified before leaving manufacturing. Do not accept if there is any visible loss or damage. |
| Installation | Install on a rigid, dry, and leveled surface. Avoid direct sunlight. Sufficient ventilation. Keep it far away from heat sources such as coal or gas. Solid, level surface without carpeting or flooring that may obstruct ventilation. The surface to install the refrigerator must support a fully loaded refrigerator, or approximately 100 kg. Leave space around the refrigerator. Provide at least 30 cm (12 inches) at top, 10 cm (4 inches) at rear side and 5 cm (2 inches) on the left and right of the refrigerator for proper air circulation. |
| Temperature Control | Normally set the temperature control switch to the Middle Position. If the refrigerator does not seem cold enough, turn the dials toward “MAX”. if it seem too cold, turn the dial toward “MIN”. For the freezer, when storing ice cream, the temperature should be set between Middle position and “MAX” position of the Freezer Control Switch. Changing the refrigerator compartment temperature control also varies the temperature in the vegetable crisper. |
| Moisture Control | Control air flow by changing the position of slide knob in the vegetable crisper. |
| Leveling | Install on a strong and level floor. Turn the adjustable leg and stabilize the refrigerator horizontally. Adjust the right and left feet to a horizontal level. Raise the lower door up to the level of the higher door and insert the supplied fastener-ring by using plier in the gap between the hinge-grommet and the lower hinge. |
FAQS
What should I do if my Toshiba Refrigerator Freezer arrives with visible loss or damage?
If you notice any visible loss or damage upon receiving your Toshiba Refrigerator Freezer, do not accept the product and ask the delivery person to make a note on the freight bill or receipt.
What should I do if I notice loss or damage after opening the box of my Toshiba Refrigerator Freezer?
If you notice any loss or damage after opening the box of your Toshiba Refrigerator Freezer, which you did not notice upon delivery, inform the Toshiba Service Centre immediately.
Does the user manual contain all product service-related procedures required for continued successful operation of the product?
No, the user manual does not contain all product service-related procedures required for continued successful operation of the product. Therefore, it is recommended to employ the services of a Toshiba Authorized Service Person on a periodical basis for the same.
What are the key features of the Toshiba Refrigerator Freezer?
The key features of the Toshiba Refrigerator Freezer include a user interface control panel, temperature control, moisture control, air flow control, and detailed instructions on how to level the refrigerator and its door.
What are some safety precautions that should be followed while using the Toshiba Refrigerator Freezer?
All instructions described in the manual should be carefully read and followed to prevent the risks of serious injury or death of the user and any damages to property. Do not operate the product before reading the manual supplied with this product and follow instructions to ensure personal safety and proper operations. Carrier Medea India Limited assumes no liability for installation performed by any unauthorized person.
What is the recommended installation area for the Toshiba Refrigerator Freezer?
The installation area should be a rigid, dry, and leveled surface with sufficient ventilation. The suggested temperature range is between 10°C and 43°C, and the refrigerator should be kept far away from heat sources such as coal or gas. The surface to install the refrigerator must support a fully loaded refrigerator, or approximately 100 kg.
How should I level the Toshiba Refrigerator Freezer?
Before leveling the refrigerator, ensure that the refrigerator is disconnected from the power supply. Turn the adjustable leg and stabilize the refrigerator horizontally. Procedures for leveling feet include turning the feet clockwise to raise the refrigerator and counterclockwise to lower the refrigerator. Adjust the right and left feet based on the procedures above to a horizontal level.
How do I level the door of my Toshiba Refrigerator Freezer?
To level the door of your Toshiba Refrigerator Freezer, raise the lower door up to the level of the higher door and insert the supplied fastener-ring by using pliers in the gap between the hinge-grommet and the lower hinge.
How do I control the temperature in my Toshiba Refrigerator Freezer?
Normally set the temperature control switch to the Middle Position. If the refrigerator does not seem cold enough, turn the dials toward “MAX”. If it seems too cold, turn the dial toward “MIN”. For the freezer, when storing ice cream, the temperature should be set between Middle position and “MAX” position of the Freezer Control Switch.
How do I control temperature in the Ultra Fresh room of my Toshiba Refrigerator Freezer?
To control temperature in the Ultra Fresh room of your Toshiba Refrigerator Freezer, pull the ultra fresh room to the front direction and adjust the lever which is inside that.
How do I control air flow in my Toshiba Refrigerator Freezer’s vegetable crisper?
To control air flow in your Toshiba Refrigerator Freezer’s vegetable crisper, change the position of slide knob.
