
Q1012

Dear respectable customers,
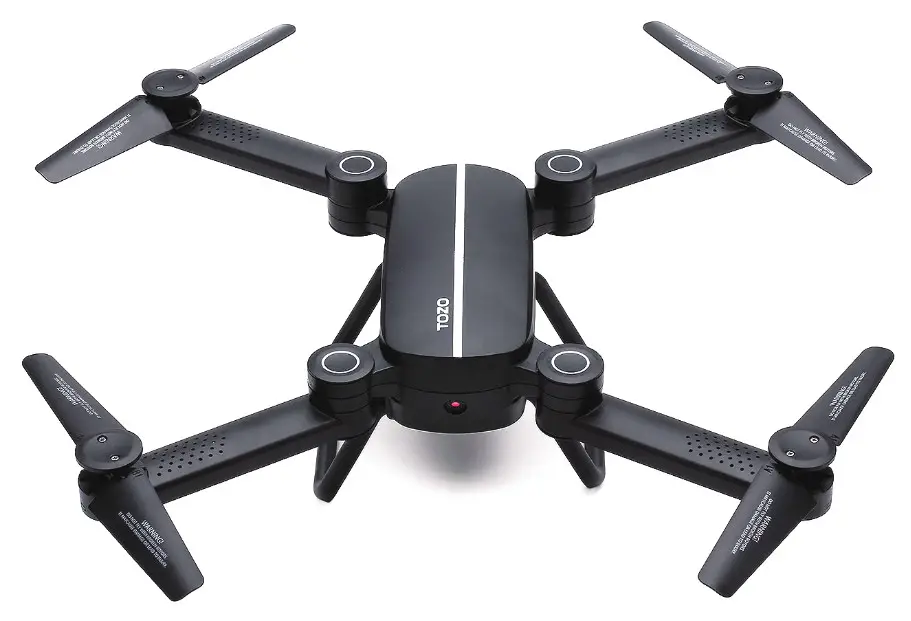
Thank you very much for your purchase of aircraft products manufactured by TOZO company! The built-in barometer in the aircraft can accurately hover on the fixed height, in order to you can be safe and correct use of this product, be sure to carefully read this specification, and to retain the convenience for future reference!
Note:
- The motors, circuit board and battery may heat up with use. Take 10-minutes cool-down between flights and recharge to ensure your parts last as lond as possible.
- When out of control, just press both L2 and R2 button for emergency stop to prevent more damage.
- No need TF card for Q1012. The photos and video will be stored on the phone through APP (scan the QR code on manual page 13).
Unfold the aircraft
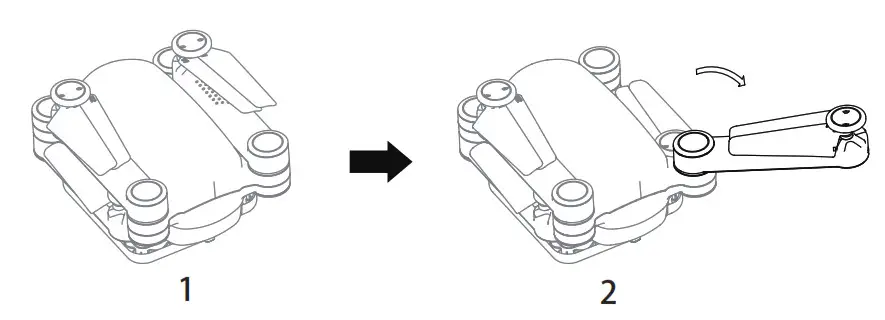
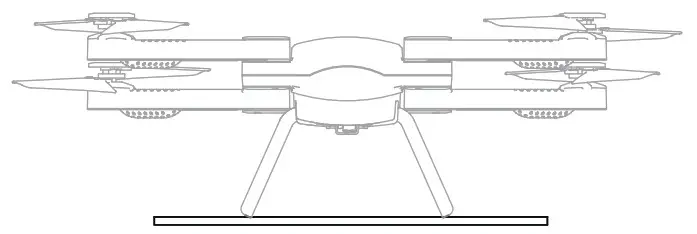
1. When you receive the aircraft, the state of being acquiescent is the folding state, at this time unfold the aircraft arms respectively rotate to outside about 120 degrees ( as shown in Figure 2), when you hear a sound of click, the rotation has been in place.
Note: when rotate in place stop the lateral rotation, or else this will damage the built-in rotational-axle structure in the aircraft arms.
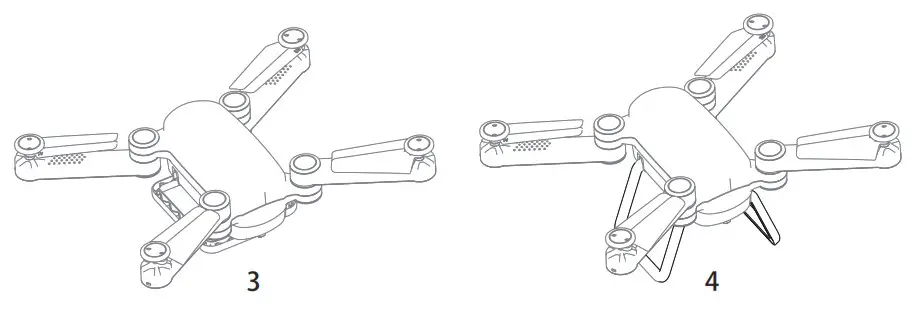
2. After unfolding the four arms and then unfold the foot frames according to the shown style in Figure 4.
Know your aircraft
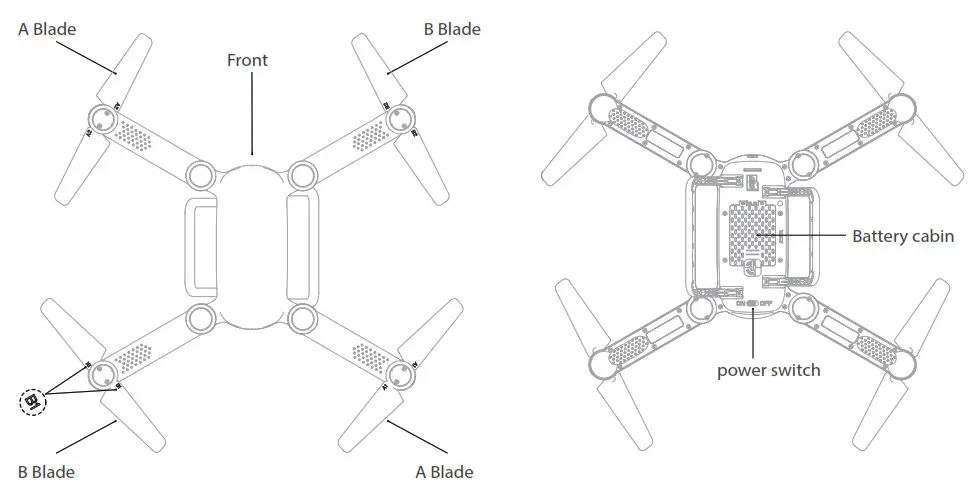
- When flying, please take the aircraft head toward to the front, so that you will be better to control the aircraft.
- The central axis location of the blade are marked “A” “B” blades, when the blade is damaged, please follow the above-shown picture to replace the blade, when changing please note that two blades of the same machine arm need to be replaced the same numbers, such as “B1”, on both sides of the blades are required “B1”, if “B2”, is required “B2”, so the aircraft will be more stably flight.
Know your remote control
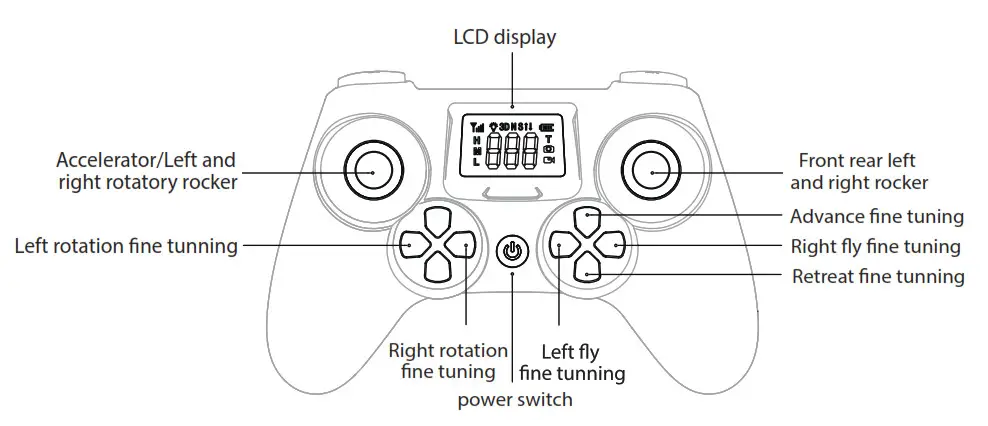
TIP: Camera key and Recording key may not have a function on some of the flying models.
Flight notes
- This product is suitable for the people who with operating experience of model, and at least 14 years old.
- When using this product, please choose the wider space, away from the barrier, crowd, high voltage wires, communication base station, and so on.
- Do not use this product in bad weather conditions, such as strong wind (wind speed 3 classes or more) or thunderstorms, heavy fog weather, and so on.
- When the aircraft in flight, please keep a certain distance from it, avoid fingers or body close to the propeller so as not to cause harm.
- There are many built-in precision electronic parts in the aircraft, must to avoid the wet or water vapor into the interior and lead to the failure and caused by an unexpected accident.
- The aircraft must be far away from heat source, prevent sunlight to avoid deformation of high temperature even meltdown damage.
- Do not arbitrarily remove or any modification of the processing of this product, if have the use or maintenance problems, please can consult the local dealers, under their guidance to operate.
- When using this product., be sure to abide by the local laws and regulations, do not use it for any other purposes other than legal provisions.
Preflight preparation
- Insert the USB cable into the computer or the charger with USB mouth, then take the cable insert to the lithium battery for charging.
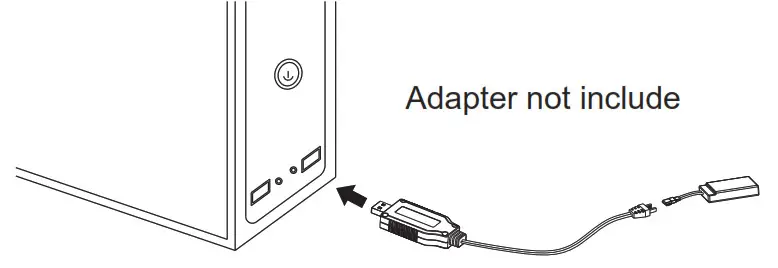
● When charging the indicator light is out of state, after completion of charging the indicator light is on, the charging time is about 90 minutes.
● In the process of flight, when the battery is close to exhausted, the LED light of the aircraft will flash for prompting. - Charging notes
● After the flight, the surface temperature of the battery will rise, please place the aircraft for a few minutes, charging after cooling.
● If no use for a long time, should be placed the aircraft and battery in a cool and dry place, away from the heat source.
● When the battery is expanded, destroyed or severe fevered etc. should immediately stop using.
● The lithium battery has a certain service life, when find the shorter flight time or slowly flight may need to replace the lithium battery.
● In the process of charging the battery to prevent accidents please place the aircraft and the charger on the ground or in the place where there is no combustible materials. - Connect the power supply to the remote controller
Remote control power supply has two kinds, one is AA size battery, another one is a lithium battery, it is recommended that using the lithium batteries in general, dry battery only for emergency use.
Method A: Insert the lithium battery of the aircraft into the inserting mouth of the battery in the remote control, after placed well the battery then close the battery cover.
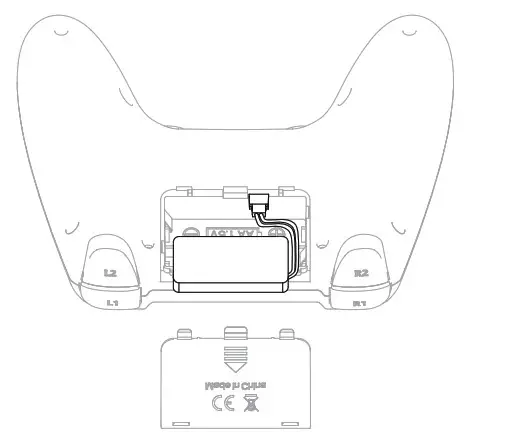
Method B: Take two 1.5V AA batteries (batteries not enclosed) in accordance with the direction to install inside the battery of the remote control, close the battery’s cover.
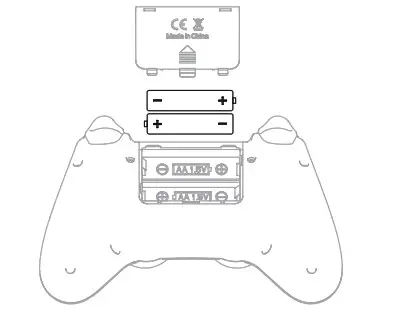 Note: do not install backward the battery, do not mix the new and old batteries or different types of batteries.
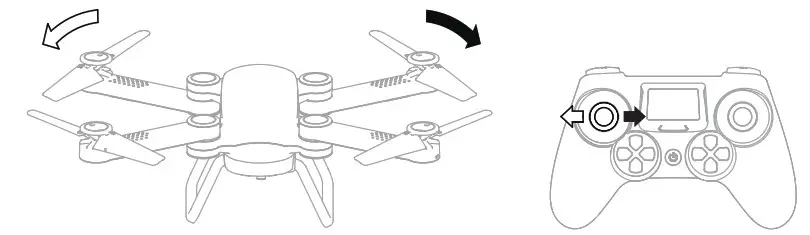
Bind Frequency and adjust the acceleration
- Power on the aircraft
 Insert the battery into the power inserting mouth in the battery, and cover well the battery, open the power supply on the tail, at this time the LED lights of the aircraft begin flashing, place the aircraft on flat ground or object to adjust by the gyroscope, (if not flat, after adjustment will affect the flight effect )
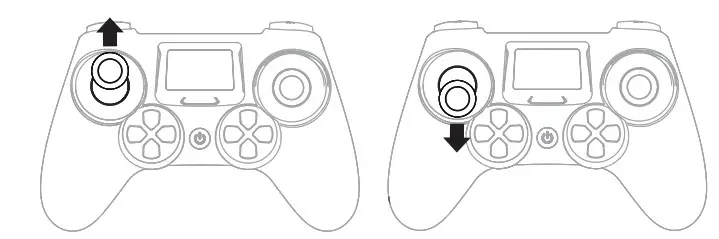
 - Open the power supply of the remote control, the indicator light starts flashing, push the left rocker of the remote control to the upper then push to the bottom (as shown in the below picture), at this time enter into the searching frequency state, when the LED lights of the aircraft turn to normal light, it shows that the success of frequency.
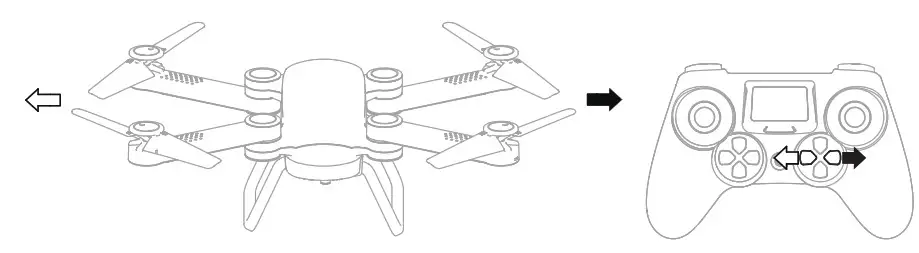
When the remote control without any operation in five minutes will be automatically sleep off. - After the success of frequency, pull the left and right rocker of the remote controller together toward to the inside below for 45 degrees angle, after the remote controller sends out a “di” sound, at this time the LED lights of the aircraft starts to flash quickly, after becomes to normal light the adjustment is completed, now can be ready to take off.
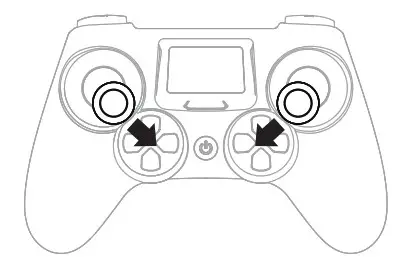
Note: When the aircraft flight instability can also repeat the steps 1-3 for adjusting the accelerometer.
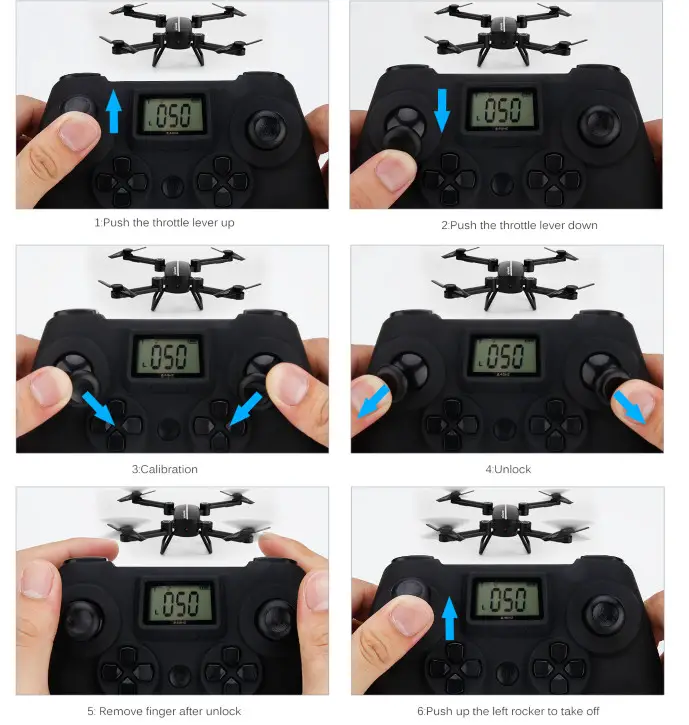
Take Off And Landing
Take off —-Method 1
Pull the left and right side rocker of the remote control toward to the outside for 45 degrees angle, when the remote controller sends out a “di” sound, at this time the aircraft is unlocked successfully, the arm blades start slowly rotating, then push up the left rocker then the aircraft can be taken off.
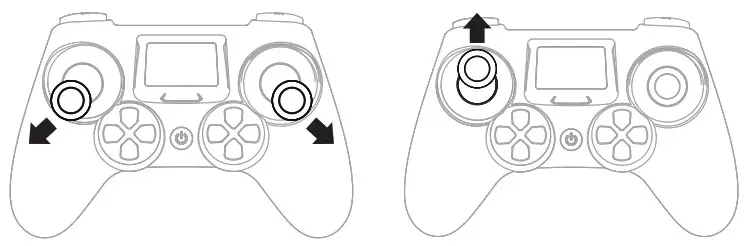
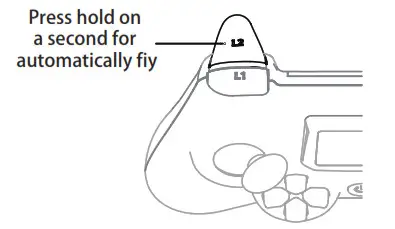
Take off —-Method 2
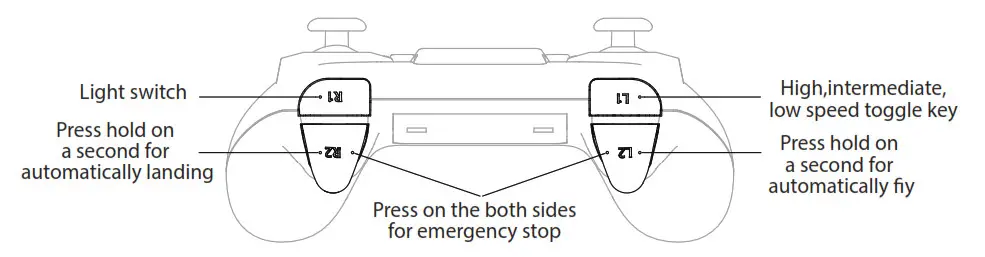
After the adjustment of the aircraft, hold on “L2” button for a second, after the remote controller sends out a “di” sound, the aircraft will take off to a certain height then suspended in the sky.
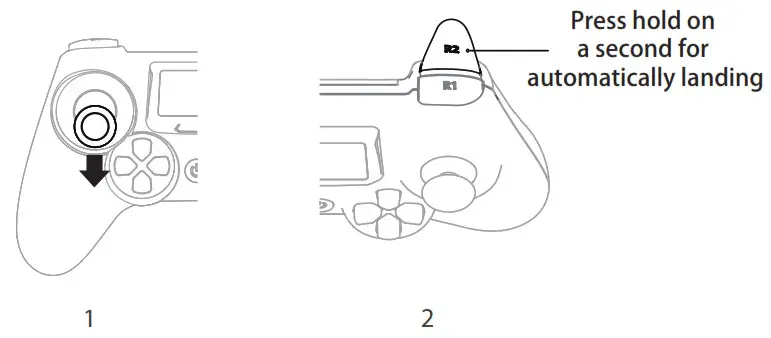
3. When landing the aircraft, can through the following two methods. Method 1(shown in Figure 1) pull down the accelerator rocker, the aircraft can fall to the land. Method 2 (Figure 2) hold the “R2” button for about a second, the aircraft will start automatic landing (the right rocker can control the direction while landing )
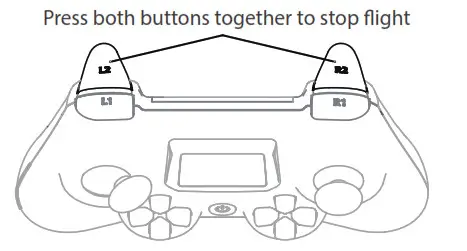
Emergency stop
When you are in a state of the emergency press the “L2” and “R2” buttons to immediately stop the flight.
High ,middle and low speed modes and lighting control
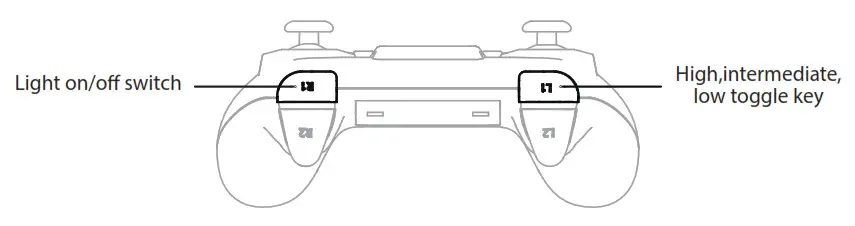
- When press the “R1” button as shown above can control the aircraft lights on and off.
- When press the “L1” button as shown above will switch the high, middle, and low-speed modes, LCD screen will display the corresponding letters: H M L; the buzzer will emit different sounds to distinguish, a “Di” sound is low speed, “Di Di” sound is middle speed, “Di Di Di” is a high speed, the low-speed mode is suitable for the beginners learning to practice, the medium spread is suitable for the advanced users learning to practice, the high-speed model is suitable for the skilled users in flight.
Direction control during flight
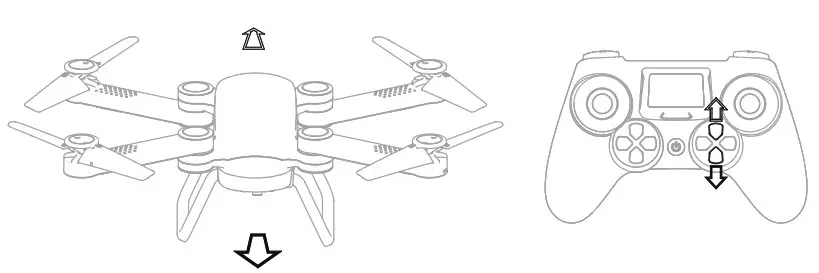
- Control the rise and fall
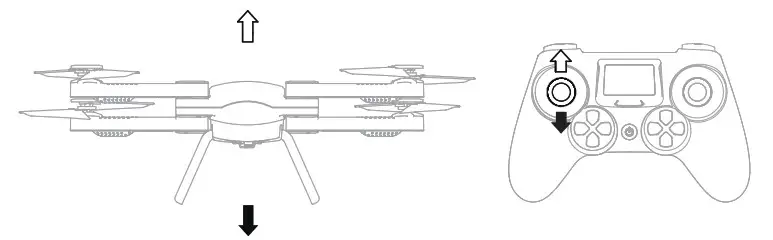 When the accelerator rocker push up the aircraft flies higher on the upside, when pull down the aircraft is going down.
Note: when the first flight, please slowly push the accelerator rocker to prevent the rapid rise of the aircraft caused by out of control. - Rotating directions control
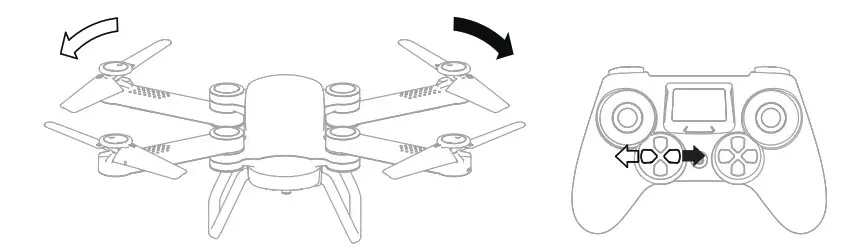
When the left rocker push to any direction of the four(front, back, left, and right) directions, the aircraft flies to the corresponding direction. - Control of the flight on the left and right directions
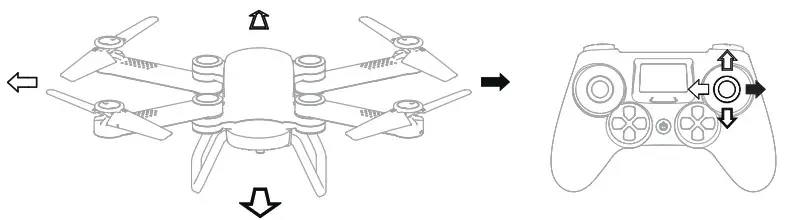 When the right rocker push to any direction of the four(front, back, left, and right) directions, the aircraft flies to the corresponding direction.
The use of fine-tuning keys
- the use of fine- tuing keys for the left and right direction
 When the aircraft automatically rotates to the left side press the right button, until amend to a balanced state, and rotates to right press the left button.
 - The use of fine-tuning keys for the front and back directions
 When the aircraft automatically flies to the front press the back button, until amend to a balanced state, when flies to the back press the front button.
 - The use of fine-tuning keys for the left and right direction
 When the aircraft automatically flies to the left side press the button on the right, until amend to the balanced state, when flies to the right side press the button on the left side of the button.
Quick guide for take off.
The use of WIFI image real-time transmission
(Take photo and video through APP )
(No need TF card, photos and videos stored on the phone directly)
- By mobile scanning the two-dimensional code as below or landing the corresponding website to download the APP suitable for the mobile phone system then install it.

https://play.google.com/store/apps/details?id=com.lewei.jiestar

https://itunes.apple.com/app/id1133794696 - After installing APP, open the mobile phone”WIFI” function, and search the WIFI name of the aircraft, find the wift named: WIFIUFO-xxxxxx click the connection, after successfully connecting return to the menu of the mobile phone, open APP and you can see the transmissive pictures from the aircraft, if there is no pictures, turn off APP and reconnect the aircraft WIFI, then open APP again to see.
- when you see the picture, can through the mobile phone to control the aircraft flight (the premise is the remote control is not bind frequency with the aircraft then can use mobile phone to control) can also take the photos and video operation and control the aircraft pose by gravity sensor, the specific operation please refer to the help in APP main interface.
Note: In the use of transmitting the pictures by mobile phone or control the aircraft by mobile phone, please pay attention to the surrounding electromagnetic environment, WIFI, signal base station, or other airplane model sign all may have an effect on the airplane control, will cause signal interference, if found the interference should immediately stop using, or change the place, so as to avoid the airplane out of control, resulting in the loss.
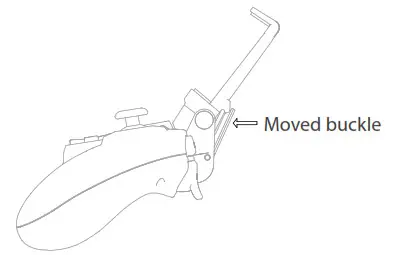
Installation and use of mobile phone holder
- when the aircraft bind frequency to the remote control, connect the mobile phone and the aircraft WIFI, (note that it must first be bind frequency to the remote control then connect the mobile phone and the aircraft WIFI)
- Installed the enclosed mobile phone holder on the remote control, through the moved buckle on the back of the mobile phone holder can be fixed tightly the mobile phone holder, and then put the mobile phone in the mobile phone holder and fix it, then can preview the real-time shooting pictures while operating the aircraft.
Control the roll in four directions
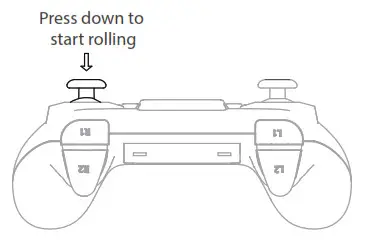
Press down the rocker controller as shown in the above figure then lose the remote control will be entered into the rolling model prompted by the continued buzzing voice, push the right rocker to the end of any direction of four(up, down, left, and right)directions then loose, the aircraft will do a 360-degree roll to the corresponding direction.
Tip: The best operating experience for rolling motion should be with full of battery, when the aircraft LED lights flashing to prompt the low voltage, the rolling function will be automatically turned off.
Operation of headless mode and one-key return
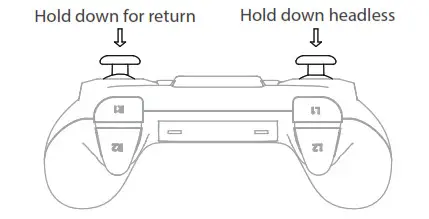
- Before departure take the aircraft tail face toward to you, and the aircraft head is placed in the front, to define the front is the headless mode;
- Press down the left rocker of remote control hold about a second, the headless mode is launched, at this time the aircraft LED lights are flashing show the headless mode is launched, after taking off the aircraft head in any direction as long as push the forward rocker, the aircraft will toward to the head direction before take-off flight (if you want to cancel the headless mode, press down the left rocker down hold about a second, there will be “Di Di” tone prompts the successful cancel)
- When into the headless mode press down the right rocker of remote control hold about a second, the return mode is launched, the aircraft will toward to the rear direction before take-off flight, when retreat to the needed site push forward the right rocker, return to stop, the return is over (the return is effective after enter into the headless mode)
Specifications
Remote control mode – 2.4GHZ
Aircraft weight – 126g
Battery capacity – 650mA
Rotor diameter – 133mm
Camera pixels – 30W
Aircraft unfolding size – 343×313×91mm
Aircraft folding size – 122×94×57mm
Optional accessories
In order to facilitate the customers upgrade or maintain this product, the optional accessories are listed as below, the customers can buy the following parts from the local dealers.
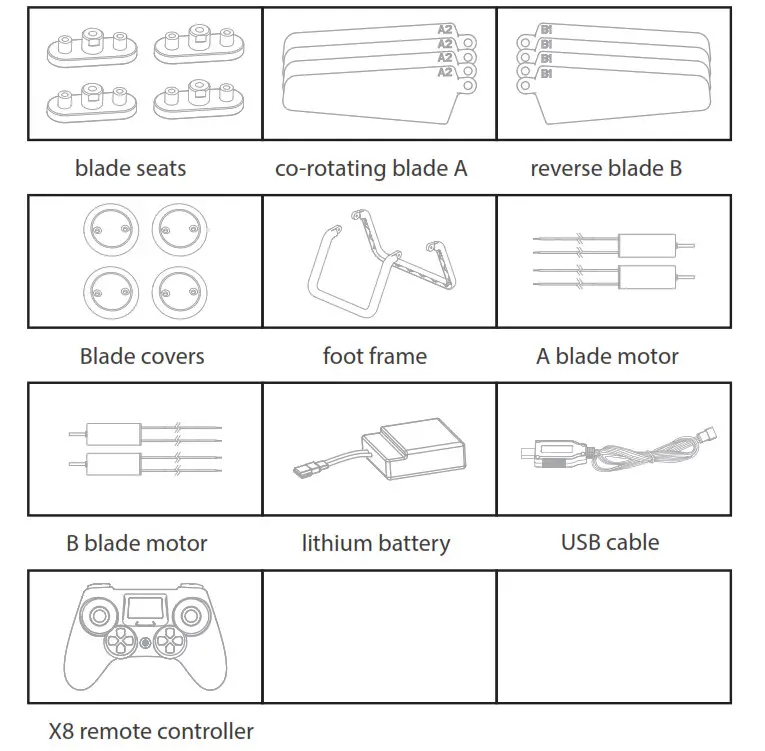
The parts could purchase at www.tozostore.com or search <q1012 part> at amazon. For any assistance, please feel free to contact email: [email protected]