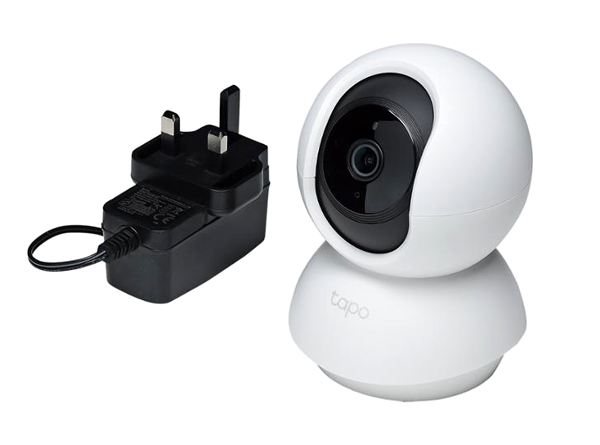
User Manual

Tapo Camera
Tp-Link | Tapo
Visit www.tapo.com/support
for technical support, user guides, and more information
STEP – 1
DOWNLOAD APP
Get the Tapo app from the Apple App Store or Google Play.

https://play.google.com/store/apps/details?id=com.tplink.iot&hl=en_US&gl=US
https://apps.apple.com/us/app/tp-link-tapo/id1472718009

STEP – 2
POWER UP
Plug in your camera and wait until the LED blinks red and green.
STEP – 3
SET UP
Tap the button in the app and select your camera model. Follow app instructions to complete setup.
Safety Information
- Adapter shall be installed near the equipment and shall be easily accessible.
- Keep the device away from water, fire, humidity or hot environments.
- Do not attempt to disassemble, repair, or modify the device.
- Do not use damaged charger or USB cable to charge the device.
- Do not use any other chargers than those recommended.
- Do not use the device where wireless devices are not allowed.
Please read and follow the above safety information when operating the device. We cannot guarantee that no accidents or damage will occur due to improper use of the device. Please use this product with care and operate at your own risk.
TP-Link hereby declares that the device is in compliance with the essential requirements and other relevant provisions of directives 2014/53/EU, 2009/125/EC, 2011/65/EU and (EU)2015/863.
The original EU declaration of conformity may be found at https://www.tapo.com/support/ce/.
For TP-Link Branded Products Only. For more information about warranty, please visit https://www.tapo.com/support
THIS WARRANTY GIVES YOU SPECIFIC LEGAL RIGHTS, AND YOU MAY HAVE OTHER RIGHTS THAT VARY FROM STATE TO STATE (OR BY COUNTRY OR PROVINCE).
TO THE EXTENT ALLOWED BY LOCAL LAW, THIS WARRANTY AND THE REMEDIES SET FORTH ARE EXCLUSIVE AND IN LIEU OF ALL OTHER WARRANTIES, REMEDIES AND CONDITIONS.
TP-Link warrants the TP-Link branded hardware product contained in the original packaging against defects in materials and workmanship when used normally in according with TP-Link’ s guidelines for some period which depends on the local service from the date of original retail purchase by the end-user purchaser.
Introduction
When you are away home, there are always something you care about. This is where the smart camera functions. No matter your child is climbing the kitchen cabinet, or the pet is stealing snacks, the Pan/Tilt Home Security Wi-Fi Camera helps you stay with them anytime, anywhere. Receive a notification whenever your camera detects motion and see a video clip of this motion to check everything.
- Smooth Pan and Tilt – 360° horizontal range and 114° vertical range.
- 1080p High -Definition – Capture every detail in crystal-clear Full HD definition.
- Advanced Night View – Even at night, the camera can provide a visual distance of up to 30 ft.
- Live View – Always stay with that matters most to you from anywhere, anytime.
- Two-Way Audio – Communicate with others with the built-in microphone and speaker.
- Sound and Light Alarm – Trigger light and sound effects to frighten away unwanted visitors.
- Privacy Mode – Shut down the surveillance to protect your privacy.
- Sharing – Share the memorable moments with your family and friends.
- Safe Storage – Store up to 128 GB on a microSD card* , equal to 384 hours (16 days) of footage△.
*The SD card is not included in the package. △The data comes from TP-Link laboratory.
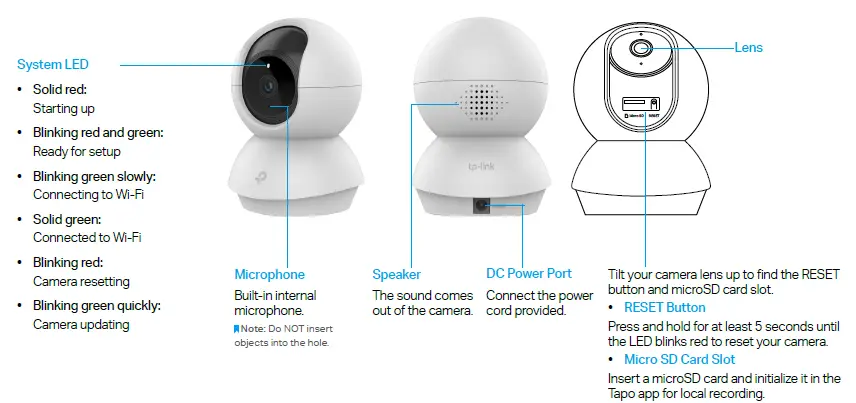
Appearance
The Pan/Tilt Home Security Wi-Fi Camera has a system LED that changes color according to its status, a lens, microphone, speaker, DC power port, RESET button and a microSD card slot. Refer below for details.
Set Up Your Camera
Follow the steps bellow to get start new camera.
Step 1. Download Tapo App
Get the Tapo app from the Apple App Store or Google Play, or by scanning the QR code below.

Step 2. Log In
Open the app, and log in with your TP-Link ID. If you don’t have an account, create one first.

Step 3. Add Your Camera
Tap the ⊕ button in the app and select your model.

Step 4. Configure Camera
Follow app instructions to configure your camera and add it to your home network.

Step 5. Place Camera
Place your camera on a flat surface, or install it on a wall or ceiling with the provided mounting template and screws.

1. Mark Position
Place the mounting template where you want the camera. For wall mounting, drill two holes through two circles.
2. Mount Base
Affix the camera base using the screws. For wall mounting, insert two anchors into the holes and use the screws to affix the camera base over the anchors.
3. Secure Camera
Attach the camera on the base and rotate to secure the camera.

Main Camera Controls
After you successfully set up the camera, you will see your camera listed on the home page. You can view and manage your camera from anywhere at any time with the Tapo app.
Home Page
This page lists all your cameras you’ve added and you can view them directly and manage them easily. Tap the camera or go to Camera Preview > Manage to enter the Live View page.

Live View
Talk or Voice Call: Communicate with loved ones
Pan & Tilt: Rotate your camera to monitor every angle of your room
Privacy Mode: Enable to temporarily shut down the surveillance for privacy
Alerts: Turn on to get noticed when motion detected
Playback & Memory: Check all recordings and saved moments

Camera Settings
On Live View page, tap SETTING to enter the Camera Settings page. You can change the settings of your camera to meet various needs, such as change your camera name, customize detection settings and recording schedules, turn on or off notifications, set activity zones, etc.

Me
On this page, you can edit your account, quickly check the memorable moments you saved, or find the FAQs of using smart camera and basic info related to the Tapo app.

Pan and Tilt Control
On the Live View page, tap to enter the control page. Tap on the Pan & Tilt panel to control your camera to move.
Pan & Tilt Settings: Tap to set how many degrees the camera will move per tap of the Pan & Tilt.
Vertical Cruise: Persistently move up and down. Tap X to stop cruising.
Horizontal Cruise: Persistently move from left to right. Tap X to stop cruising.
Mark Position: Tap to mark your current position, and then you can quickly rotate your camera to the marked direction with just a tap.

Motion Detection
With motion detection, the Tapo app alerts you of activity that matters and sends notifications straight to you when motion detected. Insert a microSD card to record the clips when motion detected. Otherwise, you can only receive the notifications. Note: Initialize the SD card on the app before using it.
1. Go to Camera Settings page and tap Detection & Alerts to customize its current detection settings.

2. On the Detection & Alerts page, enable the Motion Detection function. It’s recommended to enable the Notifications function to receive motion detection messages.

3. Customize Camera Alerts settings. Choose Alert Type (Sound/Light) and Alert Sound (Alarm/Tone), and set Alert Schedule as needed.

4. Customize Activity Zones and the camera will only detect motion in custom zones. Entire view is covered by default.

5. Adjust Motion Sensitivity (Low/Normal/High) as needed. Increased sensitivity results in more recordings and notifications.

6. After editing the detection settings for the camera, you can set the Recording Schedule for the motion detection.

7. On the Live View page, tap to CAMERA find all recordings. The orange sections are recordings for motion detection. Note: The microSD card is needed for recordings. Initialize the SD card on the app before using it.

24-hour Recordings
1. On the Live View page, tap SETTING to enter the Camera Settings page.

2. Toggle on to enable the Local Recording function and set the Recording Schedule for Continuous Recording (24-hour Recording) as needed.

3. On the Live View page, tap CAMERA PLABACK to find all recordings. The blue sections mean continuous recording. Note: The microSD card is needed for recordings. Initialize the SD card on the app before using it.

Privacy Mode
On the Live View page, tap Privecy MOD to enable the Privacy Mode. When enabled, streaming and recording functions will be temporarily disabled to protect your privacy.

Authentication
COPYRIGHT & TRADEMARKS
Specifications are subject to change without notice. TP-Link is a registered trademark of TP-Link Technologies Co., Ltd. Other brands and product names are trademarks or registered trademarks of their respective holders.
No part of the specifications may be reproduced in any form or by any means or used to make any derivative such as translation, transformation, or adaptation without permission from TP-Link Technologies Co., Ltd. Copyright © 2020 TP-Link Technologies Co., Ltd. All rights reserved.