TRAEGER TBB01RLG Timberline XL Wood Pellet Grill Instruction Manual
YOU WILL NEED TO BEGIN WITH THESE STEPS EVERY TIME YOU USE YOUR GRILL.
PRE-GRILLING CHECKLIST
- Check for and do needed maintenance:
- Clean the Traeger® Grease Management System:
- Grill Grates
- Drip Tray
- EZ-Clean Grease+Ash Keg
- Remove ash when alerted by the grill (or after approximately 30 hours of cooking).
- Check the power cord for twists, damage, or fraying.
- Make sure the grill is correctly assembled with all parts present before using it:
- EvenFlowTM Heat Shield
- Drip Tray
• Grates - Grease Governor
- Make sure you have proper airflow:
- Ensure nothing is obstructing the exhaust.
- Make sure the grill is a safe distance from combustibles (see page 2).
- Make sure the grill is on a level surface.
- Inspect the pellets:
- Make sure you have enough pellets in the hopper.
- Make sure the pellets are not wet.
- Close the hopper lid.
- Close the grill door.
COOKING ON YOUR TRAEGER
GENERAL COOKING Use this method to set and change temperature for quick cooks and simple recipes.
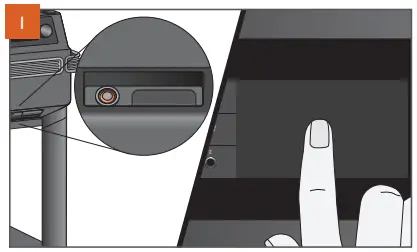
- Press the main power button located on the front of the grill to ON. Tap anywhere on the screen to wake up the controller. A splash screen will appear as the grill powers on.
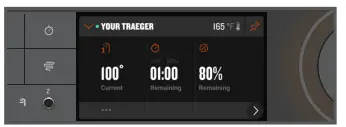
- The homescreen displays YOUR TRAEGER IS READY TO COOK. Cooking temperature can be set directly from this screen.
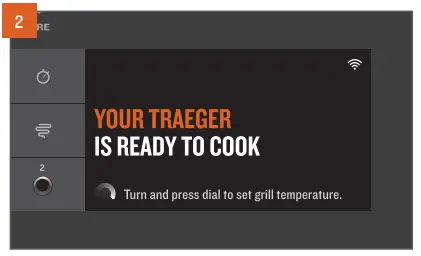
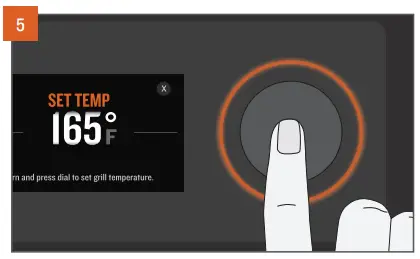
- To select temperature, turn the selection dial right or left.

- The selected temperature is displayed.
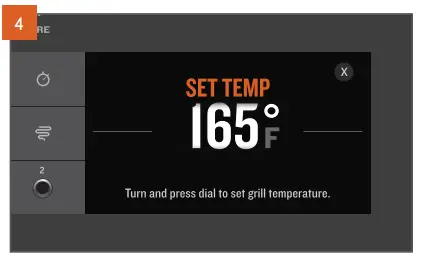
- Press the center of the selection dial to select that temperature.
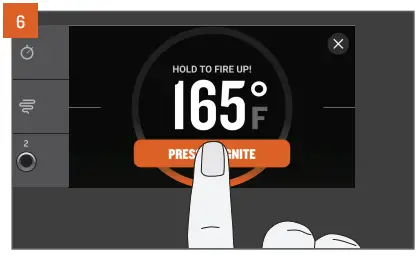
- Once your temperature is selected, you will be prompted to ignite your grill. Press and hold the button on the touch screen display for about 2 seconds until the grill displays that it is successfully “igniting.” The automatic ignition and preheat cycle will begin. The fan and auger will kick on and off throughout the cooking process to stoke the fire according to the set temperature.
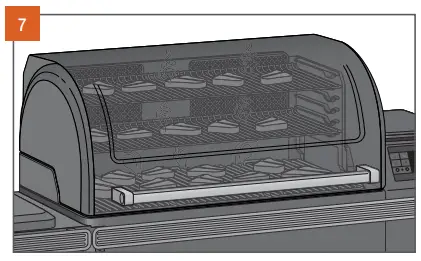
- Once preheating is complete, load food into the grill and close the grill door. See page 22 if using the meat probe prior to loading food into the grill.
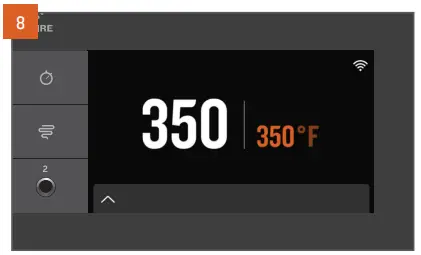
- At Traeger, we keep it simple. The grill temperature is always displayed prominently on the homescreen. To change the temperature, always navigate to this homescreen. Turn the selection dial to your desired temperature and press to select a new temperature.
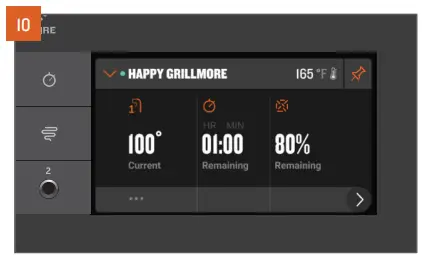
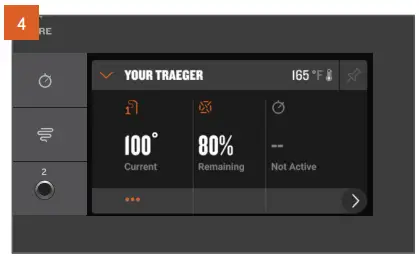
- Tap the footer bar at the bottom of the homescreen to access the Traeger Dashboard. From here, as you set up and use accessories, you can monitor timers, set probe goal temperatures, review pellet levels, and more.
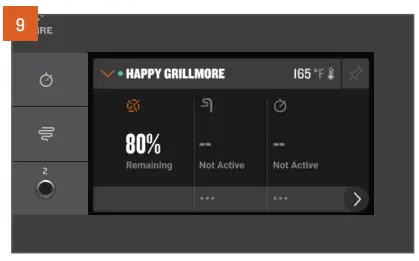
- Prefer this screen with more details related to connected accessories or sensors? Tap the pin in the upper right corner to pin the current view of the Dashboard.
TIPS
- It is recommended to wait until the preheat cycle is complete before loading food into the grill.
- Loading food too early can result in the grill taking longer than usual to achieve desired temperature.
- Keep the grill closed during the preheat cycle so that the grill can reach the desired set temperature.
- Traeger® Grills provide real time temperature readings and you should expect to see fluctuations in temperature.
COOKING WITH ACCESSORIES
COOKING WITH A BLUETOOTH PROBE You can use a Bluetooth probe when your recipe specifies an internal goal temperature for your food. Please refer to the Traeger Wireless Probe Quick Start Guide for more details.
NOTE: Due to high heat, it is not recommended to use wireless probes with the pizza oven mode.
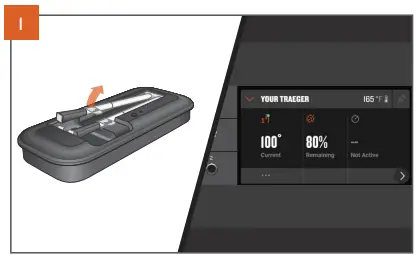
- See “Cooking on Your Traeger” on page 20 to turn on the grill. Once the grill is on, remove a charged Traeger® Bluetooth Probe one at a time from the charging dock and the controller will automatically recognize any previously paired probe. A probe widget will appear within the Traeger Dashboard where you can find additional information on probe status and shortcuts for setting probe goal alarms.
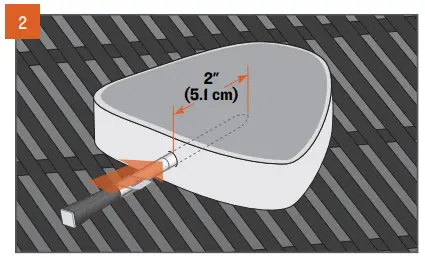
- Insert the probe tip halfway into the thickest part of the protein – avoid touching any bones or particularly the fatty portion of the protein. The probe needs to be in the protein at least 2 inches (5.1 cm). This probe may not be suitable if you cannot insert the probe into the thickest part of the protein and 2 inches (5.1 cm) into the protein. After your probe has been inserted, load your food onto the preheated grill.
COOKING WITH A WIRED PROBE You can use a wired probe when your recipe specifies an internal goal temperature for your food.
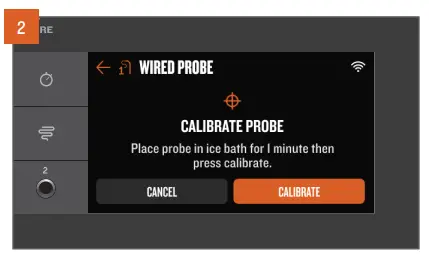
NOTE: Upon first use, it may be necessary to calibrate a probe.
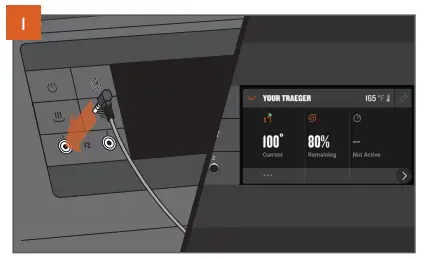
- See “Cooking on Your Traeger” on page 20 to turn on the grill. Plug the probe into the probe jack located on the WiFIRE® controller. Once connected, the controller will recognize the probe and a probe widget will appear in the Dashboard.
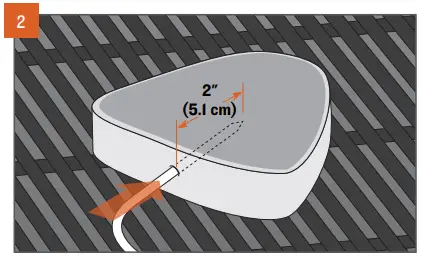
- Insert the probe tip halfway into the thickest part of the protein – avoid touching any bones or particularly the fatty portion of the protein. The probe needs to be in the protein at least 2 inches (5.1 cm). This probe may not be suitable if you cannot insert the probe into the thickest part of the protein and 2 inches (5.1 cm) into the protein. After your probe has been inserted, load your food onto the preheated grill.
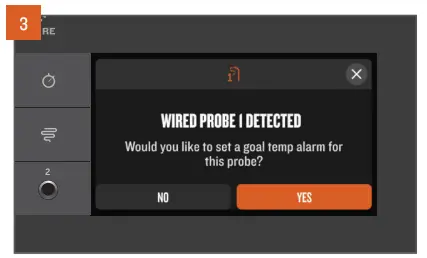
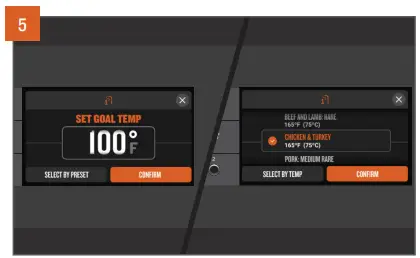
COOKING TO AN INTERNAL TEMPERATURE WITH PROBES How to set a goal temperature alarm for Bluetooth or wired probes. - To cook to an internal temperature, set a probe goal alarm. When you first connect a Bluetooth or wired probe, a popup will provide a shortcut to easily set a goal temperature alarm. Select YES and follow the prompts.
- If you missed the popup, you can set a probe goal alarm via the (…) shortcut in the Dashboard underneath the probe widget, or via the Accessories options within the menu.
- Use the selection dial to select the desired temperature for your probe goal alarm and press the dial to select and confirm. Can’t remember the safe internal temperature for Chicken Marsala? Tap SELECT BY PRESET to find a list of the food-safe temperatures associated with typical protein choices.
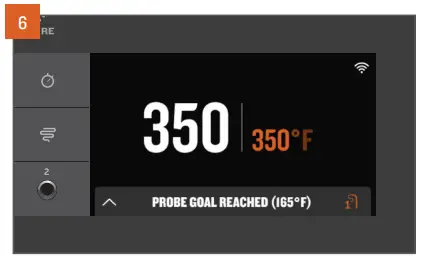
- A tone will sound when your protein reaches the set alarm temperature. If using the Traeger app, you will also receive a push notification on your connected smart device.
NOTES
- It is recommended to cook to an internal temperature using the probe, instead of cooking for a specific time.
- The probes can only be paired to one Traeger® Grill at a time. If you have multiple Bluetooth-enabled Traeger® Grills and want to use a paired probe on another grill, make sure to “Forget” the device on the first grill in order to pair with the second grill.
- To calibrate your wired probes.
MONITORING ACCESSORIES Use the Dashboard and/or the Accessories main menu item to easily monitor all accessories and their settings, such as temperatures, set probe goal temperatures, calibration, and more.
- TRAEGER® INDUCTION COOKTOP – Use the Traeger® Induction Cooktop for all your simmering, sautéing, searing, and deep-frying needs on the side. Simply turn the dial on the Induction Cooktop to set power levels. Both the Traeger app and the grill control Dashboard will monitor set temperatures and provide insight into any alerts or warnings. Refer to the Traeger® Induction Cooktop Owner’s Manual for more details.
- TRAEGER® WIRED PROBE CALIBRATION – Upon first use, it may be necessary to calibrate a probe. To do so, select this option by connecting the desired probe, placing the probe in ice water for one minute, and then navigating to the Calibrate option for the desired probe within the Accessories menu item.
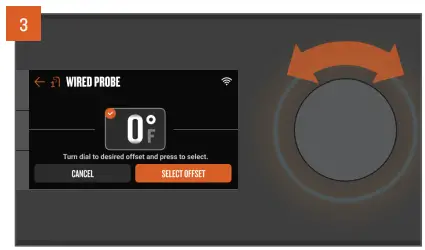
- TRAEGER® PROBES (WIRED AND BLUETOOTH) OFFSET – To set an offset increment, navigate to the Offset option for the desired probe within the Accessories menu item. Rotate the selection dial to adjust the probe temperature offset in 1° increments, from -15°F to +15°F/ -8°C to +8°C. Press the center of the dial to confirm and return to the Accessories menu.
SHUTTING DOWN YOUR GRILL
THE SHUTDOWN CYCLE EXPLAINED
The shutdown cycle is crucial to the success and high-quality grill performance of your Traeger® Grill. Shutdown cycles prevent future adverse effects and get your grill properly set up for the next cook. Always initiate a shutdown cycle after each and every cook.
To initiate a shutdown cycle, turn off your grill in one of the following ways:
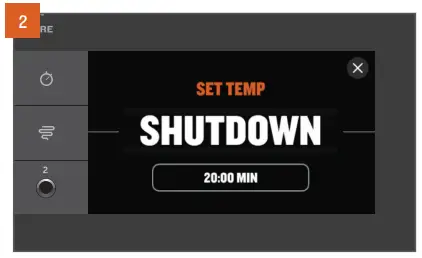
- Press and hold the selection dial down for 3 seconds, until the screen registers and shows “SHUT DOWN CYCLE IN PROGRESS.”
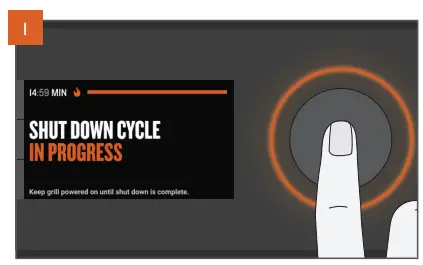
- While setting the temperature, turn the selection dial all the way to the left and push to select SHUTDOWN.
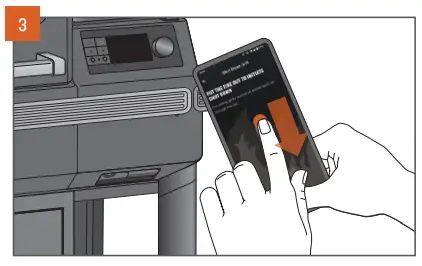
- Use the Traeger app to initiate the shutdown cycle on your grill from anywhere at any time.
NOTES
- The shutdown cycle minimizes your risk for future adverse events like backburn.
- The shutdown cycle will run for approximately 15 to 20 minutes, depending on the previous set temperature. Allow the shutdown cycle to complete for the proper operation of your grill. Do not press the main power button on the front of the grill to OFF or unplug your grill prior to completion. If it remains plugged in and is not powered off, the grill will remain in standby mode for firmware updates and quick start-ups for the next cook.
HOPPER CLEAN-OUT
Your Traeger® Grill has a hopper clean-out system that allows you to remove pellets from the pellet hopper or quickly change from one pellet flavor to another without making a mess.
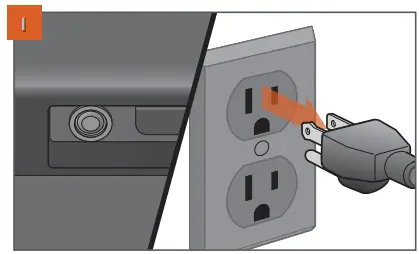
- PLUG APPEARANCE MAY VARY BY REGION.
Press the main power button to OFF and disconnect the power cord. If the grill is still hot, allow it to cool completely.
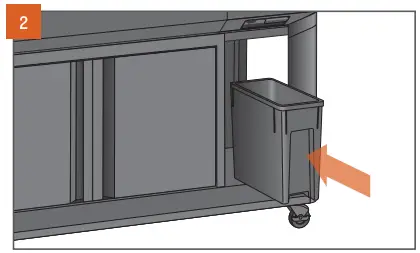
- When emptying the hopper, make sure that Traeger® StayDry™ Pellet Bin is placed directly underneath the hopper.
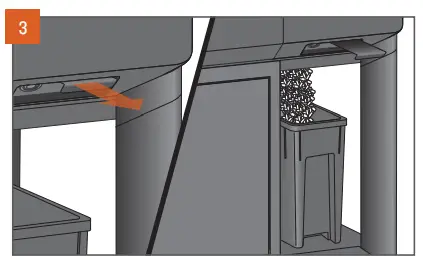
- Pull the lever directly out to release pellets. Pellets will empty into the StayDry™ Pellet Bin. You might need a spatula or spoon to push the remaining pellets out of the hopper.
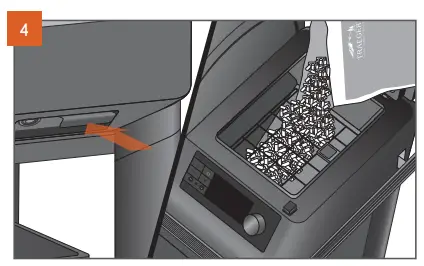
- Once the hopper’s empty, push the lever back in, and refill the hopper
with a different flavor of TRAEGER® ALL-NATURAL HARDWOOD PELLETS.
 WARNING! DO NOT EMPTY OUT THE HOPPER UNTIL GRILL HAS COMPLETELY COOLED AND THE POWER IS OFF; OTHERWISE, PELLETS MAY BE VERY HOT.
GRILL FEATURES
TRAEGER APP
Your Traeger® Grill can be controlled remotely using the Traeger app. To learn more about WiFIRE®, the Traeger app, and more ways to connect, go to traeger.com/app.
You will need a home internet Wi-Fi connection to connect your Traeger® Grill to the internet. Your smartphone or tablet must be running the latest iOS or Android operating system. If you leave the range of your Wi-Fi networks with your device, a data plan is required. The grill must remain connected to the internet to receive the latest operating, safety, and security updates.
The Traeger app is also an easy way to search, download, and cook new recipes on your Traeger® Grill.

TIMER
Your Traeger® Grill comes equipped with a convenient timer. The Timer function does not impact grill operation; you can use it to notify you of other needed steps during cooking, such as loading vegetables or other shorter time cooks into the grill or basting your food.
TO SET THE TIMER:
- Press and hold the timer icon.
- Use the selection dial to toggle between hours and minutes to set the time.
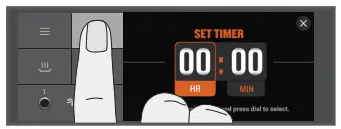
Once the dial is pressed after choosing the time, the Timer is set, you will be returned to the homescreen, and the Timer will automatically begin the countdown.
TO CANCEL THE TIMER:
- Press and hold the timer icon.
- You will see the options.
- Select.
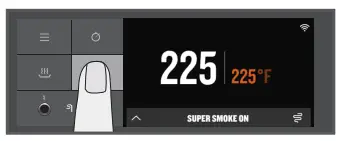
SUPER SMOKE OPTION
You can add more smoke flavor to your food by pressing the Super Smoke icon at any time during grilling. Press it again to cancel.
NOTES
- Super Smoke can only be activated when grill temperature is between 165°–225°F (74°–107°C).
- Smoke will be thin and blue
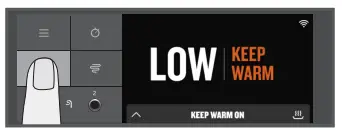
KEEP WARM FUNCTION
Keep Warm can be used to pause the cook cycle at any time during grilling and maintain the grill temperature at 165°F (74°C). Press the keep warm icon to activate the function. Press the keep warm icon again to resume cooking.
VERSATILE UPPER GRATE
Several locations are available for you to change the placement of the upper grill grate. This allows you to make room on the lower grates or upper grate if needed.
TRAEGER PELLET SENSOR
The Traeger Pellet Sensor monitors the supply of pellets. Once selected from the menu, it will display the current level of pellets, in 5% increments.
If the Traeger Pellet Sensor is properly connected, it will display “PELLET SENSOR Pellet Level: XXX%.” If the Traeger Pellet Sensor is not properly connected, it will display “PELLET SENSOR Sensor Disconnected Pellet Level: 0%.”
The Traeger Pellet Sensor allows you to check the status of your pellet level remotely using the Traeger app. This system will send you push notifications and alarms through the Traeger app on your smart device when your pellets are getting low, protecting your cook from running out of fuel.
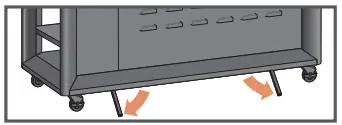
KICKSTANDS
Easy-to-use kickstands on the rear of the grill prevent the grill from tipping over if it’s on a steep incline.
MAINTAINING YOUR GRILL
 WARNING Fire Hazard: Grease fires are most frequently caused by failing to properly maintain the grill by not cleaning the grease from the grill on a consistent basis.
WARNING Press the main power button to OFF and disconnect the power cord before initiating any of the maintenance below.
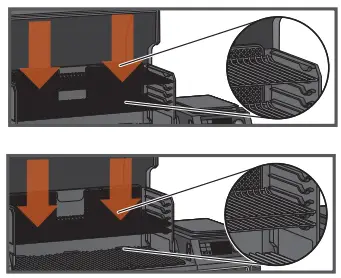
REMOVAL OF ASH AND GREASE FROM THE EZ CLEAN GREASE + ASH KEG (EVERY COOK)
WARNING Make sure that the grill is COLD and ashes are extinguished and COLD before checking the grease + ash keg.
WARNING Failure to empty the EZ Clean Grease + Ash Keg could result in a serious fire.
Underneath the grill body there is a keg that collects both ash and grease. This should be checked and emptied before every cook.
To remove and check the keg, simply grab the keg with two hands and push the button to release. Remove the disposable liner and replace with a new one. See Step 6, Disposal of Ashes, for proper ash disposal.
NOTE: Traeger’s keg liners will help keep this a clean and easy task.
CLEANING YOUR TRAEGER® GREASE MANAGEMENT SYSTEM (“TGMS”):
During your cooks, grease drippings will fall onto (i) the grease drip tray and be channeled into (ii) the grease drain tube, (iii) to be collected in the EZ Clean Grease + Ash Keg. These three components are the components of the Traeger® Grease Management System (TGMS). Grease will accumulate in all of these locations and should be regularly cleaned to reduce the risk of fire.
How often you need to clean the TGMS depends on the fat content of your food. Fattier foods will require cleaning of the TGMS more often, and sometimes you will need to clean the TGMS after every cook.
Visible pieces of food and bits of hardened grease or other buildup indicate a need for cleaning.
All components of the TGMS should be inspected before each use for signs of grease buildup.
WARNING Accumulated grease is easier to clean off when the grill is still warm—not hot. Be careful not to burn yourself. Heat-protective gloves are recommended.
Clean the grease out of the grease drain tube. We recommend cleaning this location regularly.
Remove all grill grates and the grease governor cap. This will provide access to the grease drain tube opening inside the grill. Scrape the grease accumulated on the drip tray down through the grease drain tube using a stiff, nonmetallic tool. Much of the loosened grease can be pushed down through the grease drain tube and will fall into the EZ Clean Grease + Ash Keg. Wipe up remaining grease residue with paper towels or disposable rags.
Regularly clean the grease out of the grill on the interior bottom and sides. If grease is allowed to build up, a grease fire could result.
Scrape the grease accumulation from inside the grill using a stiff, nonmetallic tool. Much of the loosened grease can be removed using paper towels or disposable rags. Excessive scraped-off residue can be cleaned using a vacuum cleaner as described in Step 5 (below) when cleaning the firepot of ashes.
Inspect and clean the EvenFlow™ Heat Shield for any grease or debris.
NOTE: Traeger’s drip tray liners can help keep your grill clean and can help reduce the risk of flare-ups.
CREOSOTE REMOVAL
When wood pellets are burned slowly, they produce tar and other organic vapors that combine with expelled moisture to form creosote. The creosote vapors condense in the relatively cool exhaust vent of a slow-burning fire. As a result, creosote accumulates on the exhaust vent lining. When ignited, creosote makes an extremely hot fire. Airborne grease particles will travel through the cooking chamber, and some of this airborne grease will accumulate on the exhaust vent lining, similar to creosote, which could contribute to a fire.
Periodically scrape the creosote and grease accumulation from the back of the backsplash and back of the grill door. Once the creosote and grease residue have been loosened from the interior lining and ventilation gaps in this downdraft system, much of it can be removed with paper towels or disposable rags. Do not spray water or other liquid cleaners onto the inside of your grill to remove creosote.
NOTE: The Traeger® Downdraft Exhaust System should be inspected at least twice a year to determine when a creosote and/or grease buildup has occurred.
When creosote or grease has accumulated, it should be removed to reduce the risk of a fire.
OUTSIDE STORAGE
CAUTION If the grill is stored outside, care should be taken to ensure that water does not get into the pellet hopper.
Wood pellets expand greatly when wet and will jam your auger.
Always cover your grill when not in use with a Traeger® Grill Cover.
This custom-fit cover can be purchased at traeger.com.
CLEANING THE ASH FROM INSIDE AND AROUND THE FIREPOT (AFTER APPROXIMATELY 30 HOURS OF COOKING)
WARNING Make sure that the grill is COLD and ashes are extinguished and COLD before cleaning the ash.
WARNING Disposal of ashes should be done only according to the following instructions.
Excess ash in the firepot will hamper ignition and may cause your fire to go out. The firepot should be inspected occasionally and cleaned to remove the ash buildup. Again, cleaning the ash from in and around the firepot should be done only when the grill is COLD.
Remove the grill grates, grease drip tray, and EvenFlowTM Heat Shield cover to provide access to the firepot and the interior of the grill, including the fan pan. Much of the ash outside of the firepot can be removed from the grill with a shop vac.
WARNING A dedicated vacuum cleaner is the best way to remove ashes from the firepot, but this must be done with extreme care to avoid the risk of fire. Again, cleaning the ash from in and around the firepot should be done only when the grill is COLD.
A utility-type vacuum cleaner having a metal collection canister without a bag would be best for this task. However, almost any vacuum cleaner will work safely if this procedure is properly followed.
After ensuring that the ash in the firepot is COLD, vacuum the ash from the inside of the firepot.
- If your vacuum cleaner is a bagless model, empty any previously accumulated debris from the collection chamber. Then vacuum the ash from the inside of the firepot. Once the firepot is clean, empty the collection chamber into the metal container handled in the manner described below under Disposal of Ashes without delay. Make sure that there is no remaining ash residue left in the collection chamber.
- If your vacuum cleaner is a model that uses a disposable bag, install an unused bag in the machine. Then vacuum the ash from the inside of the firepot. Once the firepot is clean, remove the bag from the vacuum cleaner and place it in a metal container handled in the manner described under Disposal of Ashes below.
DISPOSAL OF ASHES
WARNING Ashes should always be completely cool before handling. Ashes should be placed in a metal container with a tight-fitting lid. The closed container of ashes should be placed on a noncombustible floor or on the ground, well away from all combustible materials, pending final disposal. Ashes should be retained in the closed container until they are disposed.
CLEANING THE GRILL GRATES
WARNING Cleaning the grill grates works best while they are still warm. Be careful not to burn yourself. Heat-protective gloves are recommended. We recommend keeping a long-handled cleaning brush near the grill. After removing your food, give the grill grate a quick brushing. It takes only a minute and it will be ready the next time you want to use the grill.
CLEANING OUTSIDE SURFACES
WARNING Press the main power button to OFF and disconnect the power cord before initiating cleaning.
Use a disposable rag or cloth dampened with Traeger® All Natural Cleaner or warm, soapy water to wipe the grease from the outside of the grill. DO NOT use oven cleaner, abrasive cleansers, or abrasive cleaning pads on the outside grill surfaces.
TESTING THE GRILL AFTER CLEANING
Before replacing the EvenFlowTM Heat Shield, grease drip tray, and the grill grates, plug the power cord into an appropriate grounded/ earthed electrical outlet and press the main power button to ON.
After you set the temperature and press IGNITE, pellets should fall into the firepot and the hot rod should begin to heat (it will start to turn red).
WARNING Do not touch the hot rod.
When flames start to come out of the firepot, run the shutdown cycle. Let the grill cool down. Now you’re ready to place the EvenFlowTM Heat Shield, grease drip tray, grill grates, and food back onto the grill.
POWER CORD
If the power supply cord is damaged, it must be replaced by a special cord assembly available from Traeger.
FREQUENTLY ASKED QUESTIONS
Scan this QR code to take you to Frequently Asked Questions.