
TrueCam M7 GPS Dual User Manual
1. PACK CONTENTS

A TrueCam M7 GPS Dual
B Interior rear camera
C Magnetic GPS module
D Magnetic holder with 3M adhesive pad
E Cigarette lighter adapter with two USB outputs
F 3-metre micro USB charging cable
G Micro SD/USB adapter to transfer files to PC
H Spare 3M adhesive pads to attach holder to glass (2×)
I 3M adhesive power cable clips (5×)
J Protective carry bag
K Rear camera connection cable
L Cable tool
M USB data cable for GPS module update
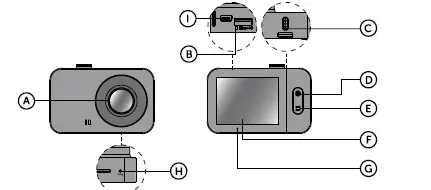
2. GETTING TO KNOW THE CAMERA
A Wide-angle lens
B Memory card slot
C Magnetic holder input
D OK/POWER button
E MENU/MODE button
F F 2.0″ display
G Status LED (lit = camera on, blinking = recording)
H RESET button
I Rear camera cable input
3. CONTROLS
|
VIDEO MODE |
OK / POWER | Press | Start/stop recording |
| Hold | Turn camera on/off | ||
|
MENU / MODE |
Press
|
Open menu
Whilst recording- protect recording |
|
| Hold | Switch mode
Whilst recording- mute/unmute audio recording |
||
|
PHOTO MODE |
OK / POWER | Press | Take photo |
| Hold | Turn camera on/off | ||
| MENU / MODE | Press | Open menu | |
| Hold | Switch mode | ||
|
PLAYBACK MODE |
OK / POWER |
Press
|
Start/stop playback
End fast playback |
| Hold | Turn camera on/off
Change playback speed during playback |
||
|
MENU / MODE |
Press | Open menu | |
| Hold | Switch mode
Return to video selection during playback |
||
|
MENU |
OK / POWER |
Press
|
Confirm
When entering characters- Up |
| Hold | Switch mode menu/camera menu When entering characters- Confirm | ||
| MENU / MODE | Press | Down | |
| Hold | Back | ||
| ANYTIME | RESET | Press with paperclip | Restart camera |
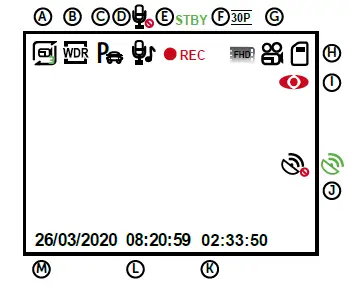
4. ICONS AND DISPLAY

A Loop recording length H Memory card inserted
B WDR (wide dynamic range) I Motion detection
C Parking mode J GPS module connected to camera / connected to satellites
D Sound recording on / off K Length of current recording
E Recording started L Time
F Resolution M Date
G Mode
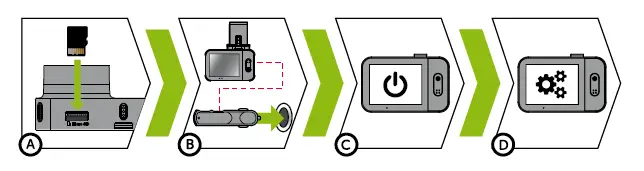
5. FIRST USAGE
A Insert the microSD card as shown into the camera (card connectors facing the display)
- Use Class 10 and higher branded cards up to 64 GB
- Only remove the card, when the camera is turned off
- When using the card for the first time, format it directly in the camera and repeat the formatting at least once a month to ensure proper camera operation
B Insert the adapter into the car cigarette lighter and connect it to the camera holder using the USB cable
- The camera is designed to operate only when connected to a power supply
- I nstead of a battery, the camera contains a supercapacitor that provides power which has several times the lifespan of a conventional battery
C Camera turns on automatically and begins recording
- For some vehicles, the ignition key must be turned first
D Perform basic camera settings before sticking the holder to the glass
6. BASIC FUNCTIONS
LOOP RECORDING
- Camera automatically splits the video into shorter files and overwrites the oldest unprotected files when the SD card is full
- This means you don’t have to worry about free space on the card
FILE PROTECTION
- ›To protect the file from being overwritten, press MENU / MODE while recording or select Protect
from the playback mode menu
G-SENSOR
- I f the G-Sensor detects an impact, it automatically protects the video currently being captured against being overwritten
- Attention, when the settings are set to high sensitivity and you are driving over uneven surfaces this can cause files to be automatically protected and the filling up of the SD card
MOTION DETECTION
- The camera automatically starts recording when it detects movement in the lens field of view and stops recording after about 10 seconds.
- If you stop recording manually or turn off the camera, motion detection is disabled
- The function is for monitoring a parked vehicle, do not use whilst driving
- To use the motion detection function, the camera must be turned on and connected to the power supply
PARKING MODE
- The camera will start recording automatically when it detects a jolt to the vehicle and if it does not happen again, after about 30 seconds it stops recording and turns off
- To use the parking mode function, the camera should be turned off and connected to the power supply
GPS MODULE FUNCTIONS
- Includes a database of more than 40,000 static speed cameras throughout Europe
- Lets you display speed / GPS coordinates in the video
- Lets you view the speed on the display
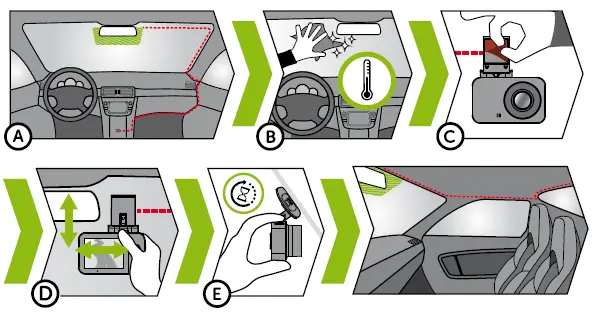
7. PLACEMENT ON GLASS
A The ideal place to mount your camera is the space between the windscreen and the rear-view mirror so as not to obstruct the driver’s view. The ideal location for the rear camera is in the centre at the top of the rear window
B Make sure that the glass is clean and dry at the attachment point
››The ideal bonding temperature is 20°C – 40°C
C Remove the film from 3M adhesive pad on the camera holder
D Before attaching it to the glass, point the camera to capture best view
E Press the 3M adhesive pad onto the glass and hold it for a while. Use the same procedure for the rear camera
F Connect the two cameras with the cable, which can easily be hidden under the ceiling trim. Route it sideways to the passenger side and gradually insert the trim tool under the upholstery
8. GPS AND SPEED CAMERA DETECTION
- Attaching the magnetic GPS module to camera mount
- When connected to GPS satellites, the module’s LED flashes blue
- The GPS module records speed, GPS coordinates and warns of static speed cameras and traffic lights
A Speed camera
B Average speed camera
C Red light camera
D Combined red light and speed camera
E Road safety camera
AUDIBLE SOUNDS:
- Approaching speed camera – long beep
- At the speed camera point / start of average measurement – short beeps
- End of average measurement – short beeps
9. UPDATING THE SPEED CAMERA DATABASE
A Connect the GPS module to a PC with an Internet connection using the included USB cable
B Open the GPS module memory (similar to flash drive)
C Run Update.exe
D Click Update
10. RECORDING ONTO A PC

A Remove the Micro SD card when the camera is off and insert it into the computer
›› Depending on the computer equipment, either directly, using a Micro SD/SD adapter or a Micro SD/USB adapter (included)
B Open the removable disk folder and play a file
››Any regular video player can be used
C Use a special player to play videos, including data, from the optional GPS module
›› At the same time as the video, you can view the speed travelled, the GPS coordinates and directions on the map
››The app is available at http://truecam.com/download/M7GD_player.zip
11. COMPLETE SETTINGS
| SETTINGS | DESCRIPTION |
| Resolution | Sets the video / photo resolution
Higher resolution = more detail and larger file |
| Loop recording | Sets the length of each loop Longer loop = larger file
Loop recording can also be turned off and recording will end if the SD card is full |
| WDR | When turned on, the camera compensates for luminance when there are very bright and very dark areas in the picture |
| Brightness | Sets the overall brightness of the recording
At the same time, the camera automatically adjusts the brightness of the recording depending on the light |
| Motion detection | Turns motion detection on / off |
| Parking mode | Turns parking mode on / off |
| Record audio | Turns the microphone on / off
Also possible to switch by holding down the MENU / MODE button while recording |
| G-Sensor sensitivity | Sets the sensitivity of the G-Sensor |
| Date stamp | Displays time and date in video |
| GPS stamp* | Displays the GPS coordinates in the video |
| Speed stamp* | Displays the speed in the video |
| Date / time | Sets date and time
Hold OK / POWER button = confirm Hold MENU / MODE = cancel |
| Date format | Set the format of a date |
| Driver name | Sets the text in the video
Hold OK / POWER button = confirm Hold MENU / MODE = cancel |
| Screensaver | The camera continues to record during screen saver Press any key to exit the screen saver |
| Speed camera detection* | Visually and audibly alerts you to approaching fixed speed cameras |
| Speed units* | Switches between kilometres / miles when using speed stamp, speed camera detection and the screensaver |
| Time zone* | With the GPS module connected, the time and date are adjusted automatically, just set the appropriate time zone |
| Daylight saving time* | Set the Daylight saving time automatically |
| Volume | Adjusts the volume of all camera sounds |
| System sounds | Turns sound on / off for buttons and on / off status |
| Language | Sets the camera menu language |
| Format | Formats data on memory card |
| Default settings | Sets camera to factory settings |
| Firmware version | Displays the installed FW version |
12. SPECIFICATIONS
| Video Resolution front camera | Full HD (1920×1080) @ 30 fps
HD (1280×720) @ 30 fps |
| Video resolution resr camera | HD (1280×720) @ 30 fps |
| Angle of view front camera | 150° |
| Angle of view rear camera | 130° |
| Video format | MOV, H.264 |
| Image resolution | 2 MP |
| Photo format | JPEG |
| Audio | Built-in microphone that can be muted |
| LCD display | 2“ 320×240 |
| Memory | MicroSD up to 64 GB |
| Features | Magnetic holder, WDR, parking mode, motion detection, G-Sensor, loop recording, file protection, auto-start, magnetic GPS module with speed camera detection, magnetic CPL filter (optional) |
| Menu languages | English, Czech, German, Slovak, Polish, Hungarian |
| Power supply | Supercapacitor |
| Dimensions | 69 × 45 × 34 mm |
13. SAFETY PRECAUTIONS AND WARNINGS
- Do not operate the camera whilst driving.
- A film-coated or heated windscreen can reduce recording quality and interfere with the GPS module (optional) signal.
- Do not expose the camera to extreme temperatures – especially avoid direct sunlight.
- Make sure that the legislation of the country where you operate the vehicle allows the use of dashcams.
- To prevent injury, the camera must always be fitted in the holder whilst driving and must not hinder the use of safety features – especially airbags.
PRECAUTIONS AND NOTICES
- For your own safety, do not use the camera’s controls while driving.
- A window mount is needed when using the recorder in a car. Make sure that you place the recorder in an appropriate place, so as not to obstruct the driver’s view or deployment of airbags.
- Make sure that no object is blocking the camera lens and no reflective material is placed near the lens. Please keep the lens clean.
- I f the car windscreen is tinted or heated, it may limit the quality of the recording and, above all, the GPS signal.
- For general use it is recommended to have motion detection enabled. It may lead to the memory card filling up quickly.
- The camera is primarily designed to operate while being constantly connected to a power supply.
SAFETY PRECAUTIONS
- Use only the charger supplied with your device. Use of another type of charger may result in malfunction and/or danger.
- Do not use the charger in high moister environment. Never touch the charger when your hands or feet are wet.
- Allow adequate ventilation around the charger when using it to operate the device or to charge the battery. Do not cover the charger with paper or other objects that will reduce cooling. Do not use
the charger while it is inside a carrying case. - Connect the charger to a proper power source. The voltage requirements are found on the product case and/or on the packaging.
- Do not use the charger if it is visibly damaged. In case of damage, do not repair the equipment yourself!
- I n case of device overheating, immediately disconnect the power source.
- Charge the device under supervision only.
- Packaging contains small pieces, that can be dangerous for children. Store the product always out of reach of children. Bags or many of the pieces containing may cause suffocation after swallowing.
SAFETY NOTICES FOR POWER SUPPLY
- For charging only use chargers, that is specified for this camera.
- Use standard cables for charging, otherwise it could damage the device.
- Do not use any damaged adapter or charger.
- Power at room temperature, never charge at a temperature below 0°C or at a temperature higher than 40°C.
- Do not expose the charger to moisture, water, rain, snow or any kind of various liquids.
- Never leave the camera unattended during power-up, short-circuiting or accidental overcharging can cause aggressive chemicals to leak, explode, or cause a fire!
- In the case of excessive heating of the camera, immediately disconnect it from the power supply.
- Do not place charger on or near flammable objects. Beware of curtains, carpets, tablecloths etc.
CARING FOR YOUR DEVICE
- Taking good care of your device will ensure trouble-free operation and reduce the risk of damage.
- Keep your device away from excessive moisture and extreme temperatures and avoid exposing your device to direct sunlight or strong ultraviolet light for extended periods of time.
- Do not drop your device or subject it to severe shock.
- Do not subject your device to sudden and severe temperature changes. This could cause moisture condensation inside the unit, which could damage your device. In the event of moisture condensation, allow the device to dry out completely before use.
- The screen surface can easily be scratched. Avoid touching it with sharp objects.
- Never clean your device when it is powered on. Use a soft, lint-free cloth to wipe the screen and the exterior of your device. Do not use paper towels to clean the screen.
- Never attempt to disassemble, repair or make any modifications to your device. Disassembly, modification or any attempt at repair could cause damage to your device and even bodily injury or property damage and will void any warranty.
- Do not store or carry flammable liquids, gases or explosive materials in the same compartment as your device, its parts or accessories.
- To discourage theft, do not leave the device and accessories in plain view in an unattended vehicle.
- Overheating may damage the device.
OTHER INFORMATION
- For households: This marking indicates that this product should not be disposed with other household wastes throughout the EU. To prevent possible harm to the environment or human health from uncontrolled waste disposal, recycle it responsibly to promote the sustainable reuse of material resources. To return your used device, please use the return and collection systems or contact the retailer where the product was purchased. They can take this product for environmental safe recycling. In case of incorrect disposal of this kind of wastes user can be fined according to national laws. User information for disposal of electric and electronic devices in countries outside the EU: The symbol stated above (crossed recycle bin) is valid only in countries in European Union. For correct disposal of electric and electronic devices ask your city hall or distributor of these devices. Everything is expressed by the symbol of crossed recycle bin on product, cover or printed materials.
- You can determine a warranty service at the place of purchase. In case of technical problems or queries contact your dealer who will inform you about the following procedure. Follow the rules for work with electric devices. User is not allowed to disassembly the device neither replace any of its components. To reduce the risk of electric shock, do not remove or open the cover. In case of incorrect setup and plug in of device you will expose yourself risk of electric shock. Products are covered by a two year warranty, unless otherwise stated. The warranty period of the battery is 24 months and 6 months for its capacity.
DECLARATION OF CONFORMITY
Hereby, elem6 s.r.o., declares that all TrueCam M7 GPS Dual products are in compliance with the essential re-quirements and other relevant provisions of Directive 2014/53/EU and 2014/30/EU. Products are intended for sale without any restriction in Germany, Czech Republic, Slovak Republic, Poland, Hungary and other EU countries. You can download the Declaration of Conformity from the
website: www.truecam.com/support/doc.
- Frequency band(s) in which the radio equipment operates: 1.524–1.627 GHz
- Maximum radio-frequency power transmitted in the frequency band(s) in which the radio equipment operates: 12 dBm
- Frequency of the GPS module: 1575.42 Mhz
MANUFACTURER:
elem6 s.r.o., Braškovská 308/15, 16100 Praha 6 www.truecam.com
TrueCam® brand is a registered trademark and our products are protected by patent. All rights reserved.
