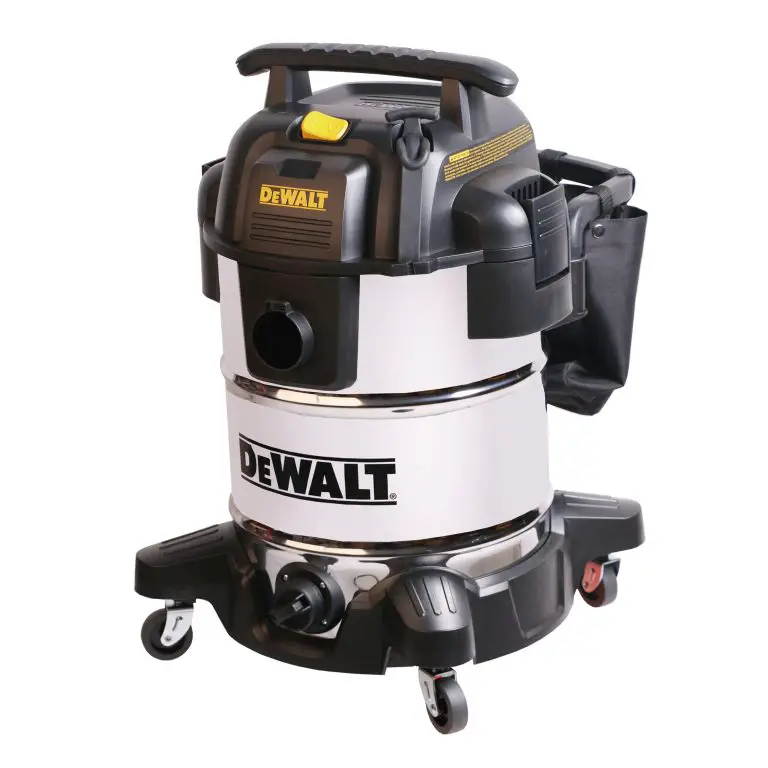

ULINE Dewalt 10 Gallon Wet/Dry Vacuum User Manual
1-800-295-5510
uline.com
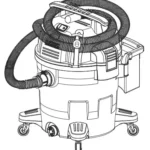
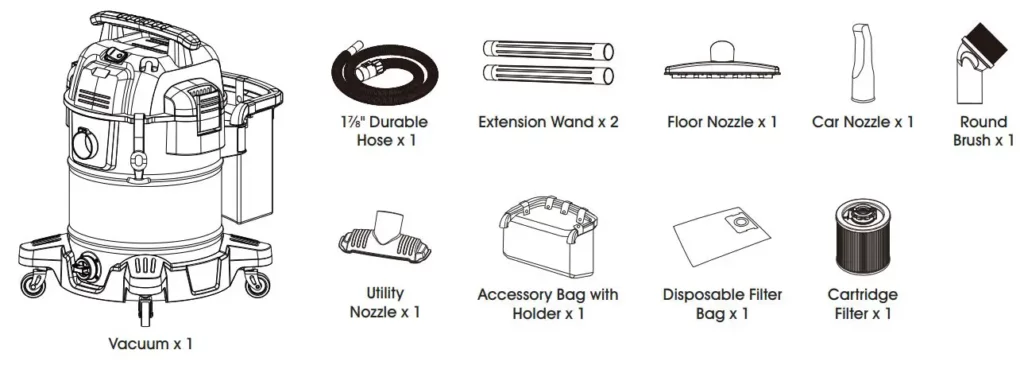
PARTS
PRODUCT SPECIFICATIONS

![]() WARNING: Use only extension cords that are rated for outdoor use. Extension cords in poor condition or that are too small in wire size can pose fire and shock hazards. To reduce risk of these hazards when using an extension cord, ensure it is in good condition and that connection does not come into contact with liquid.
WARNING: Use only extension cords that are rated for outdoor use. Extension cords in poor condition or that are too small in wire size can pose fire and shock hazards. To reduce risk of these hazards when using an extension cord, ensure it is in good condition and that connection does not come into contact with liquid.
![]() NOTE: To keep power loss to a minimum, use the following table to choose the minimum wire size extension cord.
NOTE: To keep power loss to a minimum, use the following table to choose the minimum wire size extension cord.

DEFINITIONS: SAFETY GUIDELINES
Definitions below describe the level of severity for each signal word.
![]() DANGER: Indicates an imminently hazardous situation that, if not avoided, will result in death or serious injury.
DANGER: Indicates an imminently hazardous situation that, if not avoided, will result in death or serious injury.
![]() WARNING: Indicates a potentially hazardous situation that, if not avoided, could result in death or serious injury.
WARNING: Indicates a potentially hazardous situation that, if not avoided, could result in death or serious injury.
![]() CAUTION: Indicates a potentially hazardous situation that, if not avoided, may result in minor or moderate injury.
CAUTION: Indicates a potentially hazardous situation that, if not avoided, may result in minor or moderate injury.
![]() NOTICE: Indicates a practice not related to personal injury that, if not avoided, may result in property damage.
NOTICE: Indicates a practice not related to personal injury that, if not avoided, may result in property damage.
SAFETY
![]() WARNING: To reduce risk of electric shock, do not expose to rain. Store indoors.
WARNING: To reduce risk of electric shock, do not expose to rain. Store indoors.
![]() WARNING: When using electric appliances, always follow basic safety precautions to reduce the risk of fire, electric shock and personal injury, including the following:
WARNING: When using electric appliances, always follow basic safety precautions to reduce the risk of fire, electric shock and personal injury, including the following:
- Do not leave appliance when it is connected to a power source. Unplug it from outlet when not in use and before servicing.
- Do not allow appliance to be used as a toy. Pay attention when appliance is used by or near children.
- Use this appliance only as described in these instructions.
- Do not use appliance with a damaged cord or plug. If appliance is not working correctly, or if it has been dropped, damaged, left outdoors or dropped in water, return it to a service center.
- Do not pull or carry appliance by the cord, use cord as a handle, close door on cord or pull cord around sharp edges or corners. Do not run the appliance over cord. Keep cord away from heated surfaces.
- Do not unplug appliance by pulling on cord. To unplug, grasp plug, instead of cord.
- Do not handle plug or appliance with wet hands.
- Do not put any objects into openings of appliance. Do not use appliance with any opening blocked; keep free of dust, lint, hair and anything else that may reduce air flow.
- Keep hair, loose clothing, fingers and all body parts away from openings and moving parts.
- Turn off all controls before unplugging appliance.
- Use extra care when cleaning on stairs.
- Do not use appliance to pick up flammable or combustible liquids, such as gasoline, or use in areas where flammable or combustible liquids are present.
- Static shocks are possible in dry areas or when relative humidity of air is low. This is only temporary and does not affect use of vacuum. To reduce frequency of static shocks, add moisture to air with a console, installed humidifier or anti-static hose (standard on some models).
- To avoid spontaneous combustion, empty canister after each use.
- Do not pick up anything that is burning or smoking, such as cigarettes, matches or hot ashes.
- Do not use to vacuum combustible explosive materials, such as coal, grain or other finely divided combustible material.
- Do not use to vacuum hazardous, toxic or carcinogenic materials, such as asbestos or pesticide.
- Never pick up explosive liquids (e.g. gasoline, diesel fuel, heating oil, paint thinner, etc.), acids or solvents.
- Do not use vacuum without filters in place, except as described under Wet Pick-up on page 5.
- Some wood contains preservatives that can be toxic. Take extra care to prevent inhalation and skin contact when working with these materials. Request and follow any safety information available from material supplier.
- Do not use vacuum as a step ladder.
- Do not place heavy objects on vacuum.
- If an extension cord is used outdoors, it must be marked with the suffix W-A or W following the cord type designation. For example: SJTW-A indicates it is acceptable for outdoor use.
- An extension cord must have adequate wire size (AWG or American Wire Gauge) for safety. The smaller the gauge number of the wire, the greater the capacity of the cable. An undersized cord will cause a drop in line voltage resulting in loss of power and overheating. When using more than one extension to make up total length, be sure each individual extension contains at least the minimum wire size. Following table shows correct size to use. If in doubt, use next heavier gauge. The smaller the gauge number, the heavier the cord.
![]() WARNING: Always wear proper personal hearing protection that conforms to ANSI S12.6 (S3.19) during use. Under some conditions and duration of use, noise from this product may contribute to hearing loss.
WARNING: Always wear proper personal hearing protection that conforms to ANSI S12.6 (S3.19) during use. Under some conditions and duration of use, noise from this product may contribute to hearing loss.
![]() WARNING: Always use safety goggles. Everyday eyeglasses are NOT safety goggles. Also use face or dust mask if area operation is dusty. Always wear certified safety equipment:
WARNING: Always use safety goggles. Everyday eyeglasses are NOT safety goggles. Also use face or dust mask if area operation is dusty. Always wear certified safety equipment:
- ANSI Z87.1 eye protection (CAN/CSA Z94.3)
- ANSI S12.6 (S3.19) hearing protection
- NIOSH/OSHA/MSHA respiratory protection
To reduce exposure to these chemicals, wear approved safety equipment such as dust masks that are specifically designed to filter out microscopic particles.
For convenience and safety, the following warning label is on vacuum:
![]() WARNING: Servicing of double insulated wet/dry vacuum in a double-insulated wet/ dry vacuum, two systems of insulation are provided instead of grounding. No grounding means is provided on a double-insulated appliance, nor should a means for grounding be added. Servicing a double-insulated wet/dry vacuum requires extreme care and knowledge of the system and should be done only by qualied service personnel. Replacement parts for a double-insulated wet/dry vacuum must be identical to the parts they replace. Double-insulated wet/dry vacuum is marked with words “double insulated” and the symbol (square within a square) may also be marked on the appliance. To reduce risk of injury from electrical shock, unplug power cord before servicing electrical parts of the wet/dry vacuum.
WARNING: Servicing of double insulated wet/dry vacuum in a double-insulated wet/ dry vacuum, two systems of insulation are provided instead of grounding. No grounding means is provided on a double-insulated appliance, nor should a means for grounding be added. Servicing a double-insulated wet/dry vacuum requires extreme care and knowledge of the system and should be done only by qualied service personnel. Replacement parts for a double-insulated wet/dry vacuum must be identical to the parts they replace. Double-insulated wet/dry vacuum is marked with words “double insulated” and the symbol (square within a square) may also be marked on the appliance. To reduce risk of injury from electrical shock, unplug power cord before servicing electrical parts of the wet/dry vacuum.
![]() IMPORTANT: If supply cord is damaged, it must be replaced by manufacturer or its service agent or a similarly qualified person in order to avoid a hazard
IMPORTANT: If supply cord is damaged, it must be replaced by manufacturer or its service agent or a similarly qualified person in order to avoid a hazard
![]() IMPORTANT: Remove plug from socket before performing maintenance. Before using machine ensure frequency and voltage shown on the rating plate correspond with main voltage. Specifications and details are subject to change without prior notice. The accessories shown in the pictures may vary from model to model.
IMPORTANT: Remove plug from socket before performing maintenance. Before using machine ensure frequency and voltage shown on the rating plate correspond with main voltage. Specifications and details are subject to change without prior notice. The accessories shown in the pictures may vary from model to model.
![]() IMPORTANT: Symbol on product or packaging indicates that product must not be treated as domestic refuse. Instead, it should be handed in to a collection point for the recycling of electrical and electronic components.
IMPORTANT: Symbol on product or packaging indicates that product must not be treated as domestic refuse. Instead, it should be handed in to a collection point for the recycling of electrical and electronic components.
![]() WARNING: To reduce the risk of injury, users must read instruction manual. Do not run unattended. Do not pick up flammable, combustible or hot materials. Do not use around explosive dust, liquids or vapors. Electrical devices produce arcs or sparks which can cause fire or explosion. Do not use at filling stations or anywhere gasoline is stored or dispensed. Do not vacuum toxic or carcinogenic materials or other health-endangering materials such as asbestos or pesticides. Always use proper eye and respiratory protection. To reduce risk of electrical shock, do not expose to rain. Store indoors. When servicing, use only identical replacement parts. Do not use as a step stool
WARNING: To reduce the risk of injury, users must read instruction manual. Do not run unattended. Do not pick up flammable, combustible or hot materials. Do not use around explosive dust, liquids or vapors. Electrical devices produce arcs or sparks which can cause fire or explosion. Do not use at filling stations or anywhere gasoline is stored or dispensed. Do not vacuum toxic or carcinogenic materials or other health-endangering materials such as asbestos or pesticides. Always use proper eye and respiratory protection. To reduce risk of electrical shock, do not expose to rain. Store indoors. When servicing, use only identical replacement parts. Do not use as a step stool
OPERATION
- Pull lid latches in outward motion, remove power head and any accessories that may have been shipped in tank.
- Attach accessories following these instructions.
- Before replacing power head, refer to these instructions to ensure proper filters are installed for the cleaning operation.
- Replace power head, and apply pressure with thumb to each latch until it snaps tightly in place. Ensure all lid latches are clamped securely.
- Insert air hose end into inlet of tank.
- Attach extension wands to the accessory end of hose. Apply slight pressure until fitting is tight.
- Attach one of the cleaning accessories (depending on cleaning requirements) to extension wands. Twist slightly to tighten connection.
- Plug cord into wall outlet. Vacuum is ready for use.
- To reduce risk of injury from accidental starting, always shut off vacuum and disconnect the power plug from wall outlet before installing any part or cleaning accessory.
CASTER ASSEMBLY
- Invert tank.
- Align casters with indented caster grooves in tank.
- Firmly push casters down into position. Secure each with one provided screw. (See Figure 1)
ACCESSORY BAG HOLDER BRACKET ASSEMBLY
Place accessory bag holder into hole of bracket. (See Figure 2)
![]() WARNING: To reduce the risk of fire or explosion, do not operate unit in areas with flammable gases, vapors or explosive dust in the air. Flammable gases or vapors include but are not limited to: lighter fluid, solvent-type cleaners, oil-based paints, gasoline, alcohol or aerosol sprays. Explosive dusts include but are not limited to: coal, magnesium, aluminum, and grain or gun powder. Do not vacuum explosive dust, flammable or combustible liquids or hot ashes. Do not use this vacuum as a sprayer for any flammable or combustible liquid. To reduce the risk of health hazards from vapors or dusts, do not vacuum toxic materials.
WARNING: To reduce the risk of fire or explosion, do not operate unit in areas with flammable gases, vapors or explosive dust in the air. Flammable gases or vapors include but are not limited to: lighter fluid, solvent-type cleaners, oil-based paints, gasoline, alcohol or aerosol sprays. Explosive dusts include but are not limited to: coal, magnesium, aluminum, and grain or gun powder. Do not vacuum explosive dust, flammable or combustible liquids or hot ashes. Do not use this vacuum as a sprayer for any flammable or combustible liquid. To reduce the risk of health hazards from vapors or dusts, do not vacuum toxic materials.
![]() WARNING: The operation of any utility vacuum can result in foreign objects being blown into the eyes, which can result in severe eye injury. Always wear safety goggles complying with ANSI Z87.1 (or in Canada, CSA Z94.3) before starting operation.
WARNING: The operation of any utility vacuum can result in foreign objects being blown into the eyes, which can result in severe eye injury. Always wear safety goggles complying with ANSI Z87.1 (or in Canada, CSA Z94.3) before starting operation.
![]() CAUTION: To reduce risk of hearing loss, wear ear protectors when using vacuum for extended hours or when using it in a noisy area. Unit is ready for dry vacuuming. After plugging the power cord into the wall receptacle, turn unit “ON” by pushing switch position to the “ON” position. (See Figure 3)
CAUTION: To reduce risk of hearing loss, wear ear protectors when using vacuum for extended hours or when using it in a noisy area. Unit is ready for dry vacuuming. After plugging the power cord into the wall receptacle, turn unit “ON” by pushing switch position to the “ON” position. (See Figure 3)
![]() NOTE: The unit is ready for dry vacuuming or blowing. Plugging power cord into the wall receptacle, turn the unit “ON” by pushing the switch position. (See Figure 3)
NOTE: The unit is ready for dry vacuuming or blowing. Plugging power cord into the wall receptacle, turn the unit “ON” by pushing the switch position. (See Figure 3)

DRY PICK-UP
- Filter must always be in correct position to reduce risk of leaks and possible damage to vacuum. Ensure filter is completely covering the filter cage. Ensure there are no gaps between the filter and the lid. It is important to assemble the filter to the cage without allowing any possible leaks or tears. Any leaks will allow picked-up debris to be blown out of blowing port and back into surrounding environment.
- When using vacuum to pick up very fine dust, empty dust tank and clean or replace filter at more frequent intervals to maintain peak vacuum performance.
![]() NOTE: A dry filter is necessary to pick up dry material. If using vacuum to pick up dust when filter is wet, filter will clog quickly and be very difficult to clean. If filter gets wet, replace it before continuing to do dry pick-ups.
NOTE: A dry filter is necessary to pick up dry material. If using vacuum to pick up dust when filter is wet, filter will clog quickly and be very difficult to clean. If filter gets wet, replace it before continuing to do dry pick-ups.
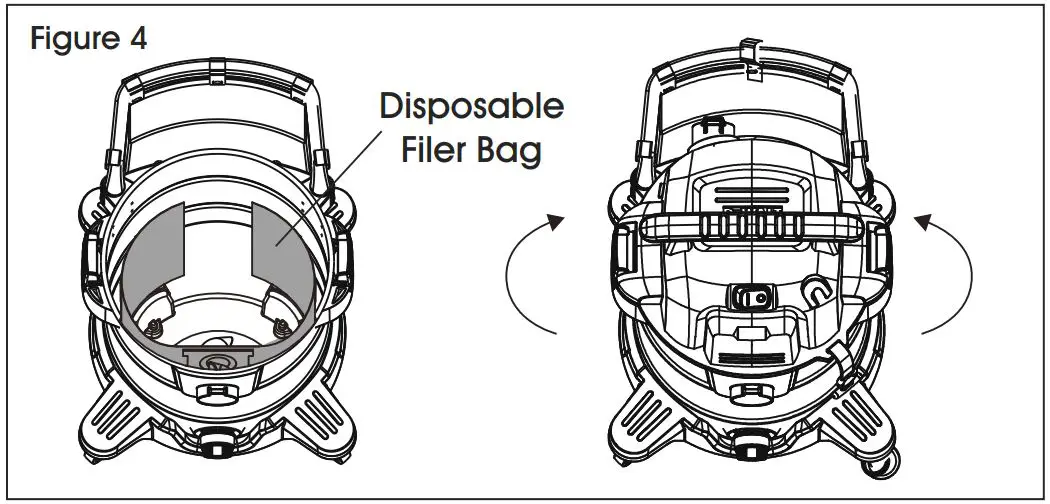
INSTALLING DISPOSABLE FILTER BAG
- Filter bag may be used for additional filtration. Slide cardboard collar opening firmly onto vacuum port deflector until it stops against deflector wall.
- Position bag so it is distributed around inside of tank.
- Replace and secure power head onto tank. (See Figure 4)

WET PICK-UP
Cartridge filter must be positioned over filter cage while vacuuming liquids. When picking up several tanks full of liquid, cartridge filter will become saturated and misting may appear in exhaust air. At this time, dry or replace cartridge filter to eliminate misting and possible dripping of liquid around lid. After completing a wet pick-up job, raise hose to drain any excess liquid into tank before shutting off. Interior of tank should be periodically cleaned.
- Always disconnect plug from wall outlet before removing power head. Place power head in an upside down position. Remove cartridge filter by sliding it up and off filter cage.
 NOTE: Wet pick-up accessories should be washed periodically, especially after picking up wet, sticky accidents. This can be accomplished with a warm solution of soap and warm water.
 - Shake excess dust off cartridge filter with a rapid up-and-down movement.
- This wet/dry vacuum is equipped with a float mechanism which will rise automatically to cut off airflow when liquid in tank reaches a pre-determined level. When this happens, turn off vacuum, unplug power cord and empty dust tank. Float has shut the airflow off when suction ceases and the motor noise becomes higher in pitch due to increased motor speed. The liquid capacity may vary with the rate of pickup.
![]() IMPORTANT: To reduce the risk of damage to vacuum, do not run motor with float in raised position. (See Figure 5)
IMPORTANT: To reduce the risk of damage to vacuum, do not run motor with float in raised position. (See Figure 5)

![]() NOTE: If accidentally tipped over, vacuum could have closed suction. If this occurs, place vacuum in upright position and turn off switch. This will allow the float to return to its normal position and unit will continue operation.
NOTE: If accidentally tipped over, vacuum could have closed suction. If this occurs, place vacuum in upright position and turn off switch. This will allow the float to return to its normal position and unit will continue operation.
EMPTY THE TANK
![]() WARNING: To reduce the risk of injury from accidental starting, unplug power cord before emptying dust tank.
WARNING: To reduce the risk of injury from accidental starting, unplug power cord before emptying dust tank.
- Remove power head assembly of wet/dry vacuum by pulling outward on lid clips located on each side of vacuum. Lift off power head assembly.
- Dump tank contents into proper waste disposal container.
- Liquids may be emptied through tank drain. To empty, turn off unit and remove plug from wall outlet. Remove drain cap and deposit liquid waste contents in suitable drain. After tank is empty, return drain cap to its original position. To continue use, plug cord into wall outlet and turn on the unit. (See Figure 6)

BLOWING OPERATION
![]() WARNING: Always wear safety goggles complying with ANSI Z87.1 (or in Canada
WARNING: Always wear safety goggles complying with ANSI Z87.1 (or in Canada
CSA Z94.3) when using as a blower.
![]() WARNING: To avoid injury to bystanders, keep them clear of blowing debris.
WARNING: To avoid injury to bystanders, keep them clear of blowing debris.
![]() CAUTION: Wear a dust mask if blowing creates dust that might be inhaled.
CAUTION: Wear a dust mask if blowing creates dust that might be inhaled.
![]() CAUTION: To reduce the risk of hearing loss, wear ear protectors when using the vac/blower for extended hours or when using it in a noisy area.
CAUTION: To reduce the risk of hearing loss, wear ear protectors when using the vac/blower for extended hours or when using it in a noisy area.
- Locate blowing port on the vac.
- Insert one end of the 1⁄” x 7′ hose into the blowing port. (See Figure 7)
- Turn vacuum “ON”.

MAINTENANCE
INSTALLING THE CARTRIDGE FILTER
The cartridge filter can be used for wet or dry pick-up. Installation is same for both.
- With power head in an upside down position, slide the cartridge filter down over the lid cage and push the filter seals against the power head.
- Turn knob on filter retainer clockwise to tighten, locking the filter into place.
- To remove filter for cleaning, turn filter knob counterclockwise until feeling the tactile and auditory cue. Align knob arrow with “Unlock” icon on the filter cap. Slide the cartridge filter off the lid cage. Grasp step of knob tightly to pull cartridge filter out of cage.
- To clean cartridge filter, shake or brush off excess dirt or rinse (from inside of filter) with water, dry completely (approximately 24 hours) and re-install. (See Figure 8)
![]() NOTE: If filter has been used for wet pick-up, it must be cleaned and dried before using for dry pick-up.
NOTE: If filter has been used for wet pick-up, it must be cleaned and dried before using for dry pick-up.

FILTER REPLACEMENT
![]() WARNING: To reduce the risk of injury from accidental starting, unplug power cord before changing or cleaning filter. Filter should be cleaned often to maintain peak vacuum performance.
WARNING: To reduce the risk of injury from accidental starting, unplug power cord before changing or cleaning filter. Filter should be cleaned often to maintain peak vacuum performance.
![]() WARNING: Do not remove filter cage and float. Float prevents water from entering the impeller and damaging the motor. The cage prevents fingers from touching the moving impeller.
WARNING: Do not remove filter cage and float. Float prevents water from entering the impeller and damaging the motor. The cage prevents fingers from touching the moving impeller.
![]() IMPORTANT: To avoid damage to blower wheel and motor, always reinstall cartridge filter before using the vacuum for dry pick-ups and wet pick-ups.
IMPORTANT: To avoid damage to blower wheel and motor, always reinstall cartridge filter before using the vacuum for dry pick-ups and wet pick-ups.
![]() IMPORTANT: After cleaning, check the filter for tears or small holes. Do not use a damaged filter. A small hole can cause dust to come out of vacuum. Replace it immediately.
IMPORTANT: After cleaning, check the filter for tears or small holes. Do not use a damaged filter. A small hole can cause dust to come out of vacuum. Replace it immediately.
![]() NOTE: Before installing filter on vacuum, clean area of lid so that filter will seal against lid and stop small particles from bypassing filter bag. If filter is clean and not damaged, replace it on filter cage. If it cannot be reused, place a new filter over filter cage.
NOTE: Before installing filter on vacuum, clean area of lid so that filter will seal against lid and stop small particles from bypassing filter bag. If filter is clean and not damaged, replace it on filter cage. If it cannot be reused, place a new filter over filter cage.
![]() NOTE: Clean filter in open area. Cleaning should be done outdoors and not in living quarter.
NOTE: Clean filter in open area. Cleaning should be done outdoors and not in living quarter.
CLEANING
Clean outside with a cloth dampened with warm water and mild soap. To clean tank:
- Dump out debris.
- Wash tank thoroughly with warm water and mild soap.
- Wipe out with dry cloth.
STORAGE
Before storing vacuum, dust tank should be emptied and cleaned. Cord should be wrapped and hung on unit and accessories should be kept in accessory holder so they can be readily available. Vacuum should be stored indoors.

1-800-295-5510
uline.com