Uniden Baby Monitor
IMPORTANT SAFETY INSTRUCTIONS
This guide contains important information about this product’s operation. If you are installing this product for others, you must leave this manual or a copy with the end user. nWhen using your equipment, always follow basic safety precautions to reduce the risk of fire, electric shock and injury to persons, including the following:
- This unit is NOT WATERPROOF. Never submerge the devices in water or rinse them in running water.
- Always position the device and power cord out of the reach of children. The power cord could result in strangulation or cause injury to children.
- Keep small parts out of the reach of children (risk of swallowing).
- Keep packaging material away from children (risk of suffocation).
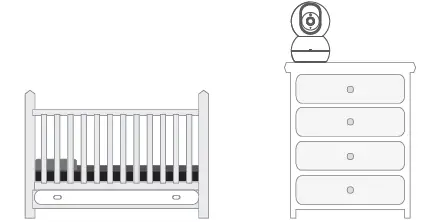
- Never place the Baby Unit in the cot or within the reach of your child.
- Make sure that cables are out of the reach of your child (risk of electric shock).
- Always make sure that the devices are fully functioning before use.
- Only use the AC adaptors included with the unit.
- Do not use the cable to pull the AC adaptor plug out of the socket.
- Disconnect the AC adaptor plug from the mains when the device is not in use.
- The device and the AC adaptor should not come into contact with hot surfaces or sharp objects.
- Do not use any additional parts that are not recommended by the manufacturer or offered as equipment.
- After use, before cleaning and changing any accessory parts, the AC adaptor should always be disconnected.
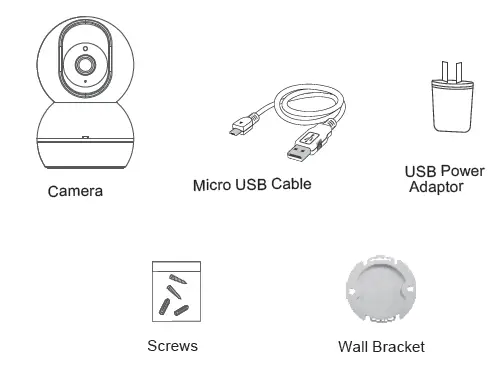
WHAT’S INSIDE THE BOX
- Image may vary slightly from the actual product.
- If any item is missing or damaged, contact your place of purchase immediately. Never use damaged products!
- Need help? Get answers at our website:
www.uniden.com.au for Australian model. All trademarks are registered trademarks of their respective owners.
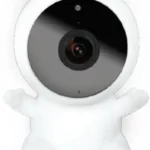
GETTING STARTED
- Light sensor
- Camera lens
- Microphone
- Micro SD Card Slot
- Night Light/ Status Indicator
- Temperature sensor
- Speaker
- Micro USB port
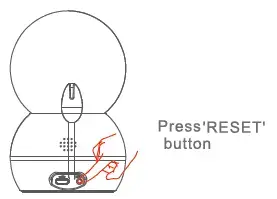
- Reset Button
INSTALLATION
General Placement Considerations
The BW150R camera can be placed on a shelf or other flat surface. You may also mount it on the wall with the provided wall bracket.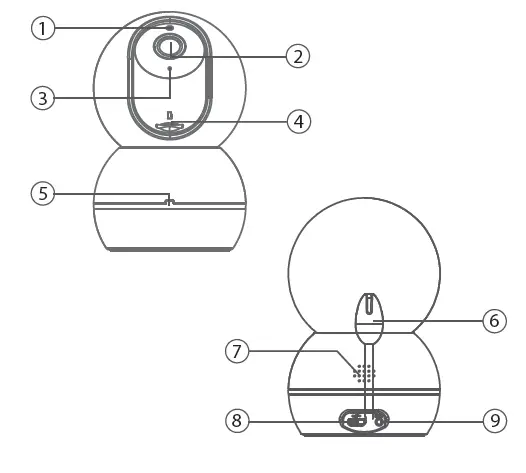
- The camera included is NOT weatherproof; it is an indoor camera.
- The clearest line-of-sight between the camera and the Wi-Fi router is best. Walls, especially brick and concrete, can affect connection quality.
- Avoid having a direct light source in view of the camera (ceiling or floor lamps).
- Carefully plan where and how the camera will be positioned, and where you will route the cable that connects the camera to the power adaptor.
- Do not cover or obstruct the inlet holes for the temperature sensors and leave the sensor horizontal for more accurate reading. The temperature reading is for reference only and there may be some variance between the actual temperature and the temperature reading.
Mounting the Camera on the Wall
- If you are mounting the camera on the wall, hold the wall bracket where you want to mount it and mark the location of the screw holes.
- Use the included bracket screws to secure the wall bracket to the wall.
- Align the wall bracket with the holes on the base of the camera and rotate the base until it snaps into place.
Wi-Fi Operating Considerations
- Ensure the Wi-Fi signal reception is acceptable between the BW150R and the Wi-Fi router. If necessary, reduce the distance between them to improve overall system performance.
As the Wi-Fi environments may vary including home construction type and wireless interference from other electronic devices, your device may indicate that the camera is disconnected or may display a black screen. - Please note the camera can only connect to 2.4G Wi-Fi and does not support 5G Wi-Fi connection. If you’re getting a weak Wi-Fi signal or you can’t connect to Wi-Fi at all on your phone at the installation area, we recommend moving your router closer or install a Wi-Fi extender to improve signal reception or selecting another installation location.
Powering the Camera
- Insert one end of the micro USB cable to the micro USB port on the camera (at the back of the camera).
- Connect the other end of the USB cable into the USB power adaptor.
- Connect the USB power adaptor into a 240 volt AC (standard indoor) power outlet.
- Switch on the plug and allow the camera to power up. This can take up to a minute.
- When the camera starts flashing red, it is ready to be paired with your Wi-Fi network.
| Status Indicator | Camera Status |
| Solid Red | Camera is booting up. |
| Red Flashing | Waiting for Wi-Fi configuration. |
| Green Flashing | Connecting to Wi-Fi |
| Solid Green | Camera is online |
INITIAL CAMERA SETUP
To set up your new BW150R baby monitor camera, please make sure it’s successfully installed and powered on, and that the status indicator on the camera is flashing red. This flashing RED status means that your camera is ready to be paired to your My Uniden App.
Prerequisites
- You must have an available Wi-Fi-enabled Smartphone (Android or iOS smartphone).
- The BW150R baby monitor and your mobile device must within the same Wi-Fi network range for initial setup (ideally within 3m from the router).
- Wi-Fi router connection is 2.4GHz and password if any.
- Search and download the free My Uniden App from the App Store for iOS devices or Play Store for Android devices. You will need to create an account specifically for the My Uniden app. If you already have a My Uniden app account, you will log into the My Uniden App using your My Uniden account email and password. You can skip to Step 6.
- When the status indicator starts flashing red, the camera is ready to be paired with your Wi-Fi network. If the status indicator is not red and flashing quickly, press and hold the reset button for 5 seconds, wait for the status indicator to flashing red.
 * Please note that app screenshots are for reference only. User Interface for iPhone and Android Phones might differ in terms of icons layout and functionality and may change without notice. As the My Uniden App is constantly under development to enrich user experience, the icons/screens shown in this QSG may vary slightly from the actual app.
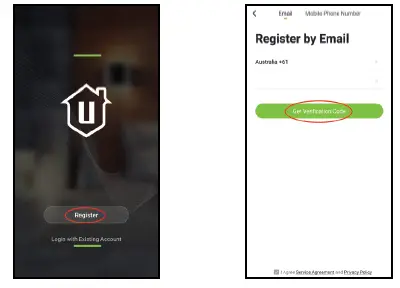
 - When you open the My Uniden app for the first time, you will see the login page. Tap the “Register” button to create a new My Uniden account. Once you select Register, you’ll be prompted to add your email address, and tap “Get Verification Code Button”.
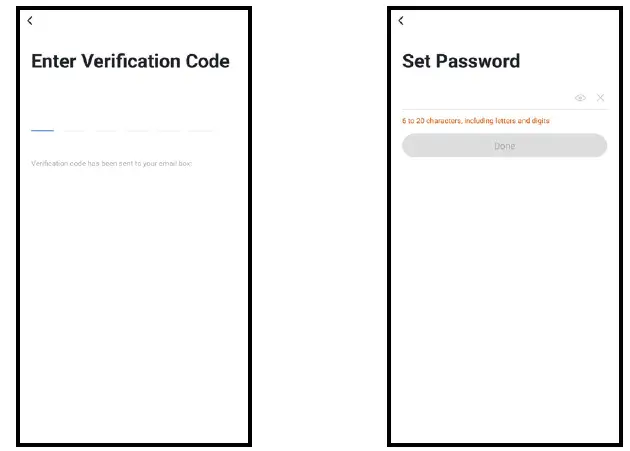
- Retrieve the verification code from your email inbox and enter the code in the space provided. Then, you’ll be prompted to choose a password for your My Uniden App Account.
- As soon as you have entered your password, tap Done button and you’ll be all set. Your My Uniden App account has now been created.
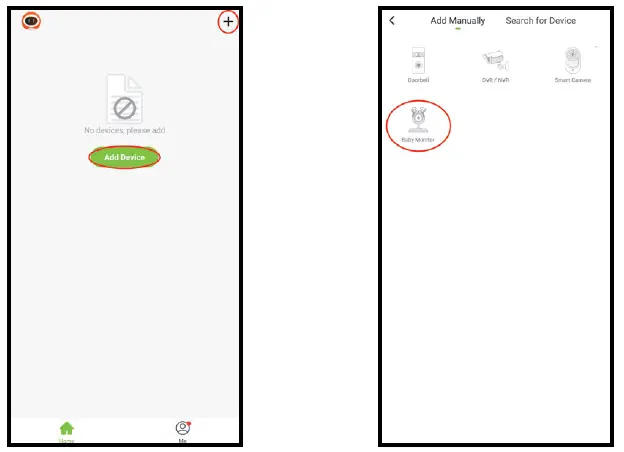
- You will see the Home tab. To pair a device, tap the “Add Device” button or the “+” button on the top right-hand side of the screen if you already have shared access or a paired device. Once you have tapped the Add Device button, tap the Baby Monitor icon to set up the BW150R camera.
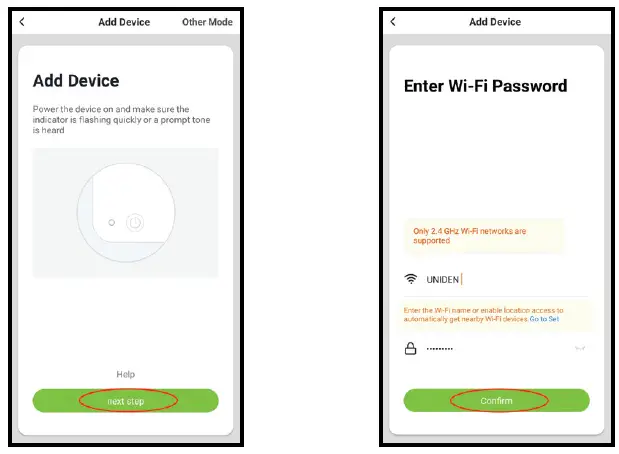
- Tap “next step” to continue. Enter the Wi-Fi password of the selected Wi-Fi network and press “Confirm” to enter the next page.
- Tap “Continue” to proceed. A QR code will be generated on the phone. Please place the QR code on your phone towards the camera lens at a distance of about 15~20cm to let the camera scan the QR code. Please make sure that you’ve ripped the protection film off the camera’s lens. After you hear the voice prompt from the camera, please press “I heard a Prompt” to continue.
- Please wait while the app is configuring your BW150R camera. Once completed, you’ll be prompted to name your camera and tap “Done”. You are now ready to start using your new BW150R camera.

Live View
Scroll up more for more icons.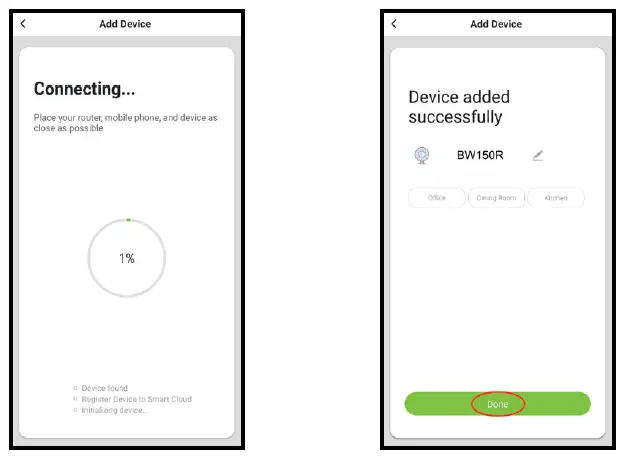
TROUBLESHOOTING
| If… | Try This… |
| The camera does not find or connect the router. | Make sure the Wi-Fi router supports DHCP protocol.
Make sure that the DHCP option is turned on. Make sure the camera and your mobile device connect to the same Wi-Fi router. Make sure you selected the correct 2.4GHz router only in your device Wi-Fi setting. Make sure you entered the correct password for the router you selected. Make sure you are within the Wi-Fi range of the router. Make sure the Wi-Fi router is enabled. Make sure the camera is properly powered on. Make sure the Wi-Fi router has enabled SSID broadcasting. |
| Poor video stream or video quality is not clear. | Please check your home upload speed to meet the minimum requirement.
Clean the lens. |
| There is no video or light indicator. | Verify that the camera is powered on and is plugged in properly. |
SPECIFICATION
| Item | Specification |
| Image Sensor | 1/2.7” Colour CMOS |
| Recording Resolution | 1920 x 1080 15fps, 640 x 480 20 fps |
| Viewing Angle | 80°(H) |
| Night Vision | up to 5m |
| Video Compression | H.264 |
| Audio | Two-way talk |
| WIFI | 2.4GHz |
| Wireless Security | WEP, WPA, WPA2 |
| Power Consumption | up to 5W |
| Micro SD Card | up to 64GB Class 10 |
TWO-YEAR LIMITED WARRANTY
Important:
Satisfactory evidence of the original purchase is required for warranty service. Please refer to our Uniden website for any details or warranty durations offered in addition to those contained below.
Warrantor:
The warrantor is Uniden Australia Pty Limited ABN 58 001 865 498 (“Uniden Aust”).
Terms of Warranty: Uniden Aust warrants to the original retail purchaser only that the BW150R (“the Product”), will be free from defects in materials and craftsmanship for the duration of the warranty period, subject to the limitations and exclusions set out below.
Warranty Period: This warranty to the original retail purchaser is only valid in the original country of purchase for a Product first purchased either in Australia or New Zealand and will expire two (2) year from the date of the original retail sale. If a warranty claim is made, this warranty will not apply if the Product is found by Uniden to be:
- .Damaged or not maintained in a reasonable manner or as recommended in the relevant Uniden Owner’s Manual;
- Modified, altered or used as part of any conversion kits, subassemblies or any configurations not sold by Uniden Aust;
- Improperly installed contrary to instructions contained in the relevant Owner’s Manual
- Repaired by someone other than an authorized Uniden Repair Agent in relation to a defect or malfunction covered by this warranty; or
- Used in conjunction with any equipment, parts or a system not manufactured by Uniden.
Parts Covered: This warranty covers the Product and included accessories.
User-generated Data: This warranty does not cover any claimed loss of or damage to user-generated data (including but without limitation phone numbers, addresses and images)that may be stored on your Product.
Statement of Remedy: If the Product is found not to conform to this warranty as stated above, the Warrantor, at its discretion, will either repair the defect or replace the Product without any charge for parts or service. This warranty does not include any reimbursement or payment of any consequential damages claimed to arise from a Product’s failure to comply with the warranty. Our goods come with guarantees that cannot be excluded under the Australian Consumer Law. You are entitled to a replacement or refund for a major failure and for compensation for any other reasonably foreseeable loss or damage. You are also entitled to have the goods repaired or replaced if the goods fail to be of acceptable quality and the failure does not amount to a major failure. This warranty is in addition to and sits alongside your rights under either the COMPETITION AND CONSUMER ACT 2010 (Australia) or the CONSUMER GUARANTEES ACT (New Zealand) as the case may be, none of which can be excluded.
Procedure for Obtaining Warranty Service: Depending on the country in which the Product was first purchased, if you believe that your Product does not conform with this warranty, you should deliver the Product, together with satisfactory evidence of your original purchase (such as a legible copy of the sales docket) to Uniden at the address shown below. You should contact Uniden regarding any compensation that may be payable for your expenses incurred in making a warranty claim. Prior to delivery, we recommend that you make a backup copy of any phone numbers, images or other data stored on your Product, in case it is lost or damaged during warranty service.
UNIDEN AUSTRALIA PTY LTD
Phone number: 1300 366 895
Email: [email protected]![]()