UNITOPSCI 9601 MP5 and FM Receiver 7.0 Inch
TFT LCD Instruction Manual
INSTALLATION
* Please read the following notice before installation *
- Make sure that you or the professional are using our original connector in your first installation, otherwise it could cause a short circus in the radio because the order of the cable does not match correctly. If you use another connector, the radio may not turn on or make any sound, even when you use our original connector for the second attempt. Any damage caused by misuse of the wiring will not be included in the term of the warranty.
- After installing the radio, you may see some regular problems that most buyers can see, but most of which can be verified and resolved by “F&Q”
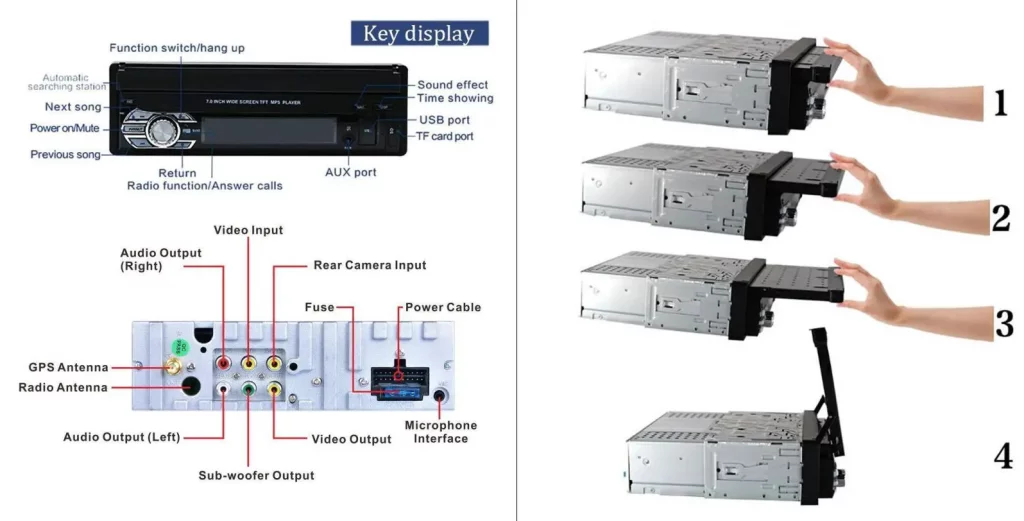
Remove the stereo carefully from the box. keeping the box. For warranty and service of the unit.
- Remove the screws.
- Unpack the car’s dashboard and mounting bracket.
- Check the size of the board window to meet the requirements. The holes of the left alignment screws and the right plates.
- By machine support fixed with screws in the dashboard.
- Control panel installed.
PRECAUTIONS
Choose the mounting location carefully so that the unit will not interfere with the normal driving functions of the driver. Avoid installing the unit where it would be subject to high temperatures, from direct sunlight or hot air from the heater, or where it would be subject to dust, dirt or excessive vibration. Use only the supplied mounting hardware for a safe and secure installation. Adjust the mounting angle as desired.
Note: Keep the release Key in the safe place as you may need it in future to remove the unit from the car.
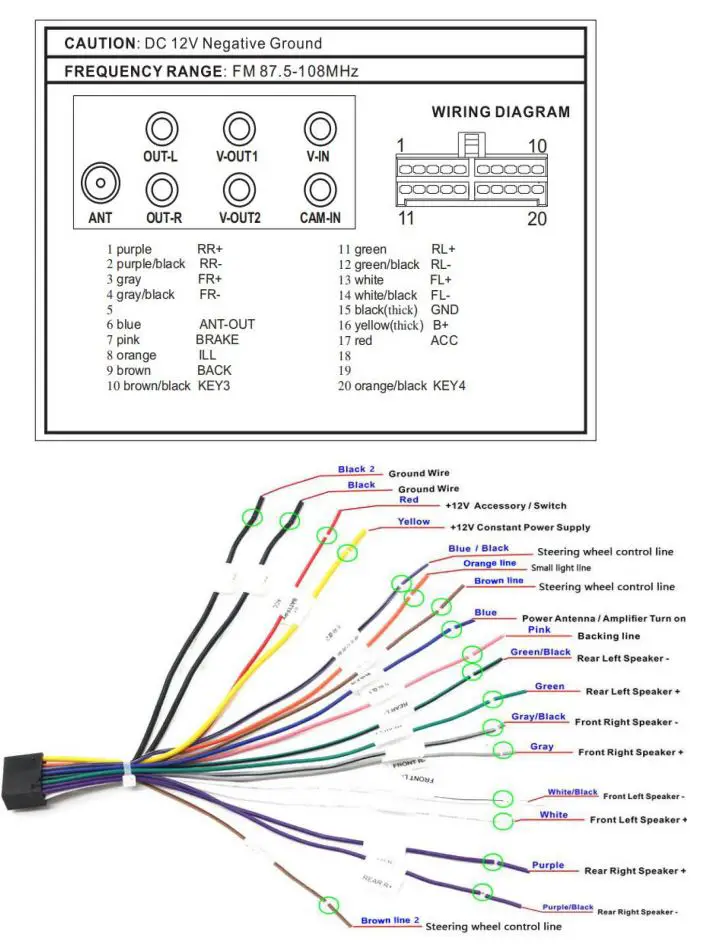
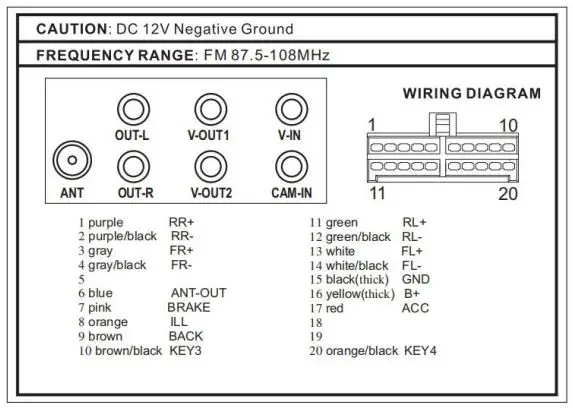
WIRING DIAGRAM
WARNING
Use the specified amperage fuse for each lead. Using a higher amperage fuse may cause serious damage.
Reminder:
You will receive an manual within 24 hours after order placement. Please check your mailbox or your Amazon message box.
Troubleshooting:
Before install the car stereo to your car (especially when you want to hire an expensive professional), please make a simple test. Please combine red and yellow line from power harness to a constant (+)12V power source, black to (-)12V negative power source, then open the auto radio. If the auto radio can be opened, it will work when you install it onto your car, unless your wire connection is wrong or some wrong operation had blown the fuse.
- Please ask professional electricians to do the installation avoiding wrong wiring caused a short out problem.
- Please wrap exposed wires, avoiding exposed wires contacted each other and result in a short circuit and damaged the product.
- Make sure the voltage is DC 12V on this car stereo.
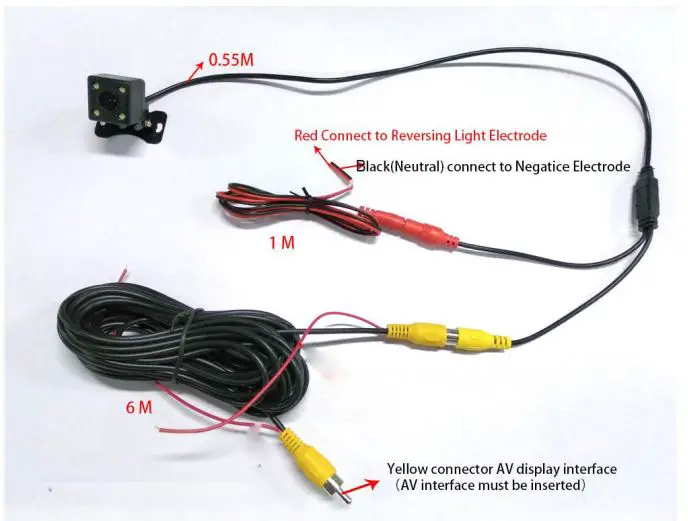
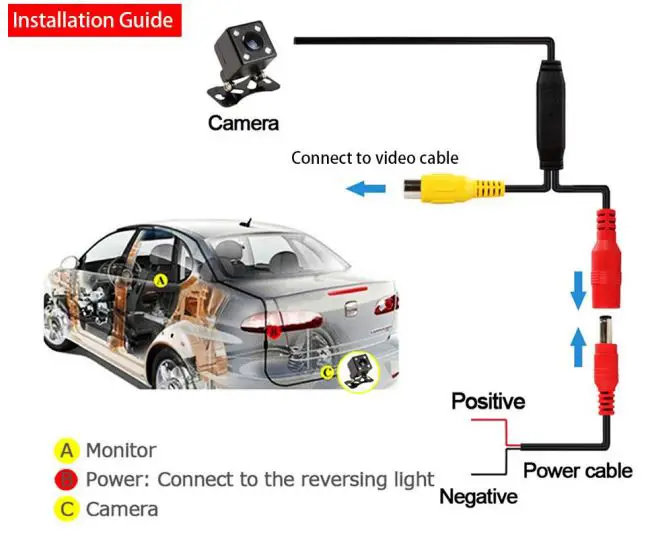
Camera Wiring:
- Power cable: red and black
Red — reverse light positive
Black — reverse light negative - RCA cable: yellow port. insert into CAMIN port (yellow) on the radio
- Make sure the pink cable on the radio power cable is connected to backing line.
Thus, the device will show rear view image automatically when you are parking, and return to radio page when parking finishes.
SPECIFICATIONS
FM TUNER
Frequency Range 87.5-108MHz
Sensitivity 10 dBu
I.F. Frequency 10.7MHz
Frequency Response 80Hz-12kHz (±3dB)
Stereo Separation >25dB
S/N Ratio >50dB
GENERAL
Power Supply Voltage 12 V DC, Negative Ground
Max Current Consumption 15 A
Max Output Power 4x55W
Note: Specifications and the design are subject to possible modification without notice due to improvement.
FandQ:
- Language Setting: Setting- Language
- Why can’t watch video, showing ‘video warning’?
Please click ‘Setting – other – video warning’ and turn ‘video warning’ off. - Why can’t use GPS?
Please try to re-activate the SD map card.
Steps:
(1). Remove the SD card, make sure there is no dust on it, and put it back in the unit
(2). Click “Navigation/GPS – Setup – Navi Path” – “Primo” – “Primo.exe” – “Load Map Automatically” – “”.
(3). Return to the home page and click “Navigation” to load the map, start to use it
(4) If the map is still empty, click on the map to show “+”and “-” button, click “+” to magnify the map until it shows streets - Why the car radio shows “No Signal” when I’m reversing? If the camera can light up when it connect to power, the camera can work. Then please check if the camera’s lines are wired correctly, exactly as written in “camera wiring”.
Service
Any question or problem, please contact us via [email protected]. We will respond within 24 hours. P. S. If possible, photos or video can help us to confirm the problem faster.
Main Functions
1. HOME
In the task bar click ![]() to enter the main menu interface.
to enter the main menu interface.
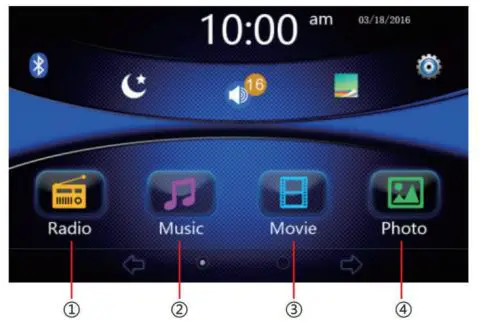
- Click here to enter radio player interface.
- Click here to enter the music player interface.
- Click here to enter the video player interface.
- Click here to go to photo browsing interface.
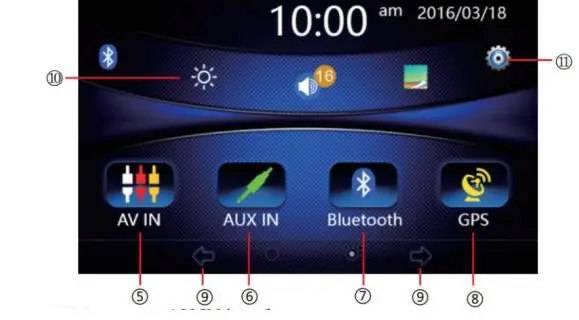
- Click to go to AV IN interface.
- Click to go to aux input interface.
- Click here to go to the Bluetooth player interface.
- Click to go to GPS interface.
- Click to go to the prev/next page.
- Click here to adjust the screen brightness and off screen.
- Click to go to System Settings interface.
2. MUSIC
In the main menu interface, touch MUSIC icon to enter the music state.
2.1 Features taskbar icon
![]()
- Click here to enter the menu setting.
- The volume regulation, paddling can adjust the volume.
- Return
- Enter the main menu
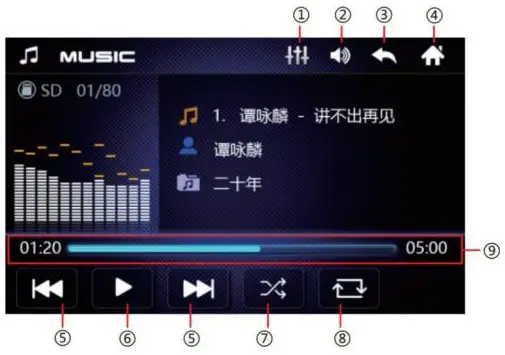
- Click here to play the prev/next song.
- Click here to play / pause.
- Click here to Shuffle.
- Click here loop.
- Playback progress display.
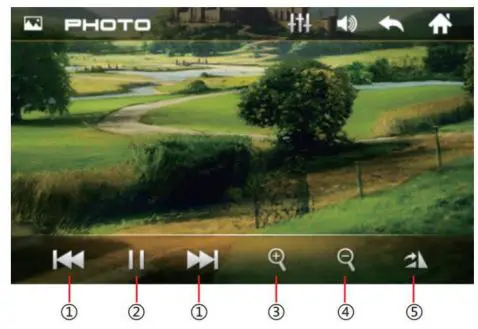
3 .PHOTO
In the main menu inte1face, touch PHOTO icon to enter the photo state.
- Click here to play the prev/next picture.
- Click here to play/ pau e.
- Click here zoom in.
- Click here zoom out.
- Click here to rotate image.
4 . VIDEO
In the main menu interface, touch VIDEO icon to enter the video state.
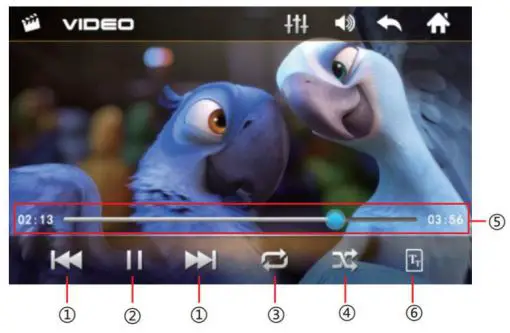
- Click here to play the prev/next video.
- Click here to play/ pause.
- Click here loop.
- Click here to Shuffle.
- Playback progress display, Touch paddling can fast forward and rewind.
- Next page
5. RADIO
In the main menu interface, touch RADIO icon to enter the radio state.
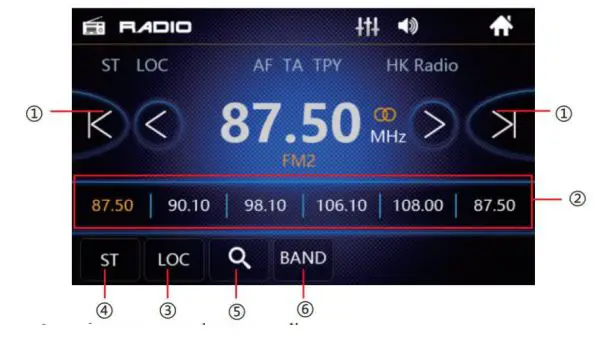
- Click here to manually scan radio.
- In radio state, each band has six frequency points, press any frequency, you can store your favourite radio stations.
- LOC/DX Switch
- Stereo
- Press to automatically search for radio stations and store the FM 1- FM2-FM3 18 radio stations, short press to navigate through the radio.
- Band Switch
6. BT
In the main menu interface, touch BT icon to enter the Bluetooth state.

- 6.1 Click into the dial-up interface.
- Bluetooth dial number keys can be used to enter a phone number to dial.
- Backspace
- Bluetooth is available under the call state will host the button to switch the sound to the phone.
- hang up the phone.
- Dial / answer a call.
- 6.2 Click to go to the call log interface
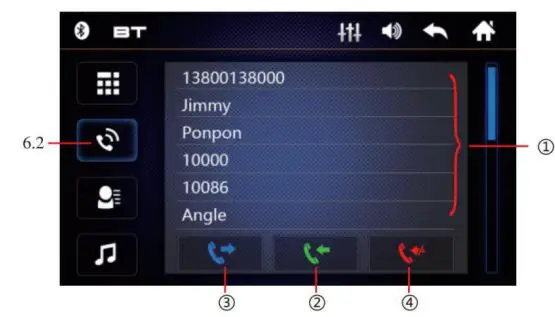
- Missed record, received record dial record list.
- Received record
- Dial record
- Missed record
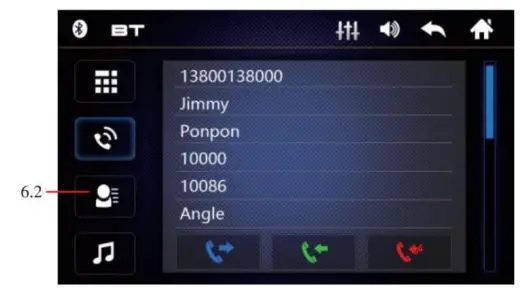
- 6.3 Click into contact interface
- 6.4 Click to go to the Bluetooth music interface.

- Prev / Next , play / pause function.
7. SETUP
In the main menu interface, touch SETUP icon to enter the setup state.

- Click to sound settings.
- Click on the language Set up.
- Other settings.
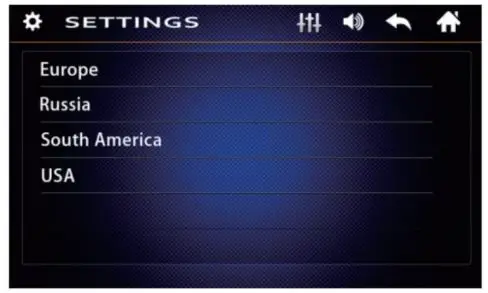
- Click to go to the radio region selection.
- Click on the steering wheel control settings.
- Click to set the time.
- 7 .1 Touch Radio Area ,select the radio region.
- 7.2 Touch TIME, into the time setting.
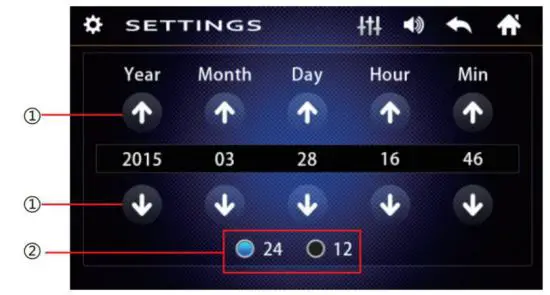
- Touch to set the time and date
- 12/24 standard switch
- 7.3 Touch Wheel Control , Steering wheel control interface.
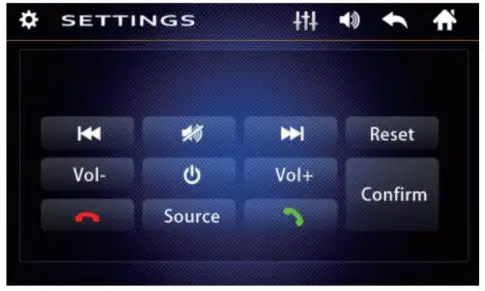
Enter the learning state:
- long press button on the steering wheel use left hand, then touch screen corresponding function use right hand, make it highlight, mean learn OK;
- When the learning was completed, click Confirm.
- When learning has failed, it should be not respond in the steering wheel.
- If operating mistake in the learning process, click Reset to relearning.
- 7.4 Other settings interface.
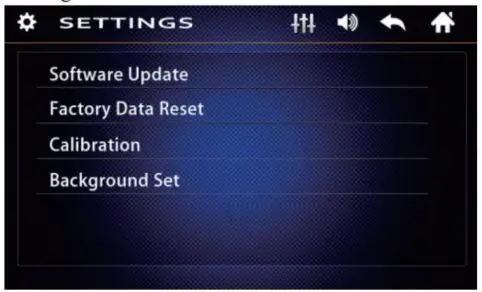
- Software Update
- Factory Data Reset
- Calibration
- Background Set
- 7.5 Touch Language, select the national language.

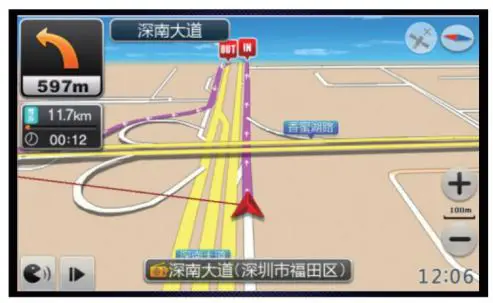
8. CPS NAVIGATION (Optional)
In the main menu interface, touch GPS icon to enter the Navigation.
9. AUX IN
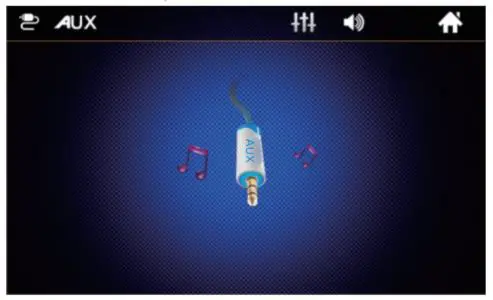
Front panel 3.5mm audio input.
10. AV IN
In the main menu interface, touch av in icon to enter the av in state.
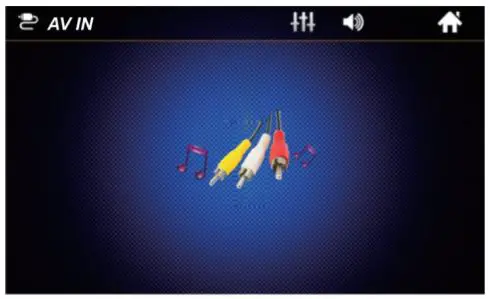
RCA audio/video input.
11. INSTALLATION
PRECAUTIONS
- Choose the mounting location carefully so that the unit will not interfere with the normal driving functions of the driver.
- Avoid installing the unit where it would be subject to high temperatures, from direct sunlight or hot a ir from the heater, or where it would be subject to dust, dirt or excessive vibration.
- Use only the supplied mounting hardware for a safe and secure installation.
- Adjust the mounting angle as desired.
MOUNTING EXAMPLE
Installation In the dashboard

Note: Keep the release Key in the safe place as you may need it in future to remove the unit from the car.
12. WARNING
Use the specified amperage fuse for each lead. Using a higher amperage fuse may cause serious damage.
13. FEATURES
The Unit Features MPS/USB/SD Ports and 7.0 inch TFT LCD
- Electronic Pll Tuning Control with 18 Programmable Stations
- MP3/WMA Compatible
- Preamplifier Line-out
- Front Audio Aux-in
- USB Port and SD/MMC Input
- Last Track Memory (RADIO & SD/MMC & USB)
- 7.0 inch TFT LCD
14. SPECIFICATIONS
FM TUNER
Frequency Range – 87.5-108MHz
Sensitivity – l0dBu
I.F. Frequency – 10.7MHz
Frequency Response – 80Hz – 12kHz (±3dB)
Stereo Separation – >25dB
S/N Ratio – >50dB
GENERAL
Power Supply Voltage – 12 V DC, Negative Ground
Max Current Consumption – 15 A
Max Output Power – 4 x 55W
Note: Specifications and the design are subject to possible modification without notice due to improvement.
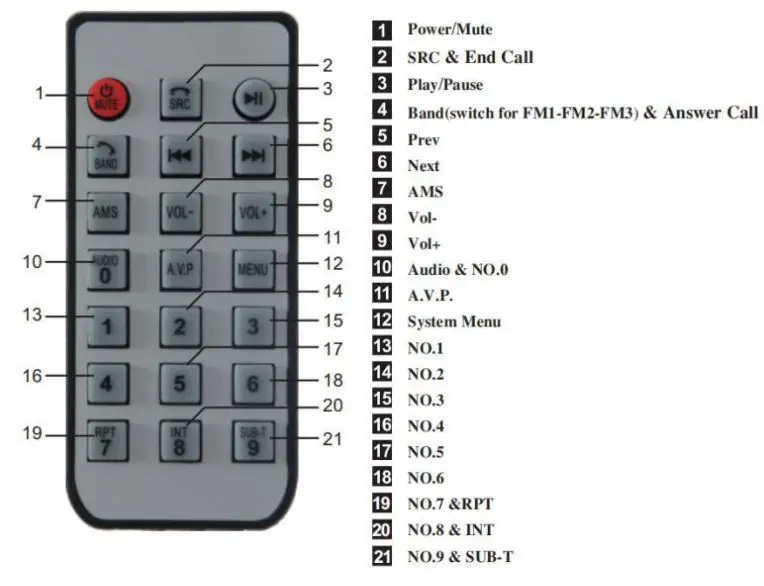
15. REMOTE CONTROL GUIDE
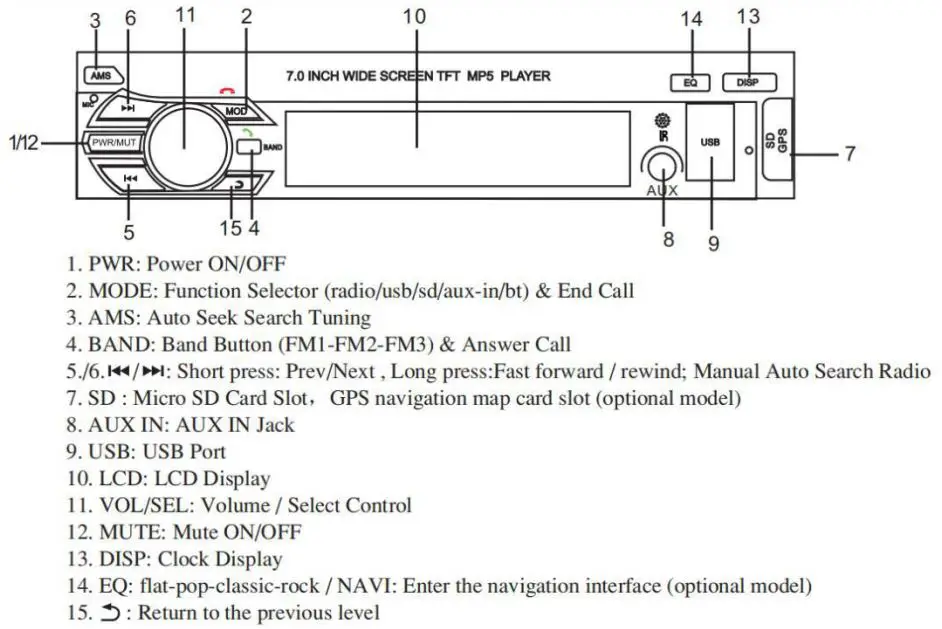
16. LOCATION OF CONTROL
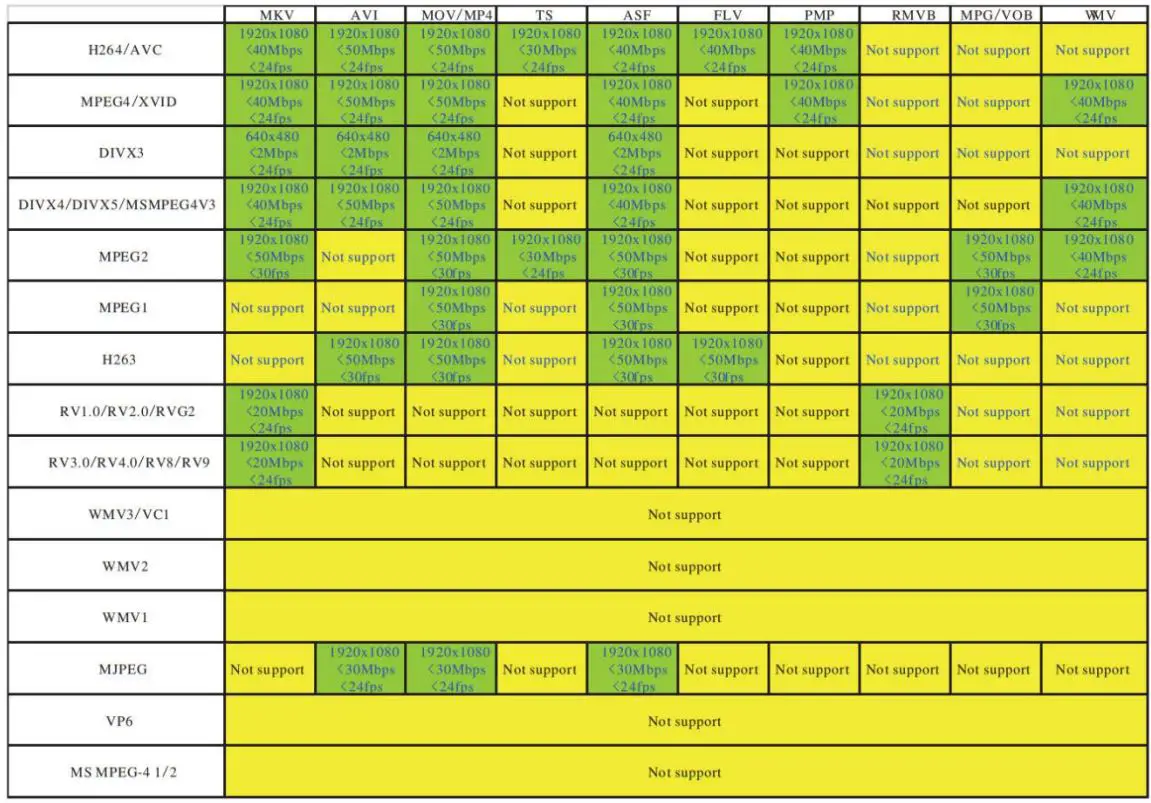
17. SUPPORT VIDEO FORMAT