UUGear Firmware User Guide
Witty Pi 3 Firmware Update Guide
- Revision 1.00

Download the Firmware and Tools
Firmware version 1.02 (ID=0x22) is the default firmware for Witty Pi3 (Rev1) and Witty Pi 3 Mini, while version 1.04 (ID=0x24) is the latest firmware for Witty Pi 3 (Rev2). Witty Pi 3 (Rev1) and Witty Pi 3 Mini can also use the firmware version 1.04, and the only drawback is that they will be recognized as Witty Pi 3 Rev2 by UWI (UUGear Web Interface).
If you want to confirm the firmware version of your Witty Pi 3 board, you can run this commend when your Witty Pi 3 board is mounted on your Raspberry Pi:
- i2cget -y 1 0x69 0x00
This command will print out the firmware ID, so 0x22 means V1.02 and 0x24 means V1.04.
You will need the application to upload the firmware to your Witty Pi 3 board. You can install avrdude by yourself, or use the all-in-one package we prepared, which includes avrdude, configuration file, firmware files and upload scripts:
- For Windows users: http://www.uugear.com/repo/WittyPi3/WP3FU_Win.zip
- For Mac OS X users: http://www.uugear.com/repo/WittyPi3/WP3FU_Mac.zip
- For Raspberry Pi users: http://www.uugear.com/repo/WittyPi3/WP3FU_RPi.zip
- If you want to download the firmware only, you can use the links below: Version 1.04 (ID=0x24) : http://www.uugear.com/repo/WittyPi3/firmware/0x24/WittyPi3.ino.hex
- Version 1.02 (ID=0x22): http://www.uugear.com/repo/WittyPi3/firmware/0x22/WittyPi3.ino.hex
Two Ways to Update Firmware
There are two ways to upload the firmware to your Witty Pi 3 board:
- Upload firmware via ICSP programmer (e.g. USBasp)
- Upload firmware via Raspberry Pi
Using programmer will be an easier way, and we will use USBasp as example in this document.
The second way is actually using Raspberry Pi to emulate an ICSP programmer, it needs a little more effort and configuration, but it is not difficult and actually fun.
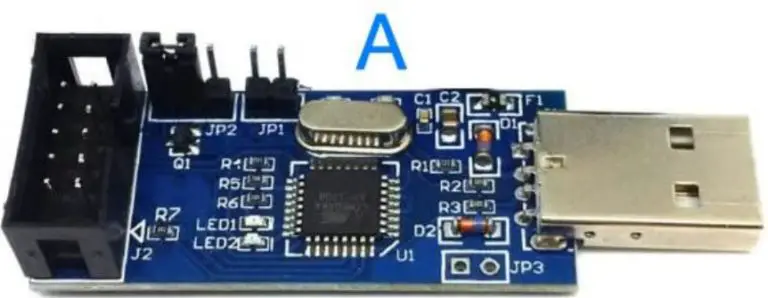
Upload Firmware via USBasp
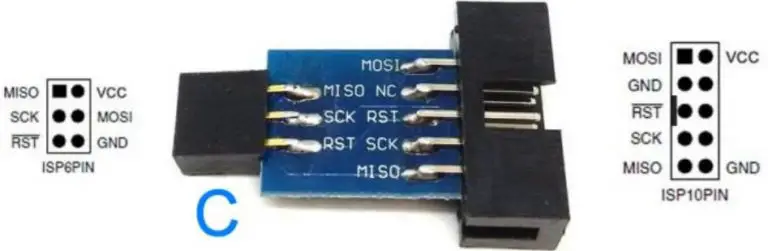
If you have a USBasp programmer, please check if it comes with extension cable (B) and ICSP adapter board (C).

If you USBasp comes with the cable (B) and ICSP adapter board (C), you can put an ICSP pin header (pitch 2.54mm, 2x3P) on the adapter board and make it a “firmware updating plug”.

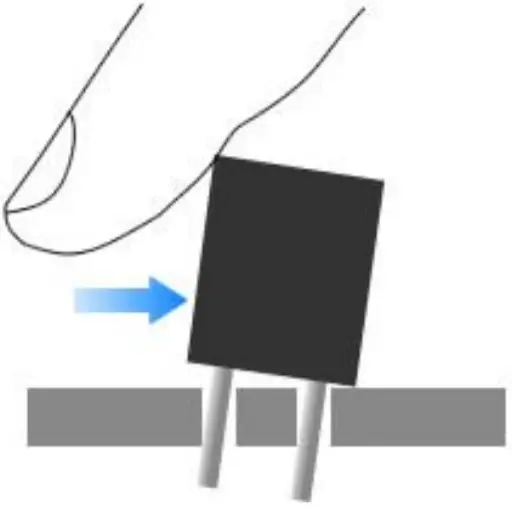
This plug can be plugged into Witty Pi 3’s ICSP footprint (from the top side of the board), and then you can use finger to gently press it to one side so that all 6 pins will get well connected. This way you don’t have to solder an ICSP header on your Witty Pi 3 board.
If your USBasp programmer doesn’t come with extension cable (B) or the ICSP adapter board (C), you will need 6 DuPont wires to make a firmware update plug.
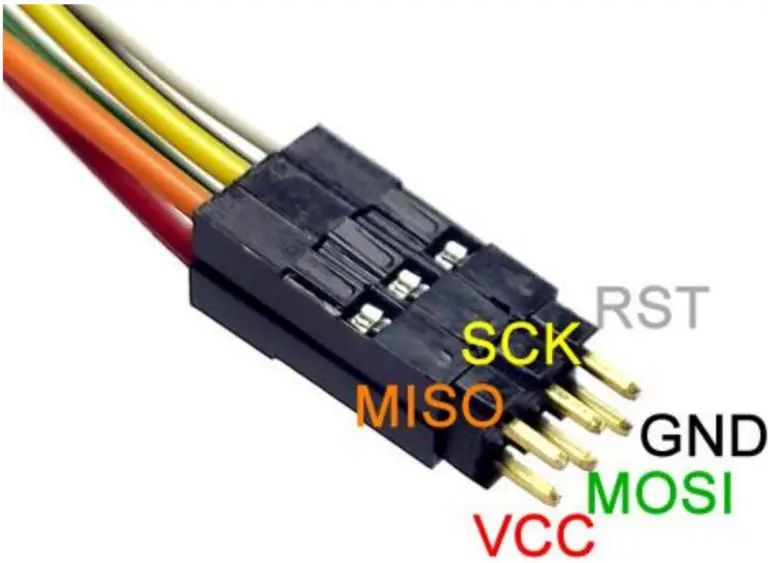
If you use 6 female-female DuPont wires, you also need to plug a 2×3 header to one end to make it a plug:
If you use 6 female-male DuPont wires, you can use a rubber band to tie up their male ends with proper layout, to make it a plug:
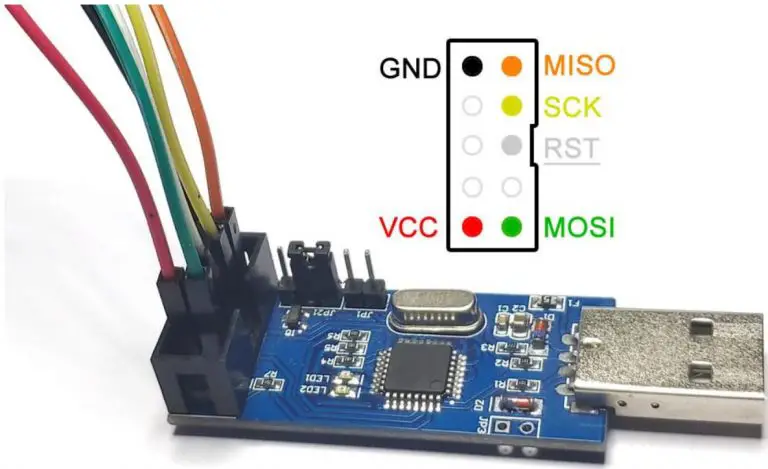
In both cases the wiring on USBasp side will look like this:

Now you have a complete set of tools that can be connected to Witty Pi 3 board and upload the firmware. Please plug USBasp to a USB connector on your PC or on your Raspberry Pi, and then connect the firmware updating plug to your Witty Pi 3 board, then you can run the upload command from your PC or from your Raspberry Pi. Please notice that Raspberry Pi only works as normal PC here, and if you want to use Raspberry Pi as a programmer, please read the chapter.
It is recommended to download our for the system you are using. After extracting the download ZIP file, you can run the upload script directly.
Windows User
If you are using Windows system, just run this command to upload firmware V1.04:
- upload_firmware_0x24.bat
Or run this command to downgrade to firmware V1.02:
- upload_firmware_0x22.bat
Mac OS X User
If you are using Mac OS X system, just run this command to upload firmware V1.04:
- sh upload_firmware_0x24.sh
Or run this command to downgrade to firmware V1.02:
- sh upload_firmware_0x22.sh
Raspberry Pi User
If you are using Raspbian system, please run this command to install avrdude first:
- sh install_avrdude.sh
Then you can run this command to upload firmware V1.04:
- sh upload_firmware_0x24.sh
Or run this command to downgrade to firmware V1.02:
- sh upload_firmware_0x22.sh
Upload firmware via Raspberry Pi
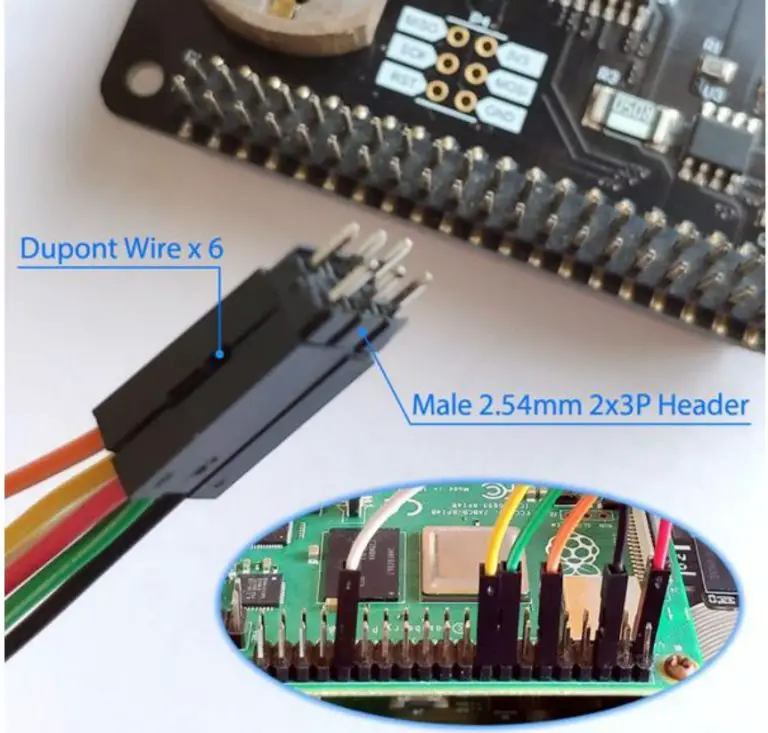
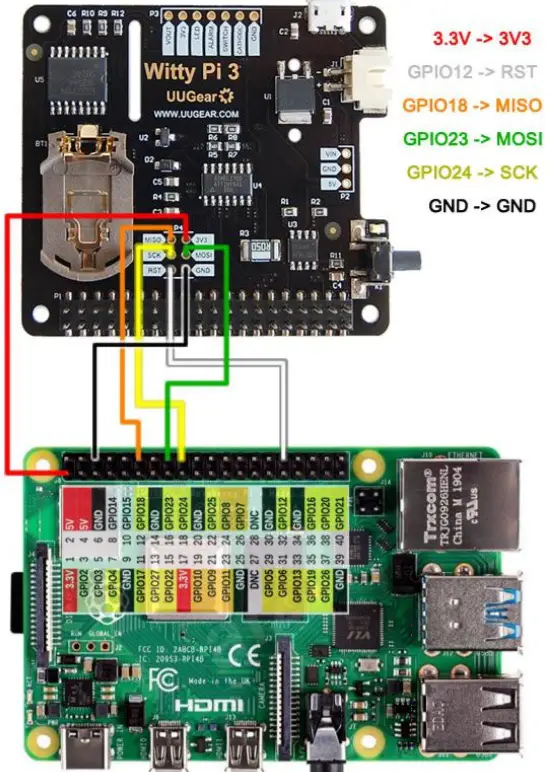
If you don’t have a USBasp programmer on hand, you can use Raspberry Pi to emulate an ICSP programmer. You will need 6 DuPont wires to connect your Raspberry Pi and Witty Pi 3 board.
If you use 6 female-female DuPont wires, you also need to plug a 2×3 header to one end to make it a plug:
If you use 6 female-male DuPont wires, you can use a rubber band to tie up their male ends with proper layout, to make it a plug:
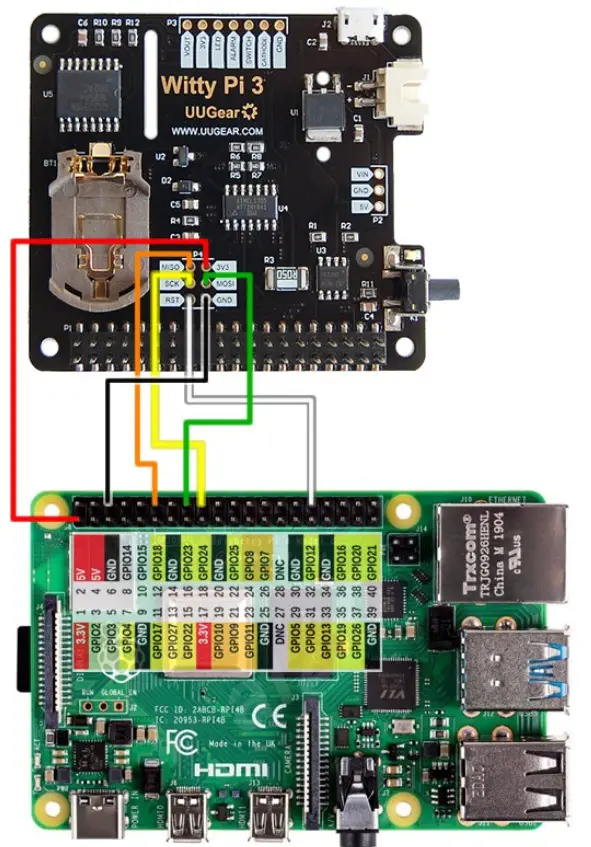
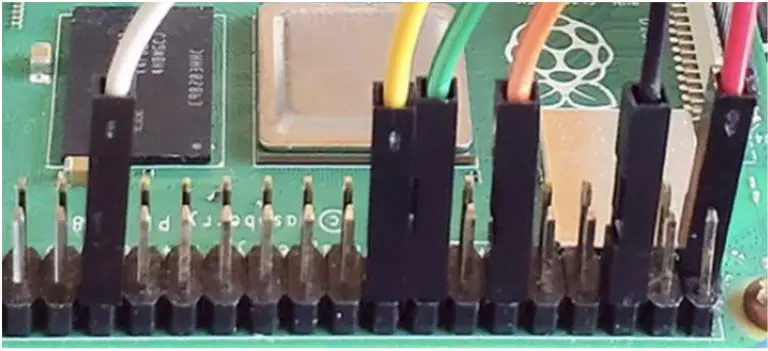
The other ends of DuPont wires are connected to the GPIO-header on the Raspberry Pi:

Please see below the detailed wiring plan:
Install and Configure avrdude
Please run this command in Raspberry Pi to install avrdude:
- sudo apt-get install avrdude
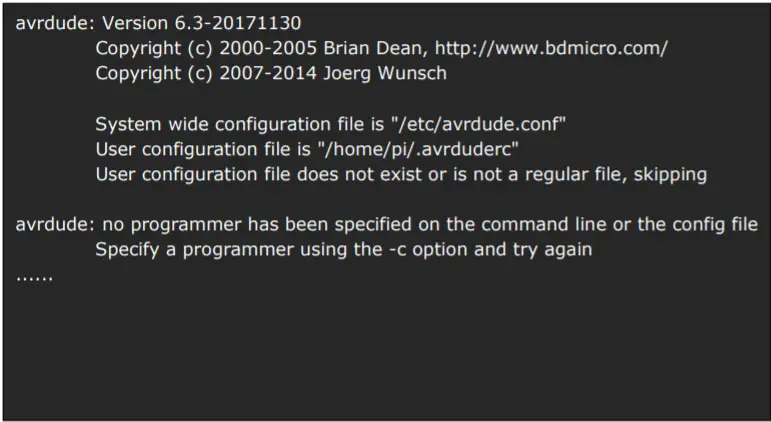
After the installation, you can run this command to confirm the version of avrdude you have:
- avrdude -v
This command will print something like this:
Your avrdude version should be 6.1 or higher, because avrdude versions before 6.1 doesn’t support “linuxgpio” programmer, which is needed to emulate an ICSP programmer.
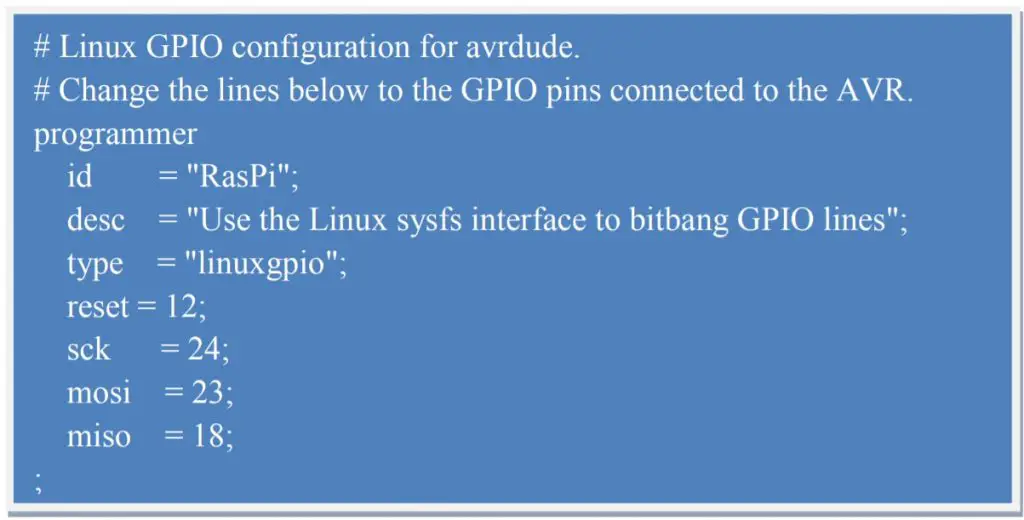
Now you need to tell avrdude that you are using GPIOs as programmer. The default configuration file for avrdude is /etc/avrdude.conf, but it is better not to modify this file directly. You can make a copy of this file in your home directory, and then edit that copy:
- cp /etc/avrdude.conf ~/avrdude_gpio.conf nano ~/avrdude_gpio.conf
Please append these lines at the end of the file:
To quit nano, you press Ctrl+X, and then press Y and Enter to save the file.
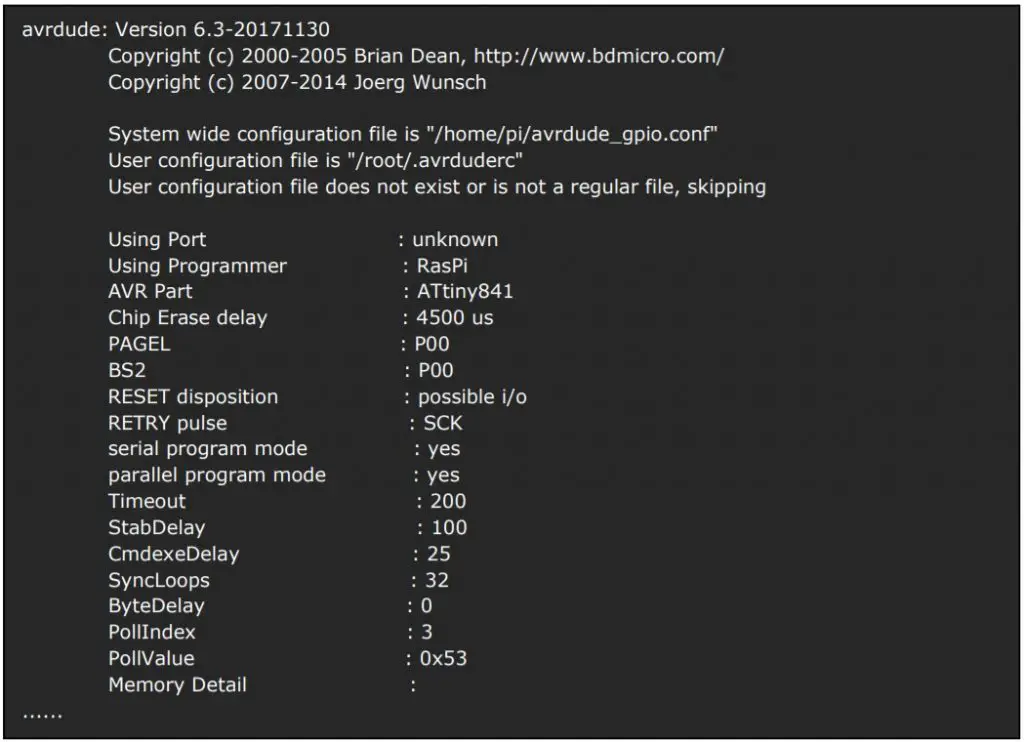
You can then run this command to verify the configuration:
- sudo avrdude -p attiny841 -C ~/avrdude_gpio.conf -c RasPi -v
If everything is OK, it will print something like this:
It should not print any error, otherwise please check the configuration according to the error message.
Upload the Firmware
The firmware is a .hex file, and you can download it from the link in chapter. Just download the firmware will be enough, and you don’t need the all-in-one package in this case.
Assume you have downloaded Witty Pi 3’s firmware to ~/WittyPi3.ino.hex, you can run this command to upload the firmware to your Witty Pi 3 board.
During the process of uploading firmware, please use finger to gently press the firmware updating plug to one side so that all 6 pins will get well connected.

After the uploading the firmware, you can mount Witty Pi 3 on your Raspberry Pi and then verify the firmware ID with this command:
- i2cget -y 1 0x69 0
Revision History
| Revision | Date | Description |
| 1.00 | 2021.03.15 | Initial revision |