
INNOVATIVE LED LIGHTING
LED PLASTIC TUBE INSTRUCTION MANUAL
-
Introduction
Many thanks for selecting and buying V-TAC LED plastic tube. V-TAC will serve you best, however, you should read this instruction carefully before starting the installation and keep it for future reference. If you have any other queries, please contact our dealer or local vendor from whom you have purchased your products. They are trained and ready to support you in the best way possible.
-
Product introduction
This LED plastic tube contains Light Emitting Diodes (LED), which is the most advanced lighting technology today, offering the most significant energy saving, environmental protection, long life span, and no maintenance required. It has 100% better efficiency and significantly better brightness than any other old fixtures.
-
Product overview:
Power saving, no maintenance, easy to install, high efficiency, low energy consumption, long life spar low temperature, and no bad glare.
-
Application and uses:
This LED plastic tube can be used in hotels, offices, factories, conference rooms, meeting rooms, commercial complexes, residential buildings, schools, colleges, universities, hospitals, etc.
- Installation requirements:
- Installation only by a certified electrician
- Operation environment temperature: from -20°C to +45°C
- Proper grounding should be ensured throughout the installation
- Do NOT use with electronic ballasts
- Do NOT use DC electricity
- It is recommended to power the product directly, without electrical ballast. If the components ar powered through the ballast, we cannot guarantee their long-term durability, therefore the warrant will be void.
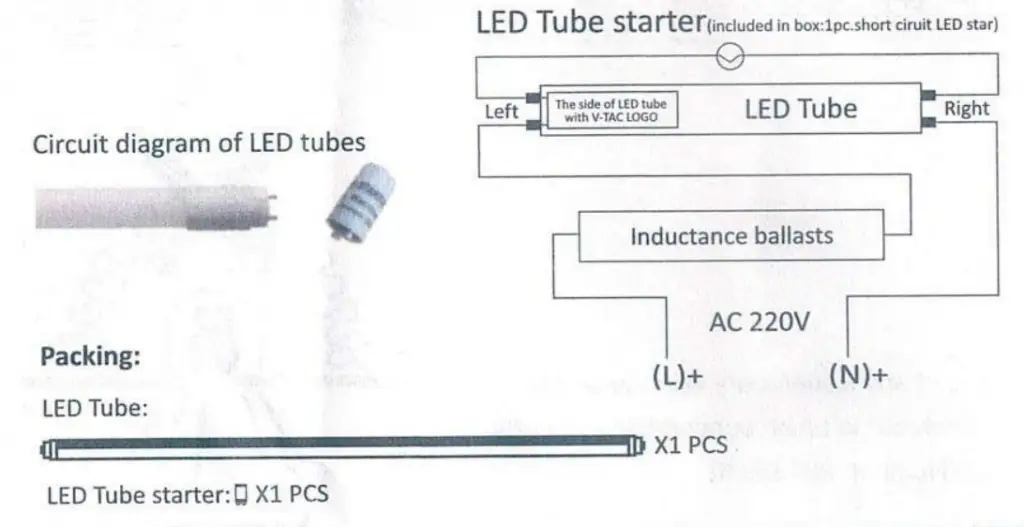
- Installation instructions:
a. Turn OFF electricity before starting!
b. Follow the diagram below:

In case of any issue/query with the product you can reach out to us at: [email protected]
WEEE Number: 80133970
WEEE Number: 80133970
INTRODUCTION
Thank you for selecting and buying V-TAC product. V-TAC will serve you the best. Please read these instructions carefully before starting the installing and keep this manual handy for future reference. If you have any another query, please contact our dealer or local vendor from whom you have purchased the product. They are trained and ready to serve you at the best.
SAFETY INSTRUCTIONS
- Unit must be fixed in an upright position.
- Never connect or disconnect electrical appliances in wet condition or when surrounding area is wet.
- Supply plug must be protected from water ingress.
- No user serviceable parts-repair be qualified electrician only
1. FUNCTIONS
- Twin sockets, both controlled by mechanical timer on top.
- Turns appliances on and off as per your setting.
- Programmable in 15 minutes intervals
- Max. 24 ON/OFFs per day
- It is ideal for controlling outdoor lighting or other appliances for the purposes of home security, home automation and energy saving.
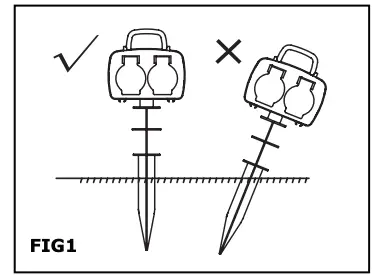
2. WARNING
- Vertical use only
(Refer to FIG 1)
3. TO START
- Screw the stake firmly onto the socket outlets housing.
- Insert the garden spike into the ground firmly so the unit is securely fixed vertically.
- Plug in the power cord making sure it is protected from water ingress.
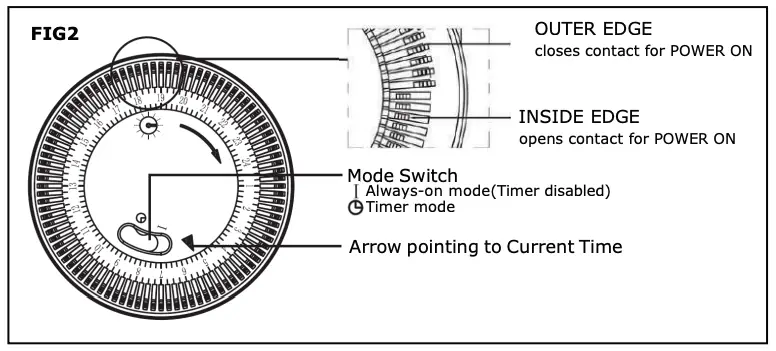
4. USING THE TIMER
- For manual override set switch to (ON)
- For automatic timer settings set switch to
- Rotate the timer wheel clockwise until the current 24hr time is set to the arrow (Refer to FIG 2)
TIMER DIAGRAM:
- Pull segments to OUTER edge for ON(Segments in 15min increments)
- Push segments to INSIDE edge for OFF

WARNING
Please make sure to turn off the power before starting the installation.
 Caution, risk of electric shock.
 This marking indicates that this product should not be disposed of with other household wastes.
IN CASE OF ANY QUERY/ISSUE WITH THE PRODUCT, PLEASE REACH OUT TO US AT: [email protected] FOR MORE PRODUCTS RANGE, INQUIRY PLEASE CONTACT OUR DISTRIBUTOR OR NEAREST DEALERS. V-TAC EUROPE LTD. BULGARIA, PLOVDIV 4000, BUL.L.KARAVELOW 9B
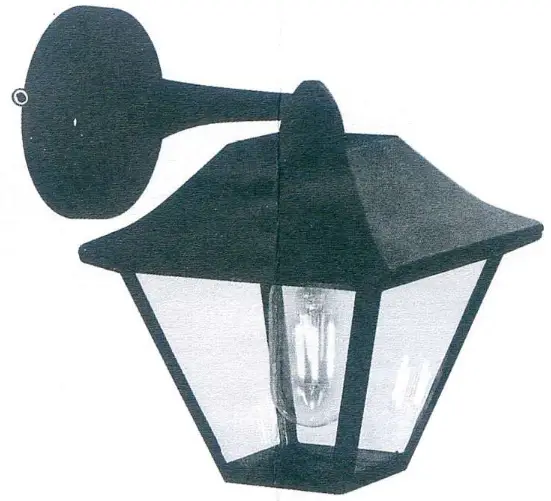
]]>V-TAC Outdoor Wall Lamp
TECHNICAL PARAMETERS
| Input Power | Holder | Protection rating | Unit Size |
| AC: 220-240V, 50Hz | E27 60W(MAX) | IP44 | 140*110*335mm |
INTRODUCTION & WARRANTY
Thank you for selecting and buying V-TAC product. V-TAC will serve you the best. Please read these instructions carefully before starting the installing and keep this manual handy for future reference. If you have any another query, please contact our dealer or local vendor from whom you have purchased the product. They are trained and ready to serve you at the best. The warranty is valid for 3 years from the date of purchase. The warranty does not apply to damage caused by incorrect installation or abnormal wear and tear. The company gives no warranty against damage to any surface due to incorrect removal and installation of the product. The products are suitable for 10-12 Hours Daily operation. Usage of product for 24 Hours a day would void the warranty. This product is warranted for manufacturing defects only.
WARNING!
- Please make sure to turn off the power before starting the installation.
- Proper grounding should be ensured throughout the installation.
- Replace any cracked protective shield.
- Install only by certified Electrician.
This marking indicates that this product should not be disposed of with other household wastes.
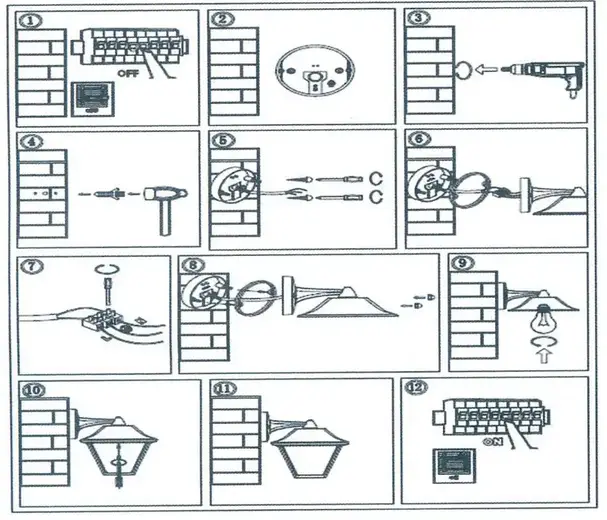
INSTALLATION DIAGRAM:


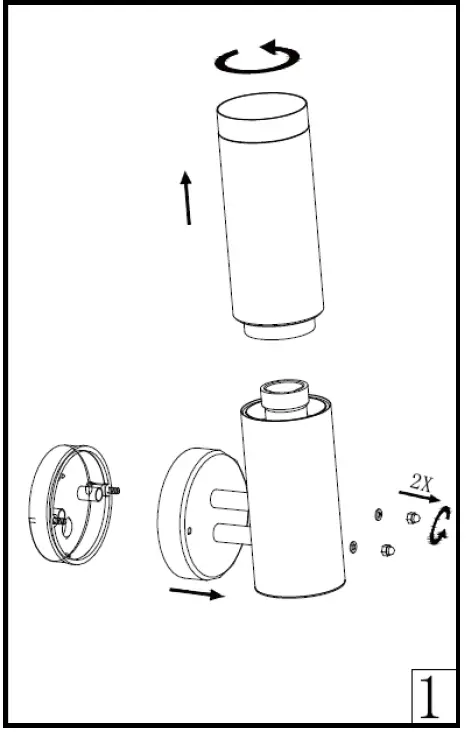
- Drill two holes on the wall and insert two plastic expansion bolts in it.
- Fix the plastic plate on the plastic expansion piece with self-tapping screws.
- Connect the supply leads with terminal.
- Open the lamp and install the bulb in the lamp
- Fix the lamp body on the plate and tighten the screws
- Switch on and test.
IN CASE OF ANY QUERY/ISSUE WITH THE PRODUCT, PLEASE REACH OUT TO US AT: [email protected] FOR MORE PRODUCTS RANGE, INQUIRY PLEASE CONTACT OUR DISTRIBUTOR OR NEAREST DEALERS. V-TAC EUROPE LTD. BULGARIA, PLOVDIV 4000, BUL.L.KARAVELOW 9B.![]()

WEEE Number: 80133970
INSTALLATION INSTRUCTION WALL LAMP VT-843
3 • WARRANTY
TECHNICAL DATA:
| SKU No. | 8686 |
| Input Voltage | AC:220-240V,50Hz |
| Holder | 0.00E+00 |
| Protection Rating | 1P44 |
| Unit size | 235x 175x 225mm |
INSTALLATION DIAGRAM
INTRODUCTION & WARRANTY
Thank you for selecting and buying the V-TAC product. V-TAC will serve you the best. Please read these instructions carefully before starting the installing and keep this manual handy for future reference. If you have any other queries, please contact our dealer or local vendor from whom you have purchased the product. They are trained and ready to serve you at your best.The warranty is valid for 3 years from the date of purchase. The warranty does not apply to damage caused by incorrect installation or abnormal wear and tear. The company gives no warranty against damage to any surface due to incorrect removal and installation of the product. The products are suitable for 10-12 Hours Daily operation. Usage of product for 24 Hours a day would void the warranty. This product is warranted for manufacturing defects only.!
! WARNING
- ENSURE ELECTRICITY IS SWITCHED OFF BEFORE INSTALL.
- PLEASE READ THROUGH ALL THE FOLLOWING INSTRUCTIONS BEFORE INSTALLING THE UNIT.
- THE USER SHOULD PREPARE NECESSARY ACCESSORIES AND SPARE PARTS (NOT PROVIDED).
INSTALLATION INSTRUCTION
- Turn off the power
- Drill the holes in the wall.
- Dig the plastic into the hole.
- Fixing the wall plate onto the wall.
- Connect supply leads with terminal brown (L) to brown, blue (N) to blue, and greenish-yellow (
 ) to greenish-yellow.
 - Install the bulb into the lamp holder.
- Tighten the nuts to fix down the lamp. R Turn on the Power