VAVA VA-CL009 Baby Night Light User Guide
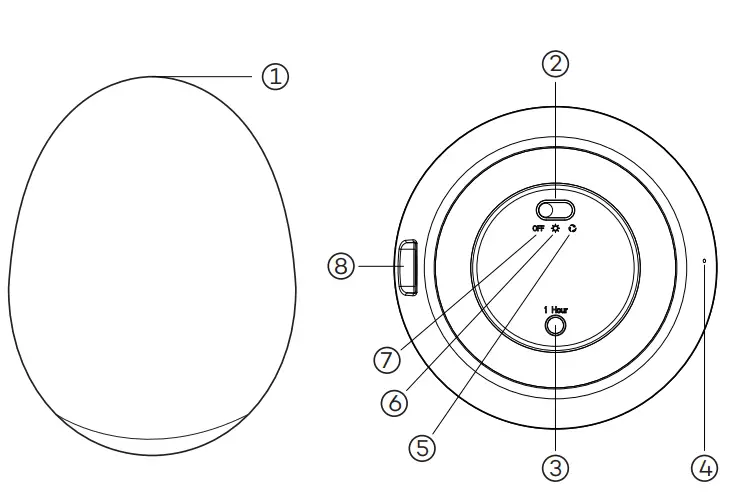
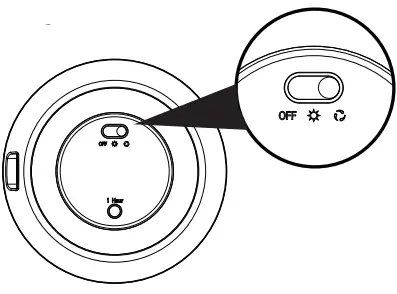
Product Diagram
- Touch Control
- Power Switch
- Timer Button
- LED Indicator
- Multicolour Light Mark
- Warm Light Mark
- Off Mark
- USB Charging Port
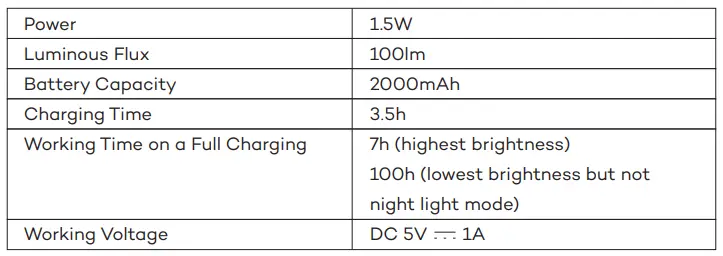
Specifications
How to Use
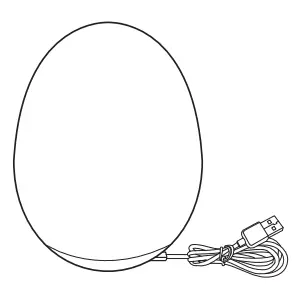
Charging
Note:
- When the battery level is lower than 20%, the LED indicator will turn red.
- The LED indicator will keep blinking when charging and stay solid blue once fully charged.
- In standby mode, the LED indicator will blink on and off for easy locating in the dark.
Warm Light Mode

- Toggle the Power Switch to Warm Light Mark.
- Tap the Touch Control twice to turn on / off the light.
- Tap and hold the Touch Control to adjust the light brightness, release at the desired level. Tap and hold it again to adjust the brightness to the opposite direction.
Multicolour Light Mode
- Toggle the Power Switch to Multicolour Light Mark to enter automatic color carousel, where several color will cycle through.
- Tap the Touch Control once to stay in current color, tap it again to resume color carousel. The LED indicator will flash twice to confirm your setting.
- Tap the Touch Control twice to turn on / off the light.
Memory Function
The Memory Function is enabled only in Standby mode.
Warm Light Mode/ Multicolour Light Mode
- To enter the Standby mode, tap the Touch Control twice and the light will turn off indicating the light is under Standby mode.
- Tap the Touch Control twice again, the light will turn on and remain the last setting for Brightness (in Warm Light Mode) or Color Temperature (in Multicolour Light Mode).
Note: Do not toggle the Power Switch to OFF, or it will exit the Standby mode and reset the night light.
Night Light Mode
When the light is in Standby mode, tap and hold the Touch Control for 1 second to enter night light mode.
Note: Night light mode is enabled only in Warm Light Mode.
Timer Setting
When the light is on, press the Timer Button once to set 1 hour timer with the LED indicator turning green.
Caution
- Do not attempt to alter or repair the unit. Return to the manufacturer for repairing.
- If a bad odor or an unusual operation is detected, turn off immediately.
- Do not place near any heat source, moisture, or corrosive substances.
- Regularly clean the lamp with a dry cloth.
- If not in use, regularly clean the unit. Store in a dry and cool place.
- Use a 5V power adapter only, as other adapters may damage the product.
![]() FCC Compliance This device complies with Part 15 of the FCC Rules. Operation is subject to the following two conditions: (1) this device may not cause harmful interference, and (2) this device must accept any interference received, including interference that may cause undesired operation.
FCC Compliance This device complies with Part 15 of the FCC Rules. Operation is subject to the following two conditions: (1) this device may not cause harmful interference, and (2) this device must accept any interference received, including interference that may cause undesired operation.
WEEE Compliance Correct Disposal of This Product (Waste Electrical & Electronic Equipment) (Applicable in countries with separate collection systems) This marking on the product, accessories or literature indicates that the product and its electronic accessories should not be disposed of with other household waste at the end of their working life. To prevent possible harm to the environment or human health from uncontrolled waste disposal, please separate these items from other types of waste and recycle them responsibly to promote the sustainable reuse of material resources. Household users should contact either the retailer where they purchased this product, or their local government office, for details of where and how they can take these items for environmentally safe recycling. Business users should contact their supplier and check the terms and conditions of the purchase contract. This product and its electronic accessories should not be mixed with other commercial wastes for disposal.
![]()
E-mail [email protected]
Manufacturer: Manufacturer: Shenzhen NearbyExpress Technology Development Co.,Ltd. Address: Floor 7, Building E, Galaxy World Phase II, Shenzhen, China
Learn more about the EU Declaration of Conformity: https://www.vava.com/pages/user-manual
![]()
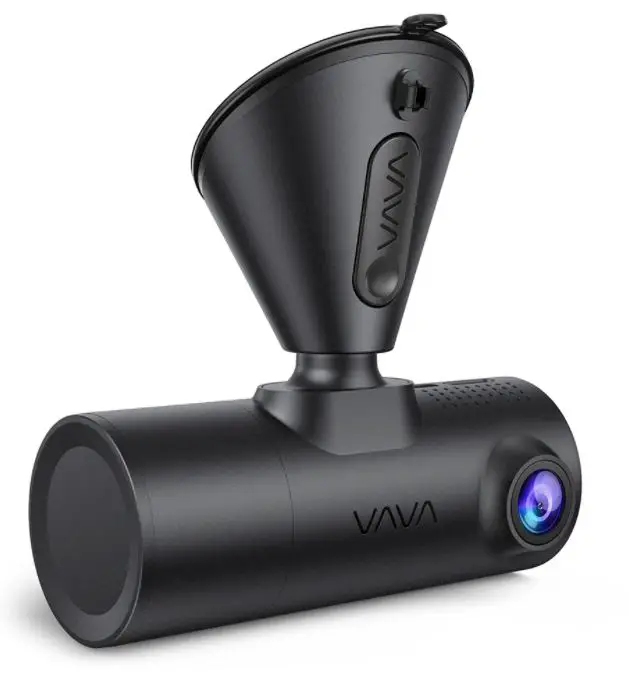
VAVA VA-VD009 2K Dual Dash Cam
What’s in the Box
Product Overview
Product Diagram
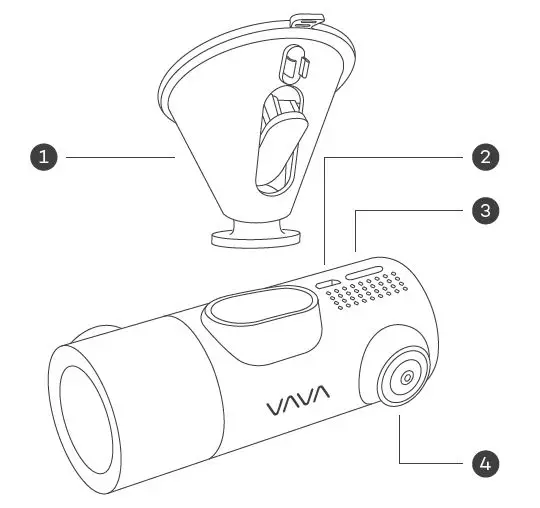
- Car Mount
- Micro USB Port
- SD Card Slot
- Front Camera
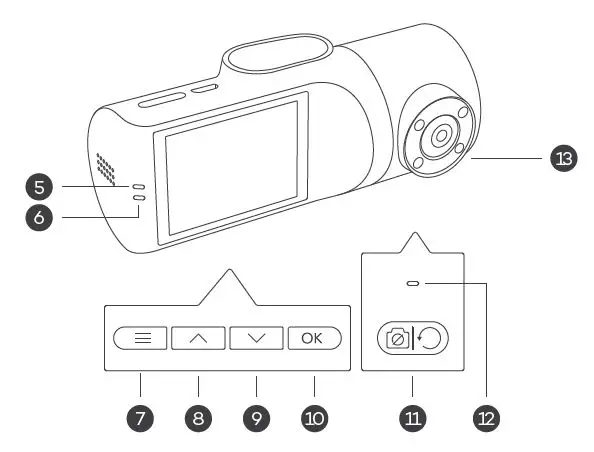
- Power / Working Status LED
- Wi-Fi Status LED
- Menu Button
- Previous
- Next
- OK Button
- Rear Camera OFF Button
- Rear Camera Working Status LED
- Rear Camera
LED Indicator
| LED Indicator | Status |
| Slowly flashes blue | Working |
| Flashes red | Recording an emergency video clip / abnormal working |
| Solid on white | Mobile phone connected to Wi-Fi |
| Solid on green | Rear camera working |
Recording Screen Icon
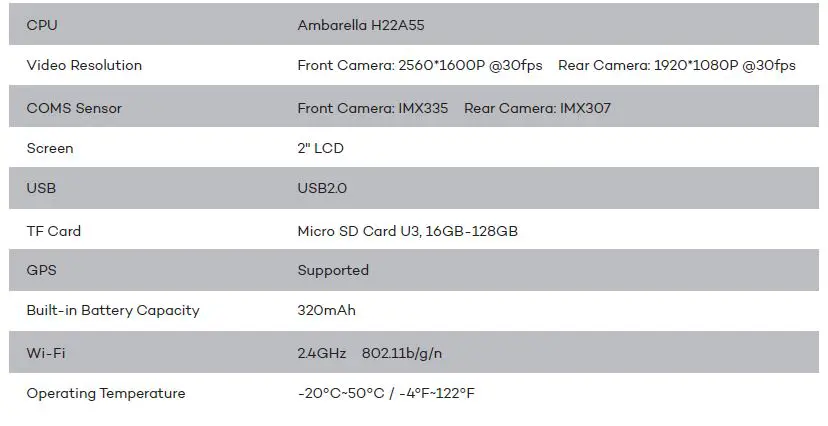
Product Specification
Getting Started
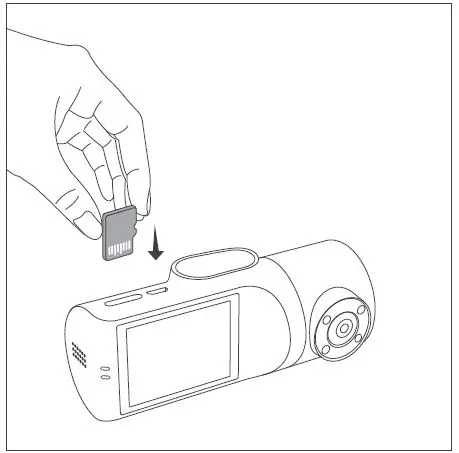
Memory Card Installation
- Insert the Micro SD card into the SD card slot.
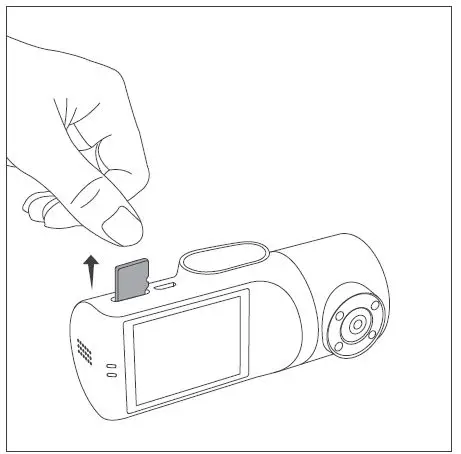
- To remove the card, gently push it until it clicks and pull it out of the slot.
- The Micro SD card shall be formatted before using.
To format the card, you can insert it into PC or connect with Dash Cam via APP.
Note:
- The Dash Cam supports a Micro SD card U3 16GB – 128GB.
- Do not remove or insert the Micro SD card when the camera is working.
- Suggested Micro SD card brands: Samsung, Sandisk.
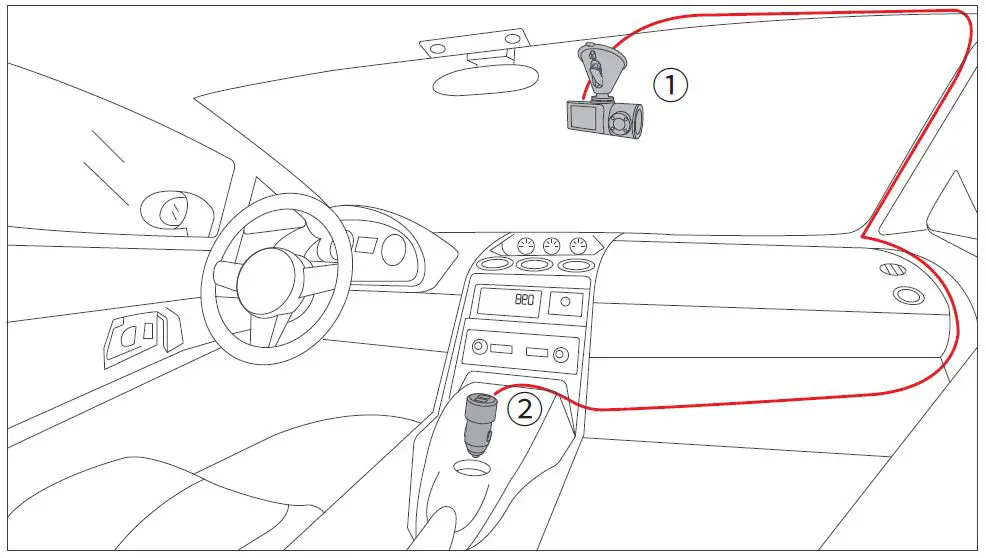
Dash Cam Installation
- Turn off the car engine.
- Stick the car mount onto your car windshield (ideally right in the middle).
- Fix the VAVA ① Dash Cam onto the mount via the magnet.
- Connect the USB cable to the micro USB port of the ① Dash Cam. Run the cable along the edge of the windshield, tuck it away in the seams, and extend it all the way to the USB port of the ② Car Charger. Be sure to keep it away from the airbag area.
- Insert the ② Car Charger into your cigarette lighter, connect the ① Dash Cam to the Car Charger.
- Adjust the ① Dash Cam to keep the lens level with the ground.
- Start the car engine to check if the ① Dash Cam is working properly.
VAVA Dash APP Download
- Before using the device, please download the “VAVA Dash” APP from the App Store (iOS devices) or Google Play (Android devices).

- Connect your Android / iOS smartphone with the VAVA Dash Cam through Wi-Fi: Settings > WLAN > Select “VAVA Wi-Fi” > Enter password (default: 12345678) > Open the VAVA Dash App.
Basic Operation
Video Resolution
- Select “Resolution” to manually set the resolutions for both front and rear cameras. Front camera supports 2560*1600p 30fps Max. Rear camera supports 1920*1080P 30fps Max.
- Resolutions for both front and rear cameras running at the same time:
2560*1600P @30fps+1920*1080P @30fps
1920*1080P @30fps+1920*1080P @30fps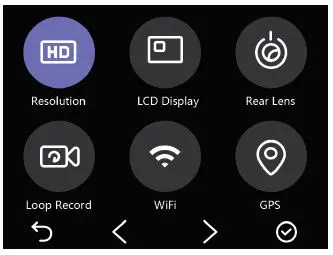
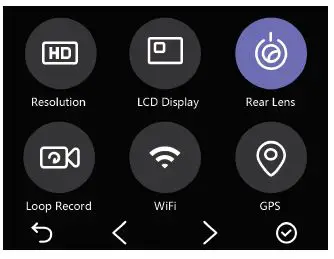
Rear Camera ON / OFF
- Select “Rear Lens” to turn on/off the rear camera.
- You can turn off the rear camera individually with the front camera working normally to protect your privacy.
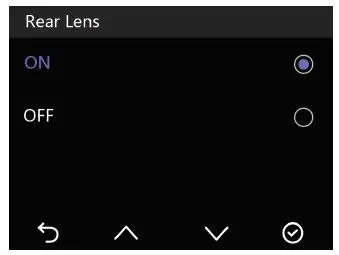
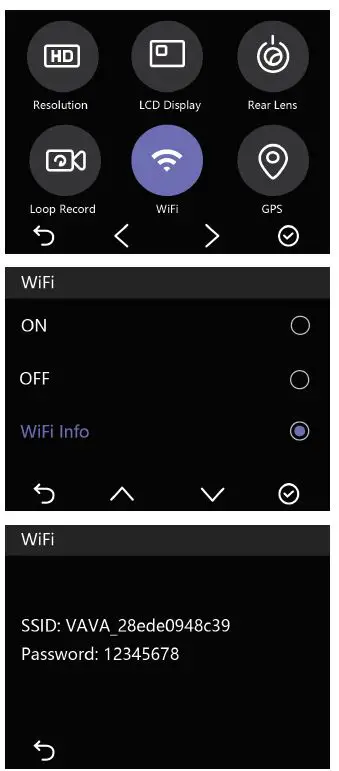
Wi-Fi Setting
- Select “Wi-Fi” to turn on/off the Dash Cam Wi-Fi.
- Select “Wi-Fi Info” to check the Wi-Fi SSID and the password.
- You can change the Wi-Fi SSID and password after connecting with VAVA Dash APP.
Viewing Video/Photos on the Camera
Exit video mode, select by pressing “ ” button to preview the videos and photos recorded.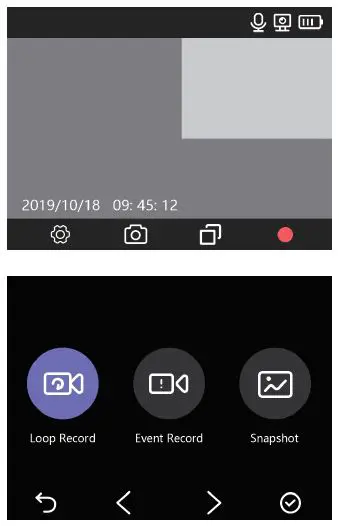
Note:
- Loop Record: Videos recorded during normal driving. The videos will be shown in chronological order.
- Event Record: Videos recorded in case of emergency or videos recorded in Parking Mode.
- Snapshot: Videos and photos captured via Wi-Fi Setting Bluetooth button or VAVA Dash APP.
Dash Cam and Snapshot Button Pairing
- Once the Dash Cam is turned on, press and hold the Snapshot Button for 5 – 30 seconds until beep sounds are heard indicating that they are synced.
The Snapshot Button enters standby mode if there is no operation in 1 minute. Press again to restart and take a photo. - Using the Snapshot Button
- Press once to take photos
- Press and hold for 3 seconds with a beep sound to take videos
Note:
- After the Dash Cam and the Snapshot Button is successfully paired, the Snapshot Button enters standby mode when the dash cam is shut off. When the dash cam is turned on again, press the Snapshot
Button to activate the button while taking a snapshot photo, it takes around 3 seconds to resume normal working status. - Continually pressing the Snapshot Button will drain the button battery. Replace the battery when it runs out.
Senior Setting – IR LED Auto
- When the rear camera is under low light, IR LED will be turned on automatically. The infrared night vision mode will be enabled and the screen will display in black-and-white.
- Once the IR LED is turned off, the screen will always display in color.
Firmware Upgrade via Memory Card
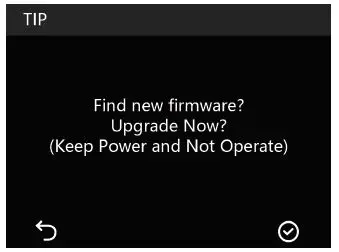
- Download the firmware for the corresponding model from VAVA web site: https://www.vava.com/c/dash-cam
- Insert the Micro SD card into PC, then copy the firmware file into the SD card root.
- Insert the card back into the Dash Cam, and power it on.
- A dialog pops up to confirm Firmware Upgrade automatically. Press OK to start upgrading.
Important: The firmware file shall be copied in the SD card Root.
Note:
- Do not power off the Dash Cam during the upgrade.
- Please ensure enough power during this process. Dash Cam will restart automatically after upgrading.
- Do not operate or remove the card during the upgrade.
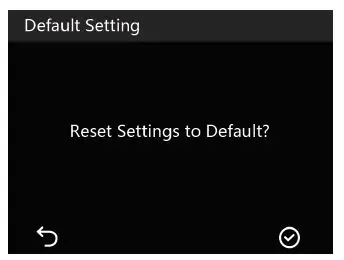
Restore to Factory Settings
- Select “Default Setting”, a dialog pops up to confirm restoring the configuration parameters of Dash Cam to factory setting.
- After restoring to factory settings, settings for Language and Time&Date will not be changed.
FAQ
Fail to connect with Dash Cam Wi-Fi.
- For Android phones: Turn off the Cellular Data.
- Check if the Wi-Fi SSID and password are correct.
- Upgrade the firmware to the latest version
- For any problem, please email us at [email protected] with details.
How to change Wi-Fi password?
- Connect with Dash Cam Wi-Fi.
- Open VAVA Dash APP.
- Go to “Setting” to change the Wi-Fi password.
Is the rear camera able to be turned off individually?
- Yes. You can turn off the rear camera individually with the front camera working normally to protect your privacy.
Snapshot button does not work
- Reset the Dash Cam, then re-pair the Snapshot button.
- Replace the battery of the Snapshot button.
- The Snapshot button shall be 5 meters range within the Dash Cam without any obstacles.
- For any problem, please email us at [email protected] with details.
Customer Service
18-month Warranty
Life-time Support
E-mail: [email protected]
Tel: 1-888-456-8468 (Monday-Friday: 9:00 – 17:00 PST)
Social Media: @LetsVAVA Facebook / Twitter / Instagram
Product Link: https://www.vava.com/
![]()
VAVA VA-UC016 USB C Hub 9 in 1 Adapter
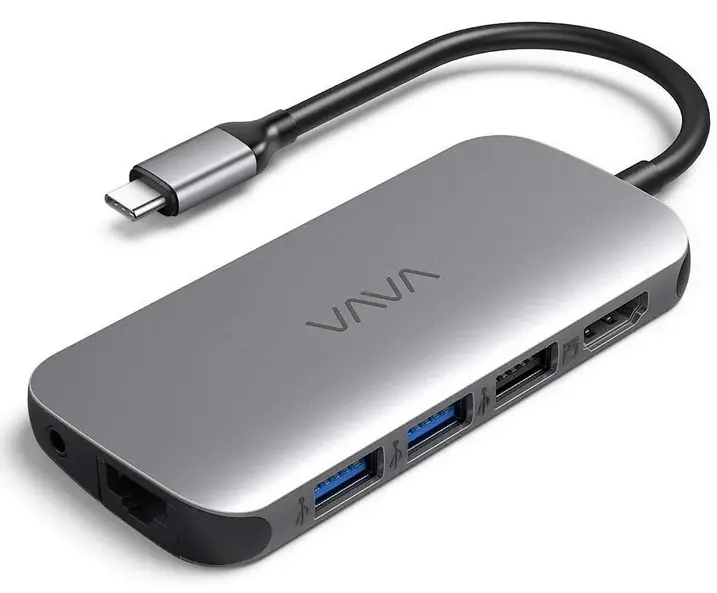
Product Diagram
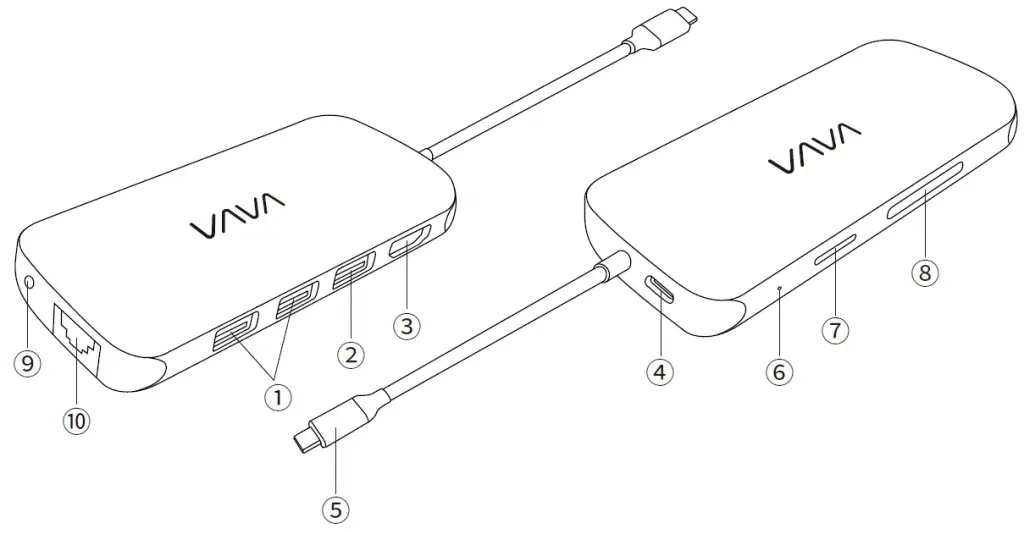
- USB 3.0 Ports
- USB 2.0 Port
- 4K HDMI Port
- USB PD Port
- USB-C Connector
- LED Indicator
- Micro SD 3.0 Slot
- SD 3.0 Slot
- Audio Port
- RJ45 Ethernet Port
Caution
- Keep away from water, fire, humidity or hot environments.
- Do not drop the device from great heights.
- Do not attempt to disassemble, modify or fix this device by yourself.
Features
- USB-C Connector: Compatible with all Type-C devices that support USB3.1 /PD3.0 /DP1.2
- SD / Micro SD 3.0 Slot: Connect your SD / micro SD card
- USB 2.0 Port: Connect your wireless mouse or keyboard without 2.4Ghz interference
- USB 3.0 Port: Support high speed data transfer for connection to flash drives when also supporting peripherals like mouse, keyboard, etc.
- HDMI Port: Connect to HDTV, projector or monitor (4K@30hz or 2K@60hz)
- PD Port: Power delivery fast charging for your laptop
- RJ45 Ethernet: 1000 / 100 / 10Mbps network connection
- Audio Port: Connect your speaker or headphones
Supported Operation Systems
Windows / Mac / Unix / Chromebook
Note:
- This hub does not work with earlier OS versions (like Windows XP, Win7, Win8, Mac 10.6-10.8, Linux, etc.). For such OS version, please refer to the Driver Installation section.
- This hub supports most of the USB C devices based on standard protocol (USB3.1 / PD3.0 / DP1.2). Yet the USB C ports of some devices only support part of the functions. Please check your device’s specifications when using.
Compatible Devices (USB 3.1 / PD 3.0 / DP 1.2 Supported)
Supports most of the USB C devices based on standard protocol
(USB3.1 / PD3.0 / DP1.2):
- Google Pixelbook or other Chromebooks with USB C port
- Apple MacBook / Pro (2016 / 2017 / 2018)
- Apple iMac / iMac Pro (21.5’’, 27’’)
- Apple MacBook Air 2018
Only PD 3.0 Supported Device
- iPad Pro 2018 (DP 1.2 supported)
- Asus ZenPad 3S
Only USB 3.1 Supported Devices
- Asus ZenBook3 / Transformer3 Pro
- Samsung TabPro
- Wacom MobileStudio Pro 16
- Asus ZenBook3
- Other USB C devices that support DP 1.2 or run under enough battery
Note:
- This USB-C hub supports pass-through charging of up to 100W. However, a 45W adapter may be too low for both the hub and laptop / computer. If charging is not started, please change to an adapter with higher output.
- The USB 3.0 ports transfer data at a rate up to 5Gbps, however the actual rate is limited by the USB transfer rate of the connected devices.
Driver Installation
For the Ethernet port use, this hub is plug-and-play and requires no driver for Windows 8.1 or higher, Mac OS 10.9 or higher version, or Unix.
For other operation system versions, please go to this link, download and install the driver: https://www.realtek.com/en/component/zoo/category/network-interface-controllers-10-100-1000m-gigabit-ethernet-usb-3-0-software
Specifications
| USB-C Cable | Power Delivery (PD) V3.0, 9V / 12V / 15V / 20V, 5A 100W Max | |
|
||
| SD / Micro SD 3.0 Slot | Support Secure Digital V1.0 / V1.1 / V2.0 / SDHC / SDXC (Capacity up to 2TB); V3.01 UHS-I (Ultra High Speed): SDR12 / SDR25 / SDR50 / DDR50 / SDR104 | |
| USB PD Port | Power Delivery (PD) V3.0, 9V / 12V / 15V / 20V, 5A 100W Max | |
| USB 2.0 Port | 480Mbps / 12Mbps max for USB 2.0 / 1.1 | Max 5V / 1.36A for 2 USB 3.0 ports and SD port; When connecting power adapter:
|
| USB 3.0 Ports | 5Gbps / 480Mbps / 12Mbps max. for USB 3.0 / 2.0 / 1.1; | |
| 4K HDMI Port | Support connecting to monitor, TV and projector via HDMI port, up to 1080p at 60Hz or UHD 3840×2160 at 30Hz. | |
| RJ45 Ethernet Port | 10 / 100 / 1000Mbps; plug and play for Windows 8.1 / Mac OS 10.9 and higher versions | |
| Audio Port | USB2.0, 48KHZ, 16bit Audio DAC | |
| Cable Length | 18cm / 7.1in | |
| Surface Temperature | <55°C (full load) | |
| Dimensions | 28.8 x 4.7 x 1.4mm / 1.1 x 0.2 x 0.06in | |
| Weight | 84g / 3oz | |
Warranty
18-month warranty
Lifetime customer service
Tips for Use
- POWER: This hub supports pass-through charging of up to 100W;however when connected to a standard 60W power adapter, the hub and the peripheral devices will use about 11W of power, thus the final charge supplied will be 49W which may not be enough for some laptops.
- DO NOT CHARGE YOUR PHONE: It’s recommended to use the USB ports only for data transfer, instead of charging iPads, tablets or smart phones.
- HIGH POWER PERIPHERAL: Though it supports simultaneous flash drive use,to achieve best transfer rates, we recommend using only one at a time.
- DISPLAY: To achieve optimal 3840 x 2160 resolution, use with a 4K screen display and HDMI 2.0 cables.
- ETHERNET: For the max 1000Mbps network speed, a 1000Mbs LAN port router, a CAT5e cable and a high speed Ethernet driver is required.
- OPERATING TEMPERATURE: When in use, the maximum working temperature of this USB-C hub can reach up to 131°F (55°C), which may feel hot to the touch, but is not abnormal (the chips can work at 161.6°F / 75°C).
- DO NOT USE C-A ADAPTER: This USB-C hub does not work with laptops with USB-A inputs even if a C-to-A adapter is used since standard protocol used for USB-C devices deviate (e.g. Power Delivery).
ASIA PACIFIC
E-mail: [email protected](JP)
Tel: 03-5542-0238(10-18時/土日祝日を除く)
JP Importer: 株式会社SUNVALLEY JAPAN
Address: 〒104-0032東京都中央区八丁堀3丁目18-6 PMO京橋東9F
EUROPE
E-mail:
[email protected](UK)
[email protected](DE)
[email protected](FR)
[email protected](ES)
[email protected](IT)
EU Importer: ZBT International Trading GmbH
Address: Halstenbeker Weg 98C, 25462 Rellingen, Deutschland
NORTH AMERICA
E-mail: [email protected]
Tel: 1-888-456-8468 (Monday-Friday: 9:00 – 17:00 PST)
US Distributor: SUNVALLEYTEK INTERNATIONAL INC.
Address: 46724 Lakeview Blvd, Fremont, CA 94538
MANUFACTURER
Manufacturer: Shenzhen NearbyExpress Technology Development Co., Ltd.
Address: 333 Bulong Road, Shenzhen, China, 518129
VAVA MOOV 12 EARPHONES
Model: VA-EP004
User Guide
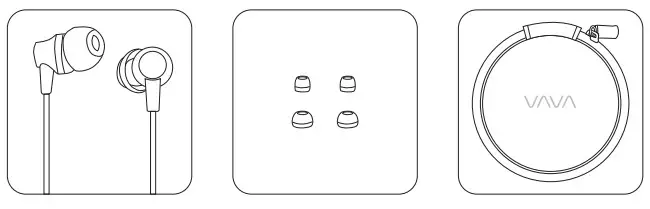
Package Contents
- 1 x VAVA MOOV 12 Earphones
- 6 x Earbud Tips (two are already attached)
- 1 x Carrying Case
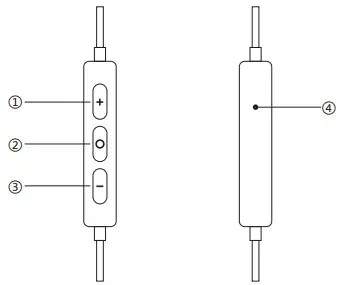
Getting Started
- Volume+
- Multifunction Button:
Previous/Next Track,
Play/Pause, Answer/End
Call, Activate Voice control - Volume –
- Microphone
Thank you for choosing the VAVA MOOV 12 Earphones. If you have any questions or issues, please contact our customer support team by email at [email protected].
Care and Maintenance
- Do not expose the earphones to extended periods of direct sunlight.
- Do not use the earphones in areas with high heat and humidity.
- Do not try to take the earphones apart.
- Do not drop or knock your earphones on hard surfaces.
- Do not use chemicals or detergents to clean the earphones.
Warranty
This product is covered by the VAVA Parts and Labor Warranty for 18 months from the date of its original purchase (from authorized retailers and distributors only). If the product has become defective, please contact VAVA Support for assistance or to launch a warranty claim.
Support and Enquiry
For further inquiries and technical assistance, please contact VAVA Support or visit our website at www.vava.com. We normally respond to inquiries within 24 hours.
NORTH AMERICA
E-mail: [email protected]
Tel: 1-888-456-8468 (Monday-Friday: 9:00 – 17:00 PST)
Address: 46724 Lakeview Blvd, Fremont, CA 94538
EUROPE
E-mail:[email protected]
EU Importer: ZBT International Trading GmbH, Halstenbeker Weg 98C,
25462 Rellingen, Deutschland
MANUFACTURER
Shenzhen NearbyExpress Technology Development Company Limited
Address: Block D, Minle Industrial Park, Meiban Road, Longhua District,
Shenzhen, China. 518131