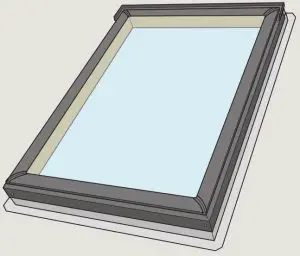
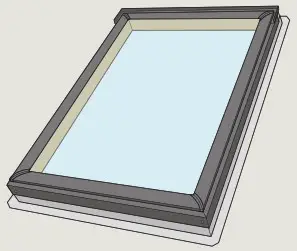
![]() FS Deck Mounted Skylight
FS Deck Mounted Skylight
Installation Instructions

TOOLS

Installation checklist
- The installer should verify that:
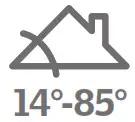
- Deck-mounted skylights FS are installed in roof pitches from 14° to 85°.
- Rough opening is dimensioned correctly according to these installation instructions.
- The skylight is properly wrapped in VELUX adhesive skylight underlayment according to installation instructions supplied with skylight, flashing, or underlayment.
- Proper VELUX flashing for the actual roofing material is installed according to installation instructions supplied with the flashing.
- Skylight cladding is properly secured and counter-flashed overall flashing on the skylight frame.
- The bottom frame rubber gasket extends over the bottom sill flashing section and can be seen below the bottom frame cladding.
- Skylight and accessories operate properly.
- The customer is informed of the required maintenance of the product as found at www.velux.com.
- The customer is informed of the warranty claim procedure. For a full VELUX warranty, go to www.velux.com.
IMPORTANT: Failure to install the skylight, flashing, and blinds in strict accordance with these VELUX instructions shall void the VELUX warranty.
Important installation requirements
Roof pitch
FS is designed for roof pitches 14° – 85° (3:12 – 137:12). In case of roof pitches below 14° (3:12), please contact your VELUX sales company for installation guidelines.
Importance of proper installation
Satisfactory product performance depends on proper installation.
The seller accepts no responsibility whatsoever for the failure of an installer to install VELUX ®roof windows and skylights in accordance with these installation instructions. Although VELUX roof windows and skylights are designed and manufactured to the highest standards, severe climatic exposure, as well as adverse indoor conditions(ie high humidity), may produce temperature conditions that exceed product performance standards. In these cases, special preventive measures may be necessary. Seller eserves the right to implement product changes for improvement without prior notification.
Sunscreening accessories
Refer to instructions for accessory type in a question or contact your VELUX sales company for further information.
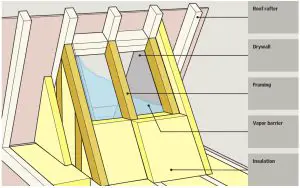
Vapor barrier
Where a vapor barrier is part of the roof construction, this barrier must be extended and connected to the skylight finish groove.
Treatment of wooden frame
Most VELUX skylights are pre-painted white but the option exists to order stain-grade skylights. These stain-grade skylights received a temporary treatment against mold and mildew. Further treatment with wood stain, paint, etc is necessary and can be done prior to installation or shortly after installation. Care should be taken to ensure wood stain, paint, etc is not applied to gaskets.
Consult local jurisdictions and authorities for recycling and proper disposal of removed skylights and materials.
NOTICE
Skylights and interior surfaces in older homes may have been painted with lead-based paint, and removal of the skylights may disturb this paint. Take proper precautions to minimize exposure to dust and debris. For more information on the proper removal of lead paint go to www.epa.gov/lead.
Seller assumes no obligation whatsoever for the failure of an architect, installer, or building owner to comply with all applicable laws, ordinances, building codes, and safety requirements.
NOTICE
In rare circumstances, all-glass may be subject to unexpected and spontaneous breakage due to imperfections in the glass that are undetectable during the manufacturing and inspection process by the manufacturer of the glass and the VELUX factory. Your VELUXsales company offers the choice of laminated or tempered glass skylights. Laminated glass is a combination of two or more glass sheets with one or more interlayers of plastic (PVB) or resin. In case of breakage, the interlayer is designed to hold the fragments together. Tempered glass does not contain an interlayer to hold the fragments together. Instead, tempered glass is designed to break into small, pebble-like pieces. When tempered glass breaks, pieces of glass come loose and may strike an individual.
Consult local regulations and/or building material consultants to determine which type of glass is right for you or if the laminated glass is required in your application.
Important installation requirements for the USA and Canada
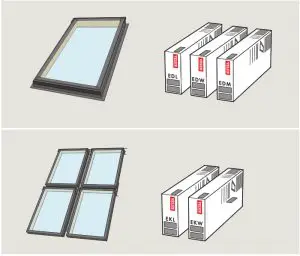
VELUX®series A21 skylights are designed and engineered to be installed with VELUX flashing systems. VELUX flashing systems include VELUX adhesive skylight underlayment in a quantity sufficient to install one skylight of the size for which the flashing system was designed.
The VELUX “No Leak” installation warranty is based upon installation strictly in accordance with VELUX deck or curbs mounted skylight and related deck or curb mounted flashing installation instructions, which specify the use and proper installation of the VELUX adhesive skylight underlayment packaged with the flashing system.
If VELUX adhesive skylight underlayment is not used or is not properly installed and a service issue occurs related to underlayment omission, failure. or its proper installation as detailed in the VELUX deck or curb mounted skylight and deck or curb mounted flashing installation instructions, the VELUX “No Leak” installation warranty is void.
VELUX America LLC understands that there are other types of adhesive underlayment that are of equal or higher quality than what is provided by VELUX America LLC. However, VELUX America LLC cannot approve or validate that any specific type of adhesive underlayment is better or worse. Thus. VELUX America LLC places the risk of using an alternative adhesive underlayment onto the specifier by stating that if the alternative underlayment becomes a failure point for the skylight or flashing system even if installed according to our instructions. then the VELUX No Leak” installation warranty cannot be honored. Further, the alternative underlayment must not in any way obstruct, alter or prevent the proper functioning of the complete skylight and flashing installation, such as increasing the overall flashing system thickness beyond prescribed dimensions.
VELUX America LLC affirms that if a high-quality alternative adhesive underlayment installed per our instructions, does not fail but a leak occurs in some other VELUX skylight or flashing component due to no cause from the alternative underlayment then such a leak would be covered under the terms of the VELUX No Leak” installation warranty.
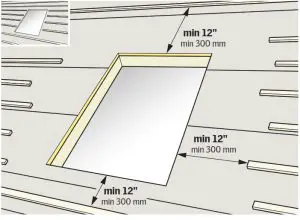
clearance around installations
![]()
Maintain illustrated clearances between skylight frame and critical areas such as valleys, ridges, slope changes, and roof-to- all intersections.
When installing skylights side by side within the span of 2½” – 12″ (65 mm – 300 mm), please refer to VELUX combi-flashing instructions.
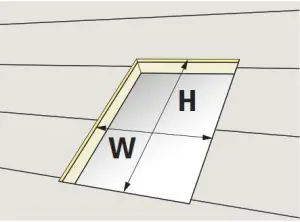
Light shaft application
Cut rough opening according to the measurements in the chart.
Roof with battens:
Clear away battens from rough opening to allow for proper installation of underlayment.
 |
 |
| Skylight size | Rough opening dimensions W x H |
| A06 | 141⁄2″ x 453⁄4″ 368 mm x 1162 mm |
| C01 | 21″ x 26 7⁄8″ 533 mm x 682 mm |
| C04 | 21″ x 37 7⁄8″ 533 mm x 962 mm |
| C06 | 21″ x 45 3⁄4″ 533 mm x 1162 mm |
| C08 | 21″ x 54 7⁄16″ 533 mm x 1382 mm |
| C12 | 21″ x 70 1⁄4″ 533 mm x 1784 mm |
| D26 | 22 1⁄2″ x 22 15⁄16″ 572 mm x 582 mm |
| D06 | 221⁄2″ x 45 3⁄4″ 572 mm x 1162 mm |
| M02 | 30 1⁄16″ x 30″ 763 mm x 762 mm |
| M04 | 301⁄16″ x 37 7⁄8″ 763 mm x 962 mm |
| M06 | 301⁄16″ x 45 3⁄4″ 763 mm x 1162 mm |
| M08 | 301⁄16″ x 54 7⁄16″ 763 mm x 1382 mm |
| S01 | 441⁄4″ x 26 7⁄8″ 1123 mm x 682 mm |
| S06 | 441⁄4″ x 45 3⁄4″ 1123 mm x 1162 mm |
 Remove existing roofing underlayment around the rough opening as shown.
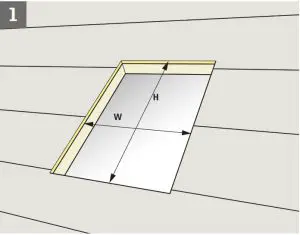
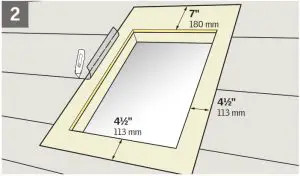
 Mark corners of the rough opening.
Roof with battens: Place 1½” (38 mm) wide battens around the rough opening. Batten thickness around rough opening should’ve equal to the thickness of battens used for roofing material.
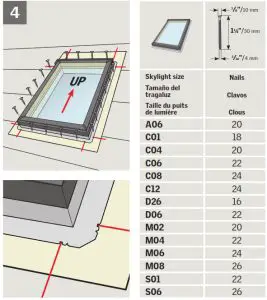
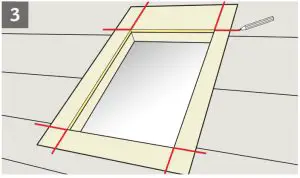
Center skylight over properly cut and framed rough opening using alignment notches as shown. Anchor skylight with 1¼” (30 mm) nails provided with the skylight, one nail per pre-punched hole in the mounting flange. The carbon steel nails are zinc-coated (double hot-dipped).
Note: Skylight FS cannot be rotated.
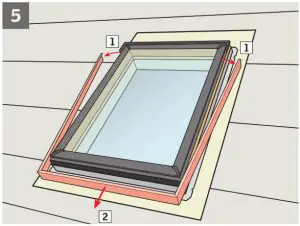
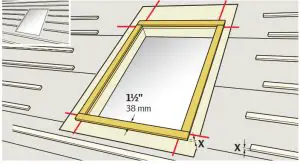
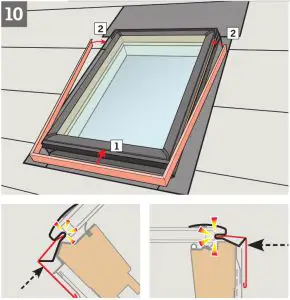
To properly install VELUX adhesive skylight underlayment, remove cladding as shown.
To ensure waterproofing, skylight frames should be completely wrapped in VELUX adhesive skylight underlayment supplied with the flashing. This underlayment must be applied before installing the flashing.
Note: If snow accumulation on the roof is likely, waterproofing is achieved by installing a continuous self-adhesive waterproof membrane beneath the roofing material and flashing material. VELUX adhesive skylight underlayment around the skylight frame must be properly integrated with a waterproof membrane on the roof decking.
Peel off the backing from VELUX adhesive skylight underlayment prior to applying it to roof decking and skylight frame. Ensure that surfaces are clean, dry, and free of debris.
Wrap the bottom frame and corners of the skylight with the underlayment and create water-shedding laps over roofing underlayment.
Note: Lift up the rubber gasket while wrapping the bottom frame.
Note: Observe the measurements stated.
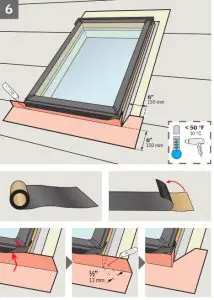
 Wrap the side frames and corners of the skylight with VELUX adhesive skylight underlayment and create water-shedding laps over roofing underlayment.
Note: Observe the measurements stated.
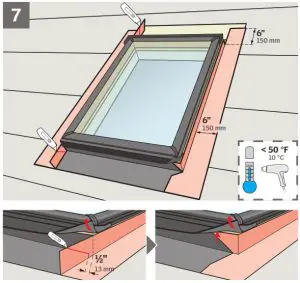
 Wrap the top frame and corners of the skylight with VELUX adhesive skylight underlayment and create a proper water-shedding lap.
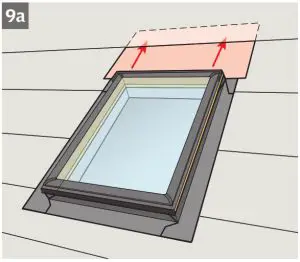
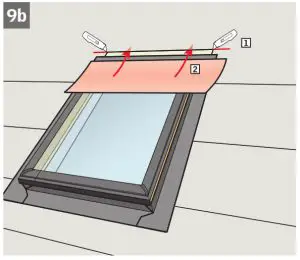
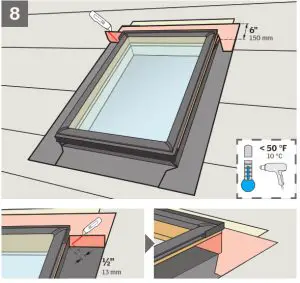
To allow for proper drainage, interweave roofing underlayment as shown in 9a for new construction applications. For retrofit applications, interweave roofing underlayment as shown in 9b.
Installing VELUX adhesive skylight underlayment on the roof with battens: Refer to installation instructions included with VELUX adhesive skylight underlayment.
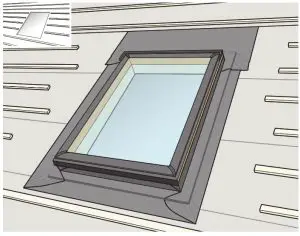
You are now ready to install the flashing. If the flashing is not to be installed immediately, reinstall cladding.
For flashing information, see instructions supplied with the relevant flashing.
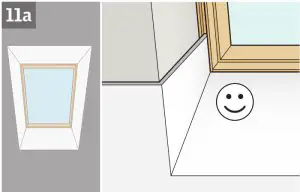
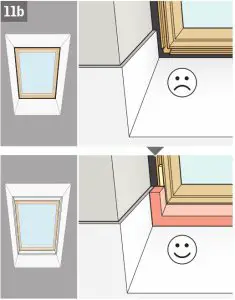
If the drywall is not installed tight into the finished groove, add on-site insulation and trim for a finished appearance and to prevent conditions that may contribute to condensation.
Homeowner information
Please complete and give it to the homeowner.
Date: ……………………………………………………………………………………………….
Product number: ……………………………………………………………………………..
(stamped on product exterior)
Quantity: …………………………………………………………………………………………
Flashing: ………………………………………………………………………………………….
Accessories installed: ………………………………………………………………………
Model ……………. Size …………… Variant code ……………………………………
Roofing material: …………………………………………………………………………….
Installation contractor: ……………………………………………………………………
The dealer purchased from: …………………………………………………………….
AU: VELUX Australia Pty. Ltd.
1300 859 856
www.velux.com.au
CA: VELUX Canada Inc.
1 800 88-VELUX (888-3589)
www.velux.ca
JP: VELUX-Japan Ltd.
0570-00-8141
www.velux.co.jp
KR: VELUX International (VELUX A/S)
+45 7632 9240
www.velux.co.kr
www.velux.com
FS DECK MOUNTED SKYLIGHT INSTALLATION INSTRUCTIONS. ©2009, 2020 VELUX GROUP ® VELUX AND THE VELUX LOGO ARE REGISTERED TRADEMARKS USED UNDER LICENSE BY THE VELUX GROUP