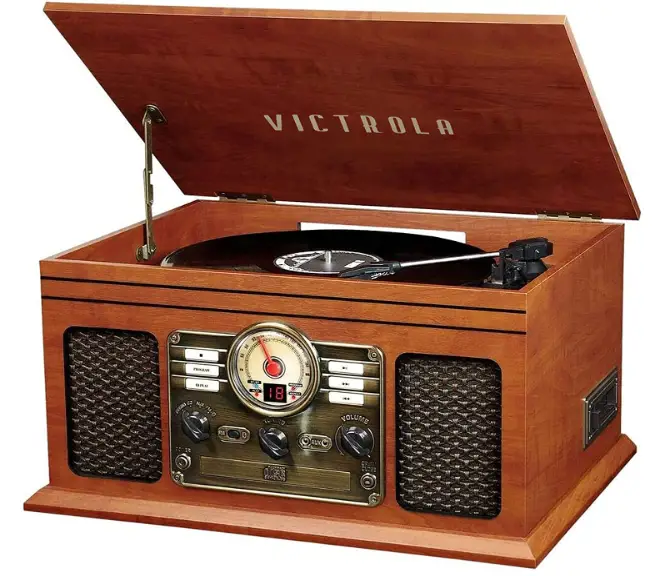
Victrola Nostalgic 6-in-1 Bluetooth Record Player and Multimedia Center

Specifications
- POWER REQUIREMENTS: AC 100-240V~50/60Hz
- POWER CONSUMPTION: 30W
- DIMENSIONS (W X H X D): 460 x 255 x 340mm | 18 x 10 x 13.4in (approx.)
- WEIGHT: 7 kg. | 16 lbs. (approx.)
- AMPLIFIER: OUTPUT POWER: 5 W + 5 W,
- FREQUENCY RESPONSE: 60 to 20,000 Hz
- SPEAKER SYSTEM: TYPE: 2-way
- IMPEDANCE: 8 ohms
- OUTPUT POWER: Max. 6W
- FM RADIO: RANGE: 88 to 108 MHz
- CD PLAYER: FREQUENCY RESPONSE: 60 to 20, 000 Hz +/-4 dB
- SIGNAL-TO-NOISE RATIO: 55 dB (IEC-A)
- CASSETTE PLAYER: TRACK SYSTEM: 4 Track, 2 channel stereo
- TAPE SPEED: 4.8 cm/sec
- WOW AND FLUTTER: 0.4% (WRMS)
- FREQUENCY RESPONSE: 125 to 6300 Hz +/-6 dB
- RECORD PLAYER: MOTOR: DC servo motor
- DRIVE SYSTEM: Belt Drive
- SPEEDS: 33-1/3rpm, 45 rpm and 78 rpm
- S/N RATIO: More than 50 dB
- CARTRIDGE TYPE: Ceramic Stereo
- CARTRIDGE STYLUS: ITRRS-300
- BLUETOOTH VERSION: Bluetooth V2.1
- BLUETOOTH PROFILES: A2DP, AVRCP
- BLUETOOTH FREQUENCY RANGE: 2.402GHz-2.480GHz
- OPERATING DISTANCE: 10 meters (33 ft.)
Introduction
Listen to vinyl records, CDs, cassette tapes, AM/FM radio, or stream music from your smartphone via Bluetooth or a 3.5 mm Aux/headphone connector. A stereo system or additional equipment is not required. In only a few minutes, you’ll have it up and running. This record player is a wonderful value, with its retro appearance and the convenience of current technology. It’s perfect for beginners and vintage fans alike. It is a belt-driven turntable with a three-speed.
This record player has three speeds (33 1/3, 45, and 78 rpm) and has upgraded premium sound quality with minimal vibrations. It’s ideal for your living room, bedroom, or office, and vinyl fans will enjoy it. Extend the sound by using the RCA Line outputs to connect external speakers or an amplifier (cable included). Plug your headphones into the headphone jack for private listening.
ACCESSORIES INCLUDED
- RCA LINE OUT CABLE
- INSTRUCTION MANUAL
- WARRANTY (BACK OF MANUAL)
- 45 RPM ADAPTER
PRODUCT OVERVIEW
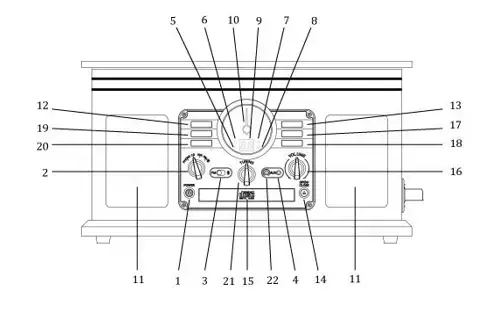
FRONT VIEW
- POWER: Push to turn the unit ON or OFF.
- “PHONO, CD, AUX, FM/” SELECTION KNOB Rotate to select your desired function.
- “FM” SLIDE SWITCH Slide to select either FM or Bluetooth.
- 5mm AUX-IN JACK Connects your external source to the AUX IN jack.
- PLAY INDICATOR Illuminates when CD is playing.
- ST/BT INDICATOR Blue light flashes when the unit is waiting for pairing. Blue light stays lit when the external device is connected to the unit. A red light illuminates when the station is received in stereo playing mode.
- PROGRAM INDICATOR Illuminates when the program playback is set.
- REPEAT INDICATOR Red light stays lit when all tracks repeat. Red light flashes when a single track is repeating.
(Note: This indicator only works in CD mode.) - LED DISPLAY
- TUNING DIAL POINTER
- STEREO SPEAKERS
- STOP: Press to stop playback or cancel the program setting.
- PLAY/PAUSE: Press to start playback, press again to pause.
(Note: This button only works in CD, Bluetooth mode.) - OPEN/CLOSE
- DISC TRAY
In CD mode, use to open and close the disc tray. - “VOLUME” KNOB Turn to adjust the volume.
- & 18. NEXT/PREVIOUS TRACK
& OFF/REWIND
In CD Mode, press once to skip to the next/previous track. Press and hold to fast forward/rewind.
(Note: This button will not work in PHONO, FM, or AUX mode) - “PROGRAM” Press to set the program playback.
(Note: This indicator only works in CD mode.) - “REPEAT” Press to select the repeat mode.
(Note: This indicator only works in CD mode.) - RADIO TUNER KNOB In FM mode, turn to tune in a station.
- 5mm EARPHONE JACK
Accepts headphone/earphone plugs
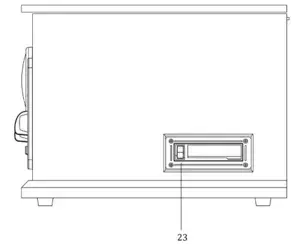
RIGHT SIDE VIEW
- CASSETTE FF & EJECT Press halfway to fast forward, press all the way to the end, and eject the tape.
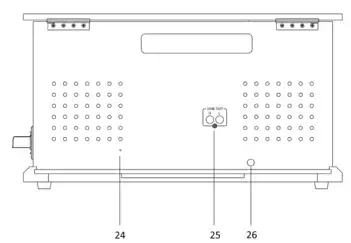
REARVIEW
- FM WIRE ANTENNA
While tuned to a station in FM mode, extend the wire and reposition to adjust for the best reception. - LINE OUT JACKS
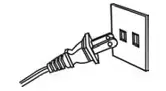
For amplifier device with RCA auxiliary input sockets, insert the white and red plugs on the RCA cable into the unit. Insert the opposite end into the amplifier device. Be sure to connect the white plug to the white jack and the red plug to the red jack. - AC POWER CORD
Connect the AC plugs into a wall outlet. It is strongly recommended that this product should be operated only from the type of power source indicated on the marking label.
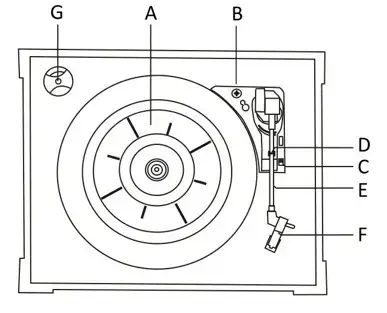
PARTS OF THE TURNTABLE
- TURNTABLE
- SAFETY SCREW (FOR TRANSPORT) Before using the unit, turn the screw clockwise using a coin or screwdriver.
Important
When you transport the unit, turn the screw counterclockwise to secure the turntable.
- SPEED SELECTOR.
- TONEARM HOLDER.
- TONEARM. Before use, completely loosen the fixed rope on the tonearm and lift the tonearm up.
- STYLUS
- 45 RPM ADAPTOR.
SETUP / BASIC OPERATION
SETUP
- Remove the white protective needle cover by gently pulling towards the front of the unit.
- Remove any packaging materials from the unit.
- Connect the AC power cord to a wall outlet

NOTE:
-It is strongly recommended that this product should be operated only from the type of power source indicated on the marking label.
-To prevent interference, avoid bundling audio signal cables together with the AC power cord.
BASIC OPERATION
- Push the POWER button to turn the unit on.
- Select the source by turning the selection knob (PHONO/AUX/CD/FM/BT).
- Rotate the VOLUME knob to adjust to the desired sound level.
LISTENING THROUGH RCA LINE OUT
For amplifier device listening, first, reduce the volume level to a minimum. Insert the white and red plugs on the RCA cable into the unit, then insert the opposite end into the amplifier device. Be sure to connect the white plug to the white jack and the red plug to the red jack.
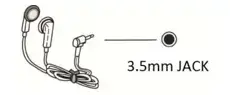
LISTENING THROUGH EARPHONES/HEADPHONES (NOT INCLUDED)
- For private listening, first, reduce the volume level to minimum.
- Insert your headphones’ plug into the 3.5mm jack, then adjust the volume up by turning the VOLUME knob.
NOTE
The speakers will automatically be deactivated while headphones are plugged in.
CONDENSATION WARNING
When the unit is moved from a cold or warm place or is used following a sudden temperature change, there is the danger that water vapor in the air may condense on the unit, preventing proper operation. In such cases, leave the unit for 1-2 hours after plugging it into an AC outlet to allow it to stabilize at the temperature of its surroundings.
LISTENING TO A VINYL RECORD
- Select the “PHONO” function.
- Gently open the top cover.
NOTE
Be careful not to pinch your fingers when opening/closing the top cover.
- Place a vinyl record on the turntable. When playing a 45 RPM record, use the included adaptor.
- Select the appropriate speed.
- Remove the tone arm-rest holder to release the tonearm

- Move the tonearm gently to the edge of the record (or the starting point of a track).
The turntable will begin to turn.
- When the record reaches its end, the tonearm will stop at the center of the record and you must lift and return the tonearm to the tonearm rest manually. Lock the tone arm-rest holder to protect the tonearm.
IMPORTANT
- Closing the top cover will help prevent dust from settling on the turntable.
- Always relock the tonearm clip before transporting the unit.
- Do not place anything on top of the turntable cover, especially while playing a record.
LISTENING TO A CD
- Select the “CD” function.
(Note: When no disc is set, “no” will appear on the display.)
- Press the OPEN/CLOSE button
(Note: This button only works in CD mode.)
- Place a disc on the tray with the printed label face up.
- Press the OPEN/CLOSE button to close the tray.
- Press the PLAY/PAUSE button to begin playback.
(NOTE: The CD playback will start automatically.)
- To temporarily pause playback, press the PLAY/PAUSE button. Press again to resume.
- To skip tracks forward or backward, press the corresponding skip button. Pressing once will restart the current track. Pressing twice in succession will return to the beginning of the previous track.
- To fast forward / rewind within a track, press and hold down the corresponding skip button until the desired position is reached.
- To stop playback, press the STOP button
IMPORTANT
- Never place more than one disc on the tray.
- The disc must be placed in the center of the disc tray. An incorrectly loaded disc can permanently damage the tray door mechanism.
- Do not push the CD tray – always use the OPEN/CLOSE button.
- It takes a moment for the unit to load a disc, during which all buttons will be temporarily deactivated.
REPEAT PLAYBACK
Each time the REPEAT button is pressed, the repeat mode will cycle through the following options:
REPEAT 1(REPEAT ONE TRACK)
The repeat indicator will flash and the current track will be played repeatedly. If you press the forward or rewind button to select another track, the track you select will be played repeatedly.
REPEAT ALL (REPEAT THE ENTIRE CD)
The repeat indicator will stay lit and the entire CD will be played repeatedly.
NOTES
- Repeat playback works with CD discs only.
PROGRAMMED PLAYBACK
Up to 20 tracks can be programmed to play in the desired order.
NOTES
- Programmed playback works with CD discs only.
- Select “CD” mode, then load a CD.
- While the CD is stopped, press the PROGRAM button.
- “PROGRAM” indicator lights up and “01” blinks on the display.
- Press forward or rewind to select a tracking number.
- Press the PROGRAM button again to set the next program track, “02” appears and blinks… Repeat steps 4 thru 5 to program the additional tracks.
- When the selection of track numbers has been finished, press the PLAY button ( ) to start the program playback.
(NOTE: when all 20 program tracks are set, you press the PROGRAM button and “FU” will appears on the display)
- To cancel the program mode, press the STOP till the program indicator won’t light.
TO CHECK THE PROGRAMMED ORDER
- In the stop mode, press forward or rewind repeatedly to show the track numbers which have been programmed.
TO ADD A TRACK TO THE END OF THE PROGRAMMED ORDER:
- In the stop mode, press the PROGRAM button.
- Select a tracking number by pressing forward or rewind, then press the PROGRAM button. The current track will be added to the end of the program.
LISTENING TO THE FM RADIO
- Select “FM/” mode.
- Slide the slide switch on “FM”.
- Tune to the desired station using the Radio Tuner Knob.
NOTE
In FM Mode, the “ST/BT” indicator lights up red when tuning in the stereo reception station.
ADJUSTING FOR THE BEST RECEPTION
FM BROADCAST
Extend and reposition the FM antenna.
LISTENING TO AN EXTERNAL AUDIO DEVICE (AUX MODE)
- In AUX (auxiliary) mode, this unit can play audio from an external audio source (iPod, MP3 Player, Portable CD Player, etc.)
- There is an AUX IN jack on the front side of the unit. When connecting a device that has a headphone jack, use a cable with a 3.5mm plug on both ends with the front AUX IN jack.
- Plug one end of the AUX IN cable (not included) into the AUX IN jack.
- Plug the other end of the cable into the headphone jack of the external audio source.
NOTE
All operations are only available on your external device.
IMPORTANT
If the front AUX IN and rear RCA LINE OUT are connected at the same time, only the front AUX IN will be active.
LISTENING TO AN EXTERNAL AUDIO DEVICE (BLUETOOTH MODE)
In BT (Bluetooth) mode, this unit can play music from external devices that have a built-in Bluetooth feature.
GETTING CONNECTED USING BLUETOOTH
- Select “FM/” mode.
- Slide the slide switch on “Bluetooth” and the ST/BT indicator will flash blue.
- Turn ON the Bluetooth function on your external device.
NOTE
The effective distance between your external device and this apparatus is 10 meters (33ft).
- Wait for “Wooden Music Center” to appear on the paired devices list of your external device and press “Wooden Music Center”.
IN SOME INSTANCES
a window will ask you a password. Fill in “0000” then press “OK” on your external device.
- A few seconds later your Bluetooth connection is successful and the blue indicator stays lit.
- Press the PLAY/PAUSE button to begin playback.
- To temporarily pause playback, press the PLAY/PAUSE button. Press again to resume.
- To skip to the previous or next tracks, press the corresponding skip button to listen.
NOTE
Stop, fast forward / rewind is only available on your external device.
LISTENING TO A CASSETTE TAPE
- Load an audio cassette tape into the unit (located on the left side of the unit). Playback will automatically begin.
- Press the button halfway to Fast Forward the tape. Press the button lightly and playback will resume.
- Press the button completely down to end playback and eject the tape.
NOTE
When loading in a cassette tape, the SELECTION KNOB function will be temporarily overridden until the cassette tape is ejected.
MAINTENANCE / PROPER HANDLING
COMPACT DISC HANDLING
- Always place the disc on the disc tray with the label side facing upward (compact discs can be played/recorded only on one side)
- To remove a disc from its storage case, press down on the center of the case and lift the disc
- upward, holding it carefully by its edges.
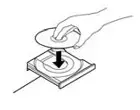
- To clean a disc, wipe the surface from the center hole outward towards the outer edge with a soft, dry cloth.
- Never use such chemicals as record spray, antistatic sprays or fluid, benzine or thinner to clean discs; they will irreparably damage the disc’s plastic surface.
- Discs should be returned to their cases after use to protect from dust and scratches.
- Do not expose discs to direct sunlight, high humidity, or high temperature for extended periods of time.
- Printable CD-R and CD-RW discs are not recommended, as the label side may become sticky and damage the unit.
- Use a soft oil-based felt-tipped pen to write information on the label side. Never use a ball-point or hard-tipped pen, as doing so may damage the recorded side.
- Do not use irregularly shaped CDs (octagonal, heart-shaped, business card size, etc.), as they will damage the unit.
- Read all precautions supplied with any CD-R or CD-RW disc
- Never handle a disc with dirty fingers.
- Never insert a disc that has a crack on the surface.
HANDLING VINYL RECORDS
- Do not touch the record’s grooves. Only handle records by the edges or the label with clean hands. Touching the record surface will cause your record’s quality to deteriorate.
- To clean a record, use a soft anti-static cloth to gently wipe the record surface.
- Keep records in their protective sleeves when not in use.
- Always store records upright on their edges
- Avoid placing records in direct sunlight, close to a heat source (radiators, stoves, etc.), or in a location subject to vibration, excessive dust, heat, cold or moisture.
GENERAL CARE
- When removing the power plug from the wall outlet, always pull directly on the plug. Never pull the cord.
- To keep the laser pickup clean, do not touch it, and do not forget to close the disc tray.
- Do not attempt to clean the unit with chemical solvents as this might damage the finish.
- For cleaning, only use a clean, dry cloth.
- In order to shut off the power to this product completely, unplug the power cord from the wall outlet. Be sure to unplug the unit if you do not intend to use it for an extended period of time.
HOW TO REPLACE THE TURNTABLE STYLUS
The stylus should last about 50 hours under normal use. However, it is recommended that the stylus be replaced as soon as you notice a change in sound quality. Prolonged use of a worn-out stylus may damage the record. The highest speed of 78 RPM records would wear out the stylus more quickly.
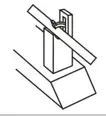
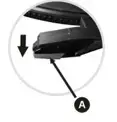
REMOVING THE OLD STYLUS
- Set a screwdriver at the tip of the stylus and push downward (A).
- Remove the stylus by pulling it simultaneously downward and forward.
INSTALLING A NEW STYLUS
- Hold the front tip of the stylus and insert its rear edge (B) first.
- Push the stylus upwards (C) until the tip locks into place.
CAUTION
- Do not bend the stylus.
- Do not touch the needle to avoid injuring your hand.
- Turn off the unit’s power before you replace the stylus.
- Keep out of reach of children.
Fequently Asked Questions
- How good are Victrola turntables?
The Victrola Vintage 3-Speed Bluetooth Suitcase Turntable with Speakers isn’t the greatest record player with speakers on the market, but it’s ideal for the audiophile on a budget looking for the best possible listening experience at a reasonable price. - Is the sound quality on the Victrola good?
The Victrola offered a considerably flatter response than the Crosley, but neither came close to the quality of the speakers mentioned in our best bookshelf speakers guide. The Victrola had a very flat response throughout an audio range of roughly 80 Hz to 15 kHz, but the Crosley had a response of about 180 Hz to 5.8 kHz. - Is it possible to connect your smartphone to a Victrola record player?
Bluetooth speakers are capable of connecting to devices other than your record player. Your phone’s Bluetooth capability can also be used to connect to your speakers. The speakers are set up in the same way, and the Bluetooth option may be found in your phone’s settings. - Are Victrola record players appropriate for novices?
More than 33,000 five-star ratings have been left for this beginner-friendly Victrola record player. (And, despite the fact that it’s called a turntable, the built-in speakers make it a record player.) - What’s the deal with my Victrola record player being so quiet?
By their very nature, record players are silent. They generate a very weak electrical signal that must be amplified twice. A preamp (internal or external) amplifies it first, bringing it up to the same line level as a CD player. Then it needs to be boosted again so that it can be heard through your speakers. - Is there a speaker on a Victrola record player?
Are you going to the beach or having a family barbecue? Whether you use the built-in speaker or connect it to an external speaker, our portable turntable is the right combination of functionality, vintage/retro appearance, and sound quality. - What’s the best way to hook up my Victrola to a Bluetooth speaker?
By connecting the RCA input side of your cable to the turntable and the 3 pins on the turntable, you may connect your turntable to your Bluetooth home speakers. Your Bluetooth speaker should be 5mm connected to the cable’s side. - On a Victrola record player, how does Bluetooth work?
To send the signal from your turntable through Bluetooth, all you need is a phono preamplifier and a Bluetooth transmitter. If your preamplifier has an external phono output, connect the transmitter to it. You can pair your turntable with a Bluetooth-enabled speaker or amplifier once it has been connected. - Is it possible to connect external speakers to the Victrola?
Connecting powered speakers to a Victrola with an RCA signal connection is the easiest and most dependable method of connecting external speakers to a Victrola. The Victrola’s RCA connectors produce a line-level analogue music signal that may be played on any powered speaker. - What is the lifespan of a Victrola needle?
Every stylus, no matter how sturdy, has a limited lifespan due to its frequent use. The majority of experts advise replacing it after 1,000 hours of use.