USER MANUAL

Vishi AirPlus EP009
Wireless Bluetooth Earbuds
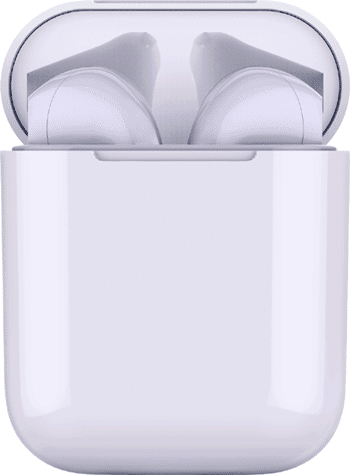
Inside the box
- Bluetooth Headset X 2PCS
- Charging Case X1PCS
- USB lightning charging cable X1PCS
- User Manual X1 PCS
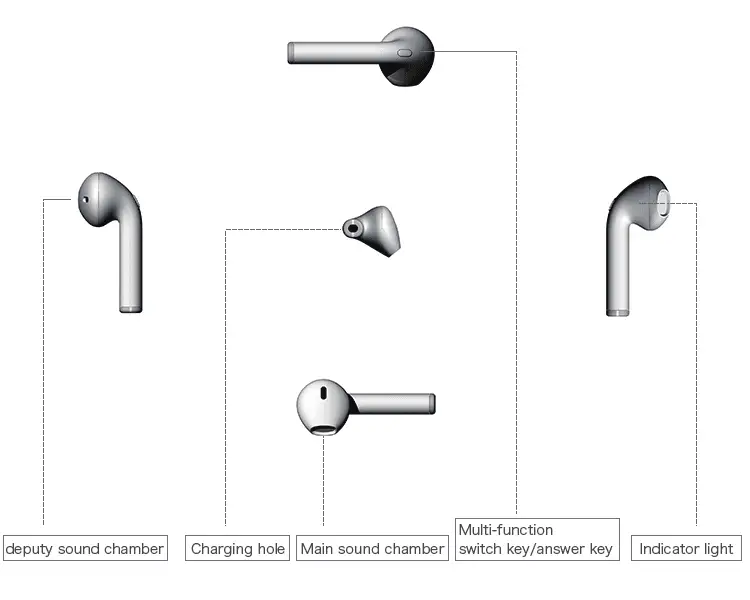
Functional Diagram
HOW TO USE
TO CHARGE CHARGING CASE
- Connect the lightning cable to lightning port on the charging case
- Plug the USB connector of the cable into a USB Power source
- The indicator light will show RED while the charging case is charging, Depending on the power delivered to the charging case, the charging case will take approximately 2 hours or more to completely charge
- The indicator light will go solid blue, then blink, then turn off when the case is fully charged
TO CHARGE EARPHONES
- Put the earphones in the charging case correctly, charging case will start to charging automatically
- The indicator light on the earphones will turn RED while charging
- The indicator light on the earphones will turn OFF when fully charged
POWER ON
Press and hold the multi-function key on BOTH L and R earphone for 3 seconds simultaneously, release when the BLUE light is on with a voice prompt: “POWER ON”
PAIRING
(1)When power on, L and R earphones will connect each other automatically and sound with a voice prompt: “ CONNECTED” , and the indicator lights of R earphone will flash blue and red with a voice prompt: “PAIRING”, While blue indicator light of L earphone flash slowly (*)

(2)Enable the Bluetooth pairing mode on your phone device. Tap on “Air plus” to connect. Right earphone will response with a voice prompt:“CONNECTED “and blue light flash when connected successfully

(3)Earphones will response with a voice prompt: “DISCONNECTED” when Bluetooth signal is cut off, and shutdown 5mins later automatically
(4)When power on, the earphones will connect the last paired mobile automatically. If not, pls repeat step 2.
NOTE: IF you see 2 Airplus entries in available devices then the earphones are not paired correctly. Pls follow below steps to get it paired correctly.
*Both L and R earphones are well paired before it leaves the factory, Right earphone is the Main-headset by default, thus you may connect with your Bluetooth devices directly. If they are not paired or reset to defaults, you need to pair 2 earphones manually as below steps:
- Press and hold the multi-function key for 6 seconds of both earphones simultaneously, release when the indicator lights turn in red and blue, and response with a voice prompt: “PAIRING”, then they will be paired and connected automatically and response with a voice prompt: “CONNECTED”
- When paired successfully, the indicator lights of R earphone will flash alternately in blue and red, While blue indicator light of L headset flash slowly c. Go back to step 2 to connect with your devices
SINGLE EAR FOR INDEPENDENT USE
- Press and hold the multi-function key for 6 seconds on either earphone (base on your personal preference), release when the red and blue light flash alternately
- Enable your phone’s Bluetooth pairing function and search for the “Air plus”to pair and connect
POWER OFF
- TWS mode (Due-ear)Press and hold the multi-function key on either earphone for3 seconds. Release when the red indicator light is on with a voice prompt: “POWER OFF”
- .Independent use mode (Single Ear, L or R)Press and hold the multi-function key on the used earphone for 3 seconds. Release when the red indicator light is on with a voice prompt: “POWER OFF”
- .Put the earphones in the charging case correctly, will auto shutdown
The battery status of earphones is visible on connected devices, when it’s running out of power, the earphones will remind you with a voice prompt:
“LOW BATTERY, PLEASE CHARGE”, pls recharging in time
PHONE & MUSIC
◆ To Answer A Call
Press the multi-function key of the right earphone one short
◆ To End A Call
Press the multi-function key of the right earphone one short. Voice response tone “call ended”
◆ To Reject A Call
Press and hold the multi-function key of the right earphone for 1s. Voice response tone “call rejected”
◆ To Redial A Call
Press the multi-function key of the right earphone twice, Voice response tone “redialing”
◆ To Play and Pause Music
Press the multi-function key on either earphone once
◆ To Play the next song
Press and hold the multi-function key on either earphone for 2s
OUTDOOR USE
*Right headset is the Main-headset by default

Right earphone receiving mobile Bluetooth signal suggest putting mobile in right pocket.
This can avoid signal cut off by human body and increase antijamming capability of outdoor use.
Specification

Safety Precautions
Please read follow and keep these instructions:
- Keep the device out of extreme heat and humid
- Power time may different depending on personal habits
- Heed all warnings on the product and in the operation instructions
- Do not listen at high volume level for long period to protect hearing
- Stop using this product immediately if it causes discomfort or pain
FCC Warning Statement
Changes or modifications not expressly approved by the party responsible for compliance could void the user’s authority to operate the equipment. This equipment has been tested and found to comply with the limits for a Class B dig it al device, pursuant to Part 15 of the FCC Rules. These limits are designed to provide reasonable protection against harmful interference in a residential installation. This equipment generates uses and c an radiate radio frequency energy and, if not installed and used in accordance with the instructions, may cause harmful interference to radio communications. However, there is no guarantee that interference will not occur in a p articular installation If this equipment does cause harmful interference to radio or television reception, which can be determined by turning the equipment off and on. the user is encouraged to try to correct the interference by one or more of the following measures:
- Reorient or relocate the receiving antenna
- Increase the separation between the equipment and receiver.
- Connect the equipment into an outlet on a circuit different from that to which the
receiver is connected - Consult the dealer or an experienced radio/TV technician for help.