Owner’s Manual

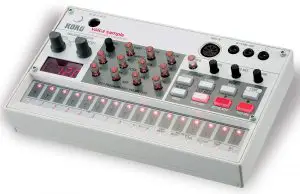
Volca Sample
Introduction
Thank you for purchasing the Korg volca sample digital sample sequencer. The volca sample is a rhythm sequencer with a digital sound source. While retaining the active step and step jump modes, which were well received with the volca beats, the volca sample is equipped with further enhanced features of the song mode and irregular playback functions for partial playback/ reverse playback of samples. In addition, an iPhone can be used to transfer new sample data.
Overview
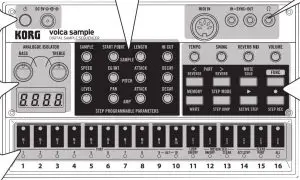
Power button
This switch turns the power on/off. To turn the power off, press and hold the switch for approximately one second.
Auto power-off
The volca sample has an auto power-off function. This function automatically turns off the volca sample after approximately four hours have passed since it last produced a sound. If desired, you can disable the auto power-off function. (See Specifying global parameter settings.)
DC 9V Jack
Connect the optional AC adapter here.
Only use the specified AC adapter. Using any AC adapter other than the specified model will cause malfunctions.
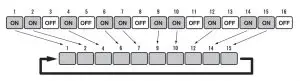
Battery level indication
When the volca sample is turned on, the LEDs below the step buttons indicate the remaining amount of battery power. If all LEDs are lit up, the batteries are completely full. Fewer lit LEDs mean that the battery level is correspondingly lower.
When using the AC adapter, the battery level indication is disabled.
Either alkaline or nickel-metal hydride batteries can be used. In order for the remaining battery level to be detected and indicated correctly, the type of batteries being used must be specified in the global parameters of the volca sample. If the batteries are running low during usage of the volca sample, it warns you by blinking “bt.Lo” in the display. If the batteries run down completely, the volca sample automatically turns off.
NOTE: It’s not possible to stop the low battery warning; however, you will be able to continue using the volca sample until the batteries have run down completely.
ANALOGUE ISOLATOR
This changes the levels of the low and high output ranges.
BASS knob
This knob sets the level of the low range between –∞ dB and +6 dB.
TREBLE knob
This knob sets the level of the high range between –∞ dB and +6 dB.
Display
This displays the values selected by using the knobs and buttons.
Step buttons 1 to 16
These function as part trigger buttons and as step buttons for the sequencer. Press the STEP MODE button to switch the function.
For exclusive groups like open/closed high hats, only one part will be played at a time.
Live performance mode (STEP MODE button unlit)
Press a step button between 1 and 10 to play the corresponding part in real-time. If a sequence is being recorded, the performance is recorded at the quantized step. Otherwise, use these buttons together with the FUNC button to specify settings for various functions.
Step editing mode (STEP MODE button lit up)
The buttons will function as step buttons for the sequencer. Pressing a button turns the step for the selected part on or off. Steps that have been turned on will be played.
In addition, by holding down the step buttons while using knobs compatible with motion recording, the values recorded with the step for that part can be edited and new motion data can be recorded.
The functionality of the sequencer differs in song mode. Refer to “Song mode” for additional information.
Song mode
In addition to 10 sequences, the volca sample can play back 6 songs. With each song, a maximum of 16 sequences can be played in any order.
The following functions cannot be used in song mode. “SONG” will appear on the display to indicate the error.
Playing using the step buttons, recording using the ![]()
Entering song mode
When a song is loaded, the volca sample automatically enters song mode.
Assigning sequences to be played back in song mode
- Press a step button between 1 and 16 to select the playback order.
The playback order and the sequence number appear in the display. - Use the SAMPLE selector to assign the sequence.
- The LEDs below the step buttons indicate whether playback of the assigned sequence is turned on or off. After the volca sample enters active step mode, press the step buttons to turn on/off each sequence.
- Repeat steps 1 to 3 until the sequences are assigned to the song.
Playing a song
Pressing the ► (PLAY) button plays back the assigned sequences in the specified order. The playback order can also be specified in step jump mode.
Saving a song
Six songs can be saved with the volca sample.
- While holding down the FUNC button, press the MEMORY button.
- Press a step button between 11 (S11) and 16 (S16) to select the location where the song will be saved.
Returning to sequence mode
When a sequence is loaded, the volca sample returns to sequence mode.
SAMPLE
SAMPLE selector
This selects the sample. The number of the selected sample appears in the display.
START POINT knob
This knob sets the starting point for playback of the sample. Set the starting point within the range of 0% to 90% of the total length of the sample.
LENGTH knob
This knob sets the length of the sample to be played back. Set the length within the range of 1% to 100% of the original sample length. The length of the sample to be played back changes depending on the setting selected with the START POINT knob.
HI CUT knob
This knob adjusts the cutoff frequency. Turning the knob to the left will darken the sound of the sample to be played back, and turning the knob to the right will brighten the sound.
PITCH
SPEED knob
This knob sets the playback speed for the PCMsound. Hold down the FUNC button while turning this knob to change the speed in units of notes.
EG INT knob
This knob sets the depth (intensity) of the PITCH EG effect within the range of –100% to +100%.
ATTACK knob
This knob sets the attack time for the PITCH EG.
DECAY knob
This knob sets the decay time for the PITCH EG. When this knob is fully turned to the right, decay is turned off.
AMP
LEVEL knob
This knob sets the playback level.
PAN knob
This knob sets the pan.
ATTACK knob
This knob sets the attack time for the AMP EG.
DECAY knob
This knob sets the decay time for the AMP EG.
Specifying global parameter settings
- While holding down the FUNC button, turn on the volca sample.
- Press a step button to specify the setting for the global parameter. (Refer to the table.)
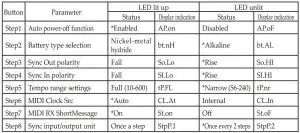
3. When you have finished specifying the settings, press the ![]()
(PLAY) button.
MIDI IN jack
This jack is where you can connect an external MIDI device to control the sound generator of the volca sample.
IN–SYNC–OUT (SYNC IN, SYNC OUT) jack
Use these jacks with the included cable to connect the volca sample to other equipment, such as another volca device or a monotribe, and synchronize them together.
The SYNC OUT jack sends a 5 V pulse of 15 ms at the beginning of each step. If the SYNC IN jack is connected, the internal step clock will be ignored and the volca sample sequencer will proceed through its steps according to the pulses that are input to this jack.
You can use this jack to synchronize the volca sample’s steps with pulses that are being output from the SYNC OUT jack of a monotribe or the audio output of another analog sequencer or a DAW.
In addition, sample data can be transferred if an iPhone is connected to the SYNC IN jack. For details on obtaining and using the application, visit the Korg Web site (http://www.korg.com/).
(Headphone) jack
Connect your headphones (stereo mini-plug) here. If nothing is connected, the sound will be output from the internal speaker.
TEMPO knob
This knob sets the tempo for the sequencer.
SWING knob
This knob moves even-numbered steps a maximum of 75% backward. Hold down the FUNC button while turning this knob to move the steps in the opposite direction.
REVERB MIX knob
This knob adjusts the wet/dry balance of the reverb. When this knob is fully turned to the right, only the wet reverb signal will be sent to the output. When this knob is turned all the way to the left, only the original dry signal will be sent to the output. .
VOLUME knob
This knob sets the output volume.
PART < and > buttons
Use these buttons, for example, when selecting a part.
STEP MODE button
This button switches the function of step buttons 1 to 16. Pressing this button will switch the function.
MUTE button
This button mutes a part. Press this button to enter part muting mode (while the button is lit up). With step buttons 1 to 10, specify the mute setting for each part.
Canceling muting for all parts (MUTE button + step button 16)
While holding down the MUTE button, press step button 16 to cancel muting for all parts.
FUNC (function) button
The setting for various functions can be specified by holding down the FUNC button and pressing another button. The FUNC button will be lit up while a setting is being specified.
For details on the functions that can be specified with the FUNC button, refer to “Specifying function settings with FUNC button”.
MEMORY button
The volca sample is equipped with memory locations to save 10 sequences and 6 songs.
Press the MEMORY button, and then press a button between M1 and M10 to load the saved sequence. Pressing the FUNC button and MEMORY button, then pressing a button between M1 and M10 will save the current sequence into the memory. Press the MEMORY button, and then press a button between S1 and S6 to load the song and enter song mode. For details on operations in song mode, refer to “Song mode”.
► (PLAY) button
Press this button to play the sequence. The ► (PLAY) button will be lit up during playback. Pressing this button again stops playback.
![]()
Sequences can be recorded. Press the ![]()
![]()
Motion sequencing
This function records adjustments made to knobs while a sequence is being recorded. Once the
sequence has made a full cycle from the step where a knob was used, this function is automatically deactivated. Knobs that are adjusted during recording will blink.
Specifying function settings with FUNC button
The settings for various functions can be specified by holding down the FUNC button and pressing another button. The FUNC button will be lit up while a setting is being specified.
Selecting a part: FUNC button + step buttons 1 to 10
The part is selected. The selected part can be edited.
Part solo mode: FUNC button + MUTE button
This specifies a part as a solo. When the buttons are pressed and light up, the volca sample is in part solo mode. Press a step button between 1 and 10 to mute all other parts.
Loop settings mode: FUNC button + step button 11
The loop playback function can be turned on/off for each part. When loop playback is turned on, the sample for that part will be played back in a continuous loop. While holding down the FUNC button and the step button 11, press a step button between 1 and 10 to specify the setting.
Motion sequence on/off: FUNC button + step button 12
This turns motion sequencing on/off.
This function records adjustments made to knobs while a sequence is being recorded. Once the sequence has made a full cycle from the step where a knob was used, this function is automatically deactivated. While recording, knobs that are operated light up, and knobs used while the motion sequence is being played back blink.
Deleting a motion sequence: FUNC button + step button 13
The recorded knob adjustments are erased.
NOTE: Transparent knobs other than the TEMPO knob will be recorded with motion sequencing.
Deleting the sequence pattern for a part: FUNC button + step button 15
The sequence pattern for the currently selected part is deleted.
Deleting a sequence: FUNC button + step button 16
The current sequence is deleted.
Step jump mode: FUNC button + STEP MODE button
The volca sample enters the step jump mode. Pressing a step button between 1 and 16 while the volca sample is in step jump mode will immediately begin playback at the specified step.
Pressing a step button between 1 and 16 while the sequence is stopped (the button will light up) causes playback to begin from that step. Press the FUNC button to exit step jump mode.
Active step mode: FUNC button + ► (PLAY) button
Each step of the currently loaded sequence can be turned on/off. Steps that are turned off are disabled and will be skipped during playback and recording. While holding down the FUNC button, press the ► button (ACTIVE STEP) to enter active step mode. Pressing a step button between 1 and 16 turns on/off each step. The button for steps that have been turned on will light up. When you have finished specifying the settings, press the FUNC button to exit active step mode.
Resetting active step mode: FUNC button + step button 14
The settings for active step mode will return to the defaults (all steps turned on).
Reverse settings mode: FUNC button + PART < button
The reverse playback function can be turned on/off for each part. When reverse playback is turned on, the sample for that part will be played back in reverse. While holding down the FUNC button and PART < button, press a step button between 1 and 10 to specify the setting.
Reverb on/off: FUNC button + PART > button
This turns the reverb on/off. Use the REVERB MIX knob to adjust the depth (intensity) of the effect for parts with reverb turned on. While holding down the FUNC button and the PART > button button, press a step button between 1 and 10 to specify the setting. While holding down the FUNC button and PART > button, press a step button between 1 and 10 to specify the setting.
STEP REC (step recording): FUNC button + ![]()
This is the mode used to input a pattern for each step. While holding down the FUNC button, press the ![]()
To play multiple parts with a single step, simultaneously press the buttons for the parts to be played. The following operations can be performed, except during playback.
- PART > button: Pressing this button plays back the sequence being recorded, then continues to the next step. (This is the same operation as when the
► (PLAY) button is pressed.) - PART < button: Pressing this button plays back the sequence being recorded, then returns to the previous step.

- FUNC button: Pressing this button exits step recording mode.
Main Specifications
- Keyboard: Multi-touch controller
- Sound generators: PCM sound sources (maximum of 8 simultaneous notes), digital reverb, analog isolator
- Connectors: (Headphone) jack (ø3.5mm stereo mini-phone jack), SYNC IN jack (ø3.5mm monaural mini-phone jack, 20V maximum input level), SYNC OUT jack (ø3.5mm monaural mini-phone jack, 5V output level)
- Power supply: AA/LR6 alkaline battery ×6 or AA nickel-metal hydride battery ×6, DC 9V AC adapter (
 )
) - Battery life: Approximately 10 hours (when using alkaline batteries)
- Dimensions (W×D×H): 193 × 115 × 45 mm/7.60″ × 4.53″× 1.77″
- Weight: 372 g/13.12 oz. (excluding batteries)
- Included items: Six AA alkaline batteries, Cable, Owner´s manual
- Options:
AC adapter (DC 9V )