The VOYAGE VA-1000 HD Streaming Video Drone Instruction Manual is a comprehensive guide that provides users with all the necessary information to operate the drone effectively. With its compact fold-in design, obstacle avoidance training feature, and air pressure sensor, the VA-1000 is an ideal drone for beginners and professionals alike. The manual includes detailed instructions on how to install the remote control battery, charge the VA-1000 Li-Poly battery, expand and fold the drone, sync the drone with the controller, and recognize the front and rear of the drone. Additionally, the manual provides information on how to use the automatic take-off and landing feature, adjust the speed settings, and control the drone during flight. The manual also offers helpful tips for flying in different weather conditions and adjusting the trim settings. Whether you are a first-time user or an experienced pilot, this instruction manual is an essential guide to help you fly and capture HD footage with your VA-1000 HD Streaming Video Drone.
 VA-1000 HD Streaming Video Drone
Instruction Manual
WARNING: Never leave product charging unattended for extended periods of time. Always disconnect the battery from the charger immediately after the battery is fully charged. Please refer to the enclosed safety instructions.
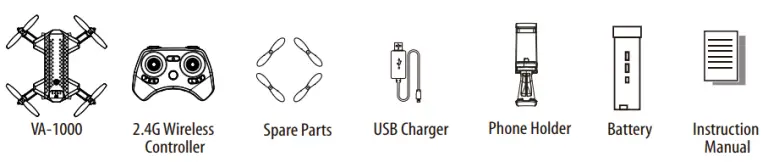
PACKAGE CONTAINS:
FEATURES
- The compact fold-in design allows for easy portability
- A new obstacle avoidance training feature will cause the drone to automatically circumvent walls and other obstructions so new pilots can get the hang of flying
- Air pressure sensor locks flight altitude for stable video footage
- Takes video and still shots with onboard HD Camera
- 6 axis gyro for extremely stable flight and maneuverability
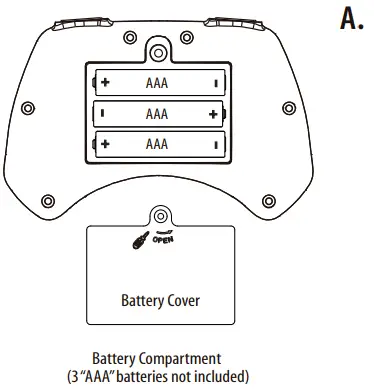
REMOTE CONTROL BATTERY INSTALLATION
- Unscrew and remove the battery cover from the back of the controller.
- Install 3 fresh “AAA” alkaline batteries into the controller as shown in diagram A. Replace the battery cover and secure it.
- Turn over the controller and press the power button. If the power indicator turns on you have installed your batteries properly.
CHARGING THE VA-1000 LI-POLY BATTERY
- Connect the USB charger to the battery charging socket (see diagram B).
CAUTION: The USB plug fits the charging socket only in one way. Do not force it. Improper connection will damage the VA-1000’s battery. Battery Compartment (3 “AAA” batteries not included) - Connect the USB end of the cable to your computer’s USB port or a USB wall charger (see diagram C).
- The indicator light on the USB charger will turn to solid red to indicate that the battery is charging. The red LED indicator will turn off when charging is completed.
- The average charging time is approximately 50-60 minutes ( via 5.0V
 2A USB wall charger). A fully charged VA-1000 can fly for 5-6 minutes depending on environment and user input.
- The average charging time is approximately 50-60 minutes ( via 5.0V
IMPORTANT: ALWAYS REMEMBER TO UNPLUG YOUR CHARGING CORD WHEN NOT IN USE!

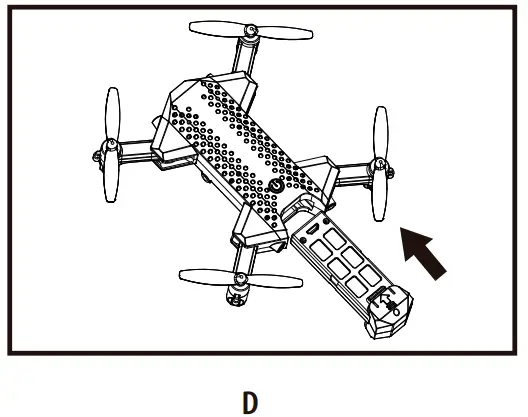
INSTALL THE VA-1000 BATTERY
Push the fully charged battery into the battery compartment then lock the end with the battery locks.(see diagram D) The battery only fits one way to the battery compartment, do not force it.
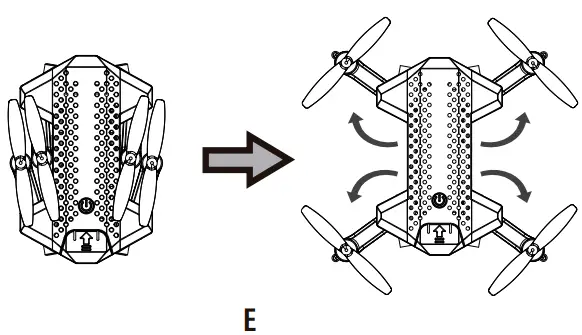
Before flying your VA-1000, you need to expand the foldable arms out. Turn your VA-1000 over, bottom side facing you, pull and expand the 4 arms as shown in the diagram below carefully. Make sure the arms are fully expanded to the position. After flying your VA-1000, it is recommended to fold all 4 arms back in. When expanding or folding your VA-1000, make sure to be gentle.(see diagram E)
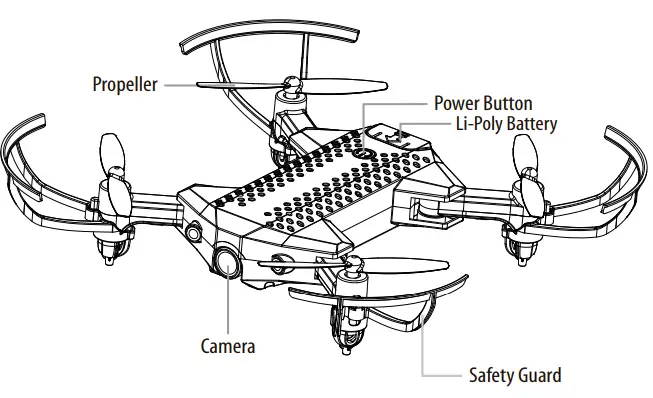
VA-1000 DIAGRAM
CONTROLLER DIAGRAM
WARNING
DO NOT FLY YOUR VA-1000 IN FOUL WEATHER!
FLIGHT PREPARATION
- Verify that there are 3 “AAA” batteries inside the remote control unit and the VA-1000 battery has been fully charged.
- Make sure to be in a large open space preferably a field or a park with an open radius of at least 200 feet.
- Make sure to start your drone on a clean flat-level surface before take-off.
- IMPORTANT! Until you have experience in flying your VA-1000, it is not advised to use in any rate of wind. Pick a day with zero wind or extremely light wind conditions when learning how to fly.
SYNCING YOUR VA-1000
Important! When syncing your VA-1000 with the controller always make sure that the drone is on a flat level surface and that your digital trim settings are in the center position.
- Before starting, make sure that the power on your controller is off and the battery is removed from the VA-1000. Make sure that there are no other 2.4G devices in the area.
- Insert the battery into the VA-1000 and set it down on a flat level surface. Press down the power button and hold for a few seconds (see diagram F).The LED lights on the drone should begin to flash.
- Quickly turn ON the remote and you will notice that the top red LED light on the face of the controller.
- Push the throttle stick all the way up until it stops and then pull it back all the way down to the bottom(see diagram below). When pushing the stick up or pulling the stick down you should hear a high-pitched beep both ways. The indicating lights on the drone and controller will stop flashing and stay solid on. You have successfully synced your VA-1000 and are ready to fly. If this doesn’t happen, repeat steps 1-4 again.
- TIP 1: Try not to leave too much time between putting your battery into the drone and turning on the controller or your syncing window will time out.
- TIP 2: Syncing your drone indoors or in the shade will make it easier to see the LED light indicators on both the controller and the drone.

NOW YOU ARE READY TO FLY!
If you have successfully synced your VA-1000 to your controller as explained on page 4 you are now ready to fly. Before beginning to fly your drone you should familiarize yourself with how to start and stop the rotors, how to use your auto land feature and how the controls work so please carefully read and familiarize yourself with various control features explained in the next. Once again as a beginner pilot you should learn how to control your drone in a large open field or park on a day with zero or very light wind. Do not try to fly your VA-1000 too high until you become a more experienced pilot.
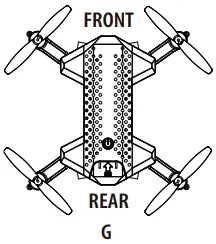
RECOGNIZING THE FRONT & REAR OF THE VA-1000
Even though the VA-1000 has four rotors there is still a front or “forward” facing direction and a “rear” or backward-facing direction. The front and forward-facing direction of the VA-1000 is the side with a camera (see diagram G). The rear and backward-facing direction of the drone is the side with a red light (see diagram G).
AUTOMATICALLY TAKE OFF / LAND
Make sure you have properly synced The VA-1000.
- simply press the Auto Start/Land button, your VA-1000 will automatically take off.
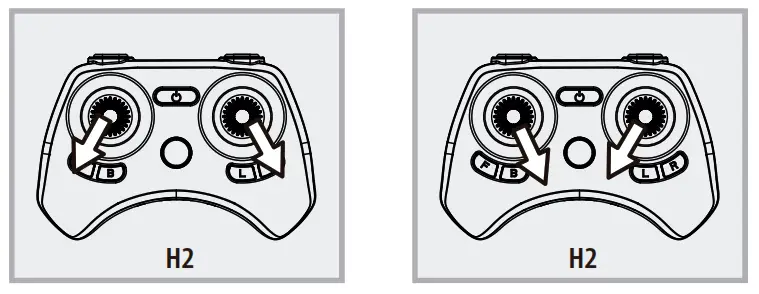
- To stop or land the VA-1000 just Press the Auto Start/Land button again and the VA-1000 will descend and land automatically (see diagram H1).
Tips: You also can move the two control sticks simultaneously down inside or outside corners, hold them till the blades start spinning. Release the control sticks and push the throttle stick slowly to take off manually (see diagram H2).
SPEED SELECT BUTTON
The VA-1000 has 4-speed settings; T(Training),1 (SLOW), 2 (MEDIUM), and 3 (HIGH). The default setting when you first turn on your VA-1000 is the 1 (SLOW) speed mode. To increase the speed simply trigger the speed setting button (see remote diagram on pg 3) you will hear the beeping sounds of the controller will show you what speed setting you are on. Speed settings can be set before flight or during the flight.
FLIGHT CONTROL
Below is a list of basic flight functions for your long-range remote to control the VA-1000. While learning to fly your VA-1000 it is best to start in a large space with the drone facing away from you until you get used to the basic controls. As you master flying your VA-1000 you can move to more advanced maneuvering techniques. Practice makes perfect!
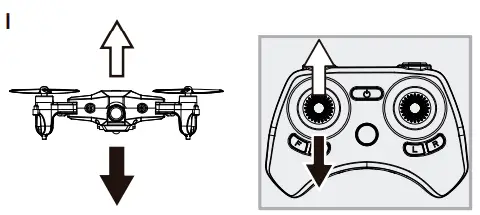
Move the left Throttle stick up to increase the propeller speed and the VA-1000 will accelerate and ascend.
Move the left Throttle stick down to decrease the propeller speed and the VA-1000 will decelerate and descend (see the diagram I).
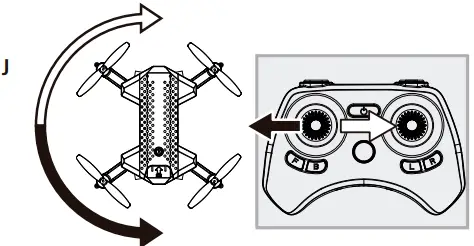
While in the air, move the left Throttle stick left and the VA-1000 will rotate left.
Move the left Throttle stick right and the VA-1000 will rotate right (see diagram J).
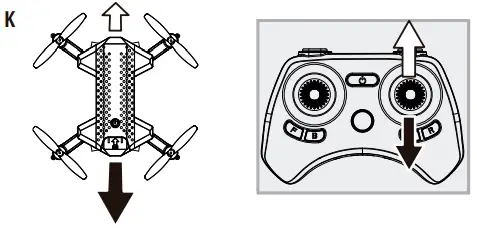
While in the air, move the right Direction Stick up and the VA-1000 will move forward.
Move the right Direction Control down and the VA-1000 will move backward (see diagram K).
While in the air, move the right Direction Control left and the VA-1000 will bank to the left.
Move the right Direction Control right and the VA-1000 will bank to the right (see diagram L).
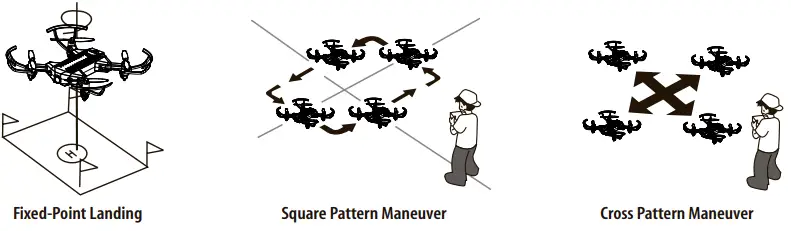
FLIGHT PRACTICE
To master flying your aircraft try practicing the exercises shown below, start with simple vertical takeoffs, landings, and left/right turning and rotating. Once those are mastered move on to square and cross maneuvers. Good luck and have fun!

ADJUSTING THE TRIM
NOTE: The VA-1000 is already properly trimmed and calibrated right out of the box and should not require any trim adjustments before flying. Some more experienced pilots may want to adjust trim settings for their style of flying. After several crashes, you may need to adjust trim settings for the VA-1000 to be more balanced.
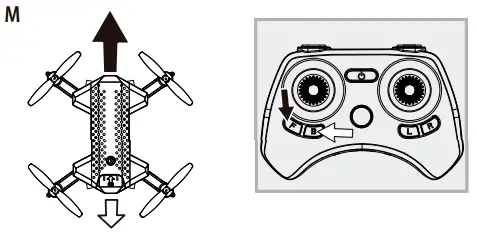
Forward/Backward Trim
- If your VA-1000 is moving forwards or backward automatically, you may need to adjust the FORWARD/BACKWARD TRIM buttons.
- If your VA-1000 drifts forward, push and release the BACKWARD TRIM button repeatedly until the moving stops and proper flight is maintained.
- If your VA-1000 drifts backward, push and release the FORWARD TRIM button in the same manner until the problem is resolved (see diagram M).
- From time to time you may have to adjust the FORWARD or BACKWARD TRIM buttons to ensure the VA-1000 will hover in mid-air and respond accurately to your commands.
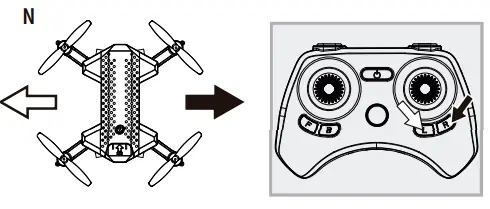
Banking Left/Right Trim
- If your VA-1000 is not steadily hovering and is banking to the left or right automatically, you may need to adjust the LEFT BANK or RIGHT BANK Trim buttons.
- If your VA-1000 banks to the left, push and release the RIGHT BANK TRIM button repeatedly until the banking stops and proper flight is maintained.
- If your VA-1000 banks to the right, push and release the LEFT BANK TRIM button in the same manner until the problem is resolved (see diagram N).
- From time to time you may have to adjust the LEFT and RIGHT BANK TRIM to ensure the VA-1000 will steadily hover in mid-air and respond accurately to your commands.
NOTE: The use of the Trim buttons utilizes sounds. A single long Beep indicates the product is center trimmed. When there’s no sound when press the trim means the product is trimmed to the maximum on a particular side.
CALIBRATING THE VA-1000
NOTE: Your VA-1000 comes pre-calibrated out of the box so you are ready to fly.
After several crashes and shocks to your gyro sensors, you may notice that your drone is drifting and can not hold its center position as well as it used to.
This most likely means that you need to recalibrate your VA-1000. Please follow the simple instructions below.
- Place the VA-1000 on a flat level surface
- Make sure the VA-1000 is on and that the controller is synced (refer to syncing pg 4). Do not start the blades. Instead, move both the throttles and control stick down and to the right corner (see diagram R). You will see the lights on the drone rapidly flash and stop. Once the lights stop flashing you have completed your calibration and are ready to fly!
TROUBLESHOOTING: If you do not see the lights flash, first remove the battery from the drone then turn off your controller and start again. Always make sure to put your battery in first, then turn on your controller. Push the left throttle stick up all the way and then pull back down again. When you hear the beep the VA-1000 is synced to the controller and you are ready to calibrate.
HOW TO PERFORM 360º STUNT ROLLS
Performing 360º stunt rolls with the VA-1000 is as easy as 1-2-3:
- Hover the VA-1000 in a still position making sure that you have at least 5 feet of clearance above and below the quadrocopter. Set the speed settings to mode 2 or 3, the VA-1000 can not do the stunt in T(Training) mode and speed 1(SLOW).
- Press the 360 stunt button down and you will enter the stunt roll mode which is indicated by rapid beeping sounds(see diagram S).
- Determine which direction you want it to flip and quickly push the right control stick in the direction you want to flip your VA-1000 (see diagram T).
NOTE: To exit the stunt roll mode without flipping, you can press the button again. The beeping sound will stop.
FCC Part 15 C Notice
CAUTION: Changes or modifications not expressly approved by the party responsible for compliance could void the user’s authority to operate the equipment.
NOTE: This equipment has been tested and found to comply with the limits for a Class B digital device, pursuant to Part 15 of the FCC Rules. These limits are designed to provide reasonable protection against harmful interference in a residential installation. This equipment generates, uses, and can radiate radio frequency energy and, if not installed and used in accordance with the instructions, may cause harmful interference to radio communications. However, there is no guarantee that interference will not occur in a particular installation. If this equipment does cause harmful interference to radio or television reception, which can be determined by turning the equipment off and on, the user is encouraged to try to correct the interference by one or more of the following measures:
Reorient or relocate the receiving antenna.
- Increase the separation between the equipment and receiver.
- Connect the equipment into an outlet on a circuit different from that to which the receiver is connected.
- Consult the dealer or experienced radio/TV technician for help.
This device complies with Part 15 of the FCC Rules. Operation is subject to the following two conditions :
- This device may not cause harmful interference, and
- this device must accept any interference received, including interference that may cause undesired operation.
FCC RF exposure statements
This Transmitter must not be co‐located or operating in conjunction with any other antenna or transmitter.
This equipment complies with FCC RF radiation exposure limits set forth for an uncontrolled environment. This equipment should be installed and operated with a minimum distance of 20 centimeters between the radiator and your body or nearby persons.
IC Radiation Exposure Statement:
This equipment complies with IC radiation exposure limits set forth for an uncontrolled environment. This equipment should be installed and operated with a minimum distance of 20cm between the radiator & your body.
![]() WARNING!
WARNING!
CHOKING HAZARD-Small parts.
Not suitable for children under 3 years.
Requires Speed Class 10 or higher microSD or microSDHC card(not included) microSDHC Logo is a trademark of SD-3C, LLC.
Conforms to safety requirements of FCC.
Voyage Aeronautics™ is the registered trademark of AMAX Industrial Group LTD.
AMAX Group USA Address: 12645 Memorial Dr. Suite F1 #388 Houston, TX 77024 © 2021 All Rights Reserved. Visit us at www.amaxbrands.com
Made in China
C002-USA-V 1.0
SPECIFICATIONS
| Design | Compact fold-in design |
| Features | Obstacle avoidance training feature, air pressure sensor, onboard HD camera, 6 axis gyro |
| Battery | Li-Poly battery |
| Battery Charging Time | Approximately 50-60 minutes (via 5.0V 2A USB wall charger) |
| Battery Life | 5-6 minutes depending on environment and user input |
| Remote Control | Uses 3 “AAA” alkaline batteries |
| Speed Settings | 4-speed settings: T (Training), 1 (SLOW), 2 (MEDIUM), and 3 (HIGH) |
| Flight Control | Left Throttle stick controls propeller speed and altitude, Right Direction stick controls direction and banking |
| Stunt Rolls | Can perform 360º stunt rolls |
FAQS
Who has the correct info on the replacement batteries?
The manufacturer.
Does it flip or do a stunt?
You can make it do a flip fairly easily.
Please provide a link to where I can buy extra batteries or to the exact battery because trying to search for one that works is painful on here?
Spare batteries are listed in the item description under the “Buy it with” section, $18.99 for 6 batteries.
Instructions say to use a computer usb port only to charge. i don’t have one. what’s the inputvoltage/amperage/wattage requirement for a usb charger?
You can use your regular phone wall android charger for it. It comes with the cord but not the base. Any base is acceptable.
Is there a link to the instructions? I lost the guide and can’t remember how to make it work.
You can find an online version of the manual here. (https://fccid.io/2ASK3CT-6164T/Users-Manual/User-Manual-4749740)
Please remember that some may vary but this is the latest revision.
Where can i get extra li-po batteries compatible with this and exactly which li-po battery should i look for?
You can buy batteries on Amazon, this is information,
How do you start a VA 1000 drone?
Insert the battery into the VA-1000 and set it down on a flat level surface. Press down the power button and hold for a few seconds (see diagram F). The LED lights on the drone should begin to flash. Quickly turn ON the remote and you will notice that the top red LED light on the face of the controller.
Do you need Internet connection to fly a drone?
A drone can fly without WiFi or cell service. Access to the internet is only required when downloading a program for your drone or doing a system update. Once the download is complete, the internet is no longer needed. However, some drone features are enhanced with WiFi or cell service.
How long does it take to charge a voyage drone?
The indicator light on the USB charger will turn to solid red to indicate that the battery is charging. The red LED indicator will turn off when charging is completed. Average charging time is approximately 50-60 minutes ( via 5.0V 2A USB wall charger).
How do you start a PA 1008 drone?
Turn ON your remote and you will hear 1 short beep, the white and red LED lights will start flashing slower. Push the throttle all the way up then pull it all the way down. You will hear one long beep and the LED lights will turn solid. Your PA-1008 and remote should have successfully synced.29-May-2021
Why does my drone not fly?
Some reasons drones may not take off are due to issues with the power supply, propeller positioning, compass calibration, or the flight location. Other cases are more complex, and relate to the drone’s inner workings. These cases may require professional intervention to be fixed.
Can you fly a drone without a smartphone?
If you want to be able to fly a drone without the need for a smartphone, your options are: Fly with the flight controller sans smartphone with limited function. Use a controller with a built in display (such as the DJI Smart Controller) Get a drone that comes with a controller with its own built-in display screen.
Do drones use wifi or Bluetooth?
Bluetooth is a popular technology for connecting to drones and controlling them via an app. Because of its range, this type of communication is often found in toy drones. Bluetooth can reach 100m maximum connectivity in ideal conditions, while WiFi can reach 1000m.
Why will my drone not connect to my phone?
Make sure both batteries have got enough charge in them. Switch the batteries with new ones. Pair the controller correctly to the drone using the correct procedure. Reboot the drone and repeat the connection process.
Could you fly a drone in space?
While it may seem crazy, it is actually very possible for a drone to record earth from space, however it needs a little assistance which in this case comes in the form of a weather balloon.
What is the average charging time for the VA-1000 Li-Poly battery?
The average charging time is approximately 50-60 minutes (via 5.0V 2A USB wall charger).
How long can a fully charged VA-1000 fly?
A fully charged VA-1000 can fly for 5-6 minutes depending on environment and user input.
How do I sync my VA-1000 with the controller?
Make sure that the power on your controller is off and the battery is removed from the VA-1000. Insert the battery into the VA-1000 and set it down on a flat level surface. Press down the power button and hold for a few seconds. Quickly turn ON the remote and push the throttle stick all the way up until it stops and then pull it back all the way down to the bottom. When pushing the stick up or pulling the stick down you should hear a high-pitched beep both ways. The indicating lights on the drone and controller will stop flashing and stay solid on. You have successfully synced your VA-1000 and are ready to fly.
What is the automatic take-off and landing feature?
The automatic take-off and landing feature allows you to simply press the Auto Start/Land button, and your VA-1000 will automatically take off. To stop or land the VA-1000, just press the Auto Start/Land button again, and the VA-1000 will descend and land automatically.
How do I adjust the speed settings of my VA-1000?
The VA-1000 has 4-speed settings; T(Training),1 (SLOW), 2 (MEDIUM), and 3 (HIGH). To increase the speed, simply trigger the speed setting button on the remote control. You will hear beeping sounds, and the controller will show you what speed setting you are on. Speed settings can be set before flight or during the flight.
How do I adjust the trim settings on my VA-1000?
The VA-1000 is already properly trimmed and calibrated right out of the box and should not require any trim adjustments before flying. Some more experienced pilots may want to adjust trim settings for their style of flying. After several crashes, you may need to adjust trim settings for the VA-1000 to be more balanced. If your VA-1000 is moving forwards or backward automatically, you may need to adjust the FORWARD/BACKWARD TRIM buttons. If your VA-1000 drifts forward, push and release the BACKWARD TRIM button repeatedly until the moving stops and proper flight is maintained. If your VA-1000 drifts backward, push and release the FORWARD TRIM button in the same manner until the problem is resolved.
What is the maximum flying time for the VA-1000?
The maximum flying time for the VA-1000 is 5-6 minutes depending on environment and user input.
Can I fly my VA-1000 in foul weather?
No, it is not advised to fly your VA-1000 in foul weather.
How do I perform 360º stunt rolls with my VA-1000?
To perform a 360º stunt roll, push the right Direction Control stick in any direction and then quickly push it in the opposite direction. The VA-1000 will perform a 360º roll in that direction.
![]()