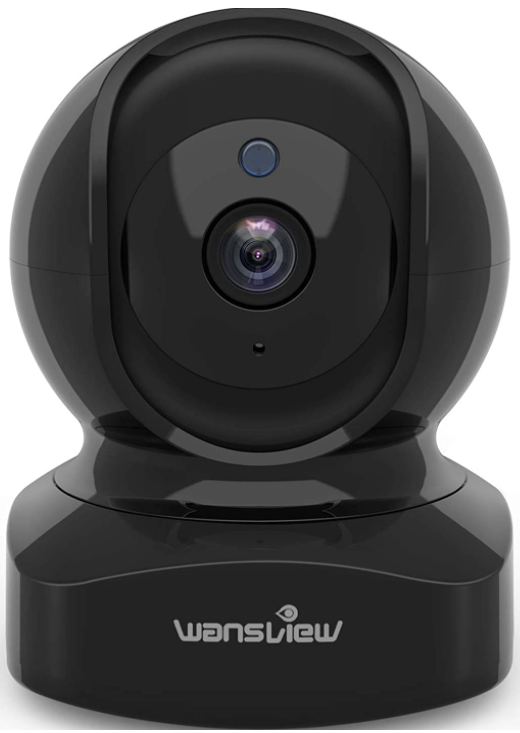
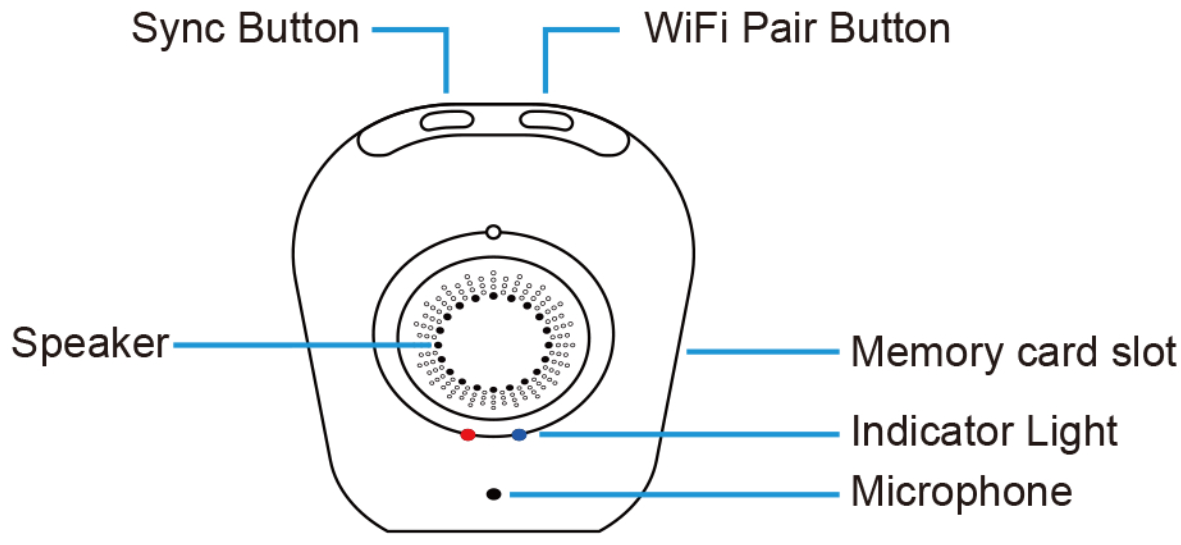
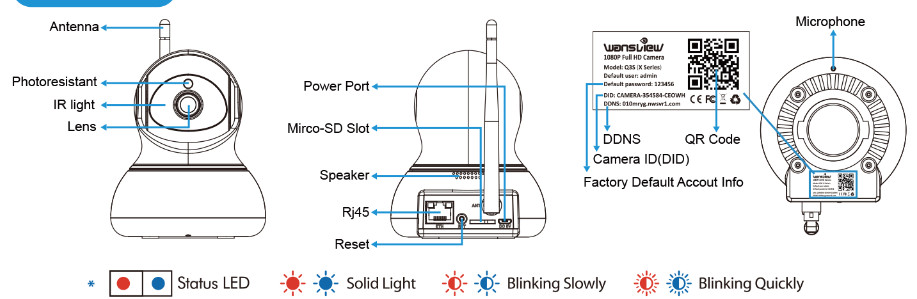
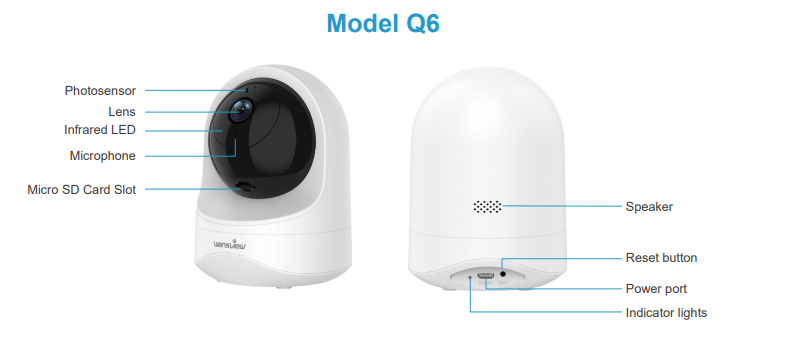
Camera Introduction
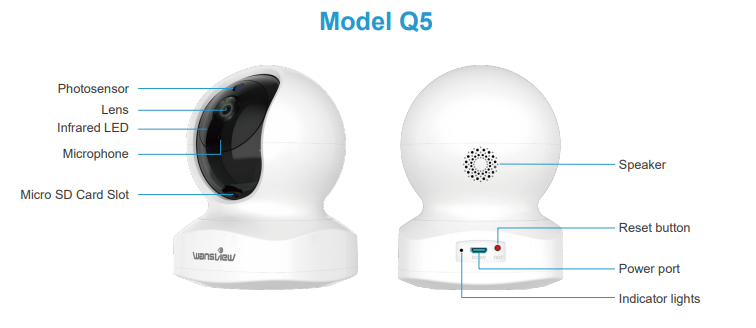
Indicator lights status
| Light Status | Camera Status |
| Red light on | Camera is powered on |
| Red and blue lights are flashing alternately | Waiting for connect now |
| Blue light is flashing | Camera is connecting to Wi-Fi |
| Blue light is solid | Connect WIFI and Pair successfully |
| Red light is flashing quickly | Reset camera to factory setting |
Warm note: Please make sure your router is connected to the Internet.
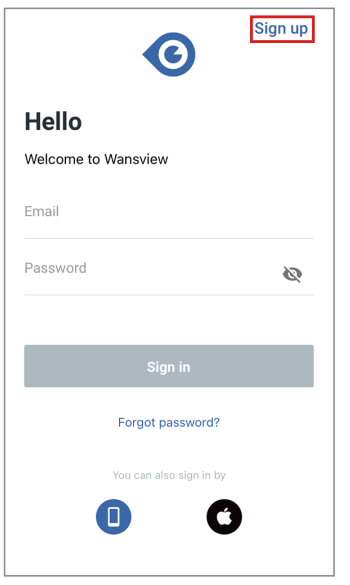
Install Wansview Cloud APP
- Download app
Please download Wansview Cloud app from APP store/Google Play. - Account Register
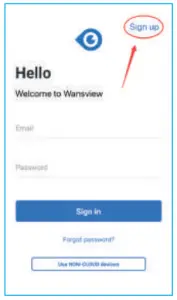
- Open the Wansview Cloud app and click【Sign up】
- Enter your email address and password
Pay attention that your password MUST be 8-16 characters, and include at least 3 categories of the following: Digits,Uppercase characters, Lowercase characters, Special characters.
Read and agree the Terms of Use and Privacy Policy, then tap Next.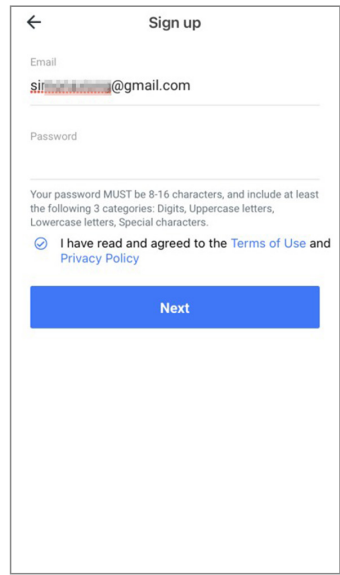
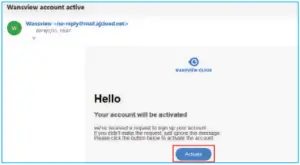
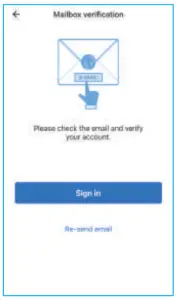
- Please go to your mailbox to find a mail that includes a verification code,enter the code to finish the Sign up.
If you cannot find the mail, please check the spam or and tap Re-send mail. Or you can contact us by sending an email to . You can also choose Phone number or Google account to sign in.
- Open the Wansview Cloud app and click【Sign up】
- Sign in
When using for the first time, you need to enter the email address and password of your app account to log in.
After signing in successfully, you can set a gesture login or Touch ID. (Wansview cloud app–Me page–【Account security】–【Touch ID/Gesture login】)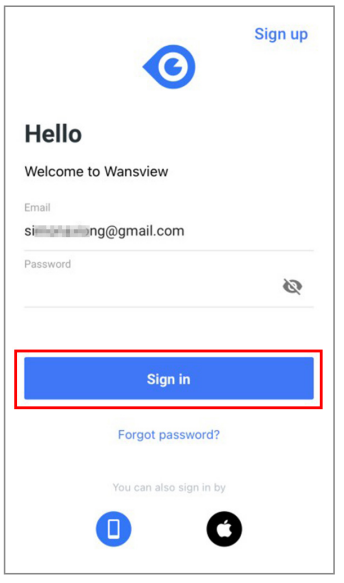
Setup Mode
Wi-Fi Setup
Note: The camera can only support 2.4Ghz Wi-Fi, it doesn’t support 5Ghz Wi-Fi.
- Place the camera near the router within 3 feet and power on the camera with the attached power cord.
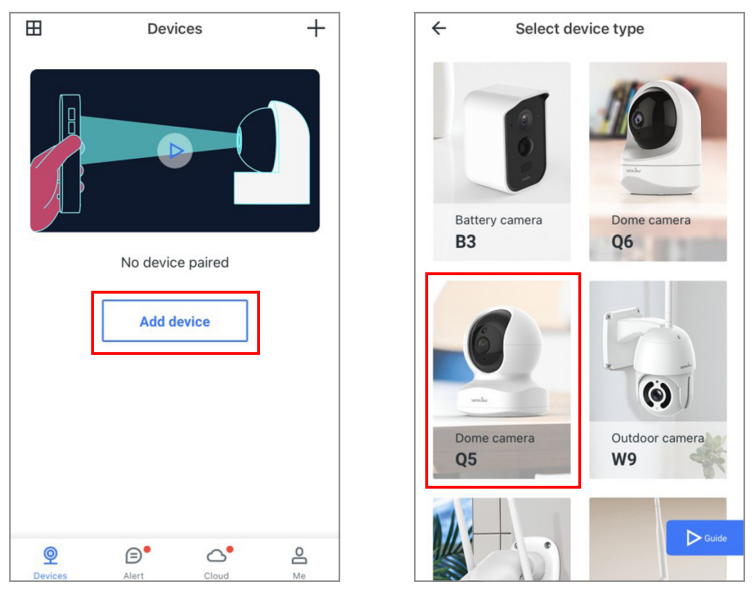
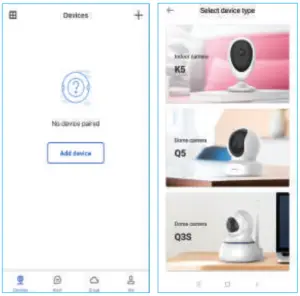
Make your phone use the 2.4G Wi-Fi. - Tap 【Add Device】 on the APP, and choose the camera model Q5 or Q6.
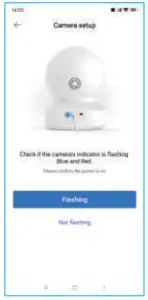
- Check if the camera’s indicator light is flashing red and blue, if yes, tap【Flashing】.

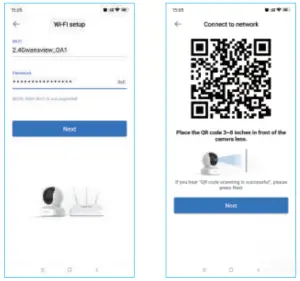
- The Wi-Fi name will be displayed automatically, then enter the correct Wi-Fi password and tap Next. If Wi-Fi name is not displayed, for Android phone, please go to the Phone Setting–APP Management– Find Wansview Cloud APP–Permissions–Allow the app to get the location info.

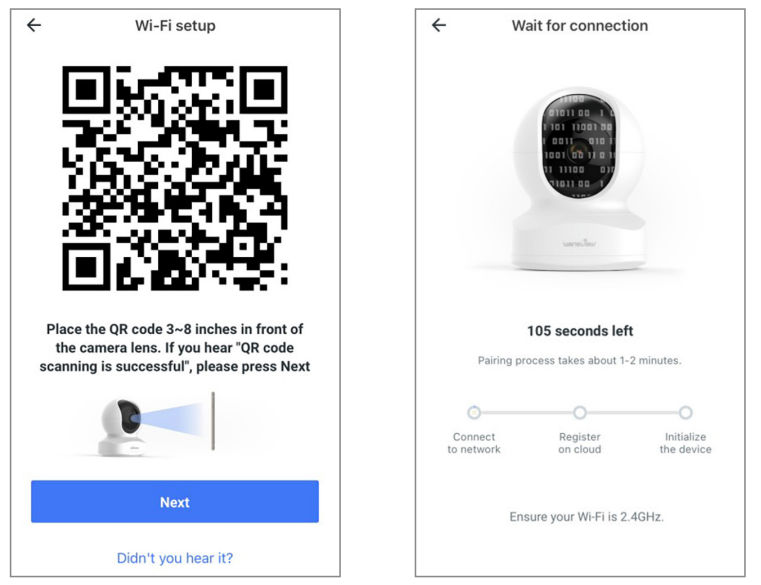
- Adjust your screen brightness to medium,then place the camera lens about 3-8 inches in front of the phone and make the camera scan the QR code on the phone screen. When hearing”QR code scanning is successful”, tap Next.

- Check the indicator light status. If the connection is successful, the blue light will be solid. You can rename the camera, and start using the camera.

Wi-Fi connection by Soft-AP
- Place the camera near the router within 3 feet and power on the camera with the attached power cord.
Make your phone to use the 2.4G Wi-Fi. - Tap Add Device on the APP, and choose the camera model Q5 or Q6.
- Check if the camera’s indicator light is flashing red and blue, if yes, tap【Flashing】.
- Click “Didn’t you hear it?” and select 【Wi-Fi connection by Soft-AP】. Use your phone camera to scan the QR code on the camera sticker.

- Check if the camera’s indicator light is flashing red and blue. If yes, tap【Flashing】.
Please go to Settings–Find a Wi-Fi named WVC***** if fail to join and connect with this Wi-Fi. Then go back to Wansview Cloud app.
- The app will ask you to choose a network. Select 2.4G Wi-Fi and enter the password. The camera will start connecting with the Wi-Fi. After the camera is online, you can rename the camera, and start using thecamera.

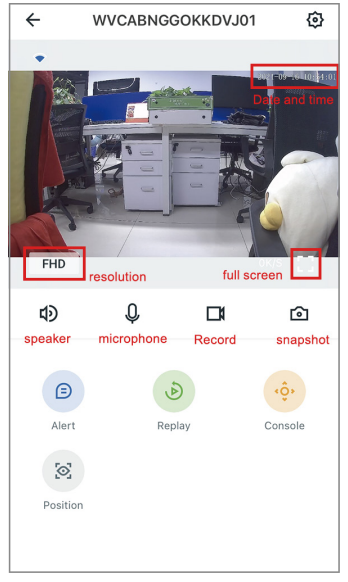
Live Feed

| FHD | Select to switch the resolution from FHD to HD |
 |
Tap to see full screen of live stream |
 |
Tap this icon to enable or disable audio |
 |
Hold to talk to the camera |
 |
Tap to record video manually, and can check the local records from Me-Local Video |
 |
Click to to snap pictures to phone storage, and can check the local picture from【Me】-【Local Photo】 |
 |
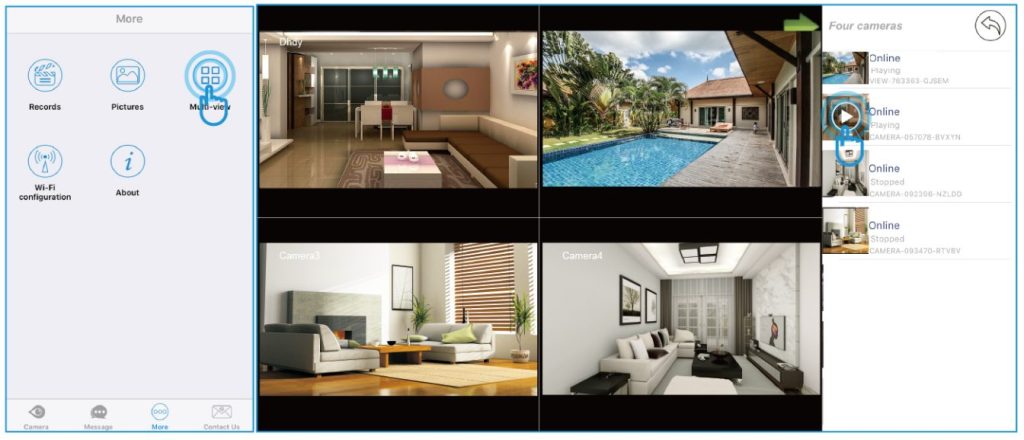
User can set up Multiple view mode to view different cameras at the same time. On multiple view mode, the video streams is applied to 480P resolution. |
Settings and Functions
Share with Family
Before proceeding the sharing, please ask your family to download Wansview Cloud APP to his phone and register a new account with their own email information to access APP firstly.
- Tap Settings icon-【Invite family members】 then press to enter share device, you can share camera feed with family members, camera is up to be shared with 3 devices at a time.
Warm tips: The shared link is valid for 30mins only, please delete the record and share again if it expires).
- Send the invitation link to your family’s phone and then ask him to click the link and open it via browser.
Tap“Receive”to accept this invitation and confirm that the camera is added to the list successfully.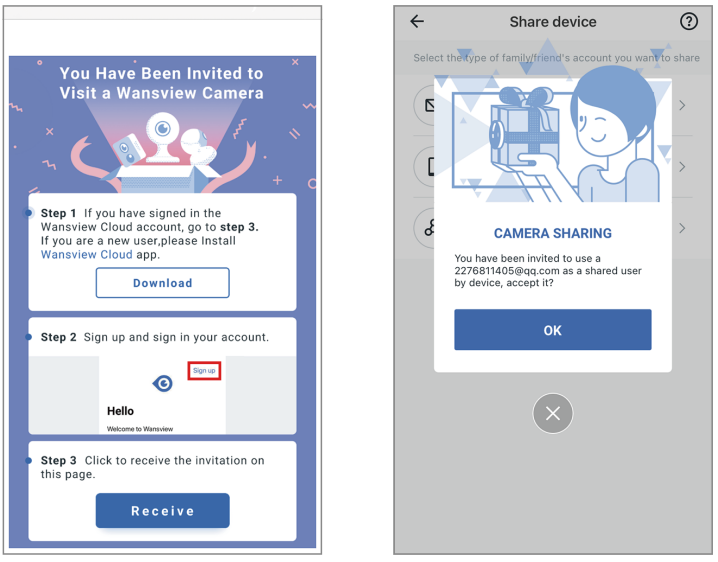
User can share access to other people, up to 3 people(devices). But the invitee can’t have a full access to this camera, they only can view the live stream, use the two-way audio, replay the alert video and the Cloud alarm video.
Motion Detection
Motion detection is defaulted to On. The generated alarm video will be stored to the Alert page.
- Detection Area: Here allow you to define a specific area that you want your camera to detect motion in.
- Sensitivity Level: User can set the sensitivity of your Wansview camera according to your preferences.
There,you’ll see a slider to adjust the level.
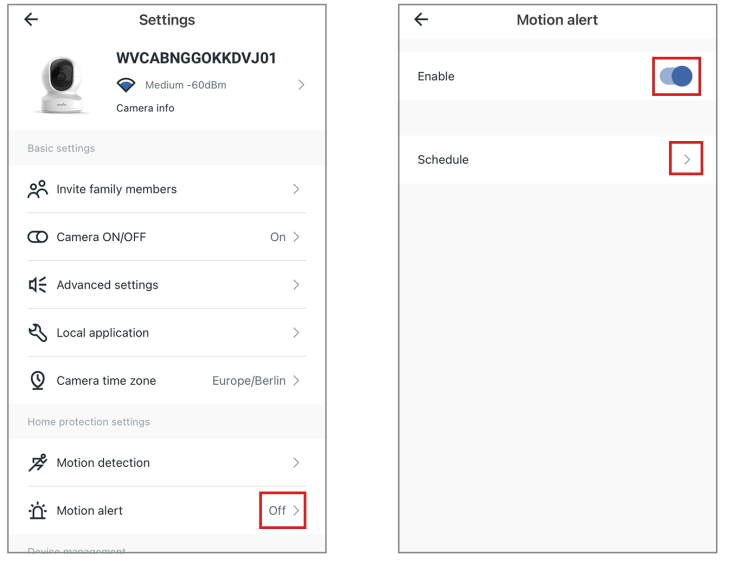
Motion Alert
Once motion is detected, user will receive a push notification in your Wansview Cloud app as below. Tap the message to view 10s alarm video recorded by the camera. Wansview Cloud App also provide the timeline to the user for select and review the specific alarm events.
You may follow the steps below to set motion alert for Wansview cameras via Wansview Cloud App.
- Launch Wansview Cloud App and log in to the camera, then tap the setting icon to find 【 Motion Alert】page.
- Enable the 【motion alert】 and then select the schedule to 24/7 or you can customize the starting and ending detection time.

Warm tips: Users can check the short videos for the past two days for free, these alert videos are supported to save to your phone and delete. If Cloud service is subscribed, you can check the recent 7 days from the Cloud page to replay the videos.
You may follow the below steps to replay your alert video: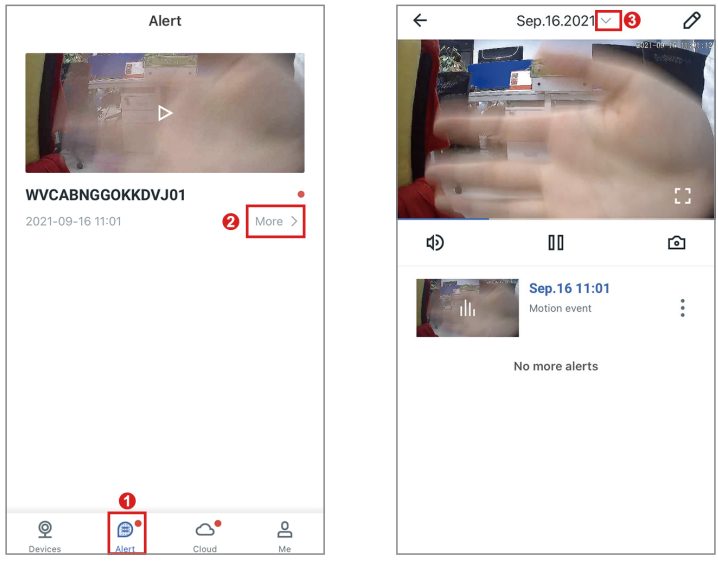
RTSP
Wansview cameras that support RTSP protocol could work with the third-party software, like iSpy, Blueiris,IP Cam Viewer. They can be used for live viewing and recording of Wansview cameras.
To connect an IP camera via RTSP, you may follow the below steps to configure the 【Local Application】under settings page and add camera to iSpy.
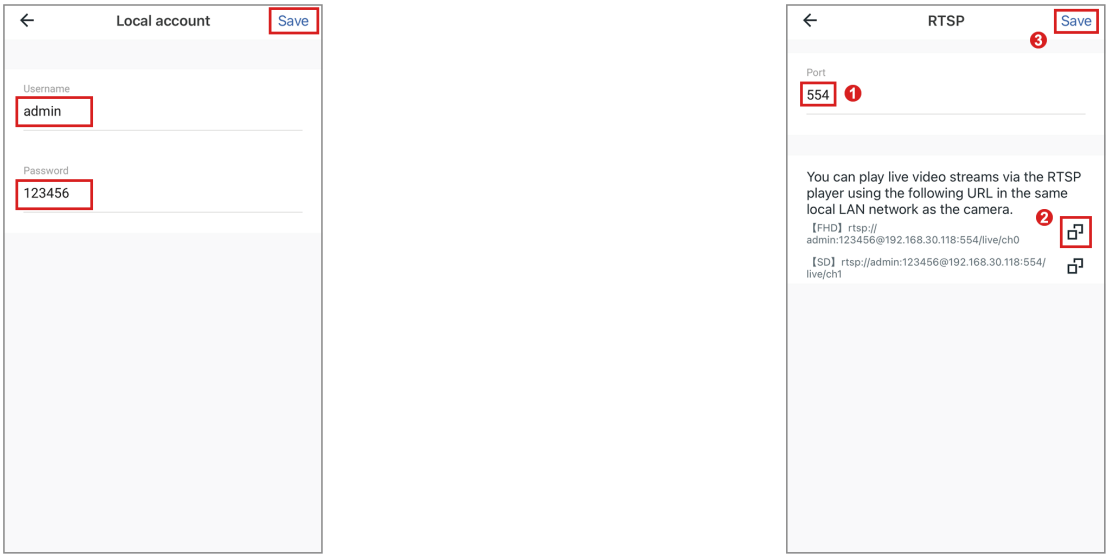
- Launch Wansview Cloud APP, go to settings–【Local Application】–【Local Account】 –Edit the username and password you want.

- Go to RTSP page to set a specific port number you want (range of 554-1554), Choose one of the live-stream URL to copy.
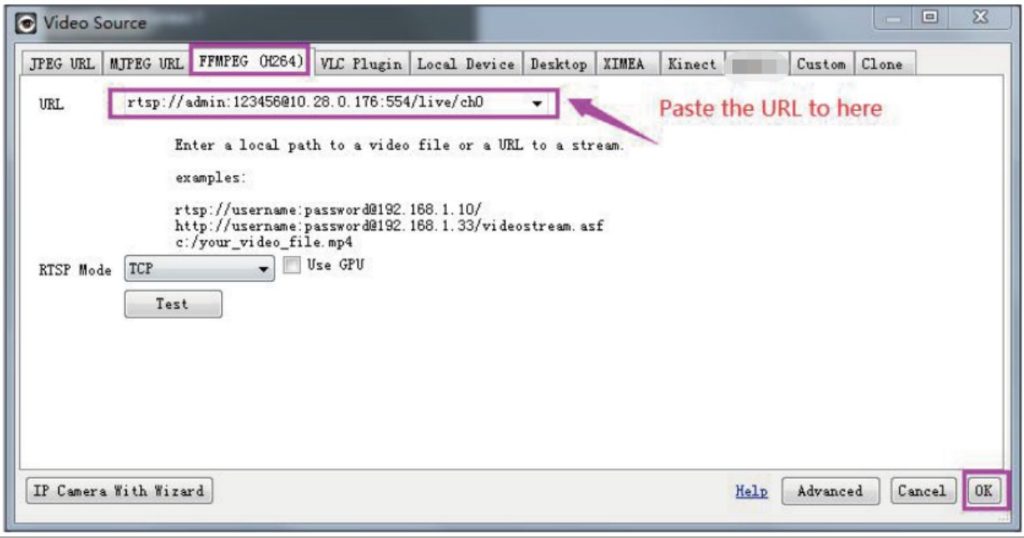
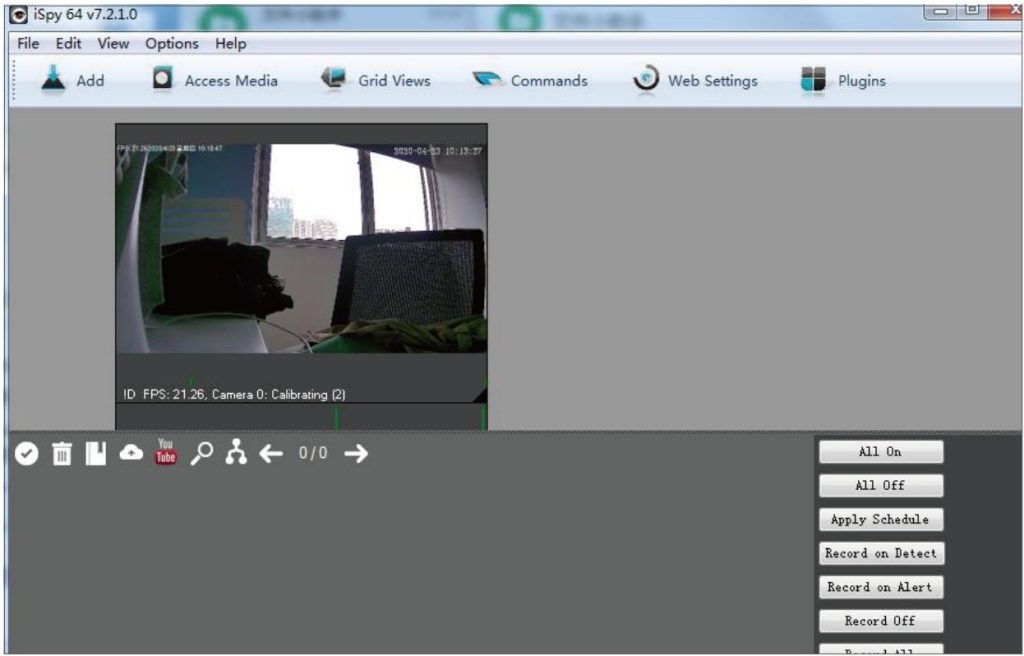
- Launch iSpy software–Add 【Local Camera】–Choose 【FFMPEG(H264)】 in Video Source–put the copied URL here–OK-Name for camera–Success.


Camera Information
- Camera Time zone
User can set the exact time zone for your camera. If you and your camera are in different time zones, then the camera will send you real-time alert notification according to your setting.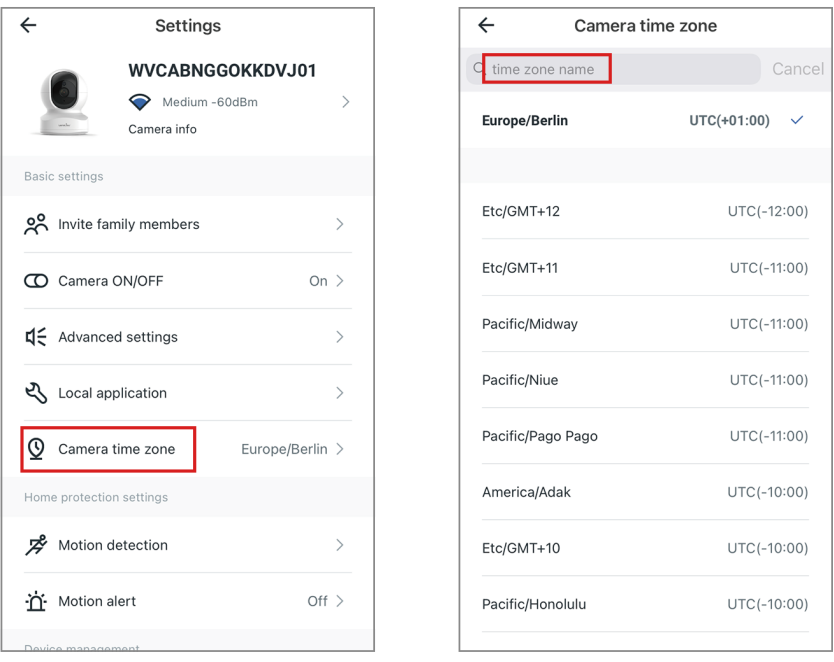
- Device Information
User can check the camera ID, firmware version,IP Address and WIFI Mac information. If there is red dot on the Settings button, it means the newest firmware version is released and is available to update by clicking the dot. 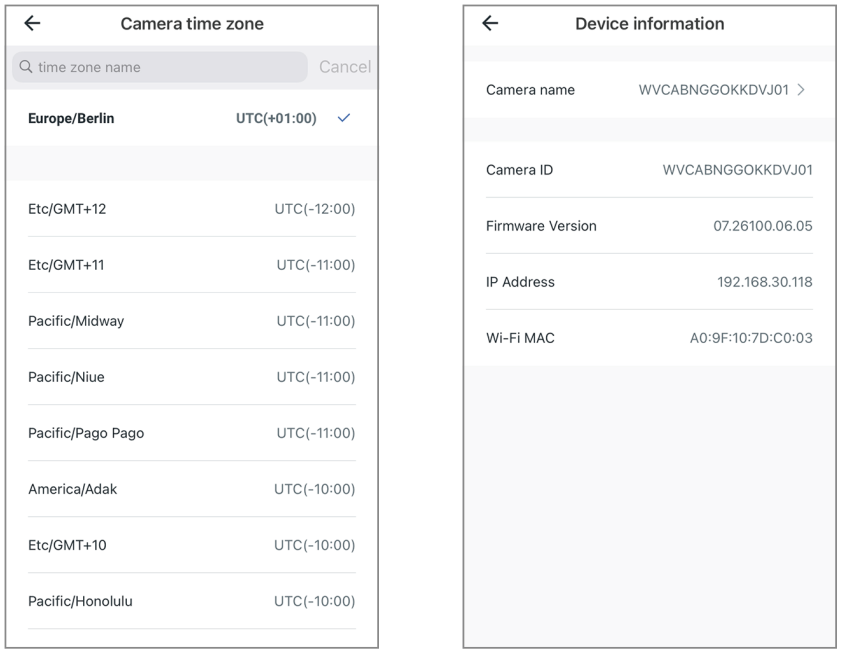 Network
User can check the camera’s Wi-Fi name and can set up camera to another Wi-Fi network.
Or if you are using Ethernet cable connection, you can access this page to switch the camera to WIFI connection directly.Device Management
User can restart the camera or restore the camera to factory settings by tapping this icon directly. You can delete the camera from here too. After deleting, the previous data will be defaulted to zero. Please note that the camera should be set up again as new if the camera is restored to the factory settings or being deleted from the Device page.
- Diagnose
If your camera can’t pair success or the APP have any breakdown, user can tap this page to allow the built-in diagnostics system running to check problem. User could provide the diagnostic report to Wansview Support to ask for suggestions.
Advanced Settings
| Image rotation | User can rotate the image if the camera is installed upside down. |
| Auto night vision | Enable the night mode to view the camera at dark clearly. |
| AC frequency | Adjust the power frequency to 50hz or 60hz. |
| Camera microphone | Enable the microphone to pick up and deliver the sound. |
| Speaker volume | Adjust the speaker volume if the audio sound is too low |
| LED indicator ON/OFF | Hide the actual camera status. If enabled, Solid red light is off. |
Optional Storages
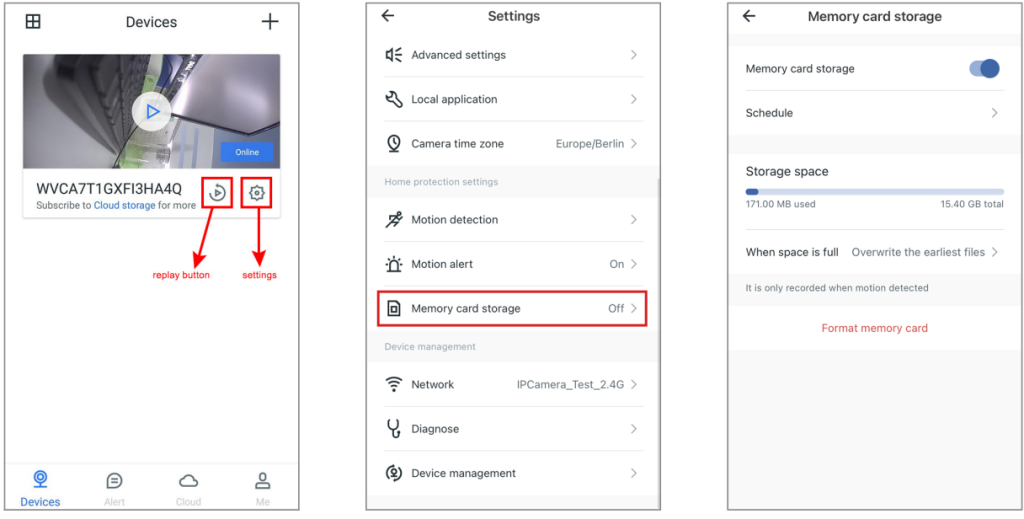
Memory Card Storage(Memory card not provided)
To find the memory card slot, please push the camera head upward.
- Install the micro SD card into camera
Note: Before install/uninstalling the SD card, please power off the camera firstly, in case it will damage the SD card. If SD card can’t be recognized by your camera successfully, please use the reader to format SD card via FAT 32 on PC and then insert into the camera to try again. - Set up SD card recording on Wansview Cloud APP
Make sure that the SD card is inserted into the camera correctly.
Tap the Settings button and set Motion Alarm and Memory Card Storage to “On”.
Select the schedule to 24/7 to allow the camera detecting the motion all day.
Tap the Replay button to see the recording on the memory card. - Playback
You may follow the below steps to playback the videos recorded to your SD card.
Note: Playback is only available when the SD card is inserted and recognized by the camera.
Wansview camera does not support consistent recordings, but only records when it detects motion.- Tap to enter the playback page.
- Tap SD card storage,choose the date when the video was recorded.
- Use two fingers to zoom in on the timeline to select a more detailed time you want to replay.
- Press “1X” to select “2X” or “4X” to fast-forward the video if you want.
- Tap to delete the video you don’t need and tap to save the important video.

 Note: After formatting successfully, firstly please turn off the camera, then please insert the SD Card into the camera, and power on the camera and check if the SD card can be recognized or not.
Cloud Services
Free Cloud Plan provides you with 30 days of free cloud service if you are the new Wansview user.
Warm note:
- Cloud storage is different from local storage. SD card storage and Cloud storage work independently without each others interference. In other words, if you enable both SD card recording and Cloud recording, the video footage will record to the Micro SD card and upload to cloud at the same time.
- Cloud service is not compulsory. Camera still can work properly even though the user do not subscribe the Cloud plan or cancel the Cloud service while using.
- Please cancel the cloud service before the free-trail expires if you have no attention to continue using the
Cloud and paying its service. Otherwise, the Cloud subscription will be automatically renewed according to the chosen plan period. - If you accidentally miss the cancellation time and get charged, please feel free to contact us via Email. We will refund the fees.
- Only records the alarm video until the motion ends.
Introduction of Cloud plans
| Plans | Basic | Extended | Pro |
| Feature | Rolling 7-days alarm
recording |
Rolling 15-days alarm
recording |
Rolling 30-days alarm
recording, |
| Quantity | Max 3 Cameras | Max 5 Cameras | Max 7 Cameras |
| Price | $6.99/month | $9.99/month | $16.99/month |
| $19.99/quarter | / | / | |
| $69.99/year | $99.99/year | $169.99/year |
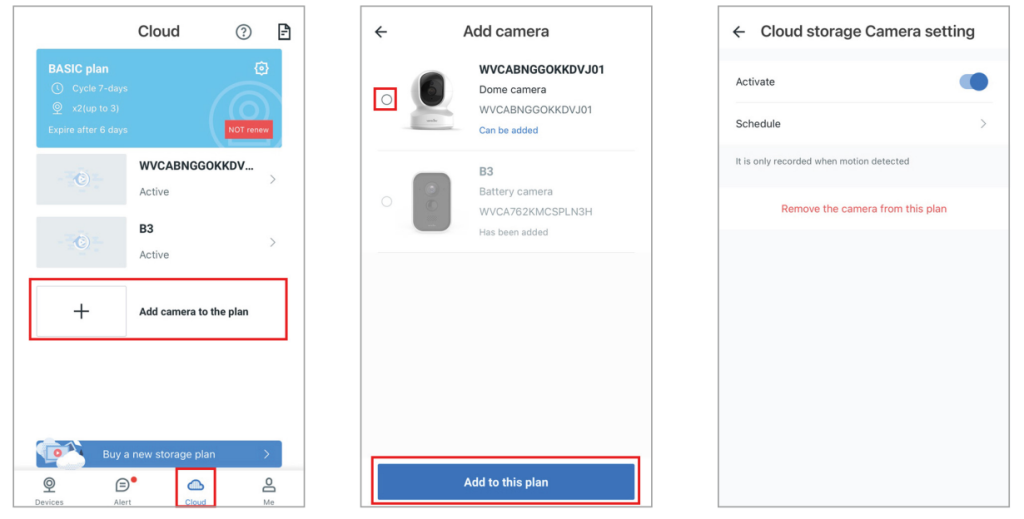
Add the camera to Cloud plan
- Enter the Cloud page, then tap + Add Camera to Plan.
- Select the camera, tap Add to this plan, enable it, and then set the schedule.
- Once added, the camera will appear in the cloud screen. Tap the camera screen to view the recording.
Tap the camera name to change the settings. - You can delete or download recordings. Once downloaded, you can view them in Local Video on the “Me”screen.

How to Cancel the Cloud:
If you want to cancel the cloud service, you can do so by tapping the Settings button on the Cloud screen, and then tapping “Cancel this subscription plan”.
Me page
| Local Video | check the alarm video, SD card or cloud recording, and real-time recording. |
| Local Image | check the pictures of recording or real time images |
| Message | check the system messages |
| Account Security | set to change Face ID, Touch ID and Password |
| General Settings | set up notifications for language, cellular usage reminders,and alarm messages |
| Contact Us | If you have any questions, please contact us at our US email address |
| FAQ | check out our FAQs if you have any questions |
| About | APP version information |
| Sign Out | log out the account |
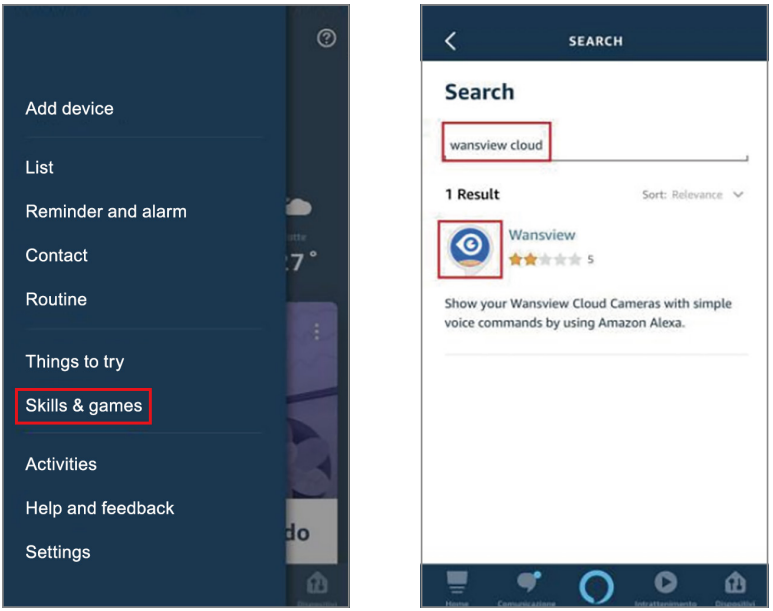
Alexa Compatibility
- Open the Alexa App menu and look for the “ Skills&Games ” button. Click Search icon and search “Wansview Cloud”.

- Enable the Wansview Cloud feature and log in your Wansview Cloud account. Allow the Alexa Device interaction then your account will be linked with Alexa.
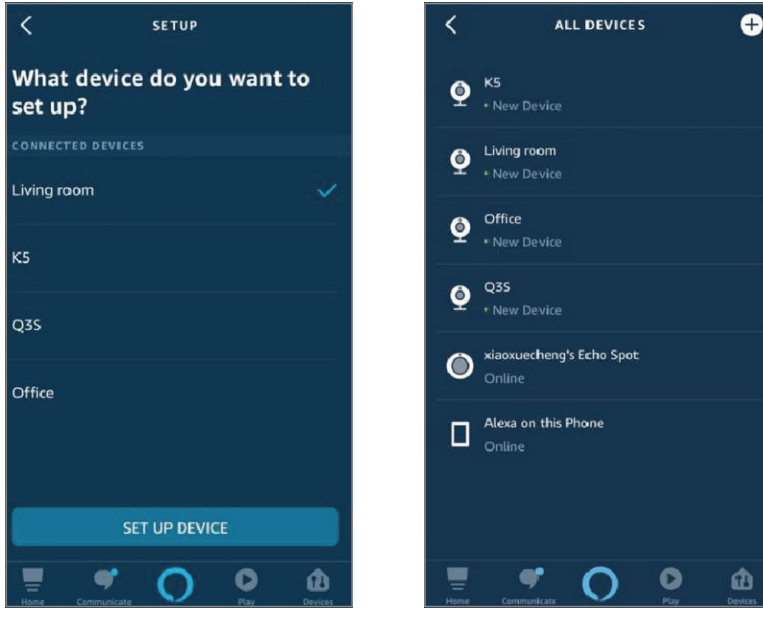
- Please go to 【Device】 page of Alexa APP — click —choose 【Add Device】 — choose【Others】 —then Alexa will find all cameras that are connected on your Wansview Cloud account.
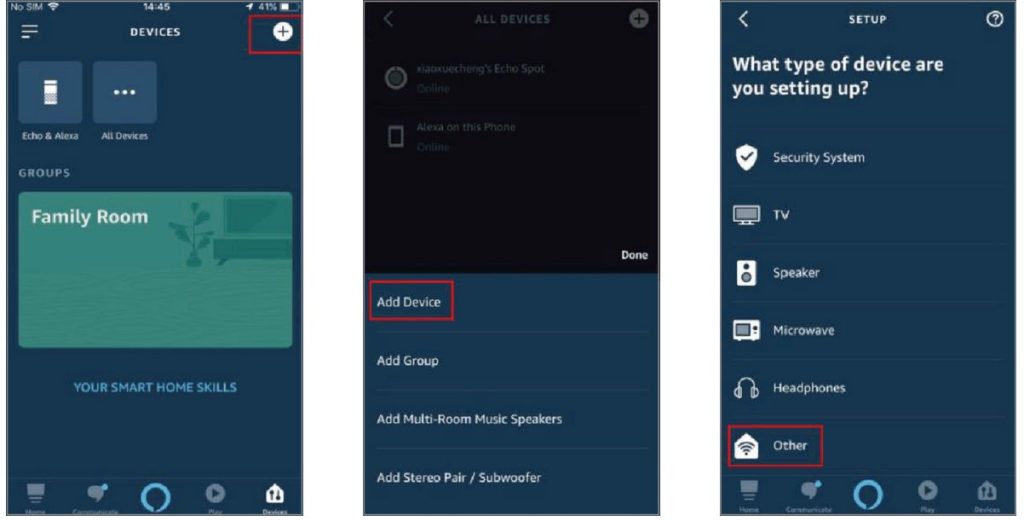
- You can add all found cameras to Alexa, but one time can only add one camera. After added, you can click【Devices】—【ALL Devices】 to check all cameras.
Congratulations!
Wansview camera is linked to Alexa. Now it’s y our time to test the camera integration, you can use the voice command to ask Alexa to show you the camera video at any time.
LET US KNOW WHAT YOU THINK
Thank you so much for your order and trust to Wansview.Please feel free to contact us if you have any questions about the product application.
As a young and growing company, it would mean the world to us if you could leave an honest review about our product and services.
- US/CA:
- UK:
- US/CA:
- UK:
- Facebook: https://www.facebook.com/WansviewOfficial
- Youtube: https://www.youtube.com/WansviewOfficial
- TEL: +13236863288 Available time: 6 pm – 3 am (PST Time) from Mo
The instruction is for reference only. Slight differences may be found in the user interface.All designs and software here are subject to change without prior written notice. For latest instructions, please go to www.wansview.com to download.
FAQS
what internet speed is supported? broadband 2.4 / 5 or only 2.4?
This camera works on the 2.4 wireless bands. I have a router that has 2 antennas and supports both bands. In my router menu it offers 3 choices which are 2.4 and 5 and Both. I have mine set for Both and all my 2.4 cameras work alongside with all my other devices that use 5. Routers differ in their menus and services so that’s why people and the manufacturer state that their cameras use 2.4 wireless.
Does this work with Ismartview app?
No. This camera doesn’t work with iSmartview pro App. It works with Wansview Cloud App.
What kind of sd card does this use?
This camera supports micro SD card which can be up to 128GB.
We normally recommend a Class 10 micro SD card for better using experience.
How many feet away does a person have to be to activate motion detection?
The motion detection distance for this camera is about 5 meters.
If a motion happens out of 5 meters from the camera, it won’t be detected.
Can an alert go to your phone when motion is detected?
Yes
Why doesn’t it support 5g Wi-Fi?
Yes, that’s a problem they never tell you about before you buy! I have 3 different kinds of cameras and none work.
What do you think about the most?
The people that troubleshoot are useless
Does this work with the new echo show 5?
this camera works with Alexa Skill, but it doesn’t work with Echo show 5 now.
We are working with Amazon Alexa Skill team, the camera will work with Ech show 5 soon.
does this camera have WPA2 Encryption?
Yes (this question was already asked)
Does it come with batteries? Is it chargeable?
Don’t listen to Lisa B. There’s apparently a large collection of people here who don’t understand in what context “wireless” means. Wireless does NOT mean it does not have any wires. Wireless means it connects to your Internet router wirelessly. Obviously it has to be powered somehow. I’d much rather it be plugged in than having to constantly
replace batteries to something that is on 24/7.
The system is down for over a day and the company says to wait 48 hours as the servers are down. Why does it
take this long?
It’s junk, just return the camera
Will it work with the SmartThings app
No. It doesn’t support SmartThings.
Does this work with the Ismartview app?
No. It doesn’t support SmartThings.
How the “position” function work? i set up 4 favorite positions, does it mean camera q5 will move to those positions continuously?
No.
]]>wansview K3 HD Wireless IP Camera K3(1080P)/K2(720P) User Manual
We keep improving the app if the app interface is not in accordance with the instructions. please go to wansviow website: http://www.wansview.com for the latest instructions.
www.wansview.com
Download the App (Android and 10S)
Go to the App Store or Google Play to search and download the “Wansview” APP to your supported device Or scan the QR code below to get the app.
 |
 |
 |
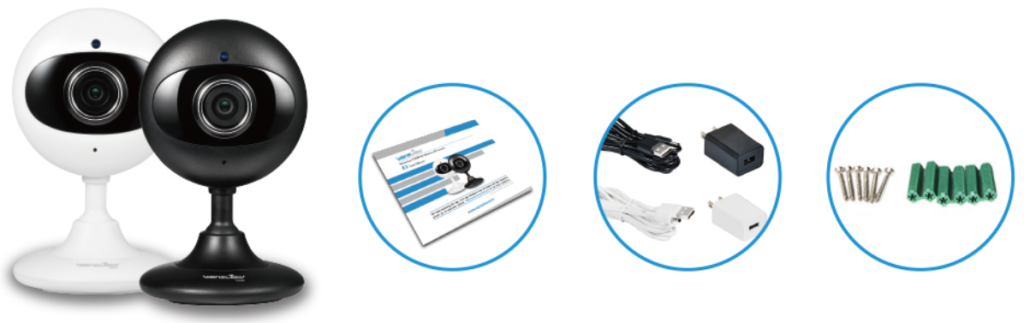
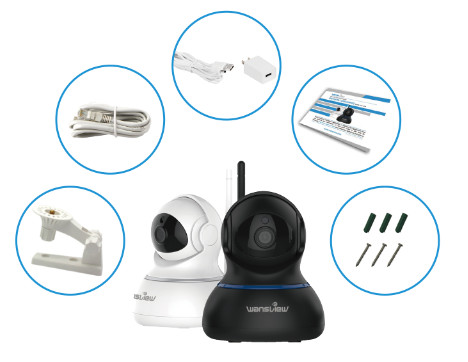
What’s in the box?
- 1 Installation guide
- 1 Power adapter
- 1 Camera
- Mounting accessories
connections
-x- 
 Status LED
 Solid Light
 Blinking Slowly
 Blinking Quickly
| Indicator Light Status | Device Status |
| Red light is blinking slowly |
Power up and activating |
| Red and blue lights are blinking slowly |
The device is ready to connect |
| Blue light is blinking quickly |
The device is receiving the wifi signal or connecting to the wifi |
| Blue and red lights are solid and steady |
The device is connected to the network |
| Red light is blinking quickly |
The device is restored to factory default |
 The blue light goes off The blue light goes off |
The device failed to connect to the network |
Power on Camera
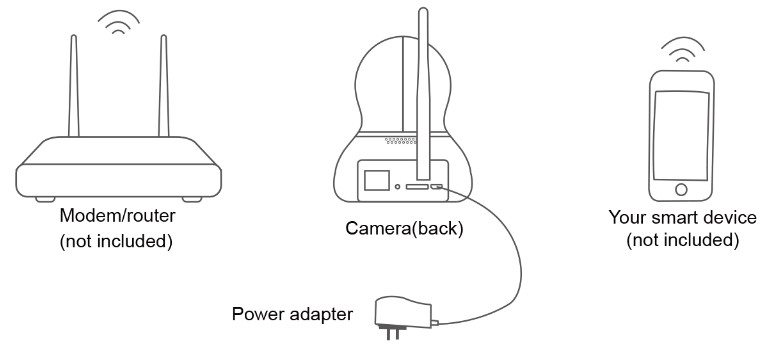
Please make sure the camera is in the same room, close to the router, before performing the setup. Then, using the included power supply, connect to Power.

Tips: You can relocate it to where you want after it is all set up. You just unplug it and move it to the new location and plug it in, the camera will connect to your WiFi automatically, no need to set it up again. But please make sure the new location will not be far from your router.
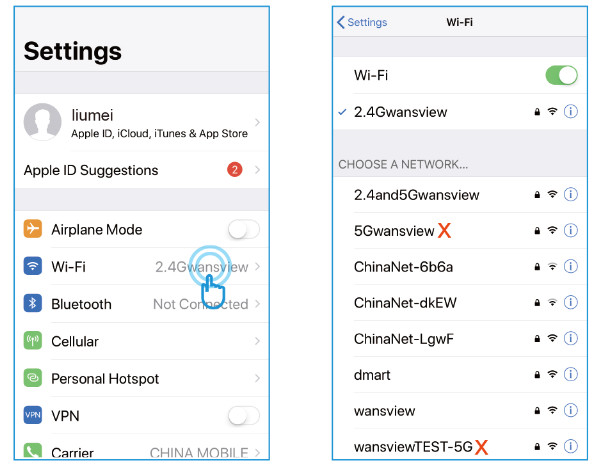
Connect Phone with 2.4G WiFi
Connect your mobile phone with 2.4G WiFi. (5G is not supported for the camera)If you are using a dual-band router, make sure your 2.4G WiFi name is different from your 5Gone.

Add Camera and Connect WiFi
1.Select [Add IP Camera], and tap +to add camera |
2. Select [Add cameras via | 3. Scan the QR code on the WiFi mode] back of the camera |
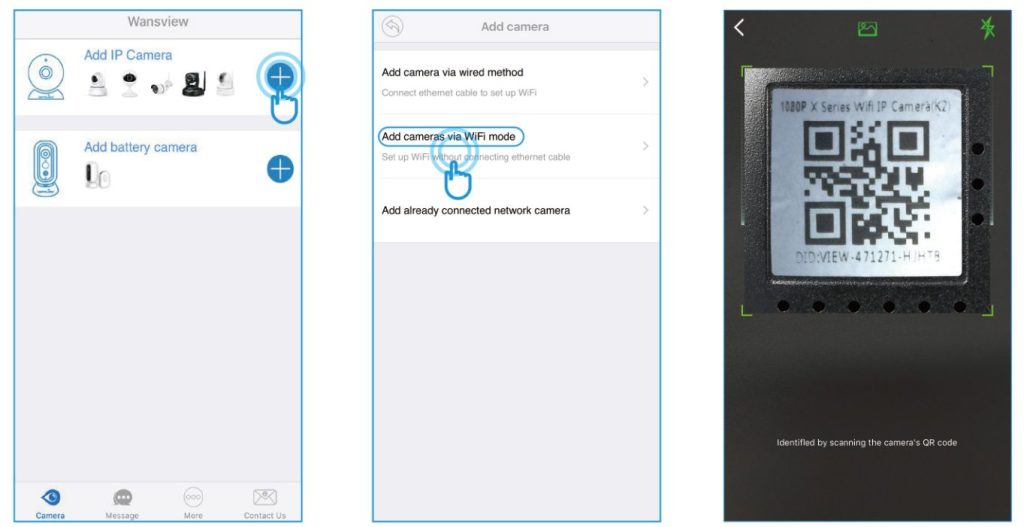 |
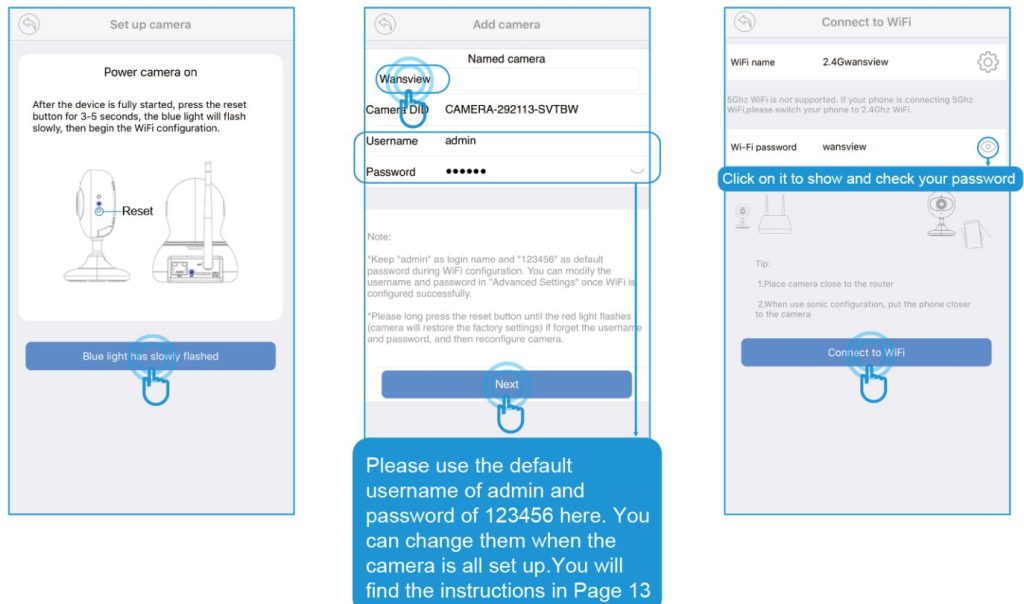
||
| 4. Hold the “Reset” button for about 3-5 seconds until you see the blue light is on | 5. Name the camera, then [Next] | 6. Input your WiFi password and click on[Connect to WiFi] |
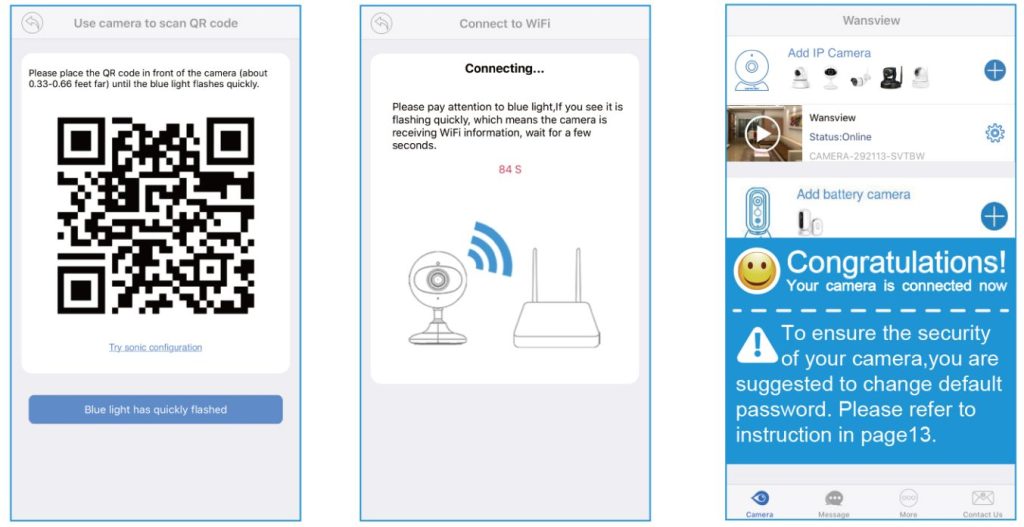
 |
||
| 7. Use the camera to Scan the QR Code, Click on [Blue light has quickly flashed] when the blue light flashes quickly | 8. When the camera receives a WiFi signal, it will sound 2 beeps | 9. You should see it says online. Congratulations! Your camera is all set up. Click on the image to enjoy viewing and controlling it now |
 |
||
Live Video Interface
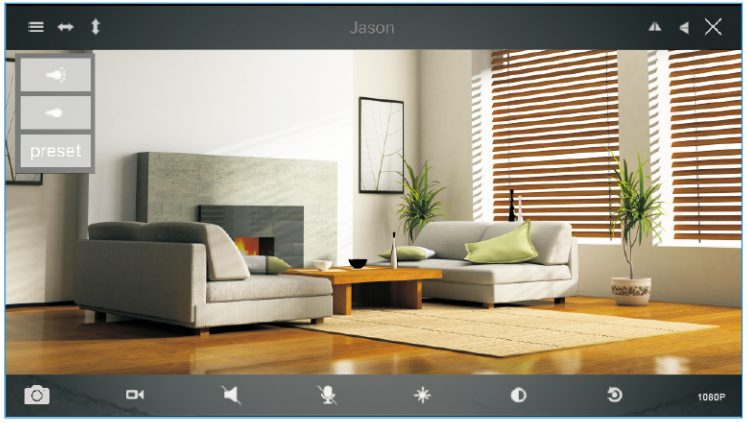
 Unavailable Unavailable |
 Snapshot to phone Snapshot to phone |
 Contrast Contrast |
|
 Mirror Mirror |
 Record video to phone Record video to phone |
Brightness |
|
 Flip Flip |
 Listen on/off Listen on/off |
 Restore to default Restore to default |
|
| ⇔ Unavailable |  Exit Exit |
 Talk on/off Talk on/off |
 1080P/480P 1080P/480P |
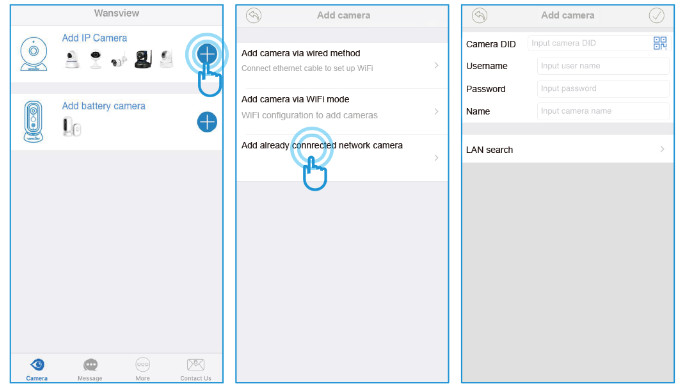
How to connect the camera to the second Phone?
Wansview camera supports 4 devices to view the same camera at the same time. After you use one phone to get your camera connected to your WiFi and you can view the live video from your first phone. If you would like to add your camera to the second phone, please follow the below steps: 1: Download the Wansview App to the second phone 2: Launch the Wansview app, and tap “+“and select “Add already connected network camera”.
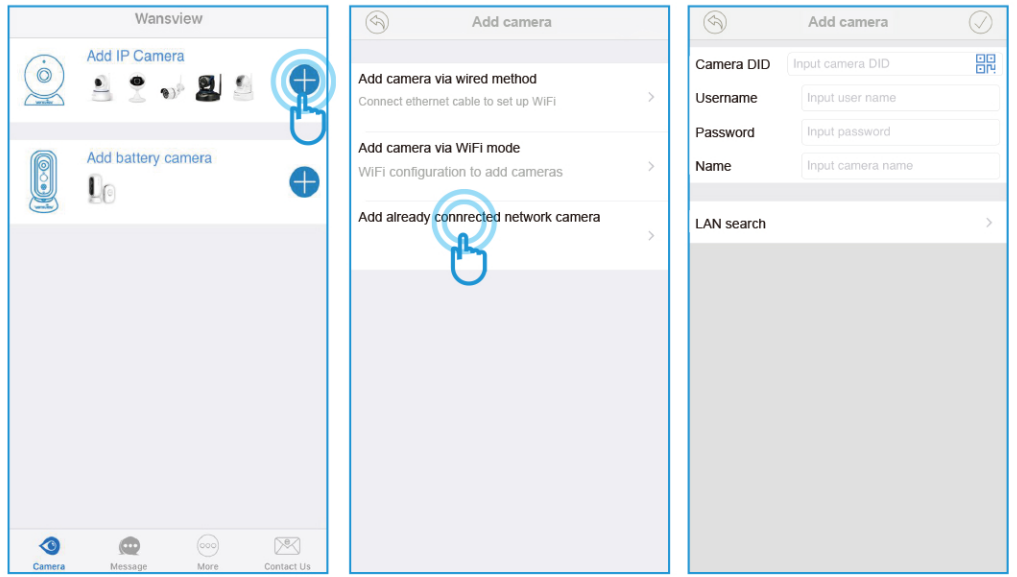
Users can use the below ways to add the camera: 1) Lan Search If the mobile device and the camera are in the same WiFi network, the user can use “Lan Search” to search the connected camera.
2) Scan QR code If the camera is on your hand, you can tap  to scan the Camera’s QR code to get the camera information.
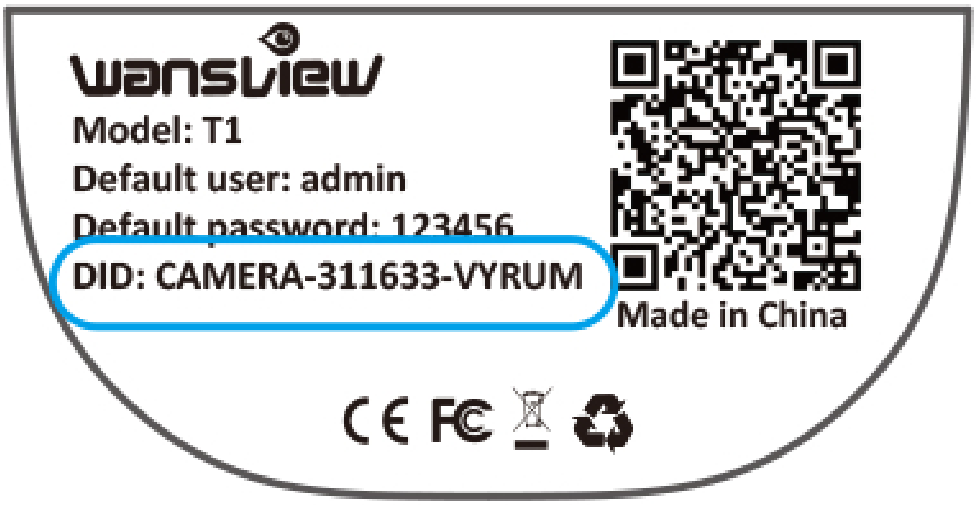
3) Manually input camera information Camera’s DID can be found from the camera’s sticker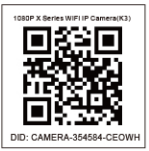 or Wansview app,
 default username/Password is admin/123456; Name can be any information. Attention:
  please remember to give your camera a name, and input your Password. Click on IV, Igo back to home to start to view & control.
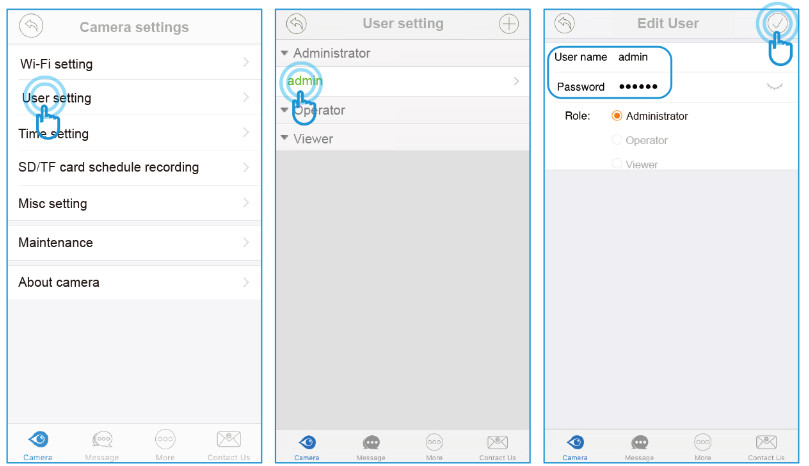
Change password and add another user
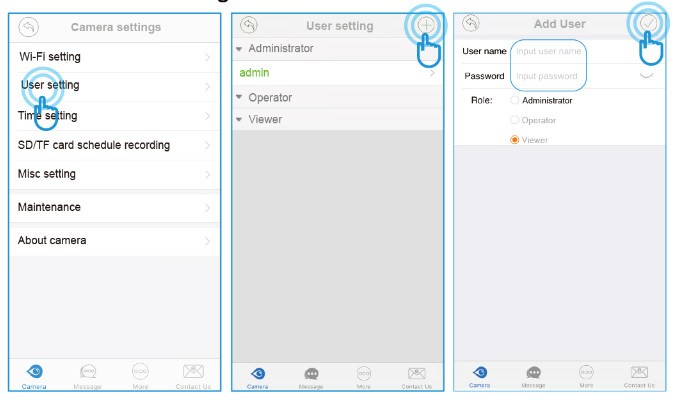
When the camera is “online”![]() , click on “IV to access “Advanced Setting”, Under the User Setting/Management, the user can change the default username(admin) and password (123456), or create another user account with certain access rights, such as an Operator or Viewer account for another person to view the camera.
, click on “IV to access “Advanced Setting”, Under the User Setting/Management, the user can change the default username(admin) and password (123456), or create another user account with certain access rights, such as an Operator or Viewer account for another person to view the camera.
Change Username and password
Tap User Setting, and choose Administrator>Admin, user can change the user name and password, then tap 2)
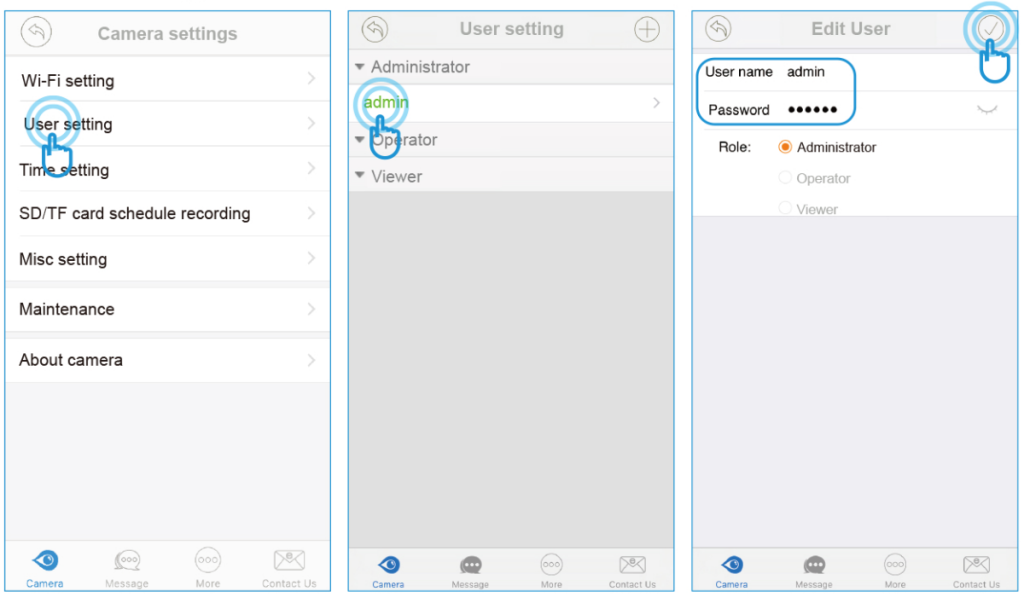 Add another user account
On User Setting, tap; 3 to add user, manually add the user name and password, then choose the Role(Operator or Viewer). Administrator: Full access rights Operator: Can operate on the camera live video screen, but not access to other settings like Alarm setting, Advanced Setting, etc.
Viewer: only can view camera, no more operations on the camera video screen.
Note: Password shall be no longer than 20 characters.
” alt=”wansview K3 HD Wireless IP Camera – wireless” width=”708″ height=”417″ data-ezsrc=”https://manuals.plus/wp-content/uploads/2022/02/wansview-K3-HD-Wireless-IP-Camera-wireless.png” />Trouble Shooting Frequently Asked Questions
1. If you have several cameras, please follow the below steps to use the Multi-view function.
Tap More on the Menu, then choose Multi-View
 2. How do I change my video stream resolution? Click on icon 480P to change the resolution.
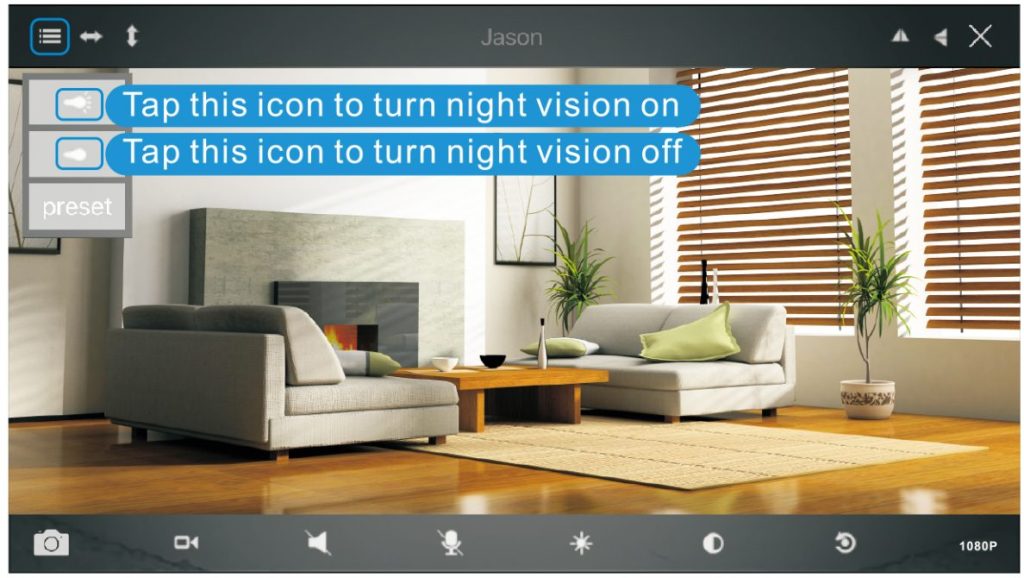
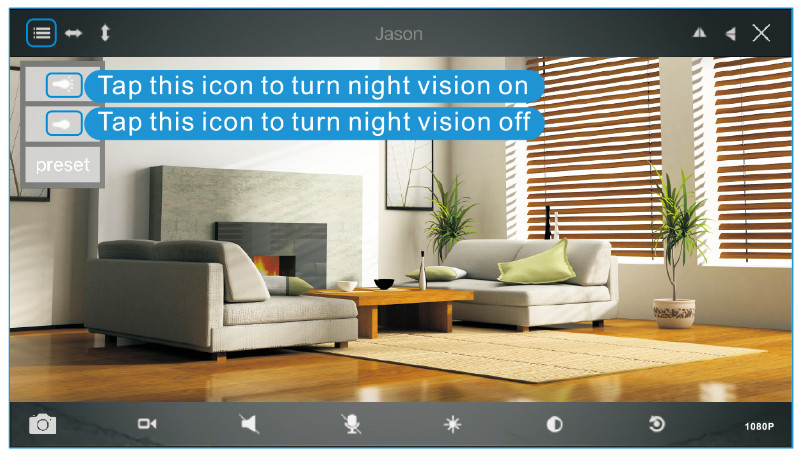
3: Night vision doesn’t work If the night vision stops working, please turn on the IR light as below
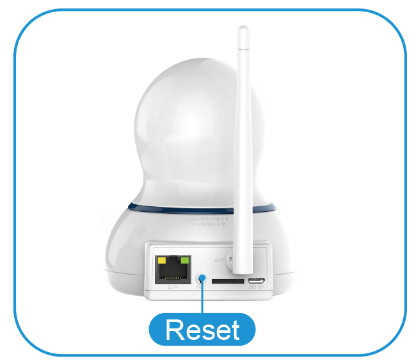
 4. How to restore to factory default Push down the “Reset” button around 15-20 seconds until the red light flashes quickly and you will hear a beep, then the camera will be back to factory default. After restore, please set up the camera using the default user name (admin) and password(123456).

5. I want to add the camera to other software/app, which URL should I use? RTSP Stream: rtsp://IP:rtsp port /live/ch0 (default RTSP port: 554)
MJEPG Stream: http://ip:port/mjpeg/stream.cgi?chn=0
Snapshot: IP:port/jpeg/snap.CGI?chn=0
6. Why can’t I access the camera remotely with Wansview App when I am outside?
If your phone is using cellular data, please check if Wansiew App has permission of cellular data usage on your phone or not. If your phone is on another available WiFi network, you still can’t access the camera remotely, the problem might be the firewall of your home router which blocks outside network to access the camera. Please follow the below instruction to turn the router’s firewall off to allow an outside network to access the camera: Connect your phone to home WiFi—go to Wireless setting of your phone, you can know router’s IP address—input the IP address to the browser on your phone—input router’s username and password then you can log in your router—find option “Firewall”—you can turn it off. Or you can access your home router on your computer, the link for your reference:? https://www.wikihow.com/Access-a-Router
Wire-Free Battery-Powered 1080P Indoor & Outdoor Home Security Camera
User Manual
We keep improving the app. if the am interface is not accordance oral the instruelvms. please go to wansview weberte: httontmnowsnsvieve. com for the latest instructors.
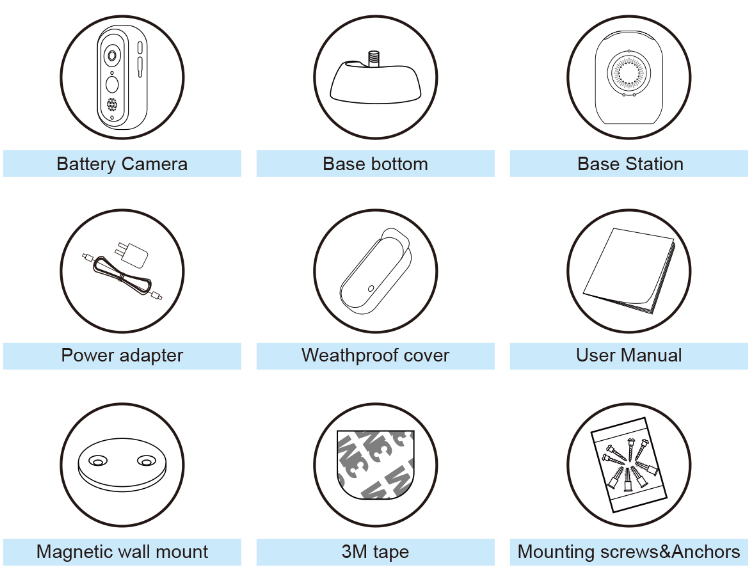
What’s in the Box
Product Diagram (Base Station)
| Bass station | |
| Speaker | Built-in 1W 80 |
| Microphone | Built-in |
| Micro Memory Card | Up to 128GB |
| Internet Connection | 2.4 Ghz WiFi Connection |
| Max Number of Connected Cameras | 4 |
| Adapter Power | 5V 2A |
| Dimensions | 60*31.5*81.9mm |
| Weight | 54g |
| Working Environment | -10°C to 50°C / 14°F to 122°F, RI-I95% |
LED Indicator & Working Status(Base Station)
| LED indication | Working status |
| OFF | Sleep mode/Power Off |
| Solid on in red | NO Internet |
| Flashes red&blue slowly alternately | WiFi configuration |
| Solid on in blue | Connected to internet |
| Flashes blue slowly | Pairing mode |
| Flashes red quickly | Restore to factory setting |
Button Controls( Base Sation)
| Button | Function | Operation |
| Wi-Fi Pair Button | Pair with the WIFI | Press and hold 5 seconds to enter pairing mode with the LED indicator flashing red&blue slowly |
| Sync Button | Pair with the camera | Press and hold 6-8 seconds to enter pairing mode with the LED indicator flashing blue slowly |
| Press the Wi-Fi Pair Button & Sync Button at the same time | Restore to factory settings Press and hold for 3 seconds |
Product Diagram (camera)
| Camera | |
| Lens | 105°wide angle ,f=2.0 |
| Sensor | 1/2.7 inch |
| Resolution | 1080P(1920*1080)Full HD Resolution |
| Microphone | Built-in |
| Speaker | ,Built-in 1W 80 |
| PIR Detection | Detection angle110 |
| Battery life | Two 18650 Lithium batteries(not included) Battery life will vary based on device settings, usage, and environmental factors. Actual results may vary. |
| Weight | 193g |
| Adapter Power | 5V 2A or Two 18650 Lithium batteries (not included) |
| Internet | 2.4G Wi-Fi |
| Weather Proof | -IP65 |
| Dimensions | 61.8*61.8*130.2mm |
| Working Environment | 10°C to 50°C / 14°F to 122°F, RHs95% |
LED Indicator & Working Status (Camera)
| LED indication | Working status |
| OFF | Sleep mode/Power Off |
| Solid on in red | Connected the Base station or charge the camera |
| Flashes red & blue slowly | Pairing mode |
| Solid on in blue | Fully charged |
Button Controls(Camera)
| Button | Function | Operation |
| Sync Button | Pair with the Base station | Press and hold 10 seconds to enter pairing mode with the red&blue LED indicator flashing red&blue slowly |
Caution
- Use the included power adapters only to charge the camera and the base station within the permitted voltage range.
- Only the camera is waterproof. The base station and adapters are for indoor use only.
- Make sure the internet is functional and fast for live data feed.
- Do not use the product at temperatures higher or lower than the specified range.
- Do not use in environments with strong electromagnetic interferences or near corrosive substances.
- The warranty does not cover defects and damages caused by misuse, unauthorized dismantling, or natural hazards.
- The 18650 battery life varies according to the frequency of the triggers and the video resolution settings.
- The PIR motion sensor can only detect motions within a certain range and will not be activated by motions out of the range
Get Started
- Download APP U Go to the Apo Store or &ogle Play to scorch and download ‘).vansyleveAPP to vow smart Phone a talgot

- Of San below OR code to gel “le APP
 http://itunes.apple.com/app/id1059638264?mt=8

Power On Base Station
- Connect the Base Station to a power source
- Placa the Base Station next to the mutat before continuing
Power the Camera
- Power the Camera o Please install two 18650 lithium batteries in the camera before using
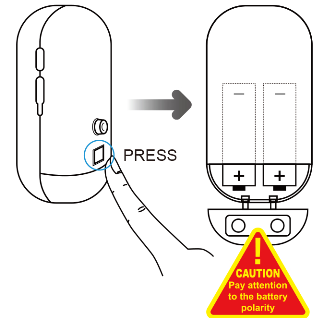
- Coming with a micro USB connector on the battery, the wifi camera can be charged by a universal 5V 2A phone adapter,Save your money for new batteries continuously.(No power adapter packed in).
Tips:ln order to extend the working time of the battery, please turn off the motion sensor when using it outdoors.
Connect Base Station to Network
Connect your mobile phone with 2.4G WiFi. (5G is not supported for the Base station)lf you are using a dual-band router, make sure your 2.4G WiFi name is different from your 5Gone.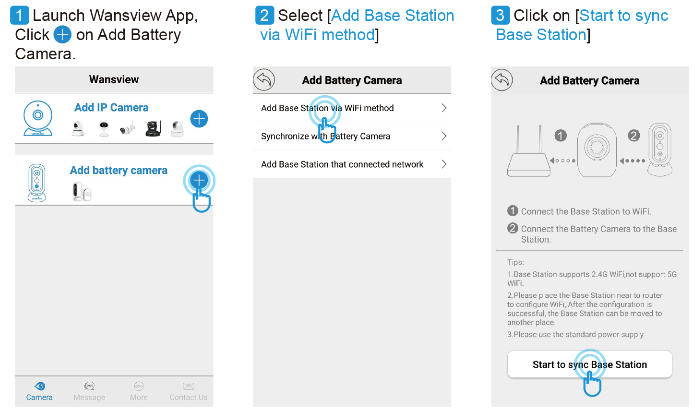
Full-Screen View

When the Base Station is online, use can do the below operations:
1. Change Username and password
For safety reasons. please follow the below illustration to change the default username and password after the Base station is connected to Wi-Fi:
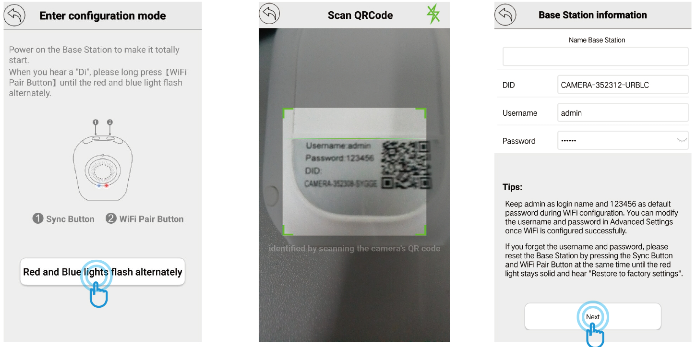
Long press (WiFi Pair Button] on the Base Station until you hear [Please Sync the Base Station to the Router], then Click on [Red and Blue lights flash alternately].
Scan the QR code on the pi Name Base Station,
Name Bass Station then chik on NExt
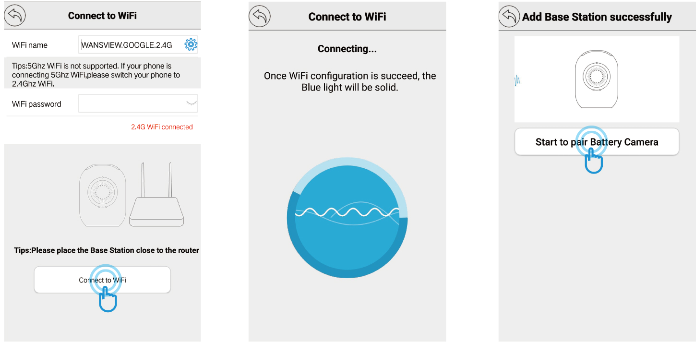
7. Your home WiFi will be located, please Input your WiFi password correctly. Click on [Connect to WiFi].
8. Base Station will by to connect 2.4G, and you will hear [Received WiFi Information] from the Base Station
9. Once the Base Station is connected, you will hear [Succeed to Connect Router ] and Add Base Station Successfully.
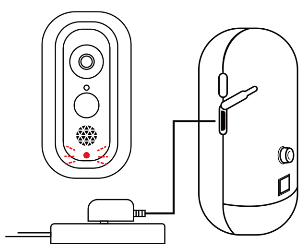
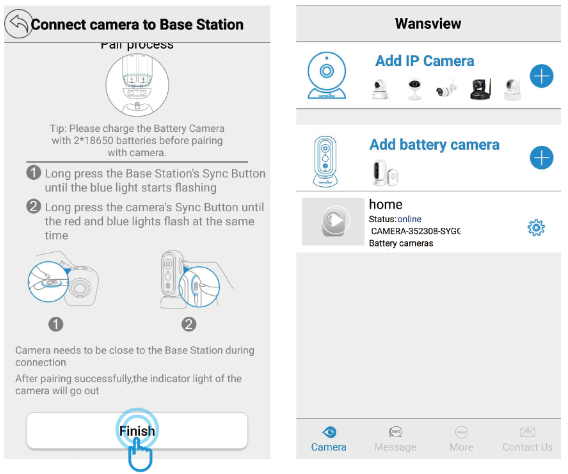
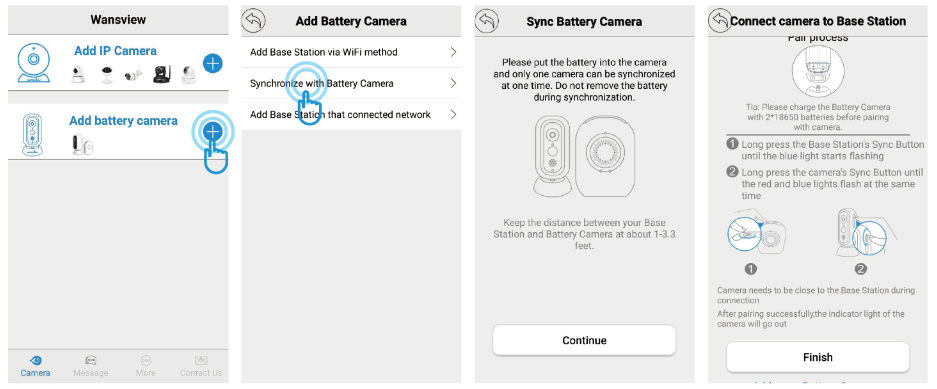
3. Long Press the [Sync Button] on Base Station until the blue light starts flashing and hear [Entering Sync Mode]. Then long-press the [Sync Button] on Battery Camera until the red&blue lights flash at the same time. Click on [Finish] When you hear [Sync Succeed] and Base Station will be Online.
More Operations for the Battery Camera. When the Base Station is online, tap to view the Battery Camera. Tap icon @ can set up the PR motion, close/Low/Middle/High can be switched according to your need. After enabling PIR motion detection, the battery camera can send a notification to your phone when an alarm is detected, refer to page 18 Push Setting. It also can record alarm video to the memory card if the memory card is available, refer to page 19 Memory Card Alarm setting. 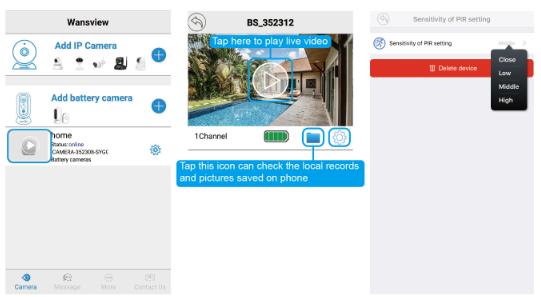
2. Push setting
Taoist;  —Advanced setting —Push setting to enable App receives the alarm and allow device to push the alarm.
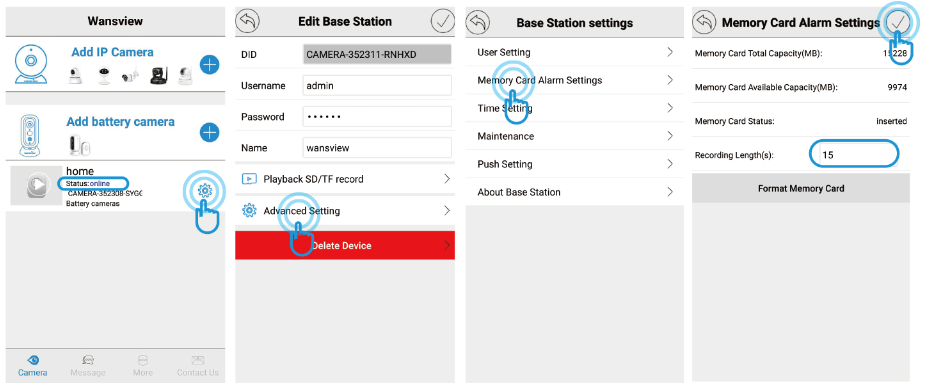
3. Memory Card Alarm setting The Base Station supports a 128GB memory card, the memory card is not included! It will send a short feed to the memory card when an alarm is detected by the battery camera(refer to page 15 About PI R setting) if the memory card is available. The video length can be adjusted between 10-30 seconds, please follow the below illustration to set it up:
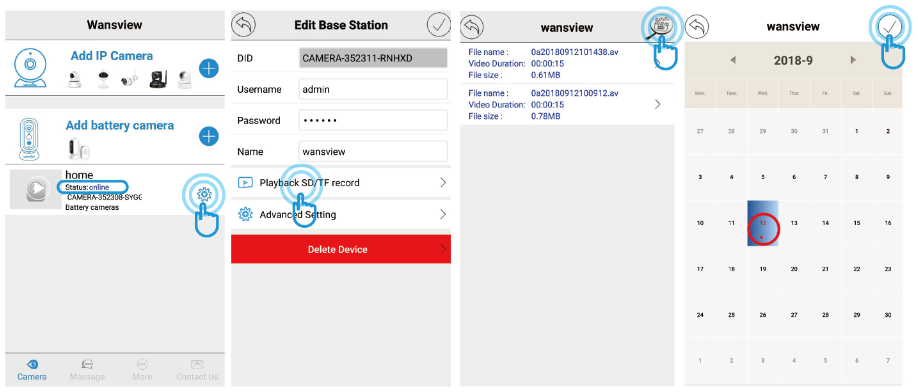
4. Playback SD/TF Record The alarm videos saved on the memory cards can be playback via Wansview App. When the Base Station is online, tap icono— Playback SD/TF card can check the alarm videos. If you have an Android phone, tap to see the Calendar, the date with a red dot means there are alarms were recorded, below illustration is for Android App. If you have an IOS device, the App will go to Calendar after tapping Playback SD/TF.
5. Maintenance
Users can reboot the Base Station and Restore the Base Station to Factory Default. if it is restored, the user needs to set up WiFi for the Base Station again.
6. About Base Station
Users can check the basic information for the Base station, such as WiFi status, Firmware, etc.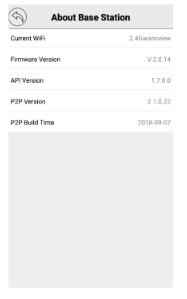
Synchronize with Battery Camera
If you have 2 or more Battery cameras. please follow below steps to connect to the Base Station, please refer to P13-14 for more details.
Tips: One Base Station can manage up to 4 Battery Cameras.
Add Base Station that connected network
There are three ways to add the Base Station to App This option is suitable for adding the Base Station to another phone or the Base station is removed from the app and wants to add again. Please follow the below steps: Tap° on Add Battery camera to the Base Station already connected network
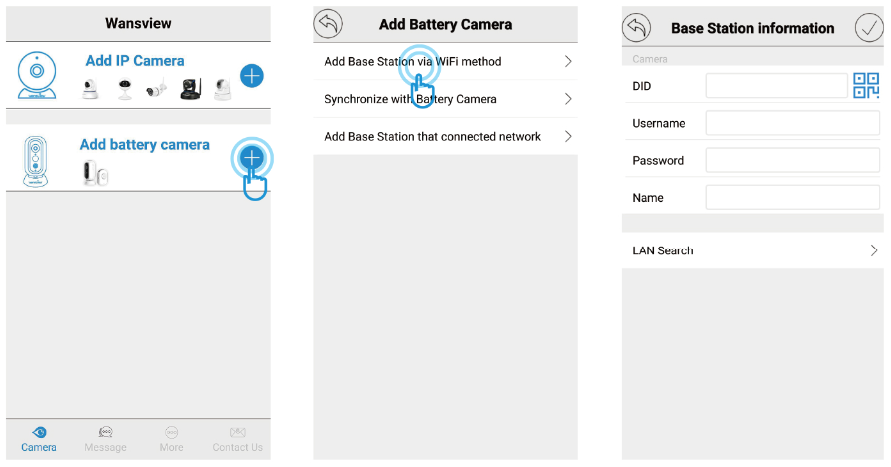
Way 1: Lan Search
If the mobile device and the Base Station are in the same WiFi network, the user can use “Lan Search” to search the connected Base Station.
Way 2: Scan QR Code If the Base Station is on your hand, you can tap to scathe Base Station’s QR code (on the back) to get the information.
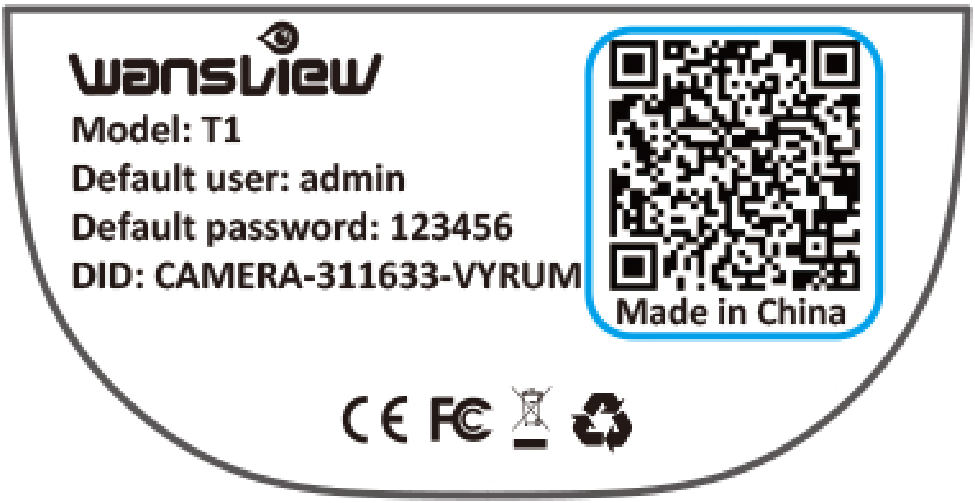
Way 3: Manually input Base Station information The Base Station’s DID can be found on the back of the Base Station.
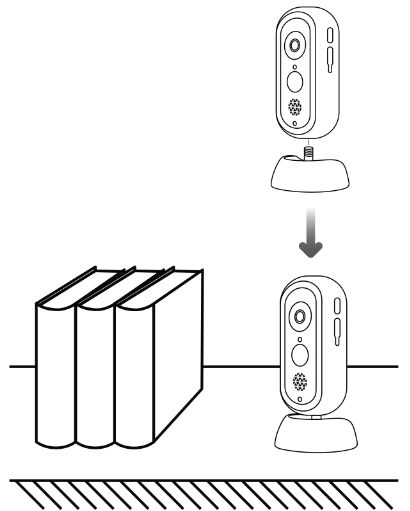
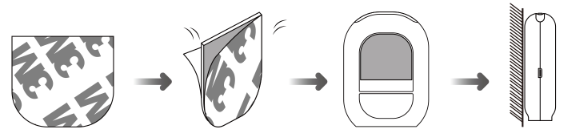
Mount the camera on a wall
Fasten the mounting screws into the wall and attach the magnetic mount.
When you are mounting the camera to drywall, be sure to use the plastic anchors.
Mount the camera on a desktop or shelf.
On the wall (Bass Station)
HD Wireless IP Camera Q3S(1080P)/Q3(720P) User Manual
We keep improving the app, if the app interface is not in accordance with the instructions, please go to the want view website: http://www.wansview.com for the latest instructions. www.wansview.com
Download the App (Android and i0S)
Go to the App Store or Google Play to search and download the “Wansview” APP to your supported device Or scan the QR code below to get the app.

What’s in the box?
- A Camera(including Antenna)
- An Installation Guide
- A Power Adapter
- Mounting Accessories
- A Network Cable
Connections
| Indicator Light Status | Device Status |
 Red light is blinking slowly Red light is blinking slowly |
Power up and activating |
 Red and blue lights are blinking slowly Red and blue lights are blinking slowly |
The device is ready to connect |
 Blue light is blinking quickly Blue light is blinking quickly |
The device is receiving the will signal or connecting to the will |
| Blue and red lights are solid and steady |
The device is connected to the will |
 Red light is blinking quickly Red light is blinking quickly |
The device is restored to factory default |
 The blue light goes off The blue light goes off |
The device failed to connect to the will |
Power on Camera
Please make sure the camera is in the same room, close to the router, before performing the setup. Then, using the included power supply, connect to Power.
Tips: You can relocate it to where you want after it is all set up. You just unplug it and move it to the new location and plug it in, the camera will connect to your WiFi automatically, no need to set it up again. But please make sure the new location will not be far from your router.
Connect Phone with 2.4G WiFi
Connect your mobile phone with 2.4G WiFi. (5G is not supported for the camera)lf you are using a dual-band router, make sure your 2.4G WiFi name is different from your 5G one.
Method 1: Add camera via WiFi mode
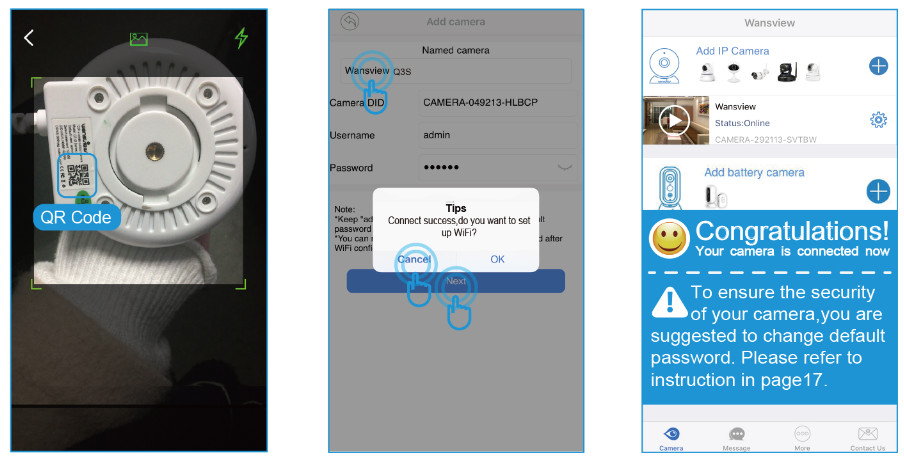
- Select [Add IP Camera], and tap
 to add camera
 - Select [Add cameras via WiFi mode]
- Scan the QR code on the back of the camera
- Hold the “Reset” button for about 3-5 seconds until you see the blue light is on
- Name the camera, then [Next]
- Input your WiFi password and click on[Connect to WiFi]
- Use the camera to Scan the QR Code, Click on [Blue light has quickly flashed] when the blue light flashes quickly.
- When the camera receives a WiFi signal, it will sound 2 beeps.
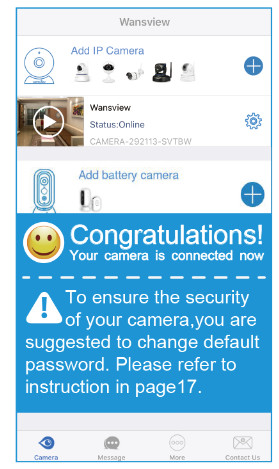
- You should see it says online. Congratulations! Your camera is all set up. Click on the image to enjoy viewing and controlling it now.
Method 2: Add camera Via Wired Method
- Select[Add IP Camera] and tap to add camera
- Select[Add Cameras via wired method]
- Tap [Next] if the camera is connected with a power supply and ethernet cable.
- Scan the QR code on the bottom of the camera.
- Name the camera, then [Next], Connect Success will appear, you could tap [Cancel] if for wired connection. For WiFi Setting, please refer to P12
- You should see it says online. Congratulations! Your camera is all set up. Click on the image to enjoy viewing and controlling it now.
 WiFi Setting
 - To Set up WiFi, Please Tap [OK].
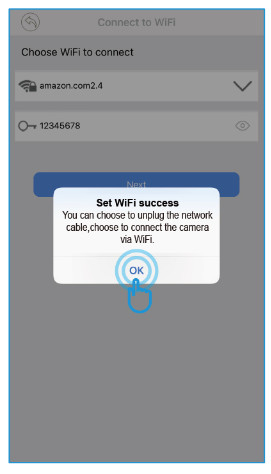
- Select your home 2.4G
- Input WiFi password WiFi. correctly, then [Next]
- Set WiFi success to appear, please tap [OK]. And you could unplug the network cable.
- You should see it says online. Congratulations! Your camera is all set up. Click on the image to enjoy viewing and controlling it now.
Live Video Interface
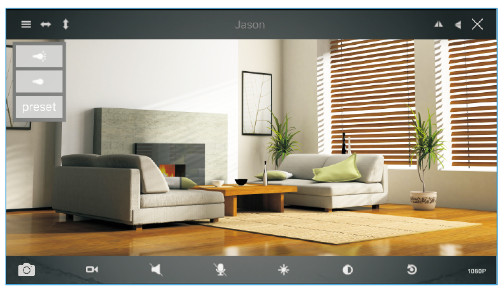
 |
Menu IR ON IR OFF Horizontal |
 |
Vertical Mirror Flip Exit |
 |
Snapshot to phone Record video to phone Listen on/off Talk on/off |
 |
Contrast Brightness Restore to default 1080P/480P |
How to connect the camera to a second Phone?
Wansview camera supports 4 devices to view the same camera at the same time. After you use one phone to get your camera connected to your WiFi and you can view the live video from your first phone. If you would like to add your camera to the second phone. please follow the below steps:
1: Download the Wansview App to the second phone
2: Launch the Wansview app, tap “![]() -and select “Add already connected network camera”.
-and select “Add already connected network camera”.
 Users can use the below ways to add the camera:
1) Lan Search
If the mobile device and the camera are in the same WiFi network, the user can use “Lan Search” to search the connected camera.
2) Scan QR code
If the camera is in your hand, you can tap to scan the Camera’s QR code to get the camera information.
3) Manually input camera information
The camera’s DID can be found from the camera’s sticker  or Wansview app,
  the default Username/Password is admin/123456; the Name can be any information. Attention: Please remember to give your camera a name, and input your Password. Click on
  go back to home to start to view & control.
Change password and add another user
When the camera is “online”, click on  to access “Advanced Setting”, Under the User Setting/Management, the user can change the default username(admin) and password (123456), or create another user account with certain access rights, such as an Operator or Viewer account for another person to view the camera.
Change Username and password
Tap User Setting, and choose Administrator. Admin user can change the user name and password, then tap
Add another user account
On User Setting, tap  to add user, manually add the user name and password, then choose the Role(Operator or Viewer). Administrator: Full access rights Operator: Can operate on the camera live video screen, but not access to other settings like Alarm setting, Advanced Setting, etc. Viewer: only can view camera, no more operations on the camera video screen.
Note: Password shall be no longer than 20 characters.
FAQs
- If you have several cameras, please follow the below steps to use the Multi-view function.
Tap More on the Menu. then choose Multi-View
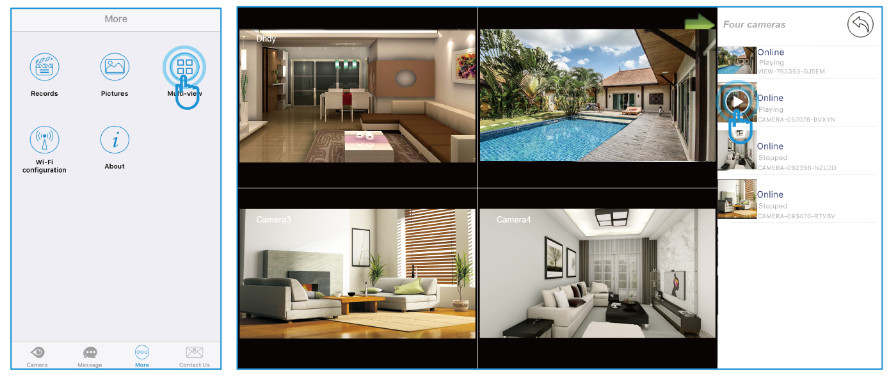
- How do I change my video stream resolution?
Click on icon 480P to change the resolution. - Night vision doesn’t work
If the night vision stops working, please turn on the IR light as below
- How to restore to factory default Push down the “Reset” button around 15-20 seconds until the red light flashes quickly and you will hear a beep, then the camera will be back to factory default. After restoring, please set up the camera using the default user name (admin) and password(123456).
- I want to add the camera to another software/app, which URL should I use?
RTSP Stream: rtsp://IP:rtspport /live/ch0 (default RTSP pod: 554)
MJEPG Stream: http://ip.port/mjpeg/stream.cgi?chn=0
Snapshot: ip:port/mjpeg/snap.cgi?chn=0 - Why can’t I access the camera remotely with Wansview App when I am outside?
If your phone is using cellular data, please check if Wansiew App has permission of cellular data usage on your phone or not.
If your phone is on another available WiFi network, you still can’t access the camera remotely, the problem might be the firewall of your home router which blocks outside network to access the camera. Please follow the below instruction to turn the router’s firewall off to allow an outside network to access the camera:
Connect your phone to home WiFi—go to Wireless setting of your phone, you can know router’s IP address—input the IP address to the browser on your phone—input router’s username and password then you can log in your router—find option “Firewall”—you can turn it off. Or you can access your home router on your computer, the link for your reference:
]]>
Camera Introduction
Indicator lights status
| Light Status | Camera Status |
| Red light on | Camera is powered on |
| Red and blue lights are flashing alternately | Waiting for connect now |
| Blue light is flashing | Camera is connecting to Wi-Fi |
| Blue light is solid | Connect WIFI and Pair successfully |
| Red light is flashing quickly | Reset camera to factory setting |
Warm note: Please make sure your router is connected to the Internet.
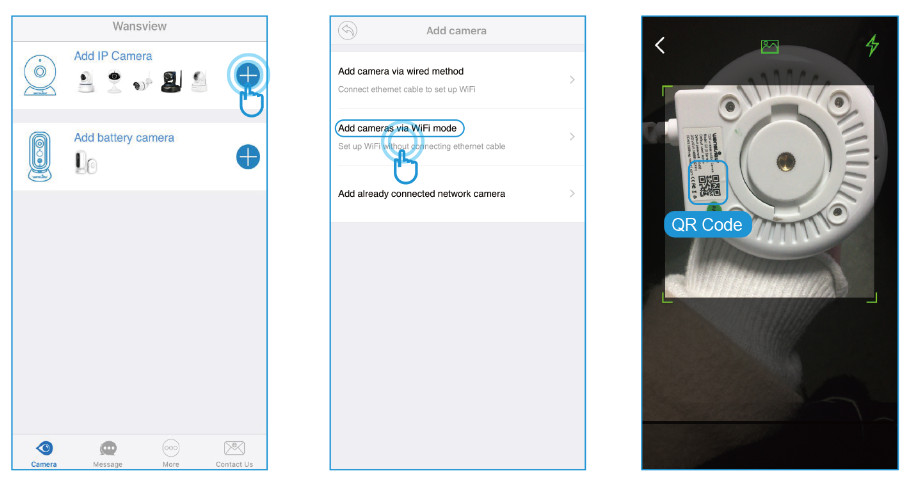
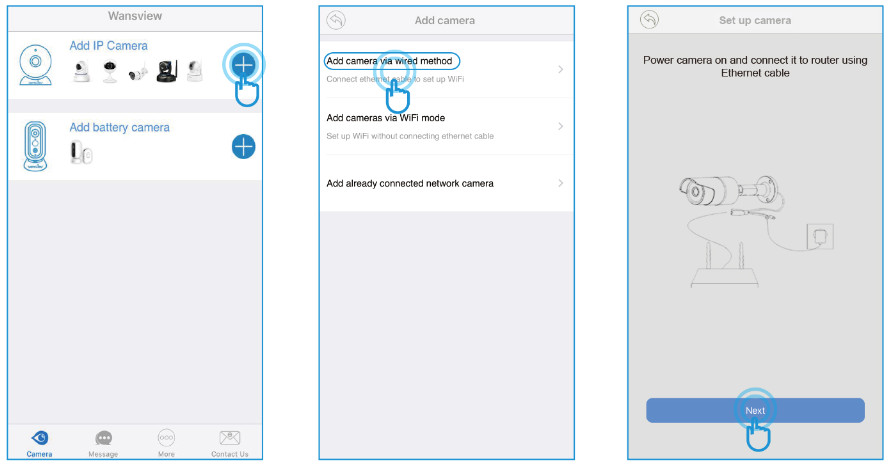
Install Wansview Cloud APP
- Download app
Please download Wansview Cloud app from APP store/Google Play. - Account Register
- Open the Wansview Cloud app and click【Sign up】
- Enter your email address and password
Pay attention that your password MUST be 8-16 characters, and include at least 3 categories of the following: Digits,Uppercase characters, Lowercase characters, Special characters.
Read and agree the Terms of Use and Privacy Policy, then tap Next. - Please go to your mailbox to find a mail that includes a verification code,enter the code to finish the Sign up.
If you cannot find the mail, please check the spam or and tap Re-send mail. Or you can contact us by sending an email to . You can also choose Phone number or Google account to sign in.
- Open the Wansview Cloud app and click【Sign up】
- Sign in
When using for the first time, you need to enter the email address and password of your app account to log in.
After signing in successfully, you can set a gesture login or Touch ID. (Wansview cloud app–Me page–【Account security】–【Touch ID/Gesture login】)
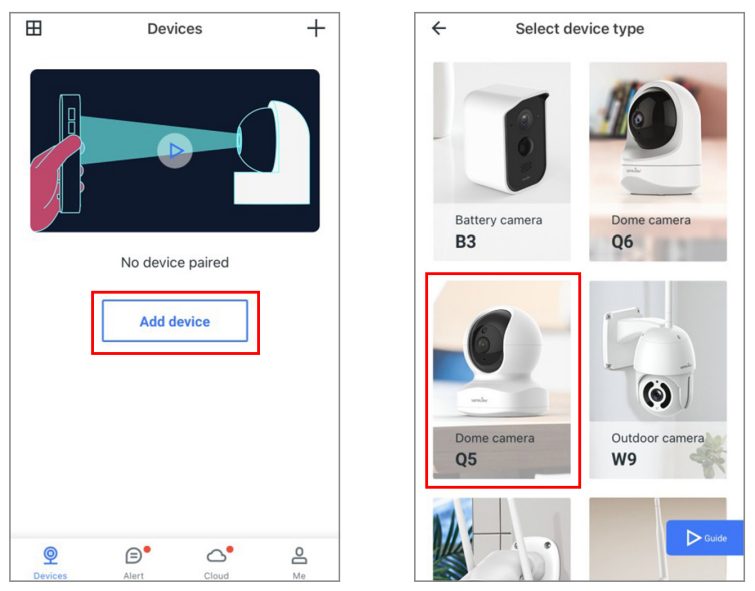
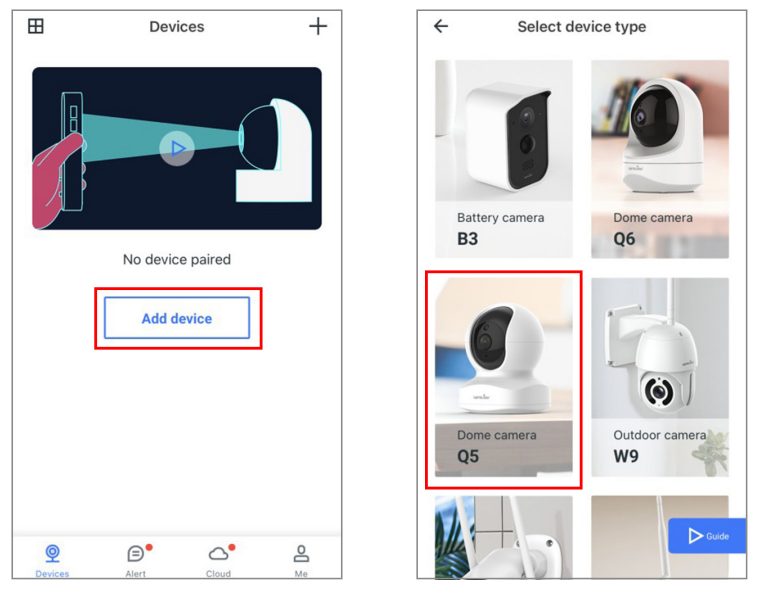
Setup Mode
Wi-Fi Setup
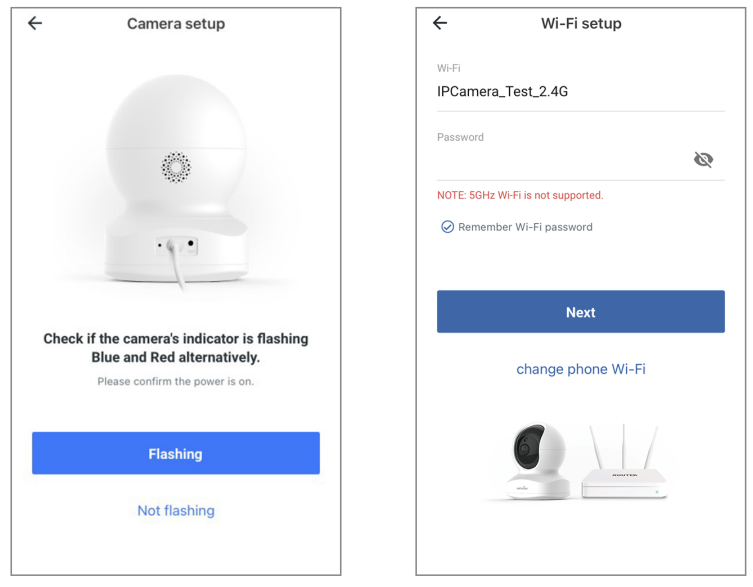
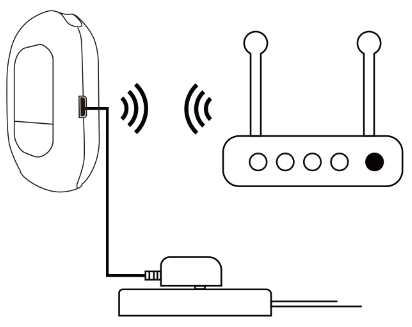
Note: The camera can only support 2.4Ghz Wi-Fi, it doesn’t support 5Ghz Wi-Fi.
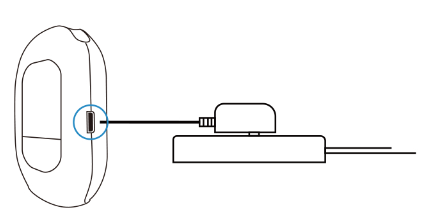
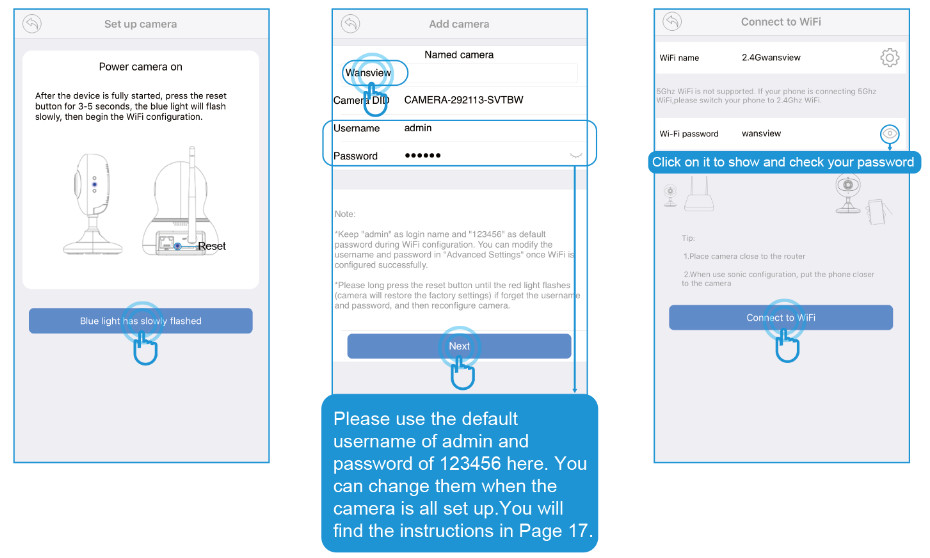
- Place the camera near the router within 3 feet and power on the camera with the attached power cord.
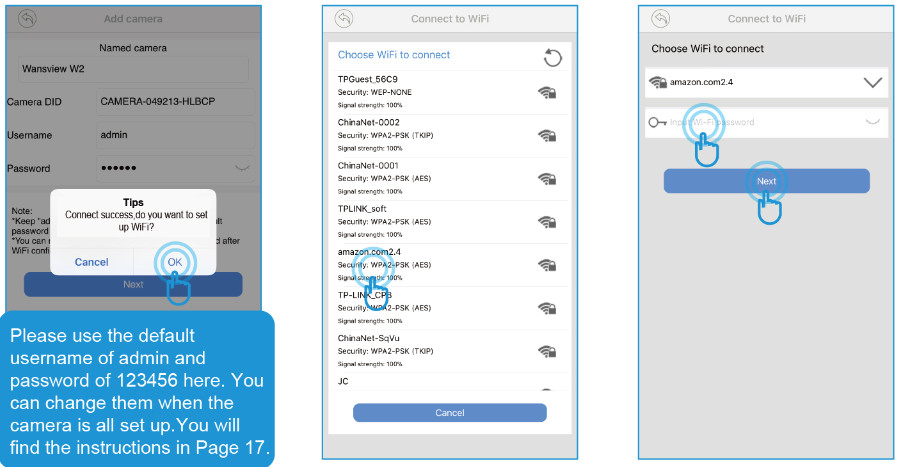
Make your phone use the 2.4G Wi-Fi. - Tap 【Add Device】 on the APP, and choose the camera model Q5 or Q6.
- Check if the camera’s indicator light is flashing red and blue, if yes, tap【Flashing】.
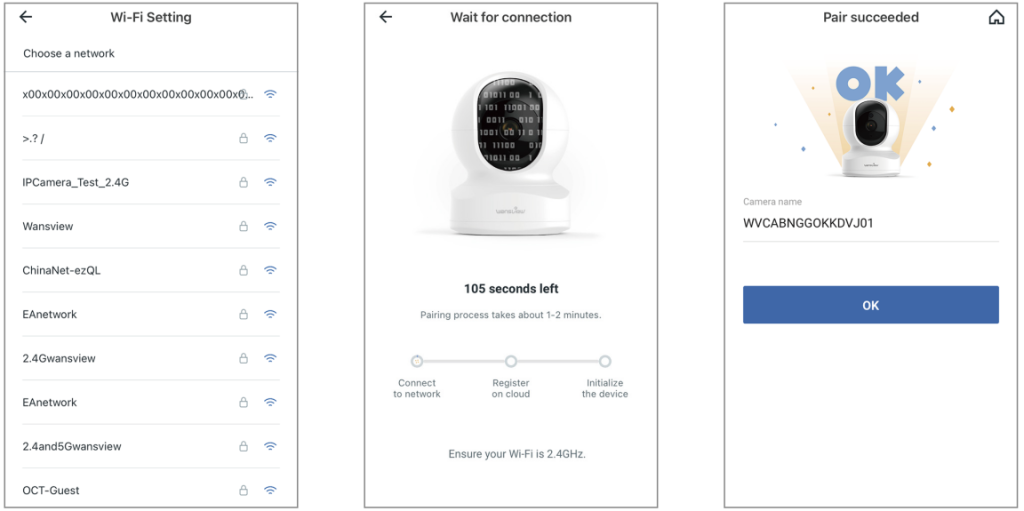
- The Wi-Fi name will be displayed automatically, then enter the correct Wi-Fi password and tap Next. If Wi-Fi name is not displayed, for Android phone, please go to the Phone Setting–APP Management– Find Wansview Cloud APP–Permissions–Allow the app to get the location info.

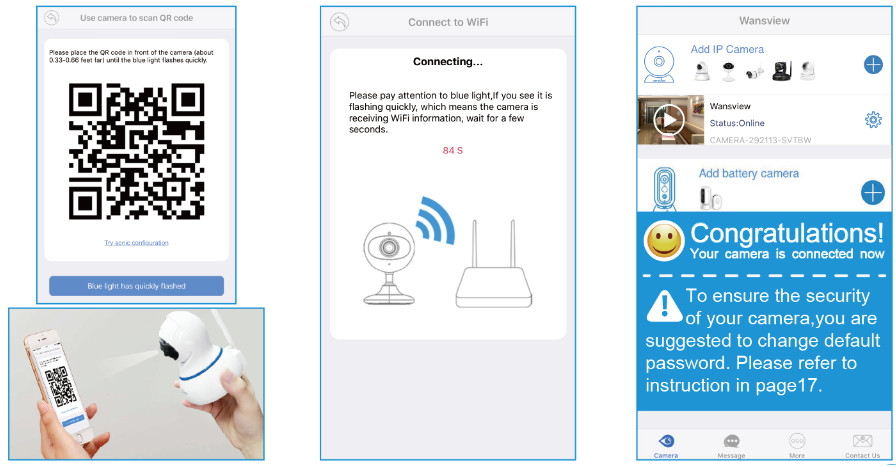
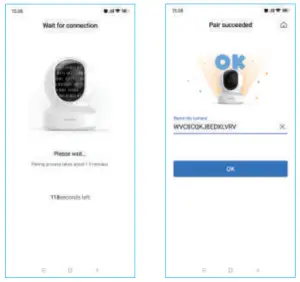
- Adjust your screen brightness to medium,then place the camera lens about 3-8 inches in front of the phone and make the camera scan the QR code on the phone screen. When hearing”QR code scanning is successful”, tap Next.
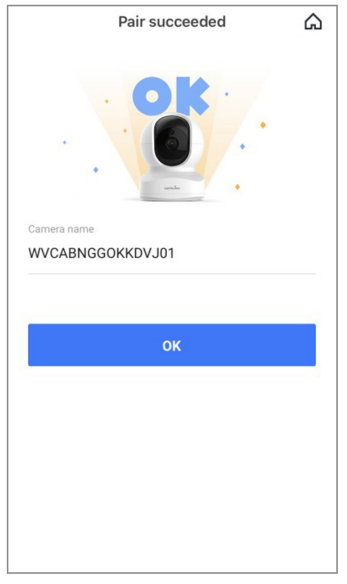
- Check the indicator light status. If the connection is successful, the blue light will be solid. You can rename the camera, and start using the camera.
Wi-Fi connection by Soft-AP
- Place the camera near the router within 3 feet and power on the camera with the attached power cord.
Make your phone to use the 2.4G Wi-Fi. - Tap Add Device on the APP, and choose the camera model Q5 or Q6.

- Check if the camera’s indicator light is flashing red and blue, if yes, tap【Flashing】.

- Click “Didn’t you hear it?” and select 【Wi-Fi connection by Soft-AP】. Use your phone camera to scan the QR code on the camera sticker.
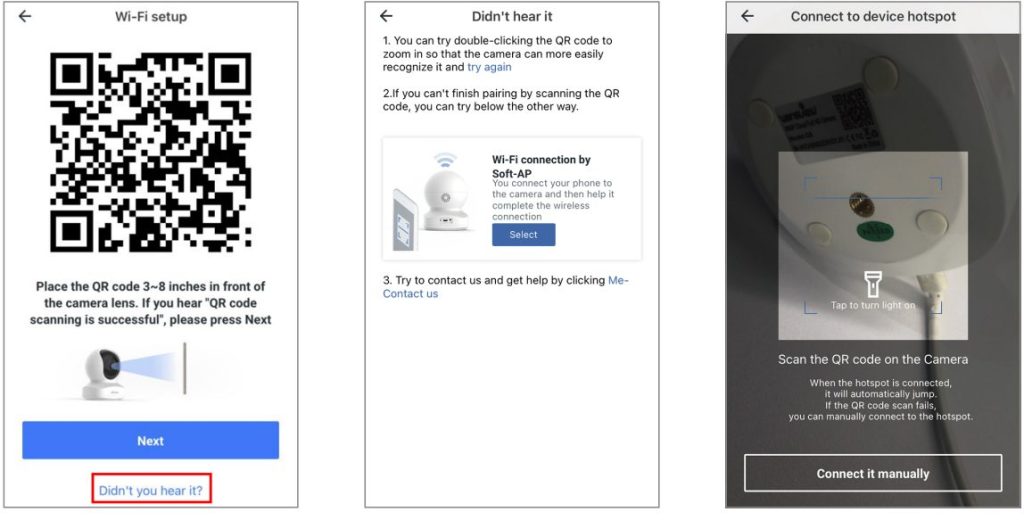
- Check if the camera’s indicator light is flashing red and blue. If yes, tap【Flashing】.
Please go to Settings–Find a Wi-Fi named WVC***** if fail to join and connect with this Wi-Fi. Then go back to Wansview Cloud app.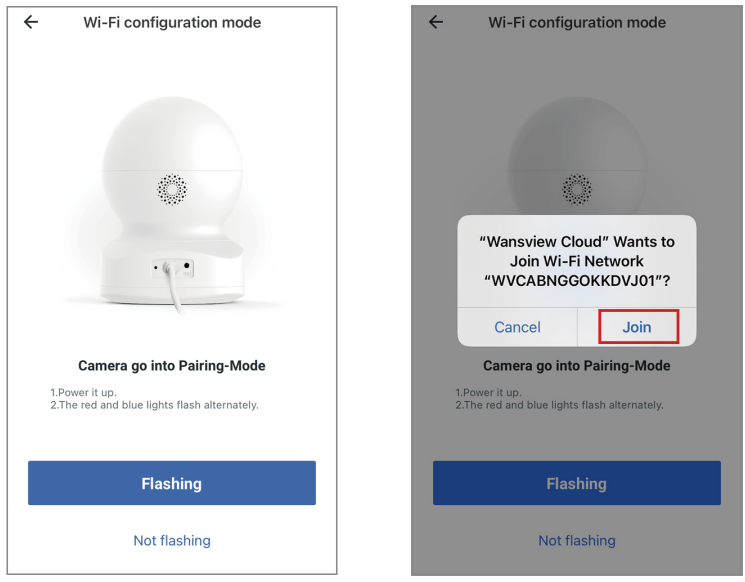
- The app will ask you to choose a network. Select 2.4G Wi-Fi and enter the password. The camera will start connecting with the Wi-Fi. After the camera is online, you can rename the camera, and start using thecamera.
Live Feed
| FHD | Select to switch the resolution from FHD to HD |
 |
Tap to see full screen of live stream |
 |
Tap this icon to enable or disable audio |
 |
Hold to talk to the camera |
 |
Tap to record video manually, and can check the local records from Me-Local Video |
 |
Click to to snap pictures to phone storage, and can check the local picture from【Me】-【Local Photo】 |
 |
User can set up Multiple view mode to view different cameras at the same time. On multiple view mode, the video streams is applied to 480P resolution. |
Settings and Functions
Share with Family
Before proceeding the sharing, please ask your family to download Wansview Cloud APP to his phone and register a new account with their own email information to access APP firstly.
- Tap Settings icon-【Invite family members】 then press to enter share device, you can share camera feed with family members, camera is up to be shared with 3 devices at a time.
Warm tips: The shared link is valid for 30mins only, please delete the record and share again if it expires).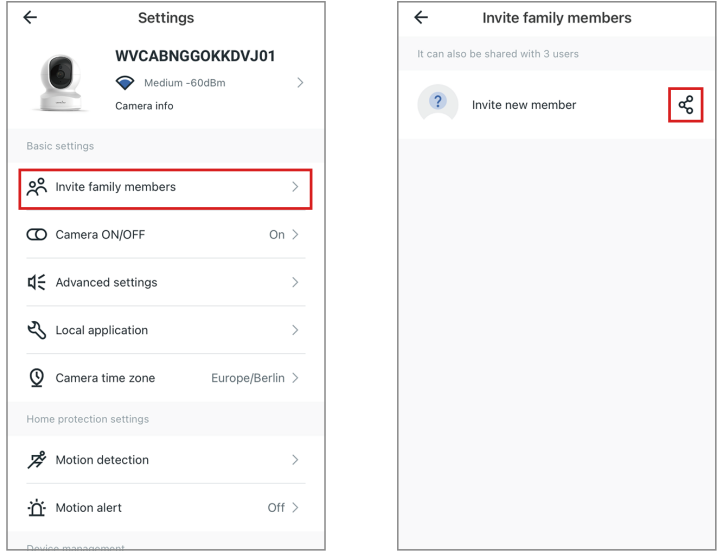
- Send the invitation link to your family’s phone and then ask him to click the link and open it via browser.
Tap“Receive”to accept this invitation and confirm that the camera is added to the list successfully.
User can share access to other people, up to 3 people(devices). But the invitee can’t have a full access to this camera, they only can view the live stream, use the two-way audio, replay the alert video and the Cloud alarm video.
Motion Detection
Motion detection is defaulted to On. The generated alarm video will be stored to the Alert page.
- Detection Area: Here allow you to define a specific area that you want your camera to detect motion in.
- Sensitivity Level: User can set the sensitivity of your Wansview camera according to your preferences.
There,you’ll see a slider to adjust the level.
Motion Alert
Once motion is detected, user will receive a push notification in your Wansview Cloud app as below. Tap the message to view 10s alarm video recorded by the camera. Wansview Cloud App also provide the timeline to the user for select and review the specific alarm events.
You may follow the steps below to set motion alert for Wansview cameras via Wansview Cloud App.
- Launch Wansview Cloud App and log in to the camera, then tap the setting icon to find 【 Motion Alert】page.
- Enable the 【motion alert】 and then select the schedule to 24/7 or you can customize the starting and ending detection time.
Warm tips: Users can check the short videos for the past two days for free, these alert videos are supported to save to your phone and delete. If Cloud service is subscribed, you can check the recent 7 days from the Cloud page to replay the videos.
You may follow the below steps to replay your alert video: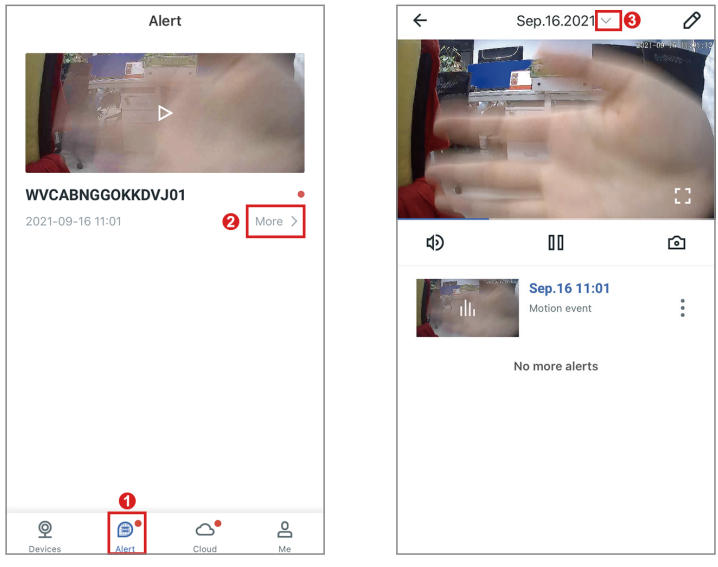
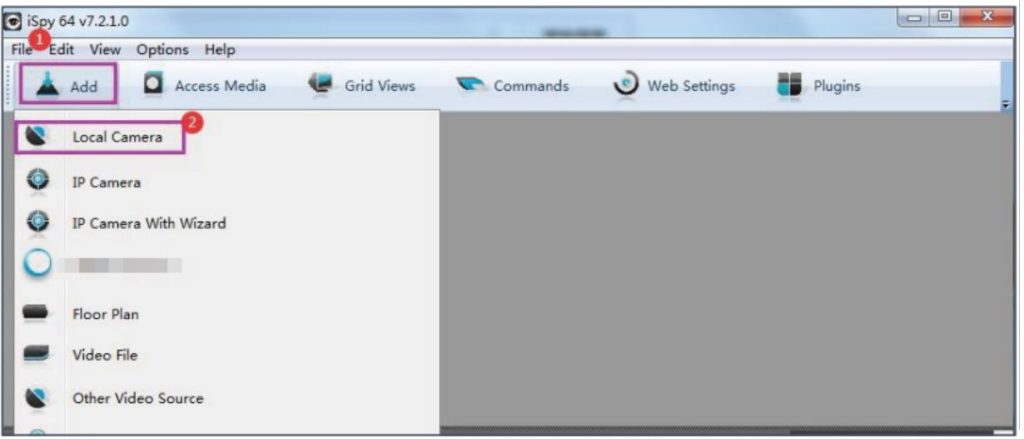
RTSP
Wansview cameras that support RTSP protocol could work with the third-party software, like iSpy, Blueiris,IP Cam Viewer. They can be used for live viewing and recording of Wansview cameras.
To connect an IP camera via RTSP, you may follow the below steps to configure the 【Local Application】under settings page and add camera to iSpy.
- Launch Wansview Cloud APP, go to settings–【Local Application】–【Local Account】 –Edit the username and password you want.
- Go to RTSP page to set a specific port number you want (range of 554-1554), Choose one of the live-stream URL to copy.
- Launch iSpy software–Add 【Local Camera】–Choose 【FFMPEG(H264)】 in Video Source–put the copied URL here–OK-Name for camera–Success.

Camera Information
- Camera Time zone
User can set the exact time zone for your camera. If you and your camera are in different time zones, then the camera will send you real-time alert notification according to your setting.
- Device Information
User can check the camera ID, firmware version,IP Address and WIFI Mac information. If there is red dot on the Settings button, it means the newest firmware version is released and is available to update by clicking the dot.  Network
User can check the camera’s Wi-Fi name and can set up camera to another Wi-Fi network.
Or if you are using Ethernet cable connection, you can access this page to switch the camera to WIFI connection directly.Device Management
User can restart the camera or restore the camera to factory settings by tapping this icon directly. You can delete the camera from here too. After deleting, the previous data will be defaulted to zero. Please note that the camera should be set up again as new if the camera is restored to the factory settings or being deleted from the Device page.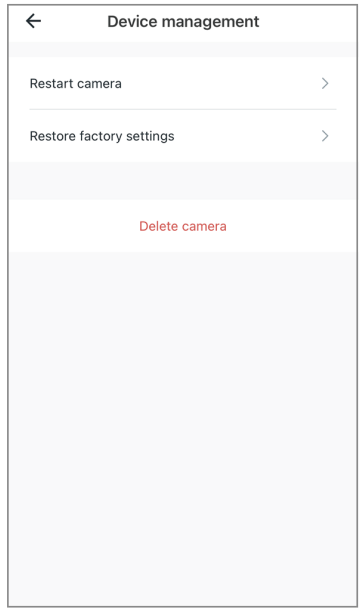
- Diagnose
If your camera can’t pair success or the APP have any breakdown, user can tap this page to allow the built-in diagnostics system running to check problem. User could provide the diagnostic report to Wansview Support to ask for suggestions.
Advanced Settings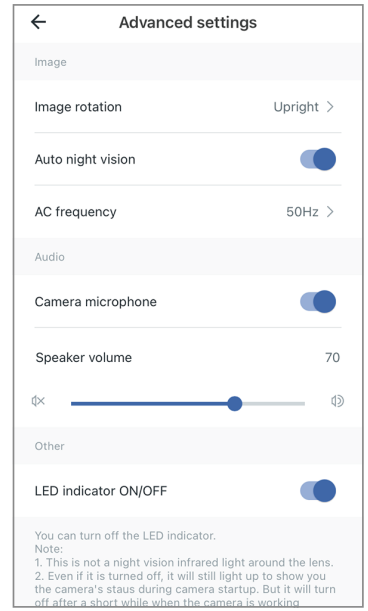
| Image rotation | User can rotate the image if the camera is installed upside down. |
| Auto night vision | Enable the night mode to view the camera at dark clearly. |
| AC frequency | Adjust the power frequency to 50hz or 60hz. |
| Camera microphone | Enable the microphone to pick up and deliver the sound. |
| Speaker volume | Adjust the speaker volume if the audio sound is too low |
| LED indicator ON/OFF | Hide the actual camera status. If enabled, Solid red light is off. |
Optional Storages
Memory Card Storage(Memory card not provided)
To find the memory card slot, please push the camera head upward.
- Install the micro SD card into camera
Note: Before install/uninstalling the SD card, please power off the camera firstly, in case it will damage the SD card. If SD card can’t be recognized by your camera successfully, please use the reader to format SD card via FAT 32 on PC and then insert into the camera to try again. - Set up SD card recording on Wansview Cloud APP
Make sure that the SD card is inserted into the camera correctly.
Tap the Settings button and set Motion Alarm and Memory Card Storage to “On”.
Select the schedule to 24/7 to allow the camera detecting the motion all day.
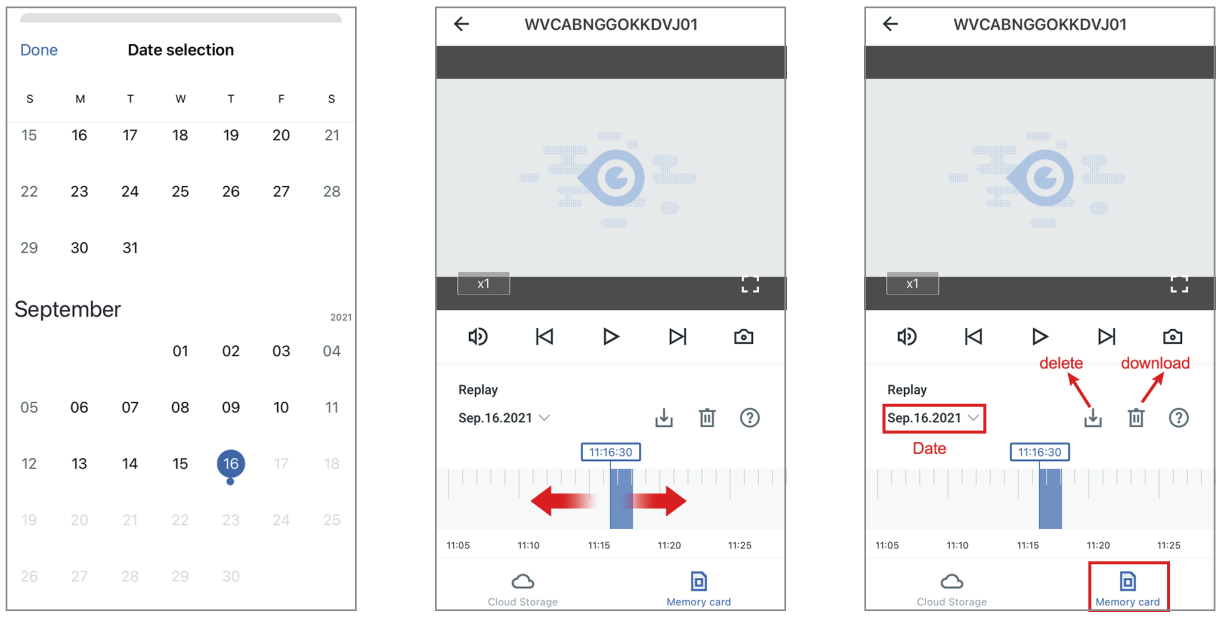
Tap the Replay button to see the recording on the memory card. - Playback
You may follow the below steps to playback the videos recorded to your SD card.
Note: Playback is only available when the SD card is inserted and recognized by the camera.
Wansview camera does not support consistent recordings, but only records when it detects motion.- Tap to enter the playback page.
- Tap SD card storage,choose the date when the video was recorded.
- Use two fingers to zoom in on the timeline to select a more detailed time you want to replay.
- Press “1X” to select “2X” or “4X” to fast-forward the video if you want.
- Tap to delete the video you don’t need and tap to save the important video.
 Note: After formatting successfully, firstly please turn off the camera, then please insert the SD Card into the camera, and power on the camera and check if the SD card can be recognized or not.
Cloud Services
Free Cloud Plan provides you with 30 days of free cloud service if you are the new Wansview user.
Warm note:
- Cloud storage is different from local storage. SD card storage and Cloud storage work independently without each others interference. In other words, if you enable both SD card recording and Cloud recording, the video footage will record to the Micro SD card and upload to cloud at the same time.
- Cloud service is not compulsory. Camera still can work properly even though the user do not subscribe the Cloud plan or cancel the Cloud service while using.
- Please cancel the cloud service before the free-trail expires if you have no attention to continue using the
Cloud and paying its service. Otherwise, the Cloud subscription will be automatically renewed according to the chosen plan period. - If you accidentally miss the cancellation time and get charged, please feel free to contact us via Email. We will refund the fees.
- Only records the alarm video until the motion ends.
Introduction of Cloud plans
| Plans | Basic | Extended | Pro |
| Feature | Rolling 7-days alarm
recording |
Rolling 15-days alarm
recording |
Rolling 30-days alarm
recording, |
| Quantity | Max 3 Cameras | Max 5 Cameras | Max 7 Cameras |
| Price | $6.99/month | $9.99/month | $16.99/month |
| $19.99/quarter | / | / | |
| $69.99/year | $99.99/year | $169.99/year |
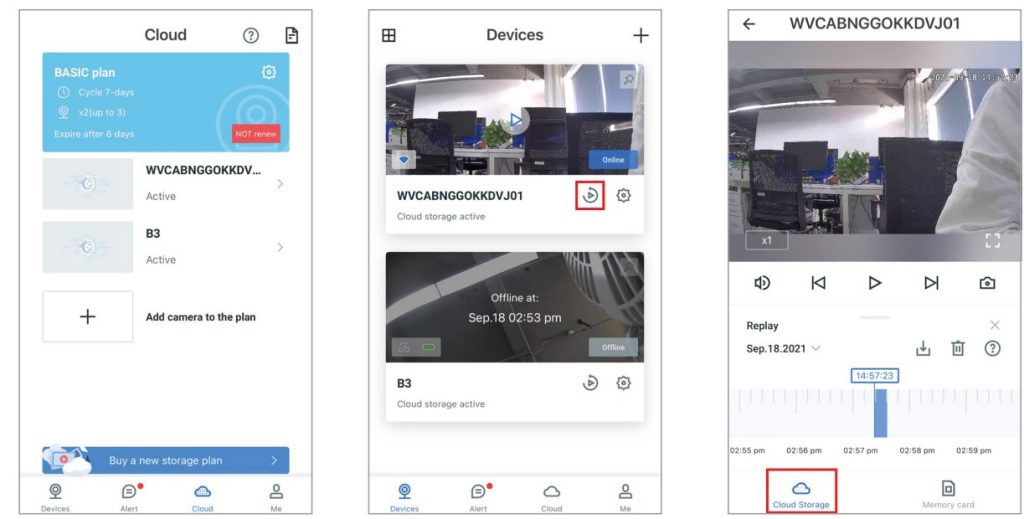
Add the camera to Cloud plan
- Enter the Cloud page, then tap + Add Camera to Plan.
- Select the camera, tap Add to this plan, enable it, and then set the schedule.
- Once added, the camera will appear in the cloud screen. Tap the camera screen to view the recording.
Tap the camera name to change the settings. - You can delete or download recordings. Once downloaded, you can view them in Local Video on the “Me”screen.

How to Cancel the Cloud:
If you want to cancel the cloud service, you can do so by tapping the Settings button on the Cloud screen, and then tapping “Cancel this subscription plan”.
Me page
| Local Video | check the alarm video, SD card or cloud recording, and real-time recording. |
| Local Image | check the pictures of recording or real time images |
| Message | check the system messages |
| Account Security | set to change Face ID, Touch ID and Password |
| General Settings | set up notifications for language, cellular usage reminders,and alarm messages |
| Contact Us | If you have any questions, please contact us at our US email address |
| FAQ | check out our FAQs if you have any questions |
| About | APP version information |
| Sign Out | log out the account |
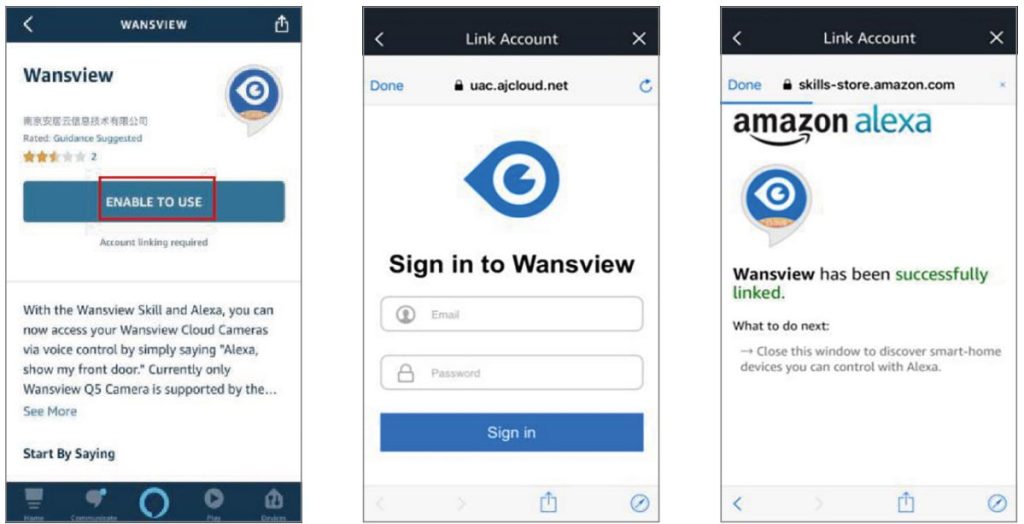
Alexa Compatibility
- Open the Alexa App menu and look for the “ Skills&Games ” button. Click Search icon and search “Wansview Cloud”.
- Enable the Wansview Cloud feature and log in your Wansview Cloud account. Allow the Alexa Device interaction then your account will be linked with Alexa.

- Please go to 【Device】 page of Alexa APP — click —choose 【Add Device】 — choose【Others】 —then Alexa will find all cameras that are connected on your Wansview Cloud account.

- You can add all found cameras to Alexa, but one time can only add one camera. After added, you can click【Devices】—【ALL Devices】 to check all cameras.

Congratulations!
Wansview camera is linked to Alexa. Now it’s y our time to test the camera integration, you can use the voice command to ask Alexa to show you the camera video at any time.
LET US KNOW WHAT YOU THINK
Thank you so much for your order and trust to Wansview.Please feel free to contact us if you have any questions about the product application.
As a young and growing company, it would mean the world to us if you could leave an honest review about our product and services.
- US/CA:
- UK:
- US/CA:
- UK:
- Facebook: https://www.facebook.com/WansviewOfficial
- Youtube: https://www.youtube.com/WansviewOfficial
- TEL: +13236863288 Available time: 6 pm – 3 am (PST Time) from Mo
The instruction is for reference only. Slight differences may be found in the user interface.All designs and software here are subject to change without prior written notice. For latest instructions, please go to www.wansview.com to download.
FAQS
what internet speed is supported? broadband 2.4 / 5 or only 2.4?
This camera works on the 2.4 wireless bands. I have a router that has 2 antennas and supports both bands. In my router menu it offers 3 choices which are 2.4 and 5 and Both. I have mine set for Both and all my 2.4 cameras work alongside with all my other devices that use 5. Routers differ in their menus and services so that’s why people and the manufacturer state that their cameras use 2.4 wireless.
Does this work with Ismartview app?
No. This camera doesn’t work with iSmartview pro App. It works with Wansview Cloud App.
What kind of sd card does this use?
This camera supports micro SD card which can be up to 128GB.
We normally recommend a Class 10 micro SD card for better using experience.
How many feet away does a person have to be to activate motion detection?
The motion detection distance for this camera is about 5 meters.
If a motion happens out of 5 meters from the camera, it won’t be detected.
Can an alert go to your phone when motion is detected?
Yes
Why doesn’t it support 5g Wi-Fi?
Yes, that’s a problem they never tell you about before you buy! I have 3 different kinds of cameras and none work.
What do you think about the most?
The people that troubleshoot are useless
Does this work with the new echo show 5?
this camera works with Alexa Skill, but it doesn’t work with Echo show 5 now.
We are working with Amazon Alexa Skill team, the camera will work with Each show 5 soon.
does this camera have WPA2 Encryption?
Yes (this question was already asked)
Does it come with batteries? Is it chargeable?
Don’t listen to Lisa B. There’s apparently a large collection of people here who don’t understand in what context “wireless” means. Wireless does NOT mean it does not have any wires. Wireless means it connects to your Internet router wirelessly. Obviously it has to be powered somehow. I’d much rather it be plugged in than having to constantly
replace batteries to something that is on 24/7.
The system is down for over a day and the company says to wait 48 hours as the servers are down. Why does it
take this long?
It’s junk, just return the camera
Will it work with the SmartThings app
No. It doesn’t support SmartThings.
Does this work with the Ismartview app?
No. It doesn’t support SmartThings.
How the “position” function work? i set up 4 favorite positions, does it mean camera q5 will move to those positions continuously?
No.
]]>Wansview Q5 K5 Home Security Camera Installation Guide
Model Q5

Model K5

Indicator Lights Status
| Light Status | Camera Status |
| Red light on | Camera is powered on |
| Red and blue light alternately flashing | Waiting to connect now |
| Blue light flashing | Camera is connecting Wi-Fi |
| Blue light solid | Succeeded to connect Wi-Fi |
| Red light quickly flashing | Reset camera to factory setting |
| Camera is upgrading firmware |
Warm note: Please make sure your router is connected to Internet.
Easy Set Up
Step 1 Download
- Go to the App Store or Google Play to search and download “Wansview Cloud” APP to your supported devices.

Wansview Cloud APP icon - Or please scan below QR code to download Wansview Cloud to your Android or Apple device.


Step 2 Account Register
- Open Wansview Cloud App, 2 then select Sign up.
- Enter your email.

- Create a password at least 8 characters long. Your password must include three of the following:
- At least one uppercase letter.
- At least one lowercase letter.
- At least one number.
- You will receive an email with your Activation Link. Open the link to activate your account.

- Go back to login your account after activation successful.
Step 3 Power on camera
- Power on the camera with the supplied power cord and put the camera near to router.
Step 4 Connect to network
(Wi-Fi connection process for Q5/K5 are the same. Here we take Q5 camera as example.)
- Connect your phone to 2.4G Wi-Fi (5G is not supported). Open the Wansview Cloud app. Please tap [Add device], and choose your camera model(Q5/K5).
- If you see the flashing blue and red light on the back of camera, please tap [Flashing]. If there is no blue light, please check FAQ .
- You’ll see your Wi-Fi name, inputting the correct Wi-Fi password and tap [Next]. The app will show a QR code, please put the phone in front of camera about 3-8 inches, then please tap [Next] if you hear “QR code scanning is successful”.
- During connecting, the blue light will flash quickly. Once it’s connected, camera will say “WiFi is connected” and the blue light will flash slowly.
When the blue light is steady, the App will switch to a page that you can change camera name.
Now can enjoy the video from camera !
FAQ:
The camera can not connect to Wi-Fi ?
Please press the reset button on camera for 5 seconds until the red light flashes quickly and camera says “reset is successful”.
Please wait for about one minute, then camera will flash blue and red light alternately and you can reconnect it now.

LET US KNOW WHAT YOU THINK
Thank you so much for your order and trust to Wansview. Please feel free to contact us if you have any questions about the product application.
As a young and growing company, it would mean the world to us if you could leave an honest review about our product and services.
 US/CA: [email protected]
UK: [email protected]
 US/CA: [email protected]
UK: [email protected]
 TEL: +13236863288
Available time: 6 pm – 3 am (PST Time) from Monday to Friday
 Online chat: Chat on Wansview Cloud
app: Me-Contact Us-Online Customer Service
 Facebook: https://www.facebook.com/WansviewOfficial
 Youtube: https://www.youtube.com/WansviewOfficial
The instruction is for reference only. Slight differences may be found in the user interface.
All the designs and software here are subject to change without prior written notice.
For latest instructions, please go to www.wansview.com to download.