![]()
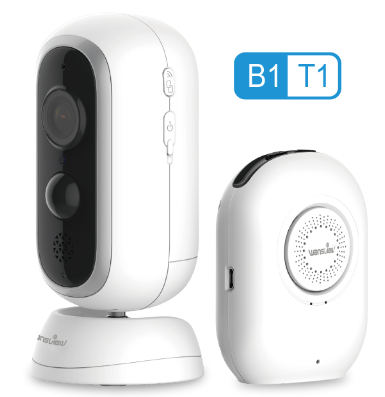
Wire-Free Battery-Powered 1080P Indoor & Outdoor Home Security Camera

User Manual
We keep improving the app. if the am interface is not accordance oral the instruelvms. please go to wansview weberte: httontmnowsnsvieve. com for the latest instructors.
What’s in the Box

Product Diagram (Base Station)

| Bass station | |
| Speaker | Built-in 1W 80 |
| Microphone | Built-in |
| Micro Memory Card | Up to 128GB |
| Internet Connection | 2.4 Ghz WiFi Connection |
| Max Number of Connected Cameras | 4 |
| Adapter Power | 5V 2A |
| Dimensions | 60*31.5*81.9mm |
| Weight | 54g |
| Working Environment | -10°C to 50°C / 14°F to 122°F, RI-I95% |
LED Indicator and Working Status(Base Station)
| LED indication | Working status |
| OFF | Sleep mode/Power Off |
| Solid on in red | NO Internet |
| Flashes red&blue slowly alternately | WiFi configuration |
| Solid on in blue | Connected to internet |
| Flashes blue slowly | Pairing mode |
| Flashes red quickly | Restore to factory setting |
Button Controls( Base Sation)
| Button | Function | Operation |
| Wi-Fi Pair Button | Pair with the WIFI | Press and hold 5 seconds to enter pairing mode with the LED indicator flashing red&blue slowly |
| Sync Button | Pair with the camera | Press and hold 6-8 seconds to enter pairing mode with the LED indicator flashing blue slowly |
| Press the Wi-Fi Pair Button & Sync Button at the same time | Restore to factory settings Press and hold for 3 seconds |
Product Diagram (camera)
| Camera | |
| Lens | 105°wide angle ,f=2.0 |
| Sensor | 1/2.7 inch |
| Resolution | 1080P(1920*1080)Full HD Resolution |
| Microphone | Built-in |
| Speaker | ,Built-in 1W 80 |
| PIR Detection | Detection angle110 |
| Battery life | Two 18650 Lithium batteries(not included) Battery life will vary based on device settings, usage, and environmental factors. Actual results may vary. |
| Weight | 193g |
| Adapter Power | 5V 2A or Two 18650 Lithium batteries (not included) |
| Internet | 2.4G Wi-Fi |
| Weather Proof | -IP65 |
| Dimensions | 61.8*61.8*130.2mm |
| Working Environment | 10°C to 50°C / 14°F to 122°F, RHs95% |
LED Indicator and Working Status (Camera)
| LED indication | Working status |
| OFF | Sleep mode/Power Off |
| Solid on in red | Connected the Base station or charge the camera |
| Flashes red & blue slowly | Pairing mode |
| Solid on in blue | Fully charged |
Button Controls(Camera)
| Button | Function | Operation |
| Sync Button | Pair with the Base station | Press and hold 10 seconds to enter pairing mode with the red&blue LED indicator flashing red&blue slowly |
Caution
- Use the included power adapters only to charge the camera and the base station within the permitted voltage range.
- Only the camera is waterproof. The base station and adapters are for indoor use only.
- Make sure the internet is functional and fast for live data feed.
- Do not use the product at temperatures higher or lower than the specified range.
- Do not use in environments with strong electromagnetic interferences or near corrosive substances.
- The warranty does not cover defects and damages caused by misuse, unauthorized dismantling, or natural hazards.
- The 18650 battery life varies according to the frequency of the triggers and the video resolution settings.
- The PIR motion sensor can only detect motions within a certain range and will not be activated by motions out of the range
Get Started
- Download APP U Go to the Apo Store or &ogle Play to scorch and download ‘).vansyleveAPP to vow smart Phone a talgot

- Of San below OR code to gel “le APP


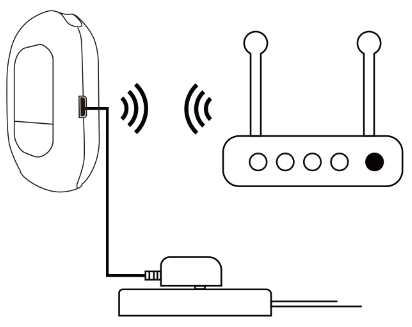
Power On Base Station
- Connect the Base Station to a power source
- Placa the Base Station next to the mutat before continuing


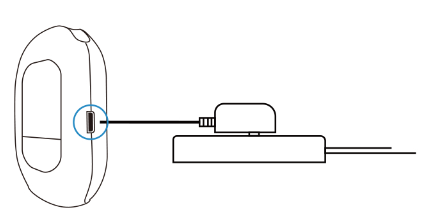
Power the Camera
- Power the Camera o Please install two 18650 lithium batteries in the camera before using
- Coming with a micro USB connector on the battery, the wifi camera can be charged by a universal 5V 2A phone adapter,Save your money for new batteries continuously.(No power adapter packed in).


Tips:ln order to extend the working time of the battery, please turn off the motion sensor when using it outdoors.
Connect Base Station to Network
Connect your mobile phone with 2.4G WiFi. (5G is not supported for the Base station)lf you are using a dual-band router, make sure your 2.4G WiFi name is different from your 5Gone.
Full-Screen View

When the Base Station is online, use can do the below operations:
1. Change Username and password
For safety reasons. please follow the below illustration to change the default username and password after the Base station is connected to Wi-Fi:
Long press (WiFi Pair Button] on the Base Station until you hear [Please Sync the Base Station to the Router], then Click on [Red and Blue lights flash alternately].
Scan the QR code on the pi Name Base Station,
Name Bass Station then chik on NExt

7. Your home WiFi will be located, please Input your WiFi password correctly. Click on [Connect to WiFi].
8. Base Station will by to connect 2.4G, and you will hear [Received WiFi Information] from the Base Station
9. Once the Base Station is connected, you will hear [Succeed to Connect Router ] and Add Base Station Successfully.

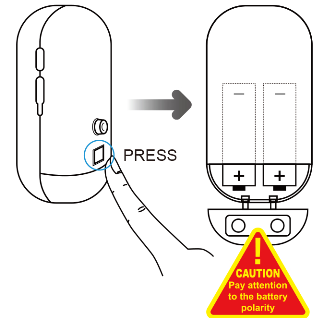
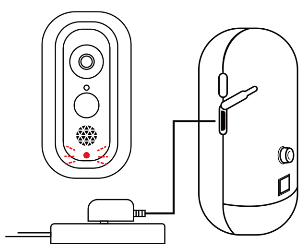
3. Long Press the [Sync Button] on Base Station until the blue light starts flashing and hear [Entering Sync Mode]. Then long-press the [Sync Button] on Battery Camera until the red&blue lights flash at the same time. Click on [Finish] When you hear [Sync Succeed] and Base Station will be Online.

More Operations for the Battery Camera. When the Base Station is online, tap to view the Battery Camera. Tap icon @ can set up the PR motion, close/Low/Middle/High can be switched according to your need. After enabling PIR motion detection, the battery camera can send a notification to your phone when an alarm is detected, refer to page 18 Push Setting. It also can record alarm video to the memory card if the memory card is available, refer to page 19 Memory Card Alarm setting. 
2. Push setting
Taoist; 

3. Memory Card Alarm setting The Base Station supports a 128GB memory card, the memory card is not included! It will send a short feed to the memory card when an alarm is detected by the battery camera(refer to page 15 About PI R setting) if the memory card is available. The video length can be adjusted between 10-30 seconds, please follow the below illustration to set it up:

4. Playback SD/TF Record The alarm videos saved on the memory cards can be playback via Wansview App. When the Base Station is online, tap icono— Playback SD/TF card can check the alarm videos. If you have an Android phone, tap to see the Calendar, the date with a red dot means there are alarms were recorded, below illustration is for Android App. If you have an IOS device, the App will go to Calendar after tapping Playback SD/TF.

5. Maintenance
Users can reboot the Base Station and Restore the Base Station to Factory Default. if it is restored, the user needs to set up WiFi for the Base Station again.
6. About Base Station
Users can check the basic information for the Base station, such as WiFi status, Firmware, etc.
Synchronize with Battery Camera
If you have 2 or more Battery cameras. please follow below steps to connect to the Base Station, please refer to P13-14 for more details.
Tips: One Base Station can manage up to 4 Battery Cameras.

Add Base Station that connected network
There are three ways to add the Base Station to App This option is suitable for adding the Base Station to another phone or the Base station is removed from the app and wants to add again. Please follow the below steps: Tap° on Add Battery camera to the Base Station already connected network

Way 1: Lan Search
If the mobile device and the Base Station are in the same WiFi network, the user can use “Lan Search” to search the connected Base Station.
Way 2: Scan QR Code If the Base Station is on your hand, you can tap to scathe Base Station’s QR code (on the back) to get the information.

Way 3: Manually input Base Station information The Base Station’s DID can be found on the back of the Base Station.

Mount the camera on a wall
Fasten the mounting screws into the wall and attach the magnetic mount.
When you are mounting the camera to drywall, be sure to use the plastic anchors.
Mount the camera on a desktop or shelf.

On the wall (Bass Station)