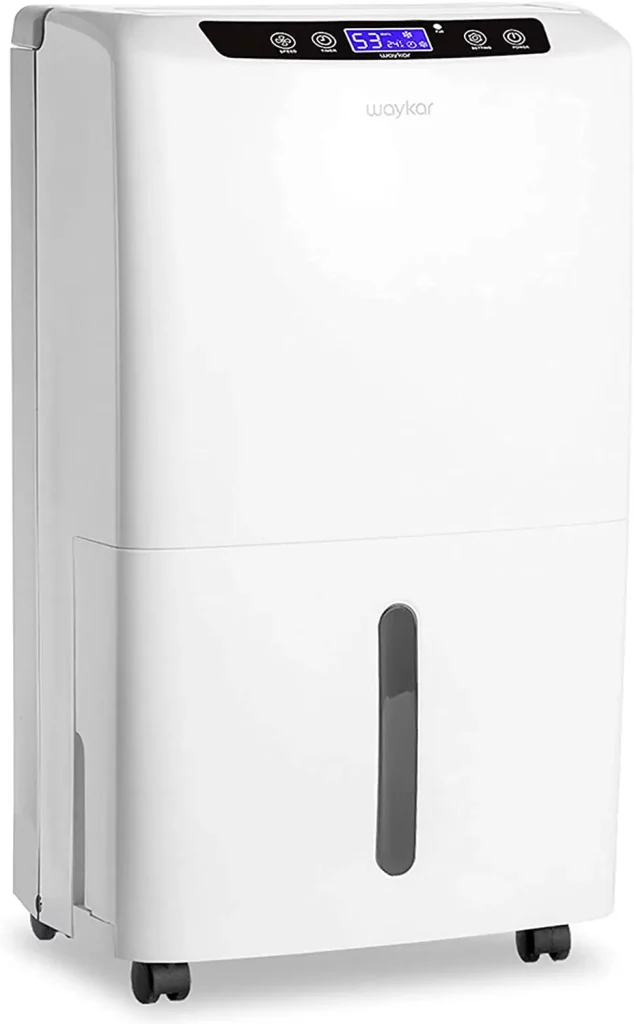
Waykar PD160B 34 Pints Dehumidifier User Manual$

BEFORE FIRST USE
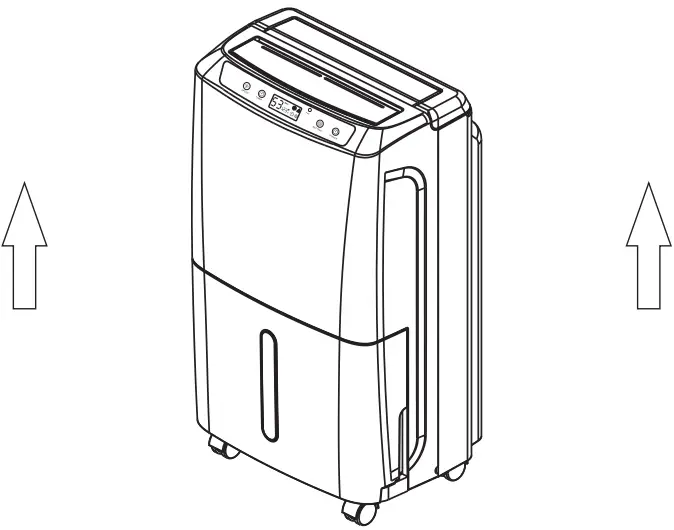
To prevent any internal damage, it is very important to keep the unit (like this one) upright throughout its journey.
Please leave it standing as the picture shown below and outside the box for 24 HOURS before plugging it in.
Safety Instruction
 IMPORTANT NOTICE FOR FIRST USE
To prevent injury to the user or other people and property damage, the following instructions must be followed when using the Dehumidifier. Incorrect operation due to ignoring of instructions may cause harm or damage. This instructions are for household use only.
- Make sure to turn off and unplug the dehumidifier before cleaning.
- Do not touch the plug with wet hands.
- Do not operate or turn off the dehumidifier by plugging in or unplugging the device. Use the control panel instead.
- Be sure to run the slopping water hose downward to let the water flow out smoothly.
- Do not use if the power cord is broken or damaged.
- Do not place or operate in a wet room such as bathroom or laundry room, which may be splashed by water.
- Do not place the dehumidifier near a heat source.
- Do not install the dehumidifier in a location that may be exposed to combustible gas.
- Do not use the dehumidifier near flammable gas or combustibles, such as gasoline, benzene and thinner, etc.
- Do not use in areas where chemicals are handled.
- Do not climb on or place objects on the dehumidifier.
- Do not place a heavy object on the power cord and make sure that the cord is not compressed.
- Place the dehumidifier on a level, sturdy section of the floor, and avoid placing on uneven or tilted section.
- Disconnect the power if strange sounds, smell, or smoke comes from the dehumidifier.
- Do not take the water tank out while the dehumidifier is working.
- Do not cover the intake or exhaust openings with cloths or towels.
- Care should be taken when using the dehumidifier in a room with the following persons: infants, children, the elderly and people not sensitive to humidity.
- Never insert your fingers or other foreign objects into grilles or openings. Take special care to warn children of these dangers.
- You should never try to take apart or repair the grilles by yourself.
- Do not drink or use the water drained from the dehumidifier.
- Always insert the filters securely. Make sure to clean the filter once every month.
- Do not use the dehumidifier in very small spaces.
- If water enters the dehumidifier, please turn the dehumidifier off and disconnect the power, contact Waykar Customer Service at [email protected] in order to avoid a hazard.
CAUTION
- If the dehumidifier is knocked over during use, turn off the dehumidifier and unplug it from the main power supply immediately. Visually inspect the dehumidifier to ensure there is no damage. If you suspect the dehumidifier has been damaged, contact Waykar Customer Service at [email protected] for repair or replacement.
- To reduce the risk of fire or electric shock, do not use this dehumidifier with any solid-state speed control device.
- Do not operate dehumidifier with a damaged cord or plug to avoid a hazard, it must be replaced by the manufacturer or its service agent. Please contact Waykar Customer Service at [email protected] for repair or replacement.
- The dehumidifier shall be installed in accordance with national wiring regulations.
- Be sure the dehumidifier is properly grounded. To minimize shock and fire hazards, proper grounding is important. This power cord is equipped with a three-prong grounding plug for protection against shock hazards.
- Your dehumidifier must be used in a properly grounded wall socket. If your wall socket is not adequately grounded or protected by a time delay fuse or circuit breaker, have a qualified electrician install the proper socket.
- To avoid fire hazard or electric shock, do Not use an extension cord or an adapter plug, do Not remove any prong from the power cord.
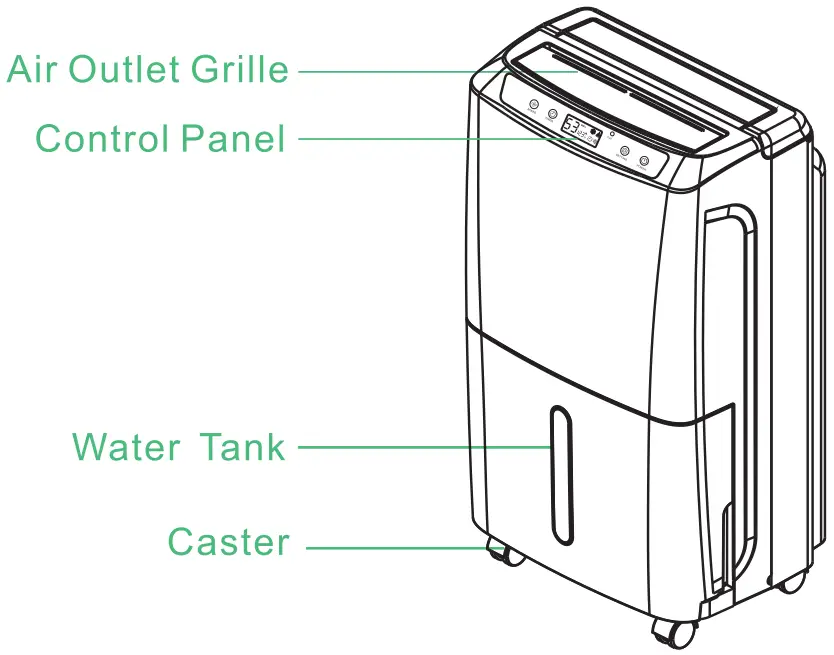
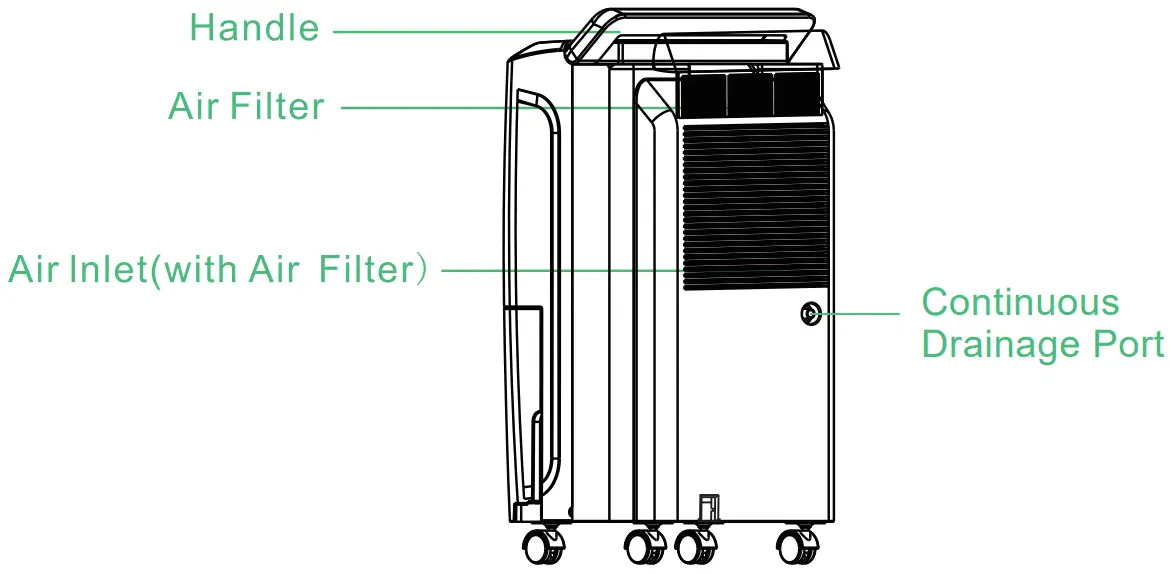
Parts Description
FRONT
REAR
OPERATION INSTRUCTIONS
PLACE CORRECTLY
This unit may have been tilted or placed upside down during shipping. To ensure this device works properly, please ensure this unit is upright for at least 24 hours before initial use.
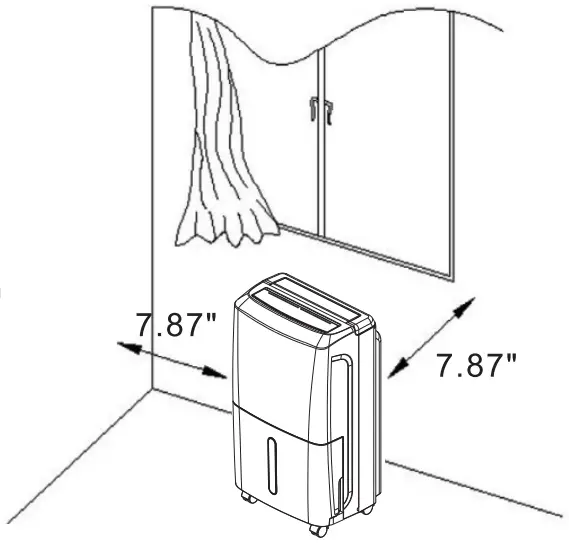
This dehumidifier is designed to operate with a working environment between 41°F (5°C) and 95°F (35°C). When using dehumidifier, other objects surrounding the machine at least need to be kept a distance of 7.9 inches (20cm), as shown in the picture on the right:
CONTROL PANEL
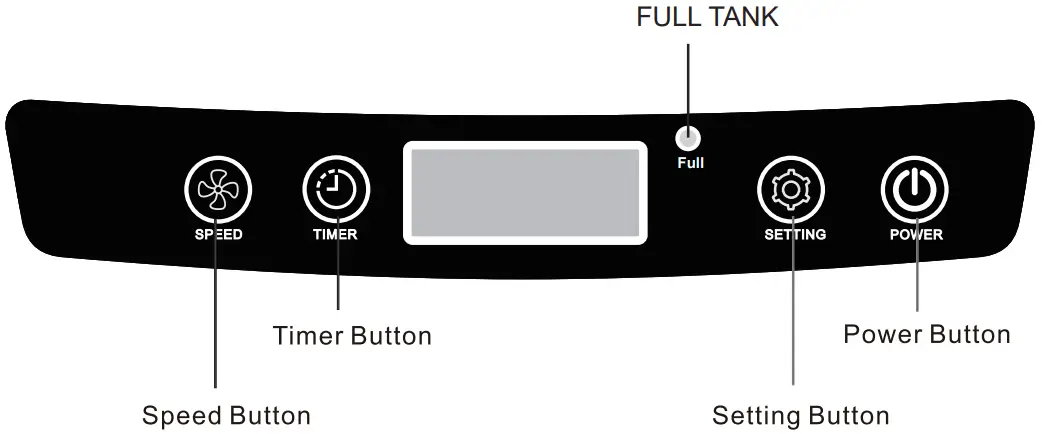
Power Button
Press to turn the dehumidifier on and off.
Humidity Setting
The humidity level can be set within a range of 30%RH to 80%R1-1 in 5% increments.
- When it starts to work, it will first automatically detect and show the humidity (and temperature) in the room, then you can press or hold the Setting Button to change the humidity selection in 5% increments. (After you set the desired humidity, the readout will display the actual humidity.)
- When the room huimidity level overtakes or drops to the level you set, the duhumidifier will automatically start working or stop.
- When the humidity level is set at 30%RH, the dehumidifier will be at CONTINUOUS dehumidifying mode.
Timer Setting
The TIMER function enables you to either Delay Start or Delay Stop the unit in the choice from 1 hour to 24 hours. When the unit is running, selecting TIMER will turn the unit off in the set hours later (Delay Stop). When the unit is off, then the TIMER will turn the unit on in the hours you earlier selected (Delay Start).
TIMER setting: Press or hold the Timer Button to change the delay timer at 1 hour increment, up to 24 hours. After TIMER setting is finished, the control panel will display the remaining time (8, 7 or 6, etc.) until the unit starts or stops.
If then press TIMER button again, the control panel will display the room temperature and humidi-ty value as before. After that, adjust the TIMER setting to 00 will cancel the Auto Start/Stop function.
For the Delay Start, the fan speed and humidity maintained will be the same as previous setting.
NOTE
- Before entering TIMER setting, make sure power is being supplied to the unit.
- Before entering TIMER setting, make sure you press the Setting Button to set a desired room humidity first.
Speed Button
Control the fan speed. Press to select either High or Normal fan speed. A higher fan speed will result in quicker moisture removal.
Set the speed high for maximum removal first, when the humidity has been reduced and quiet operation is more preferred, you can return the speed back to Normal.
FULL TANK Indicator Light
When the tank is full, the light will flash and the machine will automatically shut off. After the water in the tank is emptied, put the tank back in place, then the indicator will go out, and the machine will restart.
Action Description
Power on:
Compressor starts after the fan work for a few seconds.
Power off:
Compressor shuts down at once, and the fan will stop after a few seconds. (When other malfunction occurs, or the humidity reaches desired level, the fan will stop after tens of seconds).
Tips:
The compressor features “3 minutes delay protection” function — While the dehumidifier is powered, the compressor can only start again three minutes after its last shutdown.
Faults and Protection Codes
| Fault Phenomenon | Analysis of Causes | Processing Method |
| Humidity always shows “25% RH” — but there is a big difference from the actual humidity. | Humidity sensor failure? | Set the humidity to 30%RH,the dehumidifier can still continue to work, and can be used normally. |
| Repair and replace the humidity sensor. | ||
| Humidity always shows “99% RH” — but there is a big difference from the actual humidity. | Water on the surface of humidity sensor? | The dehumidifier is not affected and can continue to work, and can be used normally. |
| Please let the dehumidifier keep working for a period of time, after the water on the surface of humidity sensor is removed, it will return to normal. | ||
| Repair and replace the humidity sensor. |
REMOVING THE COLLECTED WATER
There are two ways to remove the collected water:
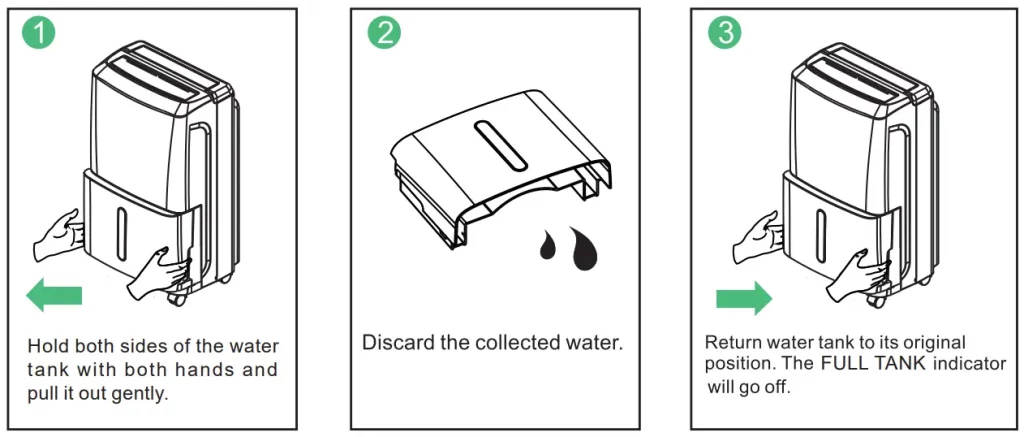
Use the Water Tank
When the water tank is full, remove the tank and empty it.
NOTE
- Replace the empty tank back into the unit, and once seated correctly, the unit will start up again.
- You should hear a click when the tank is in the correct position.
- Do not remove the float in the tank, otherwise the sensor will not be able to sense the water level properly, so that the water will overflow from the tank when the it’s full.
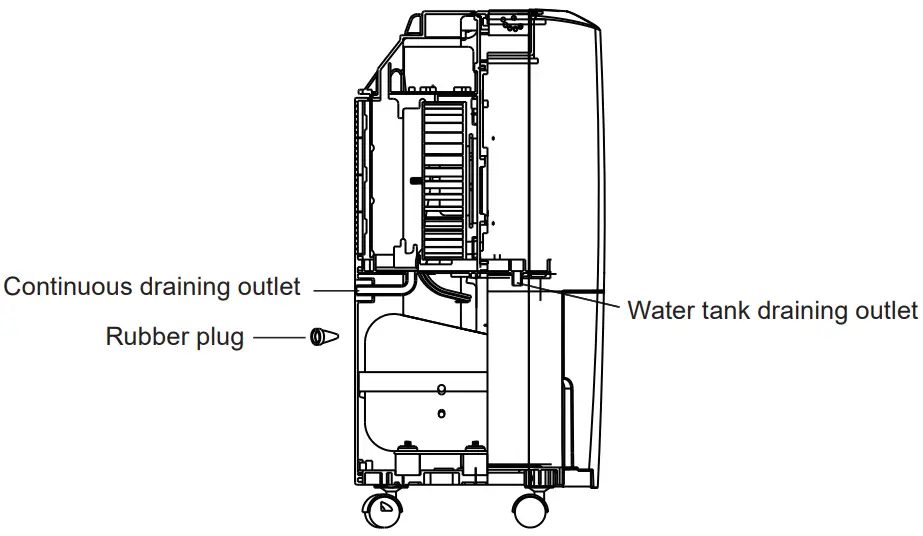
Continuous Draining
Water can be automatically emptied into a floor drain by attaching a draining hose to the dehumidifier.(It may be helpful to remove the water tank first so you can see the connection better. )
Note: The inner diameter of draining outlet is 0.39 inches.
NOTE
- Make sure the connection is tight and there is no leaking.
- Lead the water hose to the floor drain or a suitable drainage facility, the drainage facility should be lower than the draining outlet of the dehumidifier.
- Be sure to run the slopping water hose downward to let the water flow out smoothly.
- When the continuous drainage feature is not being used, remove the draining hose from the outlet.
- When on manual drainage method, insert the “rubber plug” on the continuous draining outlet to prevent water leakage.
- When on continuous drainage method, use the draining hose, insert the “rubber plug” on the water tank draining outlet to prevent water leakage.
CLEANING AND MAINTENANCE
WARNING:
Turn the dehumidifier off and remove the plug from the wall outlet before cleaning.
Clean the Water Tank
Wipe down the water tank every 2 weeks.
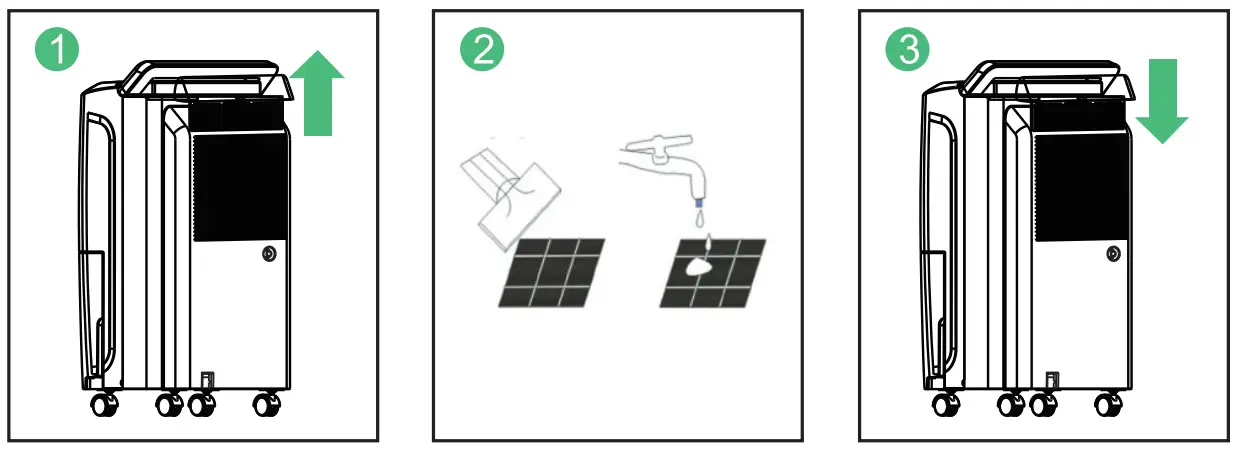
Clean the Air Filter
Pull up to remove the air filter . Clean the filter with water and cloth at least once every 30 days.
Storing the Dehumidifier
When not using the dehumidifier for a long time.
- After turning off the dehumidifier, wait for one day before emptying the water tank.
- Clean the main body of the dehumidifier, water tank and air filter.
- Wrap the cord and bundle it with the band.
- Cover the dehumidifier with a plastic bag. -Store the dehumidifier upright in a dry, well-ventilated place.
WARNING: Do not operate the dehumidifier without a filter. Because dirt and lint will clog it and reduce its performance.
TROUBLESHOOTING
Check the information below for troubleshooting steps, it will save you time to resolve issues that may happen with the unit.
The list includes most of the common cases, but not the results of defective unit, crafts or materials in the unit.
If all troubleshooting steps have been exhausted and the issue is still occurring, please feel free to reach out to Waykar Customer Service to get further assistance.
| Problem | Reason | Method |
| midifier does not work | The power cord is unplugged. | Make sure that the unit’s plug is inserted properly into the power outlet. |
| Is the FULL TANK indicator blinking? (The tank is full or in a wrong position?) | Empty the water in the water tank and then reposition the tank. | |
| Is the room temperature above 95°F (35°C)or below 41°F (5°C). | This product does not apply to over hot or cold environment. the machine; will automatically enter the protection Mode. It is a normal phenomenon. | |
| Is the room temperature between 41°F (5°C) and 68°F (20°C) ? | When running under lower ambient temperature, the machine will auto-matically defrost, which is a normal phenomenon. It will restart dehumification again until the defrosting process finished. | |
| The dehumidifier is in the defrosting process. | It is normal the compressor ceases while defrosting process. Wait until the process finished, it will restart dehumidification again. | |
| Is the room humidity lower or reaching the preset humidity level? (When the room humidity has reached the preset level, the dehumidifier will enter Standby Mode and the indicator on LCD will flash. ) |
P please set the humidity decrease by 5% than the room humidity or set the humidity to 30%. |
|
| This is to prevent the frequent start of the machine. Does the machine stop working just now? minutes. |
Please wait for more than 3 | |
| Room humidity is low. | The dehumidifier is designed to work in the humidity range of 30%-80%. Above or below this range, it will not work. | |
| Dehumidifier does not dry the air as it should | The air filter is dirty. | Clean the air filler. |
| Is the air inlet or air outlet obstructed? | Remove the obstruction from the air inlet or outlet. | |
| The dehumidifier size is too small for application. | Increase the quantity of dehumidifier. Or change to a higher capacity dehumidifier. | |
| Poor air circulation. | Please leave about 7.9 inches (20cm)around the product. | |
| Did not allow enough time to remove the moisture. | Allow enough time to remove the moisture. When first installed, allow at least 3-4 days to maintain the desired RH. |
|
| The room has not been sealed properly. | Check that all doors, windows and other openings are securely closed. | |
| Room temperature is too low, or below 41 7 (5C): The machine will not work or undergo poor dehumi- fying efficiency in low temperature. | Please wait until the temperature rises to above 5C or higher. | |
| The dehumidifier makes loud noise when operating | The dehumidifier is not positioned levelly | Move the machine to a horizontal position. |
| Is there blocking around the air inlet? The air filter is clogged. |
Clean up the dirt or lint on the air outlet and intake. | |
| Is the filter installed correctly? | Please check whether the packing bag of the filter had been removed and the filter has been installed correctly. | |
| Dehumidifier operates continuously | Check if the dehumidifier is in Continuous Mode | Do Not set the humidity too low. Typically. 40-50% are good for use. |
| Room humidity is too high. | Change humidity settings. Or change to a higher capacity dehumidifier. | |
| Doors and windows are open. | Ensure that all doors, windows and other openings are closed. |
| Overflow of water on floor | Hose to connector or hose connection may be loose. | Connect the hose with the draining outlet tightly. |
| The water tank has not been installed properly | Re-install the water tank properly. | |
| The float of water tank has been stuck. | Move the float and let it swing freely. | |
| The magnet on the float has come off. | Put the magnet in right position. |
Please contact Waykar Customer Service at [email protected] if the dehumidifier operates abnormally or does not operate, and the above solutions are not useful.
Technical Specification
| MODEL | PD160B |
| POWER SOURCE | 120V — 60Hz |
| RATED POWER (95°F, 90%RH) | 230W |
| RATED CURRENT (95°F, 90%RH) | 2.0A |
| MOISTURE REMOVAL (65°F, 60%RH) | 9.0 Pints/Day (4.25L/Day) |
| MOISTURE REMOVAL (80 °F, 60%RH) | 14 Pints/Day (6.6L/Day) |
| MOISTURE REMOVAL (86 °F, 80%RH) | 25 Pints/Day (12L/Day) |
| MOISTURE REMOVAL (95 °F, 90%RH) | 34 Pints/Day (16L/Day) |
| INPUT POWER (65°F, 60%RH) | 128W |
| INPUT CURRENT (65°F, 60%RH) | L2A |
| IEF ( 65°F, 60%RH) | 1.30 liters/kWh |
| MOTOR FLA | 0.19A |
| MOTOR COMPRESSOR | RLA: 2.5A LRA: 10.0A |
| REFRIGERANT | R134a/5.11ozs (145g) |
| MAXLMUM ALLOWABLE PRESSURE | 363PSIG (2.5MPa) |
| HIGH PRESSURE | 232PSIG (16MPa) |
| LOW PRESSURE | 90PSIG (0 62MPa) |
Warning:
This product can expose you to chemicals including Styrene and its compounds, which is known to the State of California to cause cancer and birth defects or other reproductive harm.
For more information, please visit: www.P65Warning.ca.gov.
Warranty
Waykar offers a 12-month warranty to all of our products together with the original proof of purchase when a defect occured, including those newly purchased and unused, from Waykar or through an authorized reseller, wholly or substantially, or as a result of faulty manufacturing parts, or workmanship during the Warranty Period. The warranty does not apply if damage is caused by other factors, including but without limitation of:
- Normal wear and tear;
- Abuse, mishandling, accident or failure to follow operating instructions;
- Exposure to liquid or infiltration of foreign particles;
- Servicing or modification of the product other than by Waykar.
These are our general terms for the warranty service, but we always encourage our customers to reach out to us if any issues, regardless of warranty terms. If you are experiencing an issue with Waykar product, you can contact us at support@waykarcom we will dedicate our efforts to resolve it for you.
Extend Your Warranty by 1 Year
Register your product at www.waykar.com to extend your 1-year warranty by an additional year. Please fill out all required fields and inlcude your Order ID, Date of Purchased if applicable.
Customer Support
If you have any questions or concerns about your product, please feel free to contact our expert support team. Waykar customer service is here to help.
Waykar Office
13211, Spring Street Baldwin Park, CA, US
Email: support@waykarcom
Live Chat: www.waykar.com
Support Hours 24 Hours available *Please have your Order Number ready before contacting customer support.
For FAQs and more information please visit:
http://www.waykar.com/
(Scan the QR Code for Live Chat)

 @Waykar
 @Waykar
 @Waykar
 @Waykar
We are expecting to see our products fulfill your life and hear your voice.
Your satisfaction means a lot to us.
Please tag us if you share a snap on your social media.
http://www.waykar.com/