
weed eater Electric Corded String Trimmer Instruction Manual

Product Overview
Installation
![]() WARNING: (PROPOSITION 65)
WARNING: (PROPOSITION 65)
Some dust created by power sanding, sawing, grinding, drilling, and other construction activities contains chemicals known to cause cancer, birth defects or other reproductive harm. Some examples of these chemicals are:
- Lead from lead-based paints
- Crystalline silica from bricks and cement and other masonry products, and
- Arsenic and chromium from chemically treated lumber.
Your risk of exposure to these chemicals varies depending on how often you do this type of work. To reduce your exposure to these chemicals, work in a well-ventilated
area, and work with approved safety equipment, such as dust masks that are specially designed to filter out microscopic particles.
IDENTIFICATION OF SYMBOLS
 |
WARNING! This power tool can be dangerous! Careless or incorrect use can result in serious or fatal injury to the operator or others. |
 |
Please read the operator’s manual carefully and make sure you understand the instructions before using the machine |
 |
|
 |
Always wear heavy, long pants, long sleeves, boots, and gloves. |
 |
Keep children, bystanders, and animals away from work area a minimum of 30 feet (10 meters) when starting or operating unit |
 |
Secure hair above shoulder length. |
 |
Electrical shock |
 |
To reduce the risk of electric shock, unplug before cleaning or servicing. |
 |
Remove plug from the mains immediately if the cable is damaged or cut. |
 |
Rocks or debris can ricochet or be thrown into eyes and face and cause blindness or other serious injury. |
 |
Do not expose to rain. |
 |
Use only specified trimmer head, spool, and recommended trimmer line. Never use blades, flailing devices, wire, rope, string, etc. This attachment is designed for line trimmer use only. Failure to follow these instructions may result in serious injury. |
 |
Double insulated |
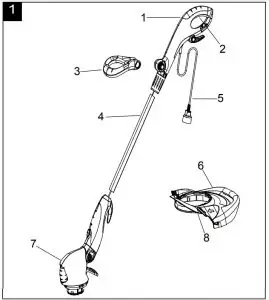
KNOW YOUR MACHINE
See Fig. 1
- Upper handle
- Trigger
- Lower handle
- Shaft
- Power cord
- Guard
- Cutting module
- Plant and tree guard
SAFETY
GENERAL POWER TOOL SAFETY WARNINGS
![]() WARNING : Read all safety warnings and all instructions. Failure to follow the warnings and instructions may result in electric shock, fire and/or
WARNING : Read all safety warnings and all instructions. Failure to follow the warnings and instructions may result in electric shock, fire and/or
serious injury.
Save all warnings and instructions for future reference.
The term power tool in the warnings refers to your electric (corded) power tool or battery-operated (cordless) power tool.
Work area safety
- Keep work area clean and well lit. Cluttered or dark areas invite accidents.
- Do not operate power tools in explosive atmospheres, such as in the presence of flammable liquids, gases or dust. Power tools create sparks which may ignite the dust or fumes.
- Keep children and bystanders away while operating a power tool. Distractions can cause you to lose control.
Electrical safety
- Power tool plugs must match the outlet. Never modify the plug in any way. Do not use any adapter plugs with grounded power tools. Unmodified plugs and matching outlets will reduce risk of electric shock.
- Avoid body contact with grounded surfaces such as pipes, radiators, ranges and refrigerators. There is an increased risk of electric shock if your body is grounded.
- Do not expose power tools to rain or wet conditions. Water entering a power tool will increase the risk of electric shock.
- Do not abuse the cord. Never use the cord for carrying, pulling or unplugging the power tool.Keep cord away from heat, oil, sharp edges or moving parts. Damaged or entangled cords increase the risk of electric shock.
- When operating a power tool outdoors, use an extension cord suitable for outdoor use. Use of a cord suitable for outdoor use reduces the risk of electric shock.
- If operating a power tool in a damp location is unavoidable, use a ground fault circuit interrupter (GFCI) protected supply. Use of an GFCI reduces
the risk of electric shock.
Personal safety
- Stay alert, watch what you are doing and use common sense when operating a power tool. Do not use a power tool while you are tired or under
the influence of drugs, alcohol or medication. A moment of inattention while operating power tools may result in serious personal injury. - Use personal protective equipment. Always wear eye protection. Protective equipment such as dust mask, nonskid safety shoes, hard hat, or hearing protection used for appropriate conditions will reduce personal injuries.
- Prevent unintentional starting. Ensure the switch is in the off-position before connecting to power source and/or battery pack, picking up or carrying the tool. Carrying power tools with your finger on the switch or energizing power tools that have the switch on invites accidents.
- Remove any adjusting key or wrench before turning the power tool on. A wrench or a key left attached to a rotating part of the power tool may resultin personal injury.
- Do not overreach. Keep proper footing and balance at all times. This enables better control of the power tool in unexpected situations.
- Dress properly. Do not wear loose clothing or jewelry. Keep your hair, clothing and gloves away from moving parts. Loose clothes, jewelry or long hair can be caught in moving parts.
- If devices are provided for the connection of dust extraction and collection facilities, ensure these are connected and properly used. Use of dust collection can reduce dust-related hazards.
Power tool use and care
- Do not force the power tool. Use the correct power tool for your application. The correct power tool will do the job better and safer at the rate for which it was designed.
- Do not use the power tool if the switch does not turn it on and off. Any power tool that cannot be controlled with the switch is dangerous and must be repaired.
- Disconnect the plug from the power source and/ or the battery pack from the power tool before making any adjustments, changing accessories, or storing power tools. Such preventive safety measures reduce the risk of starting the power tool accidentally.
- Store idle power tools out of the reach of children and do not allow persons unfamiliar with the power tool or these instructions to operate the power tool. Power tools are dangerous in the hands of untrained users.
- Maintain power tools. Check for misalignment or binding of moving parts, breakage of parts and any other condition that may affect the power tools operation. If damaged, have the power tool repaired before use. Many accidents are caused by poorly maintained power tools.
- Keep cutting tools sharp and clean. Properly maintained cutting tools with sharp cutting edges are less likely to bind and are easier to control.
- Use the power tool, accessories and tool bits etc., in accordance with these instructions and in the manner intended for the particular type of power tool, taking into account the working conditions and the work to be performed. Use of the power tool for operations different from those intended could result in a hazardous situation.
Service
- Have your power tool serviced by a qualified repair person using only identical replacement parts. This will ensure that the safety of the power tool is maintained.
TRIMMER SAFETY WARNINGS
IMPORTANT SAFETY INSTRUCTIONS
When using the power tool, basic precautions should always be followed, including the following:
READ ALL INSTRUCTIONS BEFORE USING THIS POWER TOOL
![]() WARNING: To reduce the risk of fire, electric shock, or injury:
WARNING: To reduce the risk of fire, electric shock, or injury:
- Keep guards in place and in working order.
- Do not use this product without the guard being installed.
- Keep hands and feet away from cutting area.
- Do not use heavier trimmer lines than recommended in this manual.
- Do not use trimmer line materials of other types – for example, metal wire, rope, and the like.
SAVE THESE INSTRUCTIONS
ELECTRICAL OUTLETS AND EXTENSION CORDS
![]() WARNING: Do not touch the terminals of the plug when installing or removing the extension cor from the plug.
WARNING: Do not touch the terminals of the plug when installing or removing the extension cor from the plug.
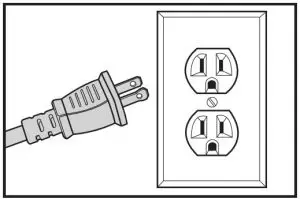
Double insulated power tools are equipped with a polarized plug (one blade is wider than the other) and will require the use of a polarized extension cord. The power tool’s plug will fit into a polarized extension cord only one way. If the plug does not fit fully into the extension cord, reverse the plug. If the plug still does not fit, obtain a correct polarized extension cord.
A polarized extension cord will require the use of a polarized wall outlet. The plug will fit into the polarized wall outlet only one way. If the plug does not fit fully into the wall outlet, reverse the plug. If the plug still does not fit, contact a qualified electrician to install the proper outlet. Do not change or alter the power tool plug, the wall outlet, or the extension cord plug in any way.
Double insulation eliminates the need for a three-wire grounded power cord and grounded power supply system. This is applicable only to Class II (double-insulated) tools. This power tool is a double-insulated tool.
![]() WARNING: GFCI protection should be provided on all circuits or outlets to be used for the power tool. Receptacles are available having built-in GFCI protection and should be used for this measure of protection.
WARNING: GFCI protection should be provided on all circuits or outlets to be used for the power tool. Receptacles are available having built-in GFCI protection and should be used for this measure of protection.
NOTE: Double insulation does not take the place of normal safety precautions when operating the power tool.
Before plugging in the power tool, make sure that the outlet voltage supplied is within the voltage marked on the power tool’s data plate. Do not use “AC only” rated power tools with a DC power supply.
To reduce the risk of electric shock, use the power tool only with an extension cord intended for outdoor use, such as an extension cord of cord type: SW-A, SOW-A, STW-A, STOW-A, SJW-A, SJOW-A, SJTW-A. or SJTOW-A.
When using an extension cord, be sure to use one heavy enough to carry the current that your power tool will draw. An undersized extension cord will cause a drop in line voltage resulting in loss of power and overheating. The table below shows the correct size to use depending on cord length and nameplate ampere rating. If in doubt, use the next heavier gauge. The smaller the gauge number, the heavier the cord.
| Minimum gauge for extension cords | ||||
| Volts | Total length of cord | |||
| 120V | 7.6 m (25 ft) | 15.2 m (50 ft) | 30.4 m (100 ft) | 45.7 m (150 ft) |
| AWG | ||||
| 18 | 16 | 16 | 12 | |
VIBRATION EXPOSURE
Exposure to vibrations through prolonged use of power tools could cause blood vessel or nerve damage in the fingers, hands, and joints of people prone to circulation disorders or abnormal swelling. Prolonged use in cold weather has been linked to blood vessel damage in otherwise healthy people. If symptoms occur such as numbness, pain, loss of strength, change in skin color or texture, or loss of feeling in the fingers, hands, or joints, discontinue the use of this power tool and seek medical attention. An anti-vibration system does not guarantee the avoidance of these problems. Users who operate power tools on a continual and regular basis must closely monitor their physical condition and the condition of the power tool.
ASSEMBLY
WARNING! Do not connect the power tool to the power supply before it is completely assembled.
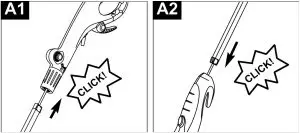
ASSEMBLY OF UPPER HANDLE TO TUBE (A1)
Ensure that the internal cable is not twisted.
- Insert the shaft into the upper handle.
- Push until it clicks into position.
Ensure that the shaft is fully installed by attempting to remove it.
ASSEMBLY OF CUTTING MODULE TO SHAFT (A2)
Ensure that the internal cable is not twisted.
- Insert the shaft into the cutting module.Push until it clicks into position.
Ensure that the shaft is fully installed by attempting to remove it.
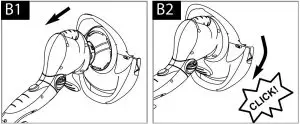
GUARD ASSEMBLY (B1, B2)
- Position the guard (B1) over the trimmer head (B2). Ensure the trimmer line is fed through the hole in the guard.
- Push the guard into place and turn it in the direction indicated until a click is heard and the guard is securely locked.
- Ensure the guard is securely in place by attempting to twist the guard.
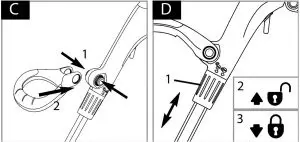
LOWER HANDLE ASSEMBLY (C)
- Depress the two buttons on the sides of the switch handle.
- Locate the steady handle over the buttons and release the buttons.
- Adjust the steady handle to the most comfortable operating position by depressing the buttons and moving the handle.
HEIGHT ADJUSTMENT (D)
- Turn height adjuster (D1) in the direction indicated to un-lock (D2).
- Adjust the length of the tube to the most comfortableoperating position.
- Turn height adjuster in the opposite direction to lock (D3).
Ensure that the shaft is fully secured.
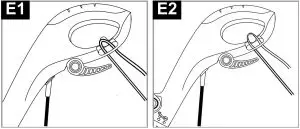
CORD RESTRAINT (E1) & (E2)
- Make a loop in the extension cord and push the loop through the slot in the handle.
- Position the loop over the hook and pull the cord back through the slot.
OPERATION
BEFORE STARTING
![]() WARNING
WARNING
- The use of eye protection is recommended.
- Do not lean over the trimmer while trimming or edging, objects may be thrown by the trimmer line.
- Do not allow trimmer head to rest on the ground.
- Do not overload the trimmer.
- Unplug the power tool from the power source before making adjustments.
- Make sure you have the proper personal protective equipment.
- Inspect the cleanliness of the power tool. Make sure the handles are dry, clean, and free of oil and grease
- Inspect for correct alignment of moving parts.
- Inspect for broken or damaged parts. Do not use the power tool if any damage affects safety or operation. Have damage repaired by an authorized service center.
- Inspect the power cord. If it is damaged, have it repaired by an authorized service center.
- Inspect the extension cord. Replace it if it is damaged.
- Connect the power cord to the extension cord.
- Connect the extension cord to the power supply
Keep the extension cord clear of the work area. Position the cord so that it will not get caught on bushes, hedges, tree trunks or other obstructions while you are working.
![]() WARNING: Check the extension cord before each use and frequently while working. If damaged, replace immediately. Never use the tool with a damaged cord since touching the damaged area could cause electrical shock, resulting in serious injury.
WARNING: Check the extension cord before each use and frequently while working. If damaged, replace immediately. Never use the tool with a damaged cord since touching the damaged area could cause electrical shock, resulting in serious injury.
STARTING AND STOPPING THE TRIMMER
- To start the trimmer, squeeze the trigger.
- To stop the trimmer, release the trigger.
TRIMMING
- Hold the trimmer as shown (G).
- Squeeze the trigger.
- Cut with trimmer line at an angle using the tip (H1).
- Swing trimmer in and out of the cutting area taking small cuts (H2)
Using the Plant & Tree Guard (J1) & (J2)
The plant and tree guard allows the trimming of grass close to plants and trees without damaging them with the trimmer line.
- Flip the guard down (J1).
- Use the trimmer around trees (J2) and near plants.
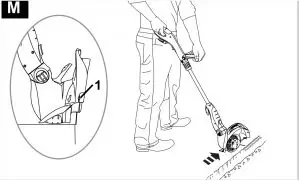
EDGING
- To convert to edging mode, press the button (K1) and twist the cutting module (K2). An audible “click” will confirm that the cutting module is locked. Ensure the plant and tree guard is flipped upwards (K3).
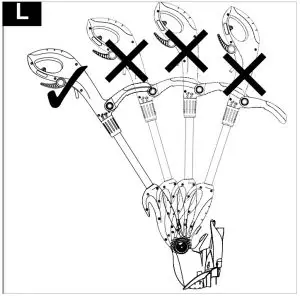
- Ensure the trimmer is in the correct position for edging (L).
- Hold the trimmer as shown (G).
- Squeeze the trigger.
- Use the wheel for extra stability and line up the edge of the lawn with the two indicators on the guard (M1). Edge in the direction indicated (M).
- To stop the trimmer, release the trigger.
- To return to trimming mode, press the button and twist the cutting module the opposite way. An audible “click” will confirm that the cutting module is locked.
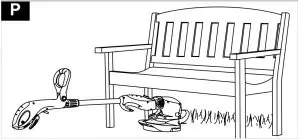
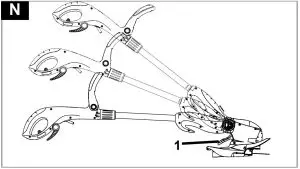
SHRUBBING
Press the lever (N1) with your foot to lower the handle. The handle can be lowered into three different positions to enable the use of the trimmer under shrubs and low obstacles (P).
MAINTENANCE
![]() WARNING: Unplug the power tool from the power source before performing maintenance. Severe injury or death could occur from electrical shock or body contact with moving parts.
WARNING: Unplug the power tool from the power source before performing maintenance. Severe injury or death could occur from electrical shock or body contact with moving parts.
AUTOMATIC TRIMMER LINE FEED SYSTEM
How the automatic trimmer line feed works
When initially switching on the trimmer, a small length of trimmer line is fed out. A ‘clattering’ noise will be heard when the trimmer line hits the trimmer line cutter (F1). This is normal. After approximately 5 seconds the trimmer line will be cut to the correct length and the noise will reduce as the motor reaches full speed.
If the noise of the trimmer line being cut cannot be heard, more trimmer line will need to be fed out. To feed more trimmer line, stop the trimmer and allow the motor to stop completely, then re-start, allowing the motor to reach full speed.
Repeat until you hear the trimmer line hitting against the cutter. Do not repeat this procedure more than 6 times. Make sure the motor is up to full speed before trimming.
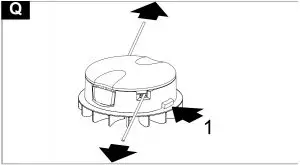
To manually feed the trimmer line (Q)
If required, the trimmer line can be fed out manually. To operate:
- Press and release the manual trimmer line feed button (Q1) while gently pulling on one of the trimmer lines until the trimmer line reaches the trimmer line cutter.
- When the required amount of trimmer line is fed out, gently pull on the second trimmer line. There is no need to press the manual trimmer line feed button again.
If the trimmer line extends past the trimmer line cutter, too much trimmer line has been fed out. If too much trimmer line is fed out, remove the spool cap and turn the spool counter-clockwise until the trimmer line is at the desired length.
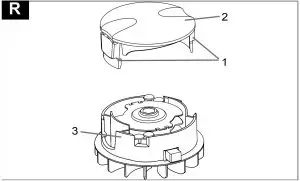
To remove the spool cap (R)
- Press and hold in the two spool cap release latches (R1).
- Pull the spool cap (R2) away from the spool holder (R3)
When re-installing the spool cap
- Clean all areas of the spool cap and spool holder. Failure to do so may prevent the spool cap from being correctly installed in the spool holder.
- Replace the spool cap, pressing firmly down towards the spool holder until the spool cap clicks into place.
- Check that the spool cap is correctly installed by trying to remove it without pressing the two latches.
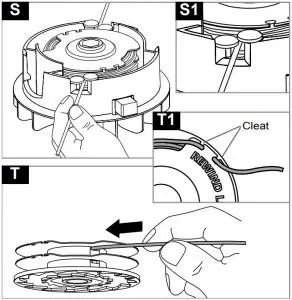
To replace the spool and trimmer line complete (S)
- Remove the old spool.
- Place the new spool into the spool holder with the cutout areas of the spool aligned with the eyelets.
- Release one trimmer line from the notch and feed the trimmer line through the eyelet.
- Repeat for the second trimmer line. Ensure the spool is correctly installed by gently rotating while keeping the spool holder steady.
- Install the spool cap
To replace the trimmer line on the spool (T)
IMPORTANT – Always wind the trimmer line onto the upper section of the spool first.
- Cut approximately 6 meters (20 ft) of trimmer line.
- Insert 15 mm (0.6 in) of trimmer line into one of the holes in the upper section of the spool.
- Wind the trimmer line in the direction of the arrows on the top of the spool. Care should be taken to ensure that the trimmer line is neatly wound on the spool. Failure to do so will impair the efficiency of the automatic trimmer line feed.
- Leave approximately 100 mm (4 in) of trimmer line unwound and place into the notch.
- Repeat on the lower section of the spool.
- Install the spool and the spool cap.
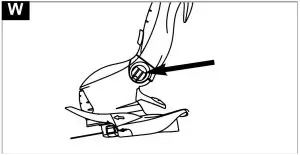
After you have finished using the trimmer:
- Disconnect from the outlet.
- Remove debris from the trimmer shaft, handles and vents with a soft brush or dry cloth. Never clean the trimmer with water, cleaning fluids, or solvents (W).
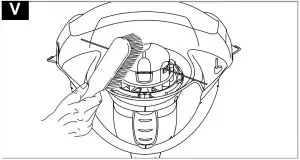
- Use a soft brush to remove debris from the inside ofthe guard, the trimmer head and the motor housing air vents (V).
- Inspect the trimmer carefully, especially the parts ofthe trimmer head. If the trimmer is damaged in anyway, contact an authorized service center. Never use a damaged trimmer.
- Store in a cool, dry place and out of reach of children.
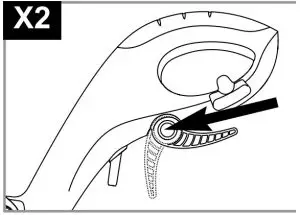
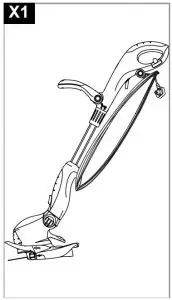
Cable Storage (X1) & (X2)
The power cable can be stored on the trimmer.
- Wind the power cable carefully to avoid kinking.
- Press the button and the cable hook will drop down (X2).
- Place the power cord onto the cable hook.
- Push the cable hook fully back into position.
TROUBLESHOOTING
![]() WARNING: Always stop the power tool and disconnect the power cord before performing any of the recommended remedies below.
WARNING: Always stop the power tool and disconnect the power cord before performing any of the recommended remedies below.
| Starting and running problems | ||
| Trouble | Cause | Remedy |
| Trimmer fails to operate |
|
|
| Trimmer operates intermittently |
|
|
| Trimmer line problems | ||
|
Automatic trimmer line feed not working | Manually feed out trimmer line |
| Trimmer line not visible | Remove spool cap and spool, free trimmer line and re-install spool and spool cap | |
| Manual trimmer line feed not working | Rewind trimmer line to remove crossed loops. Check that trimmer line is in correct section of spool. | |
| Continuous clattering noise | Motor not reaching full speed before use | Allow the motor to reach full speed before use |
| Too much trimmer line fed out | Rewind trimmer line | |
| Trimmer line cutter missing | Replace trimmer line cutter | |
| Trimmer line snaps continuously | Incorrect trimming technique | Only use tip of trimmer line to trim |
TECHNICAL DATA
| WE14T | |
| Rated voltage | 120V~60Hz |
| Rated power | 600 W |
| Cutting diameter | 36 cm (14 in) |
| Trimmer line diameter | Ø1.6 mm (0.065 in) |
| Unloaded speed | 11,280-12,720 min-1 (RPM) |
| Weight | 4.3 kg (9.5 lb) |
| Protection class | / II |
SERVICE PARTS
Environmental protection
- Waste electrical products should not be disposed of with household waste.
- Please recycle where facilities exist.
- Check with your local authority or retailer for recycling advice.