Whirlpool PORTABLE DISHWASHER Owner’s Manual
DISHWASHER SAFETY
Your safety and the safety of others are very important.
We have provided many important safety messages in this manual and on your appliance. Always read and obey all safety messages.
 This is the safety alert symbol.
This symbol alerts you to potential hazards that can kill or hurt you and others.
All safety messages will follow the safety alert symbol and either the word “DANGER” or “WARNING.” These words mean:
DANGER
You can be killed or seriously injured if you don’t immediately follow instructions.
WARNING
You can be killed or seriously injured if you don’t follow instructions.
All safety messages will tell you what the potential hazard is, tell you how to reduce the chance of injury, and tell you what can happen if the instructions are not followed.
IMPORTANT SAFETY INSTRUCTIONS
WARNING: When using your dishwasher, follow basic precautions, including the following:
- Read all instructions before using the dishwasher.
- Use the dishwasher only for its intended function.
- Use only detergents or wetting agents recommended for use in a dishwasher and keep them out the reach of children.
- When loading items to be washed:
1. Locate sharp items so that they are not likely to damage the door seal; and
2. Load sharp knives with the handles up to reduce the risk of cut-type injuries. - Do not wash plastic items unless they are marked “dishwasher safe” or the equivalent. For plastic items not so marked, check the manufacturer’s recommendations.
- Do not touch the heating element during or immediately after use.
- Do not operate your dishwasher unless all enclosure panels are properly in place.
- Do not tamper with controls.
- Do not abuse, sit on, or stand on the door or dish racks of the dishwasher.
- To reduce the risk of injury, do not allow children to play in or on a dishwasher.
- Under certain conditions, hydrogen gas may be produced in a hot-water system that has not been used for two weeks or more. HYDROGEN GAS IS EXPLOSIVE. If the hotwater system has not been used for such a period, before using the dishwasher, turn on all hot-water faucets and let the water flow from each for several minutes. This will release any accumulated hydrogen gas. As the gas is flammable, do not smoke or use an open flame during this time.
- Remove the door to the washing compartment when removing an old dishwasher from service or discarding it.
- Do not use replacement parts that have not been recommended by the manufacturer (e.g. parts made at home using a 3D printer).
GROUNDING INSTRUCTIONS
- For a grounded, cord-connected dishwasher:
The dishwasher must be grounded. In the event of a malfunction or breakdown, grounding will reduce the risk of electric shock by providing a path of least resistance for electric current. The dishwasher is equipped with a cord having an equipment-grounding conductor and a grounding plug. The plug must be plugged into an appropriate outlet that is installed and grounded in accordance with all local codes and ordinance.
WARNING: Improper connection of the equipment grounding conductor can result in a risk of electric shock. Check with a qualified electrician or service representative if you are in doubt whether the dishwasher is properly grounded. Do not modify the plug provided with the dishwasher; if it will not fit the outlet, have a proper outlet installed by a qualified electrician.
- For a permanently connected dishwasher: The dishwasher must be connected to a grounded metal, permanent wiring system, or an equipment-grounding conductor must be run with the circuit conductors and connected to the equipment-grounding terminal or lead on the dishwasher.
WARNING
Tip Over Hazard
Do not use dishwasher until completely installed.
Do not push down on open door.
Doing so can result in serious injury or cuts.
You need to:
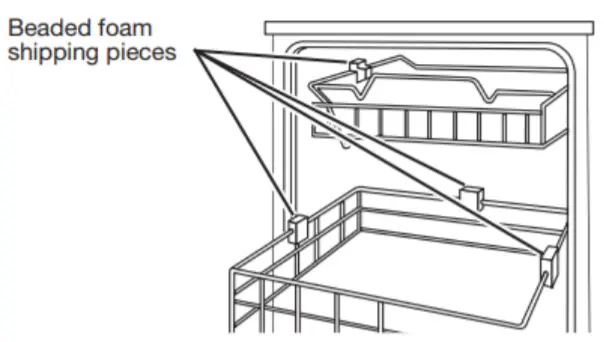
- Slowly open dishwasher door while someone grasps the rear of the dishwasher. Remove shipping materials and drain hose. Close dishwasher door until latched.
NOTE: Each dishwasher is tested at the factory and may contain some residual water in the tub as a result of the test.
- Observe all governing codes and ordinances.
- Prepare dishwasher and faucet as specified in these instructions.
- Have everything you need to properly install dishwasher. The dishwasher must be installed to meet all electrical and plumbing national and local codes and ordinances.
DISHWASHER MAINTENANCE AND CARE
WARNING
Tip Over Hazard
Do not use dishwasher until completely installed.
Do not push down on open door.
Doing so can result in serious injury or cuts.
Cleaning the Exterior
Clean the exterior of dishwasher with a soft, damp cloth and mild detergent. If your dishwasher has a stainless steel exterior, a stainless steel cleaner, such as affresh®† Stainless Steel Cleaner,
is recommended. Avoid using abrasive cleaning products on the exterior of the dishwasher.
Cleaning and Maintaining the Interior
Many detergents may leave white spots or a white residue on dishware and on the interior of the dishwasher. Over time this residue can become unsightly and could affect dishwasher performance. Use of a dishwasher cleaning product such as affresh®† Dishwasher Cleaner can help to remove the residue. Monthly use of affresh®† Dishwasher Cleaner is recommended to help maintain the dishwasher. Follow package directions. Another method to remove white residue is to use a vinegar rinse. However, vinegar is an acid and using it too often could damage your dishwasher.
Place (do not pour) 2 cups (500 mL) white vinegar in a glass or dishwasher-safe measuring cup on the bottom rack. Run the dishwasher through a complete washing cycle using an air-dry or an energy-saving dry option. Do not use detergent. Vinegar will mix with the wash water.
NOTE: We recommend the use of high-quality, premeasured detergent tablets or packs and the use of rinse aid for dishwasher cleaning and daily care. If you have a drain air gap, check and clean it if the dishwasher is not draining well.
To Reduce Risk of Property Damage During Vacation or Extended Time Without Use
- When you will not be using the dishwasher during the summer months, turn off the water and power supply to the dishwasher.
- Make sure the water supply lines are protected against freezing conditions. Ice formations in the supply lines can increase water pressure and cause damage to your dishwasher or home. Damage from freezing is not covered by the warranty.
- When storing your dishwasher in the winter, avoid water damage by having your dishwasher winterized by authorized service personnel.
Troubleshooting
The brand website listed on the Quick Start Guide has detailed information to troubleshoot most problems customers encounter. This information may save you the cost of a service call.
Operating Instructions
ADD DETERGENT
Premeasured Detergents
High-quality premeasured tablets and packs are recommended for improved performance
Quality tablets and packs have been proven better than powder, liquid, or gel detergents at reducing filming on dishes. Using tablets and packs over time will start to reduce or eliminate
white film. They are suitable for all water hardness and soil levels. Also, by using a rinse aid, you can minimize repeat buildup of white film (not all packs and tablets contain rinse aid).
Always place premeasured detergents in main compartment and close lid.
NOTE: Follow instructions on the package when using other dishwasher detergent types. See the complete Owner’s Manual for more details about powders, liquids, and gels.
- Use automatic dishwasher detergent only. Add detergent just before starting a cycle.
- Fresh automatic dishwasher detergent results in better cleaning. Store tightly closed detergent container in a cool, dry place.
ADD RINSE AID
- Your dishwasher is designed to use rinse aid for good drying performance. Without rinse aid, your dishes and dishwasher interior will have excessive moisture. The heated drying option will not perform as well without rinse aid.
- Rinse aid keeps water from forming droplets that can dry as spots or streaks. It also improves drying by allowing water to drain off dishes after final rinse. Rinse aid does not adhere to dishware and, when used, it is dispensed during each cycle.
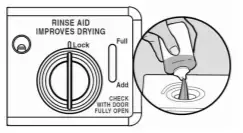
- Check the rinse aid indicator with the door down (varies by model). Add rinse aid when indicator drops to “Add” level.
- Add rinse aid to hinged lid-style dispenser by twisting the dispenser cap 1/4 turn clockwise to open and lift off. Pour rinse aid into the opening until the indicator level is at
“Full.” Replace the dispenser cap and turn to “Lock.” Make sure cap is fully locked.
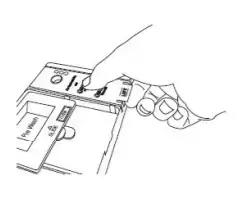
- To add rinse aid to sliding lidstyle dispenser, open the rinse dispenser lid by gently pushing in the center of the lid with your thumb and pulling up on the edge. Pour rinse aid into the opening until the dispenser is full. Then, close the dispenser by pushing down gently on the lid.

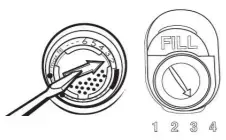
If you are experiencing poor drying performance, you may want to try a higher setting. Turn the arrow adjuster to a higher number to increase the amount of rinse aid.
NOTE: For most water conditions, the factory setting will give good results.
 ENERGY EFFICIENCY
Energy efficiency is gained by extending cycle time and reducing the amount of wattage and water used during the dishwashing cycle. For exceptional cleaning, cycles are longer due to soak and pauses. Efficient dishwashers run longer to save water and energy, just as driving a car slower saves on gas. Your first cycle will run longer to calibrate the optical water sensor.
FILTRATION SYSTEM (On some models)
Your dishwasher has the latest technology in dishwasher filtration. The Clean Water Wash system continuously removes food particles from the wash water for excellent performance. Plus, there is no need to ever remove and clean the filter.
FILTRATION SYSTEM (On some models)
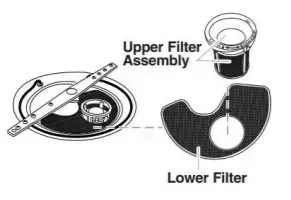
IMPORTANT: To avoid damage to dishwasher, do not operate your dishwasher without filters properly installed. Be sure lower filter is securely in place and upper filter assembly is locked into place. If upper assembly turns freely, it is not locked into place.
Your dishwasher has the latest technology in dishwasher filtration This filtration system minimizes sound and optimizes water and superior cleaning. The filter system consists of two parts: an upper filter assembly and lower filter.
RECOMMENDED DETERGENT
The United States and Canada have passed a restriction limiting the amount of phosphorus (phosphates) in household dishwasher detergents. Major manufacturers have reformulated their dishwasher detergent for this change in detergents as another step in eco-conscious awareness. With these recent changes, it is recommended to use tablets and packs for convenience and improved performance.
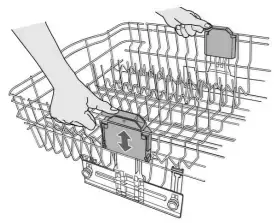
TOP RACK ADJUSTER (On some models)
You can raise or lower the top rack to fit tall items in either the top or bottom rack. Adjusters are located on each side of the top rack.
To raise the rack:
Press both rack adjuster thumb levers, and lift the rack until it is in the up position and level.
To lower the rack:
Press both rack adjuster thumb levers, and slide the rack to its down position and level.
NOTE: The top rack must be level.
INSTALLATION INSTRUCTIONS REQUIREMENTS
Tools and Parts
Gather the recommended tools and parts before starting installation. Read and follow the instructions provided with any tools listed here.
Tools Needed:

Small hammer
Parts Supplied:
- Faucet Adapter Kit
- 4 casters
- Literature package
Make sure all these parts are included in the literature package; then close and latch dishwasher door. If parts are not included, call us at our toll-free number or visit our website listed on the Quick Start Guide.
NOTE: Parts are available for purchase in plumbing supply stores. Check local codes. Check existing electrical supply. See the “Electrical Requirements” section. It is recommended that electrical connections be made by a licensed electrical installer. To order parts and accessories, call us at our toll-free number, visit our website listed on the Quick Start Guide, or see local electrical/ plumbing supply retailer for equivalent.
Location Requirements
- Grounded electrical supply is required.
- Sink or laundry tub that can drain water at a minimum carryaway capacity of 7 gal. (26 L) per minute
- Top of sink or laundry tub that is at least 27″ (68.6 cm) high and not higher than 48″ (122 cm) from the bottom of dishwasher
- Floor support for dishwasher weight of 180 lbs. (81.6 kg)
- Grounded electrical outlet
- Hot water faucet or hot and cold single-spout water faucet within 30″ (76.2 cm) of the back of dishwasher
- 20–120 psi (103–827 kPa) water pressure
Water Supply Requirements
- This dishwasher has a water heating feature and also requires a connection to a hot water supply line.
- A hot water line with 20–120 psi (138–862 kPa) water pressure can be verified by a licensed plumber.
- 120°F (49°C) water at dishwasher
Electrical Requirements
Be sure that the electrical connection and wire size are adequate and in conformance with the National Electrical Code, ANSI/NFPA 70 – latest edition, and all local codes and ordinances. For a fee, a copy of the above code standards can be obtained from:
National Fire Protection Association
1 Batterymarch Park Quincy, MA 02169-7471
You Must Have:
- 120 V, 60 Hz, AC-only, 15 A or 20 A, fused electrical supply.
- Mating grounded electrical outlet.
We Recommend:
- A time-delay fuse or circuit breaker.
- A separate circuit
INSTALLATION
Caster Installation
 WARNING
Excessive Weight Hazard
Use two or more people to move and install or uninstall appliance.
Failure to do so can result in back or other injury.
1. Place 2 corner posts on floor behind dishwasher

2. Put dishwasher on its back
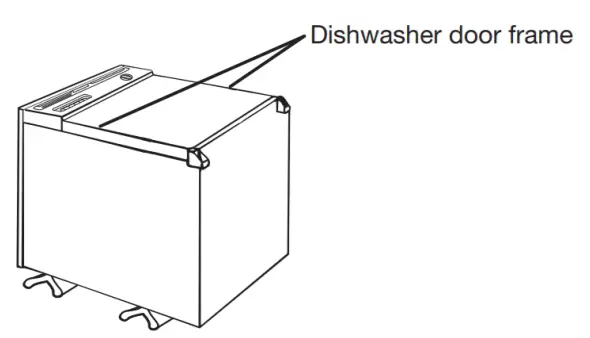
Grasp sides of dishwasher door frame and put dishwasher on its back.
3. Attach casters

Firmly push casters into holes at corners of dishwasher as shown. Pull on each caster to check that casters are snug. HELPFUL TIP: It may be helpful to place a piece of wood between the caster wheels and then lightly tap the wood with a hammer.
Prepare Dishwasher
 WARNING
 Tip Over Hazard
Do not use dishwasher until completely installed.
Do not push down on open door.
Doing so can result in serious injury or cuts.
WARNING
Excessive Weight Hazard
Use two or more people to move and install or uninstall appliance.
Failure to do so can result in back or other injury.
4. Stand dishwasher upright
Stand dishwasher upright. Open door and remove shipping foam, cardboard tower, and any other shipping materials. Close dishwasher door. Latch dishwasher door shut.
Connect Dishwasher
Connecting the Faucet Adapter
NOTES:
- A hose that attaches to a sink spray can burst if it is installed on the same water line as the dishwasher. If your sink has a spray hose, it is recommended that the hose be disconnected and the hole plugged.
- A special adapter must be installed on the faucet before the dishwasher can be connected. Complete the instructions below using the provided adapter. When moving your dishwasher, make sure the door is latched. Hold the dishwasher at the top front corners.
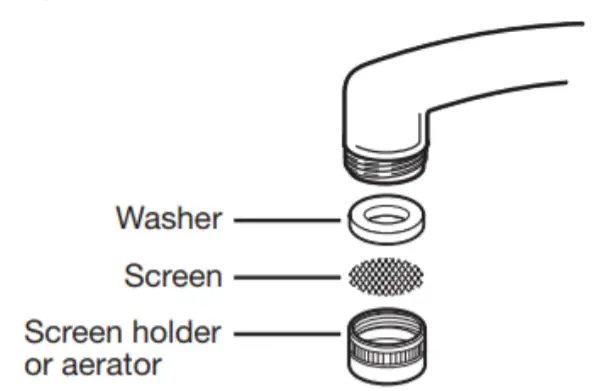
5. Prepare faucet
Remove the screen holder or aerator, screen, and washer from the end of the faucet. Use the faucet adapter kit that came with your portable dishwasher to modify the faucet where the dishwasher will be used.
NOTE: Remove and save the washer, screen, and screen holder or aerator for future use. Determine Faucet Thread Type
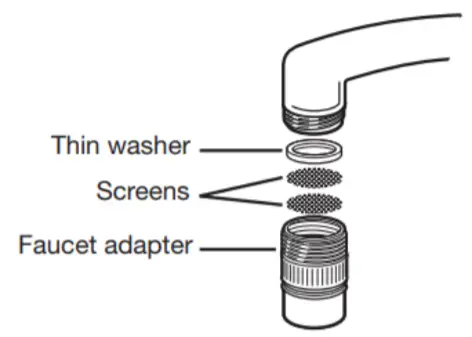
6. Attach faucet adapter – external threads
Insert the 2 screens and then the thin washer from the faucet adapter kit into the faucet adapter. Attach the adapter onto the end of the faucet.
NOTE: Do not use the thick washer.
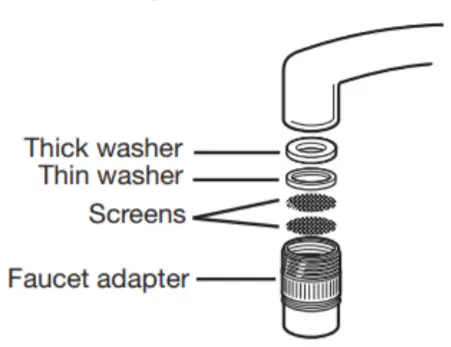
Attach faucet adapter – internal threads
Insert the 2 screens, the thin washer, and then the thick washer from the faucet adapter kit into the faucet adapter. Attach the adapter onto the end of the faucet.
NOTE: Use both washers. Connecting to Water and Electrical Supply Run water at the faucet until it is hot. Turn off the water.
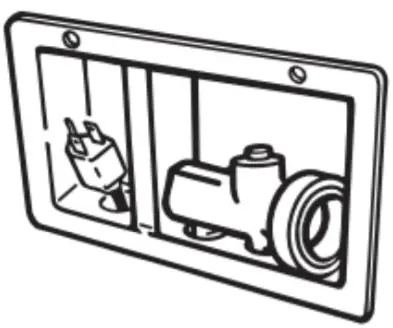
7. Check hose connection
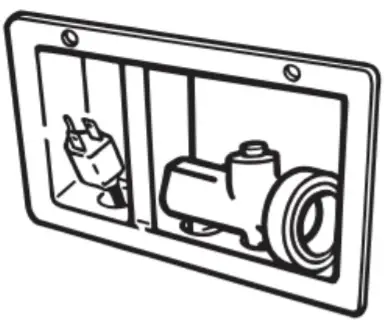
Pull the hoses out of their storage compartment on the back of the dishwasher.
NOTE: Make sure the hoses are not kinked or twisted. Kinked hoses reduce washing performance.
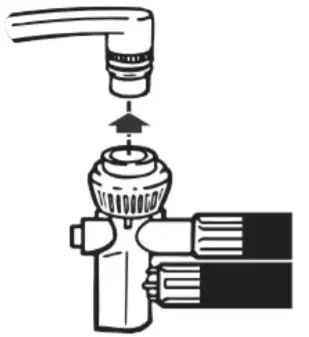
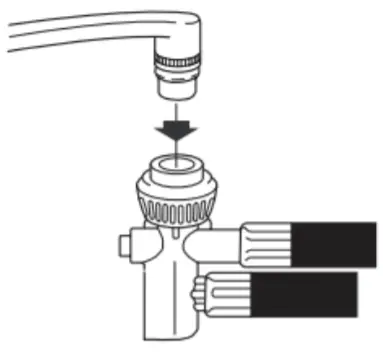
8. Connect hose to faucet

Pull down on the locking collar while lifting the hose connector onto the faucet adapter. When the connector snaps into place, release the locking collar. Turn the hot water on slowly until it is all the way on.
 WARNING
 Electrical Shock Hazard
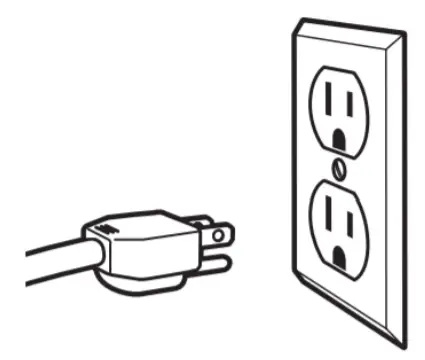
Plug into a grounded 3 prong outlet.
Do not remove ground prong.
Do not use an adapter.
Do not use an extension cord.
Failure to follow these instructions can result in death, fire, or electrical shock.
9. Plug into a grounded 3 prong outlet
Using the Faucet
You can draw water from the faucet while the dishwasher is connected.
NOTE: Do not draw water while the dishwasher is filling or while water is being pumped out. (This helps avoid a low fill when dishwasher is filling or helps keep drain water from mixing with fresh water when dishwasher is draining.)
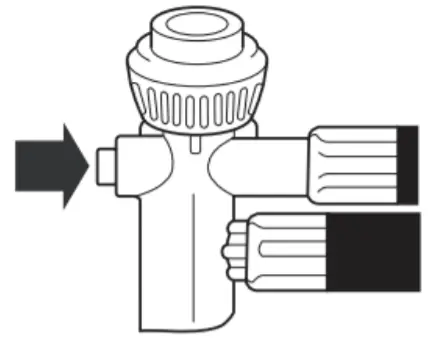
10. Adjust water temperature
Press the red button on the hose connector to draw water from the faucet. (The faucet is set on hot. Adjust the faucet for the water temperature you want.)
NOTE: Turn the hot water back on after you draw water from the faucet. Turn off the cold water
Disconnect Dishwasher
Turn off the hot water. (This can be done after the last rinse.)
11. Disconnect hose from faucet
Press the red button on the connector to release the water pressure. Lift slightly on the hose connector while pulling down the locking collar. Pull down on the connector. Empty any remaining water from the connector by turning the connector upside down.
12. Disconnect dishwasher

Unplug the power supply cord and return it to the storage compartment. Return the hoses to the storage compartment.