![]()
WOPET F01 Sprite Automatic Feeder Instructions
![]()
F01
![]()
Please read these instructions carefully before use
Thank you for choosing this WO pet intelligent product. In order to guarantee your personal and material safety, please read these instructions carefully before using our product. Under no circumstances shall WOPET be liable to pay compensation or damages to any person for any loss, injury, or damage, unless it’s explicitly stipulated in law, whatsoever occasioned by this product or as a result of not following the items and conditions and precautions laid in these instructions.
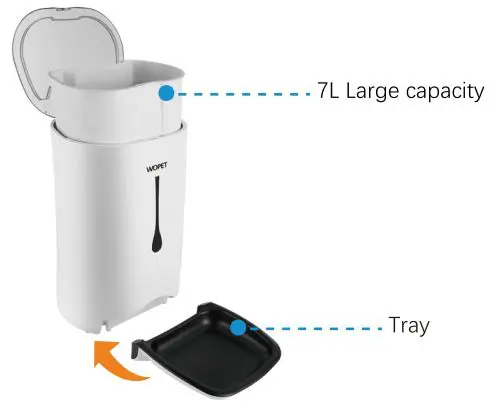
Feeder specifications

Key Features

- Large capacity hopper holds around 71bs dry food
- Humanized design, simple setup
- Voice record/play at programmed mealtimes
- Accurate portion control
- Two power supplies: Battery(NOT INCLUDED) and power adaptor
Feeder assembling
- Assemble bowl as shown in the picture.
2. Plug in the power adaptor. If you do NOT want to use the power adaptor, you can change to use batteries.

3. Install batteries in the battery compartment (3 new D cell, alkaline batteries. Batteries NOT included). Make sure the power switch is set to the “I” location.

Note: The default wheel is the large one. There is also a small wheel, and you can change the wheel when needed.

Feeding setting guide
Set the feeder using the following instructions.
A. Check the manual feeding option and function
Press and hold the “Manual” button for 3 seconds. The rotor will rotate one portion. Repeat two more times. Each time it will feed one portion. This means the machine is working correctly.

B. Set the current time
Holding the “Time” button, press the “Hour” button to set the current hour. And holding the “Time” button, press the “Minute” button to set the time.
Note: When you are setting Hour or Minute, keep holding the “Time” button.

For example: Current time is 12: 50
C. Set breakfast meal
- Holding the “Breakfast”, press the “On/off” button to set feeding breakfast.
- Holding the “Breakfast” button, press the “Meal Size” button to set meal size.
- Holding the “Breakfast” button, press the “Hour” button to set breakfast hour, and press the “Minute” button to set breakfast time.
Note: When you are setting breakfast, keep holding the “Breakfast” button and select items correspondingly.

- Small Wheel Unit: small meal size for small & medium pets Programmable: 1 to 39 portions (5g -195g)
- Large Wheel Unit: Large meal size for medium & large pets Programmable: 1 to 39 portions (lOg -390g)
D. Set lunch and dinner meal and 4th meal

E. Voice recording
- To record your voice, press and hold the “MIC” button for 3 seconds until the LCD screen flashes.
- Speak right to the “microphone location” within 15 seconds to record, and release “MIC” button to stop.
- To check your voice, press and hold the “Play” the button for 3
- seconds.
Delete the recorded voice: long-press the “MIC” button until the screen is flashing.

Feeder cleaning
- Unplug it and take out the three batteries.
- Disassemble the Hopper and Bowl.
- Hand clean a soft cloth and hand dry.
Warning:
The base unit should not be submerged in water at any time, as this will damage the electronic components and void the warranty.

FAQs
- The low battery light is flashing.
• Change three new D cell, alkaline batteries.
• Normally these batteries can last up to 1 year. - When the feeder is set up, it only dispenses ONE portion by manual feeding, even set on 39 portions.
• It’s the Manual Function Checking, and it’s normal.
• Checking steps: Press and hold “Manual” button for 3 seconds.
The rotor will rotate one portion. Repeat two more times. Eachtime it will feed one portion. - What is the weight of 1 portion?
• Using a small wheel, one portion is about 5g.
• Using a large wheel, one portion is about l0g.
Note:
There maybe slight difference of 1 portion with different size food. - How to restore it to factory settings?
• Press the “Time” and “MIC” button at the same time to restore factory settings.
Important notes
- Requires THREE D size batteries, alkaline batteries only
(Batteries NOT included). - Estimated life of one set of batteries is one year.
- Keep fingers and hands away from food wheel.
- Always turn the feeder off before cleaning.
- Check the low battery light frequently to ensure the feeder has power.
- Check the level of food frequently to be sure the feeder is dispensing properly.
FCC warnings
WARNING:
Changes or modifications to this unit not expressly approved. Non-compliance could void the user’s authority to operate the equipment.
NOTE:
This equipment has been tested and found to comply with the limits for a Class B digital device, pursuant to Part 15 of the FCC Rules. These limits are designed to provide reasonable protection against harmful interference in a residential installation.
This equipment generates, uses and can radiate radio frequency energy and, if not installed and used in accordance with the instructions, may cause harmful interference to radio communications. However, there is no guarantee that interference will not occur in a particular installation. If this equipment does cause harmful interference to radio or television reception, which can be determined by turning the equipment off and on, the user is encouraged to try to correct the interference by one or more of the following measures:
- Reorient or relocate the receiving antenna.
- Increase the distance between the equipment and receiver.
- Connect the equipment into an outlet on a different circuit from that to which the receiver is connected.
- Consult the dealer or an experienced radio/TV technician for help.
Shielded interface cables must be used with the equipment in order to comply with the limits for a digital device pursuant to Subpart B of Part 15 of FCC Rules. Specifications and designs are subject to change without any notice or obligation on the part of the manufacturer.
Warranty Information
TWO YEAR NON-TRANSFERRABLE LIMITED WARRANTY
- To provide customers with quality shopping and user experience. we guarantee to replace or issue a refund or provide acceptable solutions to any defective products (as customers prefer)from the date of purchase to 2 year.
- Proof of purchase must be provided (Amazon order number or receipt) when making a claim to our customer support center.
- Warranty registration may be requested within a month since the date of purchase.by sending your Amazon order number to the mailbox: support @ wopetshop.com.
- The warranty is not transferable. We only provide warranty service to buyers who purchased from our Amazon store and possess the purchase proof and not to any other purchase or subsequent owner.
- Price matching policy is not applicable. No price difference refund.
- Sellers are the responsible party. Amazon allows different sellers to sell the same product.so please confirm the seller by checking the order details before contacting us .
WHAT IS COVERED
- Received defective or used (proof needed)products;
- Received with missing parts;
- Defective item under proper use .
WHAT IS NOT COVERED
- Purchase from non-Amazon channel or other physical stores;
- Gift without proof of purchase;
- Tampering/abnormal use/accidental damage;
- Replacements and parts;
- Installation fee/labor fee .
MAKING A CLAIM
- If you have any problems when using our products. please send an email to the mailbox: [email protected].
- 30 days free Return & Replacement
- 2-Year product Warranty .
Have a Question For the Seller


- Gifted parts, replacements, consumable products are not covered by the 2-year warranty
- Manufactures’ warranties may not apply in all cases, depending on factors such as use of the product. where the product was purchased. or who you purchase the product from.
- Please review the warranty carefully, and contact the manufacture if you have any questions.