
![]()
YESKAMO Smart battery Powered IP Camera
Statement
- Though we apply all efforts to make the manual complete and accurate, there could still be some discrepancies due to products’ timely
- The products and manual are subject to change without previous notification.
- The content in this manual is only for users reference. We don’t promise it’s exactly the same with the products you purchase. Detailed information is in accordance with the final products.
- Please open and test before
- Please turn off the device before insert micro SD
- Although the camera is waterproof, it suggested to install the battery camera in a shaded area( such as eaves) to prevent any possibility of accelerated wear and tear the element
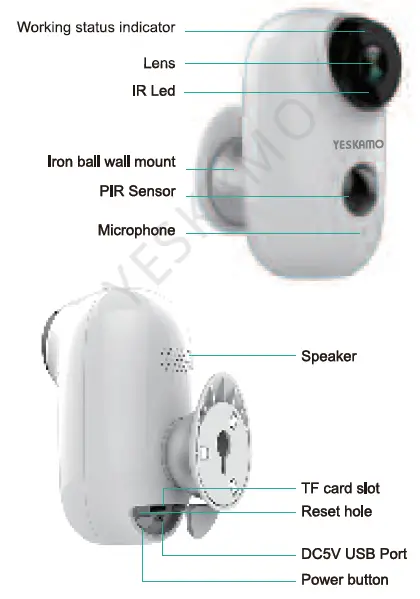
Product Description
| No. | Button | Operation |
| 1 | Power Button | Press and hold for 5 seconds to turn it on/off.
Quick press 1 second to wake up the camera from the standby status |
| 2 | Reset hole | Press and hold it for 5 seconds with ejector pin until camera sounds “bugu”, camera reset and restart automatically |
I
| No. | Light status | Indication |
| 1 | Slowly fiashes red | Waiting for WiFi connection |
| 2 | Flashes red quickly | WiFi connecting |
| 3 | Stay Red light | Network is not normal |
| 4 | Stay blue | WiFi connection complete |
Camera Specification:
- Microphone: audio input
- Speaker: audio output
- PIR sensor: detect objects with heat signature ( human, animals or cars)
- IR LED: light on / off automatically
- Lens: 130 ° wide view angle
- Operating temperature: -20 ° C to 60 ° C
- Power Adapter: Output DC 5V 1A/2A
- MicroSD card support: Up to 128GB
- IP Rate: IP65 waterproof Outdoor
- PIR sensitivity: 3 sensitivity levels (low, middle, high), configurable through phone
Configuration on Phone App
Note: Please grant the following two permissions when you run this App for the first time. Enable 4G or wireless LAN (You can not add an IP camera if no network on your phone ). @ Enable Cloudedge’s “Notification” on phone’s “Settings”, (If it is disabled, you will not receive notification or voice alert even if it detects motion).
- Touch phone “Settings” icon > “Notification”> “Cloudedge” , and enable “Allow notification” on the Notification management interface of Cloudedge
- Tap “Sign of the app
- Sign up an account with your email address/ phone number. A verification code will be send via text. (Note: please check the “Registration means agreement with user agreement and privacy policy” and click next.)
- Enter the verified code, username and password, tap “done” and then login with the created account
- Press and hold the camera power button for 5 seconds to turn it on, make sure the indicator lamps slowly blinks in red. (If it doesn’t turn on, please connect it to DC5V 1 A/2 A power adapter and charge for 15 minutes to wake it up.)
Note: DC5 V 1 A / 2 A power adapter is not included in package.
Wi-Fi wireless connection
Step 1: Take the camera and smartphone close to the router (30 to 100 cm) and hoop up phone to the router’s Wi-Fi.
Step 2: Camera reset: Press and hold the camera reset button with ejector pin for about 5 seconds to reset it, release after hear the prompt sound ” bugu”.
Step 3: Add device on app: APP main interface> Please touch the “+” button.
Step4: Check “Device has fiashed red” on the “Add battery camera” interface and touch “Next”.
Step 5: WiFi Setup: input your wifi user name and password on the “WiFi Setup·· interface , then touch “Next” and touch “Next” on the “Operation” interface
Step 6: Start recording: the camera starts recording and store on SD card only when there are motion events detected.
Note :
- Configuration is finished, the camera will be on standby status when not watching video or no motion detected. And the indicator light will stay blue instead of blinking
- If pressed the reset button after configuration finished, the work lamp blinks red, and you need to re-add the camera on phone app
Device Sharing
- Download Cloudedge App on the smartphone that you want to share with, register and login with a new user name. (Follow the instruction of previous “IV. Configuration on Phone App> 2. create account and login” )
- Tap “Friends” icon with the default phone, enter e-mail or mobile number of the one you want to share with, touch “Add” and request sent to the phone that you want to share
- On shared phone App “Devices” interface, slide screen to update data and the camera ID appears.
Device Menu
- Add camera
- Recording time
- Real time watching
- Camera type icon
- Camera ID
- Alarm information icon: A red dot on the icon indicates that alarm Tap the icon to display the recorded screenshot or video.
- Cloud storage service
- Device
- Message
- Friends
- Me (Personal Center)
- Camera Settings: Alarm, SD card, etc.
- Battery level
- Microphone: on I off
- SD/HD switch
- Full screen display
- Bit rate
- Network signal strength
- Preview
- Playback
- Cloud storage service
- Screenshot
- Intercom option: long press it to talk
- Recording: manually recording
- Body detection: Default at “ON” and appears green, recording once movements detected
- Green playback time zone: Motion detection video other than alarm time
- Red playback time zone: video of the alarm time
- Calendar: Click to select a date
- Screenshot
- Recording: Recording manually
- Alarm: alarm notifications
Motion Detection Alarm
- The PIR sensor detection with three sensitivity level options: Low, Medium and High. Default at medium, you can go to “Settings” > “Body Detection” and select
- Receive Alert Message: please enable the message notification on App> Settings> “Receive Notifications”. It default enabled.
FAQS
Q1. Why I can not connect the camera with my phone?
- Please confirm the WiFi name and password
- Please confirm the WiFi is 4G, ii not support 5G WiFi.
- Please check if the camera and mobile are close to your router, or if the camera and mobile connect the same WiFi
Q2. Why there is no voice when I receive the alert notification?
Please check if the “In-App Alert Sound ” enabled on “Me” Interface of App.
Q3. Why there is no motion recording?
- Please check if there is an SD card or not
- Please check if CloudEdge “Settings” > “SD Card” is with enough space or in normal status
- Please check if the “Body Detection” button is enabled on the app live watching screen
Q4. How long will the full-charged battery camera last?
- Standby time up to 10 months if there is no motion detected.
- If recording for 12 hours a day, and watch 10 times live viewing or operation, it will last for about one week
- It can be used in a shorter time if you want to watch or operate more frequently
- Please do not charging it over 12 hours so that protect battery.
Q5. What’s the means of red and green playback time bar?
- Red playback time bar: Video of alarm time
- Green playback time bar: Motion detection video other than alarm time
Email: [email protected] (US) [email protected] (UK)
Cell: +1 830 745 5888 (US)
+44 20 3807 4763 (UK)