Zmodo ZM-SH75D001-WA Mini Pro Camera User Guide
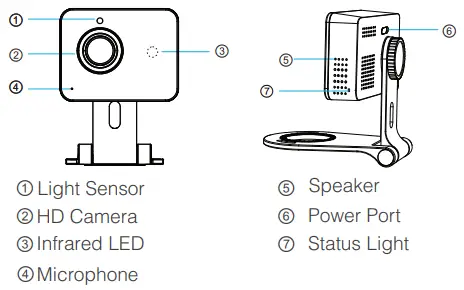
Getting to know your camera
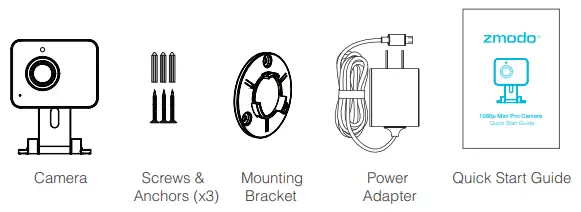
What’s in the Box:
Mobile Setup
This quick start guide will help you configure your camera for initial use. For detailed instructions and troubleshooting, please visit: www.zmodo.com/support
Before you begin:
- Make sure that you have a strong WiFi connection at the location of your camera.
- Make sure you know the SSID (WiFi network name) and password of the 2.4GHz WPA-PSK/WPA2-PSK WiFi network that you want your camera to connect to. Your network cannot be hidden.
- Make sure your network has at least 2Mbps upload speed for each camera when live viewing or 4Mbps upload speed for each camera when using the cloud service.
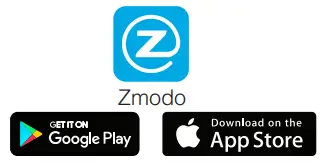
- Download and install the “Zmodo” app from Google Play™ or the App Store’ (Compatibility: iOS® 9.0+ or Android™’ 4.0+). Launch the app and sign up for a free Zmodo account. All of your devices will be bound to this account.
- Power on your camera with the supplied power adapter.
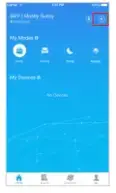
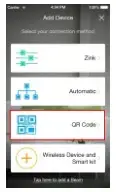
- Log in and press the Add Device + option in the upper right corner of the Home Page.
- Select the “QR Code” connection method to connect your camera. Your camera will be added to your Zmodo account.
- Follow the in-app instructions to complete the setup.
Mounting Your Camera (Optional)
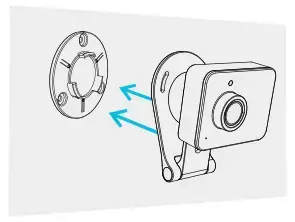
- Locate the mounting plate in the packaging You may need to remove the mounting plate by pushing the tabs in with your thumb and separating the mounting plate from the bracket as shown on the below.
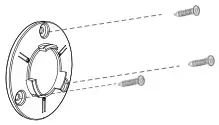
- Line the mounting plate against the wall and mark the appropriate holes. Drill three holes slightly smaller than the provided wall anchors and use a hammer to gently insert the anchors into the wall. The tip of the anchors should be flush against the wall. Fasten the three screws through the holes on the mounting bracket and the anchors as shown.
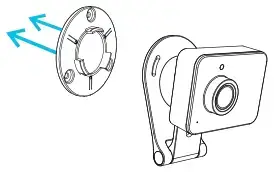
- Take the camera with the bracket (as shown) and attach it to the mounting plate. You can rotate the bracket to adjust the camera for a better viewing angle.
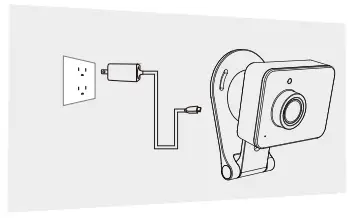
- Connect the supplied power adapter to the power port on the camera, and plug the adapter into a nearby power outlet. The LED light will light up when it powers on.
Recording and Viewing Options
Recording Options
This device is compatible with the cloud service.
Please visit www.zmodo.com/cloud for more information and articles. The cloud service will allow you to:
- Record continuously and store footage on our secure cloud servers.
- Create and save video clips from your recordings.
- Access your footage and clips at any time from any location.
- Enjoy more smart features in the future!
Viewing Options
All of your devices will be bound to your Zmodo user account. You can access your camera and other devices by using the Zmodo app with any Android™ or iOs® device. Just download the Zmodo app from Google Play™ or the App Store™.
You can also access your devices from any web browser with our web app. Visit user.zmodo.com and log in with your Zmodo user account information.
Status Light Definitions
Your camera has an LED light that indicates the status of the camera. Please refer to the guide below:
 Solid green
The camera is powering on.
 Blinking green
The camera is ready for setup.
 Blinking blue
The camera is connecting to the WiFi network.
Please do NOT turn off or unplug the camera at this time.
 Solid blue
The camera has successfully connected to the WiFi network.
Troubleshooting
You can check the status light to determine if your camera has been connected to the WiFi or not.
If it is blinking green, it means that it has not been connected to the WiFi network and you may need to retry the setup method.
If it is solid blue, it means that it is connected to the WiFi network.
If you were unable to connect your camera successfully:
- Make sure that you are connecting to a 2.4GHz WPA-PSK/WPA2-PSK WiFi network, and that your network is not hidden.
- Please make sure that you entered the network name and password correctly. Note: Both are case-sensitive.
- Try increasing your phone’s brightness when scanning the QR code during Mobile Setup.
- You may need to improve your WiFi strength.
Try moving your router closer to your camera, or purchasing a WiFi range extender. - Try resetting your camera by pressing and holding the reset pinhole on the back panel for 10 seconds until the Status Light turns off. Retry the setup process when the LED is blinking green.
Contact Us
Having difficulty?
We would love to help. You can use the Live Chat function in the Zmodo app if you have any technical problems. Just open the “Me” page in the lower right corner of the Home Page and select “Zmodo Support”.
For more instructions, troubleshooting, support, and other resources, please visit:
www.zmodo.com/support
Enjoying your Zmodo product?
Your feedback means a lot to us! Please share your positive experience on your favorite social media site to help spread the word.

REV-A02
