ZOSI Security Camera User Guide
Z18.5.T.1
For more information of your new system, please refer to www.zositech.com
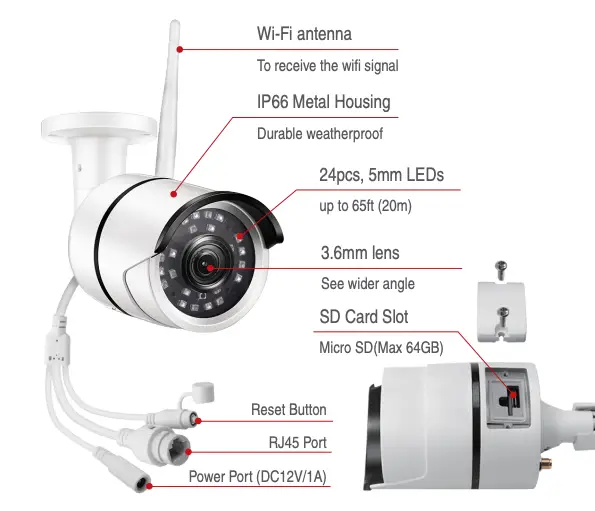
1. Camera Overview
2. Mounting Camera
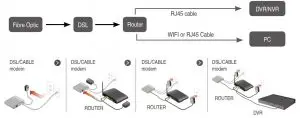
2.1 Camera Connection Diagram
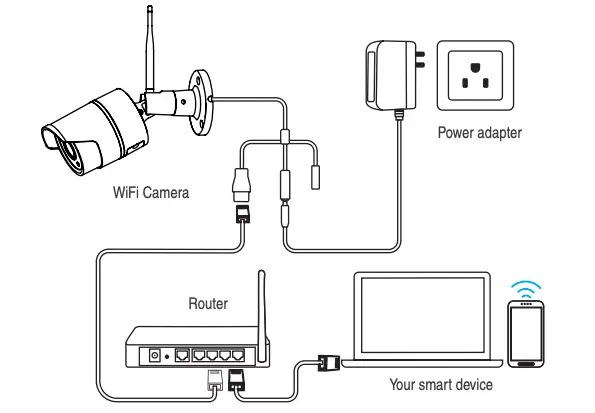
For initial setup, connect the camera to the LAN port of the router by an Ethernet cable. Then follow the steps below.
Make sure your camera and smart device are connected to the same router.
2.2 Before Installing the Camera
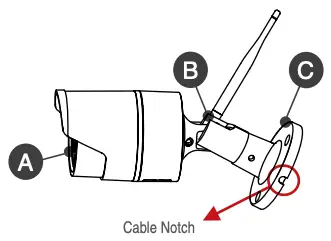 A. Light Sensor and IR LEDs
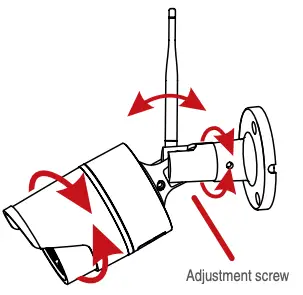
B. Adjustment Screw
C. Camera Base
- Decide whether to run the cables through the wall / ceiling (drilling required) or along the wall / ceiling.
- If you run the cables along the wall / ceiling, you must run the cable through the cable notch on the base. This will keep the camera base fasten to the surface when mounted.
2.3 To install your camera
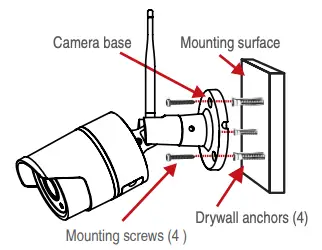 Use the included mounting template to mark holes for the screws. Drill holes for the mounting screws.
NOTE: Insert the included drywall anchors if you are installing the camera in drywall.- Connect cables as shown in the section “Connecting the Camera”
- Feed the cable through the mounting surface or cable notch and mount the camera stand to the surface using the provided screws.
- Use a spanner (included) to loosen the adjustment screw.
- Adjust the camera position as demand.
- Tighten the adjustment screw to secure the position.
 ATTENTION
This camera includes an Auto Mechanical IR Cut Filter. When the camera changes between Day/Night viewing modes, an audible clicking noise may be heard from the camera. This clicking is normal, and indicates that the camera filter is working.
3. Personal Account Registration
The following instructions are for the Android APP; instructions for the iOS version are slightly different.
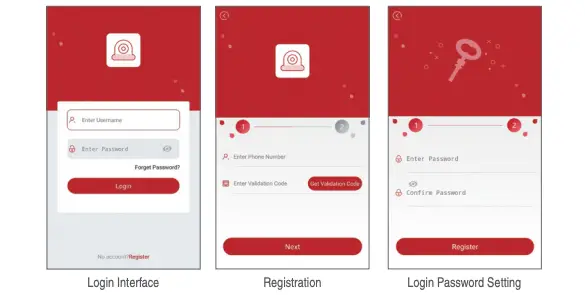
- Start and install the mobile app “Zosi Smart”, which can be downloaded by scanning the QR Code shown on the front page of this manual ).
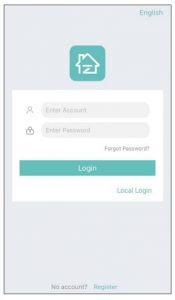
- Click “Register now” at the bottom of the interface to register your APP account.
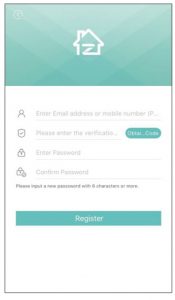
- Enter your e-mail address to get validation code. Click “Next” to set the account password and complete the registration process.
Note: Please login your email before registration in case you miss the validation code.
4. Add device(At the first time)
4.1 Wired Connection
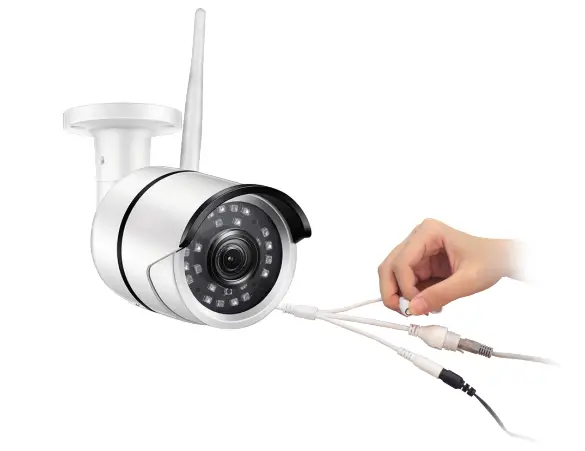
A. Power the device and wait for 20 seconds to proceed with next step
B. Use a RJ45 cable connect the device to the WI-FI router, the WI-FI router is the same with your smart phone.
C. Connect your smart phone to the WI-FI network of your router
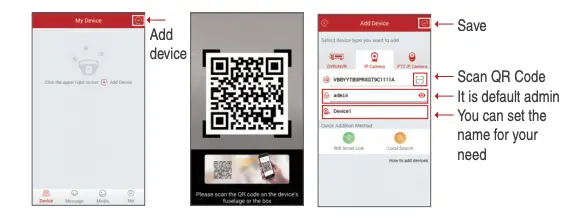
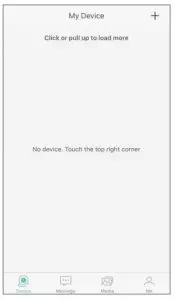
D. Open zosi smart APP, and select the APP icon in the upper right corner, as shown in the figure
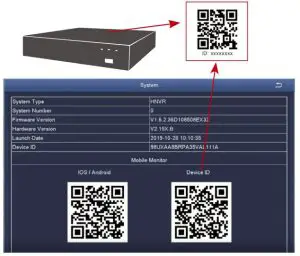
F. Click the ‘[-]’ icon to scan the QR on the camera.
E. Click “ ✓ ” in the upper right corner to save the device adding
Note: if add the device unsuccessful, please hold the reset button on the camera to reset it, and then reconnect from steps A to E above, until you can see the video on your phone
Pause for 5 seconds then you can hear crisp switch voice from the switcher inside the camera, As show in the figure
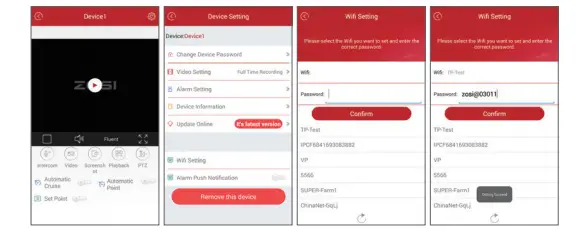
4.2 Convert Wired Connection to Wireless Connection
A. Search the corresponding device shown on device list and enter the real-time preview;
B. Click the “  ” button in the upper right corner to enter device settings
C. Select “Wireless Settings” to proceed with the wireless configuration;
D. Select the WiFi network which has stable and strong signal and enter the WiFi password accordingly;
E. Click “Confirm” to finish converting the wired connection to wireless connection.
5. App Function Introduction
5.1 App Information
- Change Password: modify the login password of the app;
- Check for Updates: update your app to the latest version;
- Fingerprint Login: no need to enter password if fingerprint touch function is available in your phone.
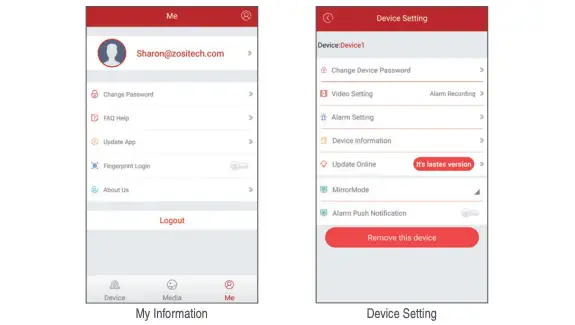
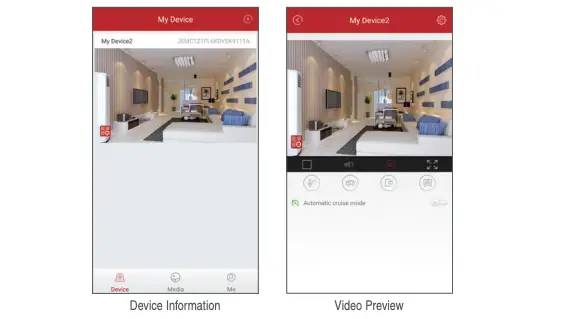
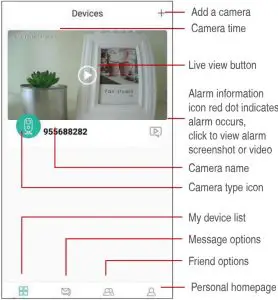
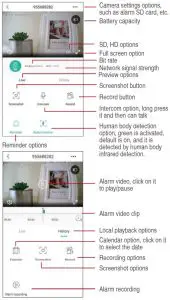
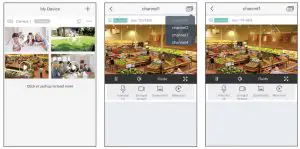
5.2 Device Information
 Share QR Code of the device;
- Video: click to start recording or stop recording;
- Screen Shot: click to start screen capture;
- Event Playback: click to view the motion detection video and other video stored by the camera;
- SD/HD: adjust sharpness of the image;
- Intercom: two-way audio (applicable for device that supports this feature).
6. PC Client Remote Monitoring
The PC Client (AVSS) is applied for DVR/NVR/IPC preview with features like real-time view, device management, remote video playback and etc.
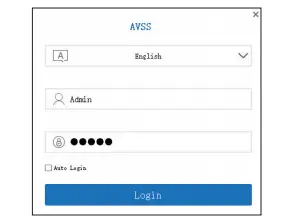
6.1 Login
Double click the icon “AVSS” to stall the PC Client. Select the language and log in.
Note: Use the default user name and password, or enter the same login information as your mobile App.
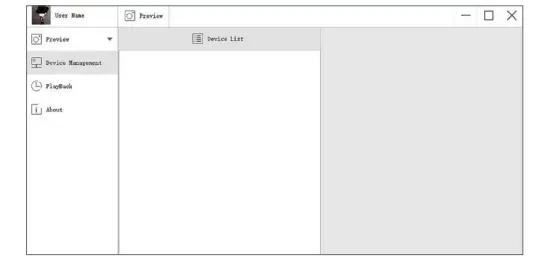
6.2 Device Management
6.2.1 Click “Device Management” to add areas and devices.
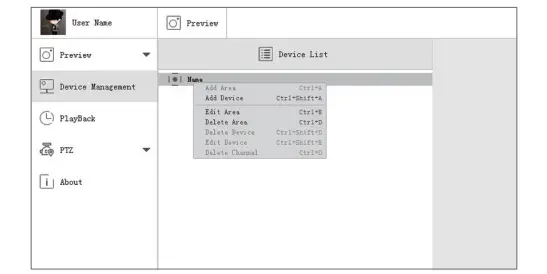
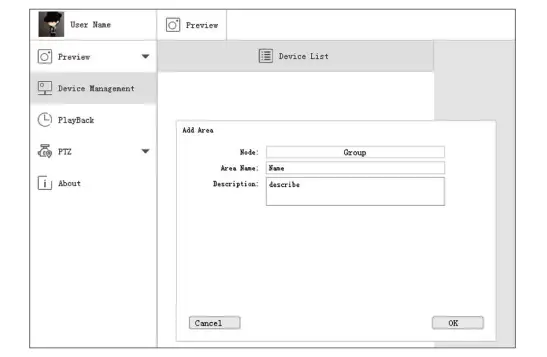
6.2.2 Add Area: Right click the blank to add area and enter the name. The Area Name is used to describe the place being monitored.
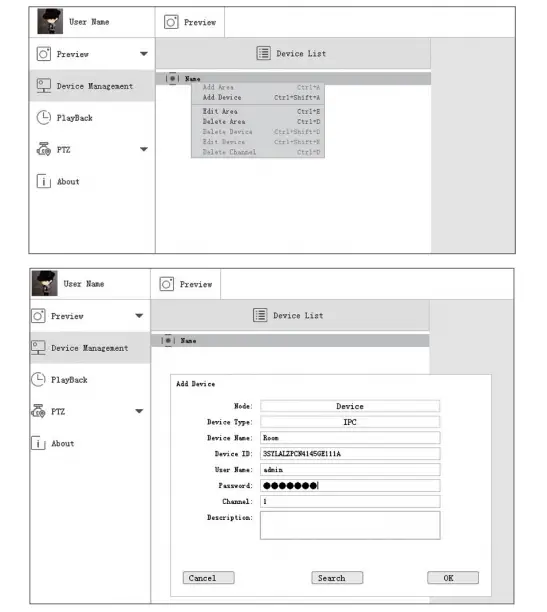
6.2.3 Add Device: Right click the Area Name to add device and change type of the device. Enter the device name, device ID, user name, device password and channel number, then click “OK” to save.
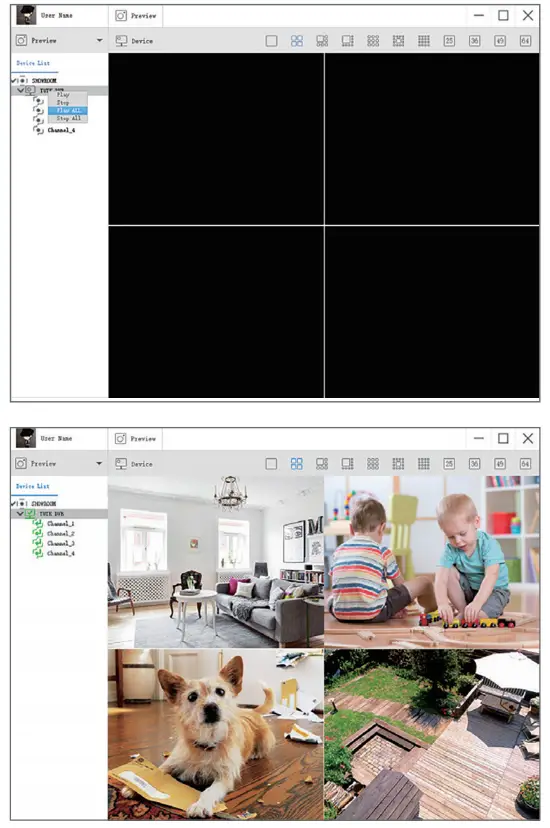
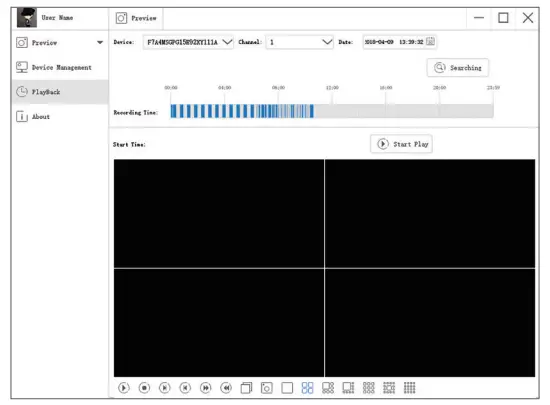
6.3 Preview
Click preview to find device list, right click device to Play All and Stop All, preview video can be displayed or stopped.
6.4 Playback
Click “PlayBack”; select device ID, channel number, date and then search to find the video. Double click record time to set the exact time and click “Start Play”.
FAQ
Why can’t I add a device using local search?
Make sure that your device is in the same LAN as your phone. If you cannot make both devices in the same LAN, manually enter the UID of your device to complete the adding.
Why is the device disconnected?
Please check:
Is your device connected to the network?
Is the router working properly?
Do you enable the feature of automatically obtaining an IP address?
Why can’t I find a video recording file?
Please check:
Is the SD card damaged?
Is the date of the search file valid?
Is the device system set at the correct time?
Can I download the instruction manual?
Yes. From zosi website
Is this a dvr or nvr, and if not nvr which model has nvr?
It is a DVR. Contact zosi if you only want nvr
Lens viewing size? Like 90 or 120?
If you meant viewing angle it is pretty wide but more likely 90 degrees.
What is the recording continuous frame rate?
30 or less fps. 1-30 on the settings but backup output is avi 7fps slow motion
Does the company offer cloud backup?
No
Does this come with everything to power the four camera’s?
This package contains 2 separate power supplies, one for the DVR and 1 (using a 4 way splitter), for the 4 cameras.
Is these wifi camera, or POE
These are hard wired cameras using cable with BNC connections. The wires are included. These are not wifi or POE.
Can you actually read a recorded license plate?
During the daytime and if the vehicle is not moving yes, the plate will be super clear. If there is movement or if the camera is operating at night in IR mode everything will be a blur. The problem with many budget 4k camera these days is frame rate… 4k resolution at 15 frames does nothing if someone dashes across your camera, all you get is a blur. If they look at the camera stand still and smile then you’ll be able to see the pores on their face. Unfortunately to get true 4k at recording at high fps it’s usually out of budget for more people.
Is this PoE or coax?
Coax
Claim is poe but photo is of coaxial connectors, not power over ethernet. why?
Coax cable is shielded and better for fast non-differential signals.
Will camera glow with red lights when night vision is on?
Yes the inferred lights will light up Red at Night when Night Vision is on.
Does the camera produce light at night?
If you look directly at the camera at night you can see the red infrared lights but that is all
Do you have to physically connect the dvr to a router or can it connect to the Internet wirelessly?
Yes you have to connect it with cat. cable. It is not wireless.
Can you hook up this system to a 4 k tv with out having any issues ?
Yes. When you first install the DVR, it will be in 1024×768 and you will need to manually change it to 4K.
Will this work without internet. But still being able to view wile not near the cameras
No
If you record in 4k, do you need a 4k monitor to play back the video?
Yes
VIDEO
![]()
ZOSI Smart Wi-Fi Security Camera with Battery User Guide
- 1x camera
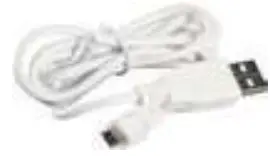
- 1x USB Cable
- 1x wall mount

- 1x Screw Sets

- 1x Double -sided adhesive

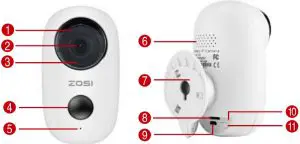
- Working Status Indicator
- Lens
- IR Leds
- PIR
- Microphone
- Speaker
- Iron Ball Wall Mount
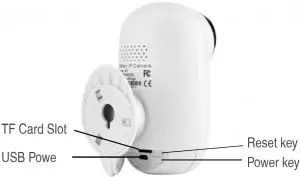
- TF Card Slot
- DC5V USB Port
- Reset key
- Power key
| NO. | Camera | Operation |
| 1 | Power Ke | Press and hold for 5 seconds to power on/
power off |
| 2 | Power Key | Quick press 1 second to wake up the camera from standby mode |
| 3 | Reset Key | Press and hold for 5 seconds, it will reset
and restart |
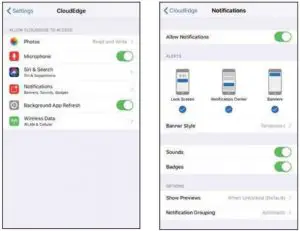
Search “Cloudedge” in App store or google play store, or scan below QR Code to download and install on smart phone.


- Allow CloudEdge use mobile cellular data and wireless LAN (Function: If not allowed, it will be failed to add IP camera).
- Allow CloudEdge to get system push message permissions (Function: When the camera triggers motion detection or audible alarm, the phone can receive alarm push).
Register Account
New users need to register by e-mail, click “Register”, follow the steps to complete the registration of the account, and log in.
Insert micro SD card
Please insert a micro SD card to record videos when motion detected and playback. (card not included, supports 128GB Max.)
Power on the camera
Press and hold on the Power Button for 5 seconds to Turn on Camera (if can not power on, please plug in DCSV 1A/2A phone adapter to charge 15min first), ensure the indicator light slowly blinking in RED.
Setup Wi-Fi
Bring the camera and phone to the router within 1 to 3 feet (30 to 100 cm) and connect wifi.
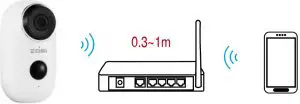 (Camera) (Router) (Smartphone)
Run CloudEdge App, Click O and select“BATTERY CAMERA”
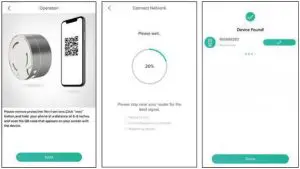
Select“The device has flashed red slowly or you hear a tone”, tap NEXT.
Select 2.4Ghz WiFi SSID and input password, tap NEXT.
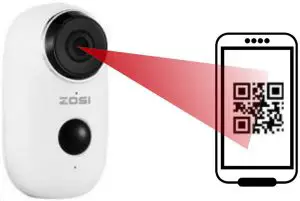
Put the QR code in front the camera lens The device lens is aimed at the QR code on the phone screen with a distance of 15 cm. After the device recognizes the QR code, it will sound “bugu”, if heard it, then tap “Hear Tone”
After clicking “Hear tone”, camera will start connecting wifi and skip to “Search to Device” page after setup finished, you can edit camera name here , then click “DONE” to open camera in My Device list, now you can watch real-time video.
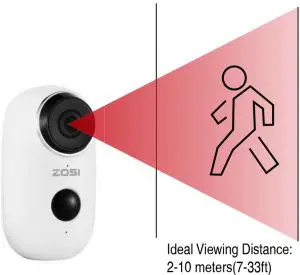
PIR “Body Detection” is default on and the default sensitivity is at “Mid” and the detecting distance is 6 meters (20ft), and it is adjustable in “My Device” -> “Device Settings” -> “Body Detection”.
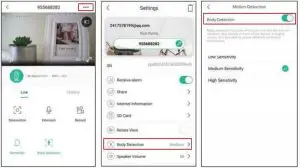
| Sensitivity | Detecting Distance(For moving and living things) |
| Low | Up to 4 meters (13ft) |
| Medium | Up to 6 meters (20ft) |
| High | Up to 8 meters (26ft) |
NOTE: Higher sensitivity offers longer detecting distance, but it would lead to more false alarms. You are advised to set up the sensitivity level to “Low” or“Medium” when you install the camera outdoors.
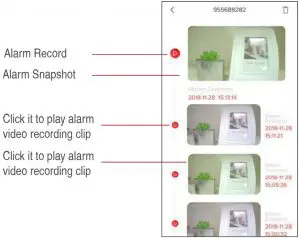
Battery camera with PIR sensor is not designed for 7X24 all day recording, but just push alarm message notification to phone app and record video to SD card when PIR sensor detected human body motion events, then you can playback the motion videos wherever you are via CloudEdge App.
When PIR is triggered, camera and system actions:
- Alarm Sound in app (please enable cloudedge app notification in mobile setting and also mobile volume is on )
- Alarm Message Notification (please enable cloudedge app notification in mobile setting)
- Alarm snapshot and video record on SD card (please insert TF Card).
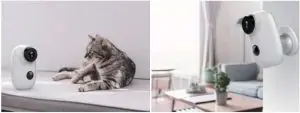
You can put it on any flat place: table, chair, floor,
Install with Wall Mount
A3 Wall Mount Installation
Fix the iron ball bracket to the wall with screws or double- sided adhesive, and then magnetize the camera to the iron ball. Installation is very convenient and also easy to adjust the ang.
To reduce false alarms, please note that
- Do not install the camera facing any objects with bright lights, including sunshine, bright lamp lights,
- Do not place the camera too close to a place where there frequently moving vehicles. Based on numerous tests, the recommended distance between the camera and vehicle is 15 meters (55ft).
- Stay away from the outlets, including air conditioner vents, humidifier outlets, the heat transfer vents of the projectors,
- Do not install the camera facing the
- Keep the camera at least 1 meter away from any wireless devices, including Wi-Fi routers and phones, in order to avoid wireless interference.
Cover the Monitoring Area
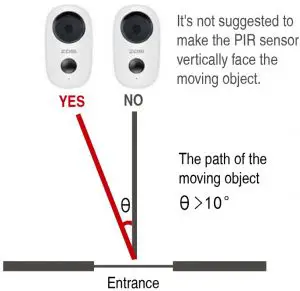
When installing the camera, it’s not suggested to make the PIR sensor vertically face the moving object, otherwise it may not detect the motion events. It is suggested to make the angular between PIR sensor and detected object larger than 10 degree.
Appendix: LED Status Description and troubleshooting sheet.
| LED Status Description | ||
| No. | LED Status | Camera Status |
| 1 | Slow blinking Red | Awaiting WiFi Connection |
| 2 | Fast blinking Red | WiFi Connecting |
| 3 | Solid on Red | Network is abnormal |
| 4 | Solid on Blue | WiFi Connected |
| Trouble Shooting Sheet | ||
| No. | Description | Solution and operation |
| 1 | Unable to connect |
|
| 2 | Reset |
|
| 3 | Change to a new network |
|
| 4 | Failed to add Device | Please enable CloudEdge app cellular data on in mobile settings |
| 5 | No Alarm Push | Please enable CloudEdge app notification in mobilesettings |
| 6 | No Alarm Video Record | Please insert TF Card |

PROFESSIONAL SECURITY MADE EASY
All rights reserved. No part of this publication may be reproduced by any means without written permission from ZOSI. The information in this publication is believed to be accurate in all respects.
ZOSI cannot assume responsibility for any consequences resulting from the use thereof. The information contained herein is subject to change without notice. Revisions or new editions to this publication may be issued to incorporate such changes.

 ZOSI Digital Video Recorder User Guide
ZOSI Digital Video Recorder User Guide
Introduction of System
DVR
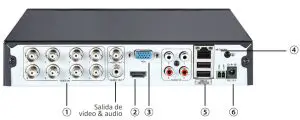
- Camera

- Monitor/Power(HDMI)

- Monitor/Power(VGA)

- Router
- Mouse

- Power Port

- HD lens
- LEDs IR 24pcs, 5mm
Camera
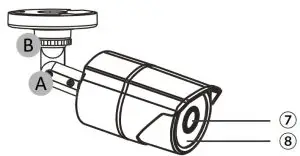
- Adjust to the desired position.
- The neck of the bracket is connected to the mounting base. Rotate the bracket by loosening the radial joint locking ring. Adjust the position to the appropriate position and tighten the locking ring.
Connect the System
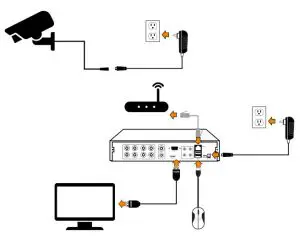
8 channel configuration shown. 4/16 channel will have the respective number of video inputs.
- Connect the Camera to DVR and Plug Camera to power.
- Connect monitor to the DVR with HDMI,VGA,BNC port.
- Connect the DVR to Router with an Ethernet cable.
- Plug the mouse to the USB port.
- Plug DVR to power.
View on Smartphone (Add Device – Video Playback)
Connect the DVR to the Internet
- How to connect DVR to the LAN?
- How to test the network status of the DVR?
- )Right click Mouse > Go to Main Menu > Setup > Network
- Tick ‘Obtain IP address automatically’
- Click ‘Test’, if ‘OK’ is displayed, the network is connected successfully.
Note: Please ensure DHCP in your router is open

Download App


Run the App
- : Install the free Zosi Smart App.
- Tap Register and input your email box to get validation code, click next to set up password,then save it, registration completed.
- Login the App,get into the main interface (My Device), click”+”in the upper right corner to add devices.
- Enter the device uid by scanning code or hand-typing
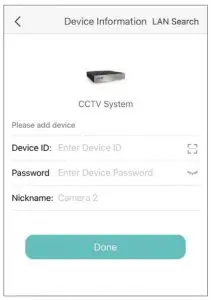
Enter the device password (the password is set by the device, and if the password is blank, it is no need to enter the password.)
Enter the device name; Click Finish to enter the device page and perform device operations (added devices are at the top of the device page). - Then will back to the Device list > Tap the device > Tap “+” to select channel(all selected) > Tap Confirm to start preview
View on PC Client Software
PC client AVSS is applied to DVR/NVR/IPC preview with real-time viewing, device management, remote video playback and more functions.
Login
Install the PC client, double-click the icon AVSS to open, select the language and click Login.
Note: You can log in with the default username and password, or register a new account. The account registered by the mobile app can also be used here
Device Management (Add Devices After Adding the Area)
- Click the Device Management> Add Area.

- Add area: in the blank area of the device list > click the right mouse button > Add area and enter the name of the area.
Note: The name of the area is used to name the monitored area.
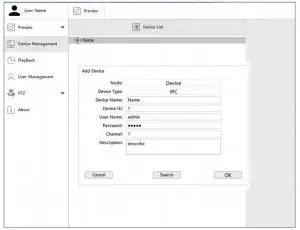
- Add device: Select the area corresponding to the Device List > right click to add device > select Device Type > enter Device Name, Device ID, User Name, Device Password and Channel Number >click OK.
Note:
- Default User name is admin.
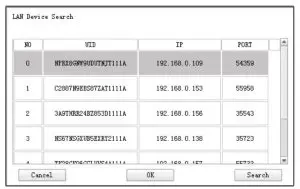
- When the computer and device are connected to the same router, you can click “Search” to add the device.
Preview
Click “Preview” > Device List > select corresponding device > click the right mouse button > select “Play All”, “Stop All” in the menu to complete the video preview display and close.
Install a Hard Disk
The system may not include Hard Disk, it’s depending on the kit you selected. This system works with most 3.5” SATA Hard Disk or 2.5” SATA Hard Disk.
Note: if your system has preinstalled hard disk, please skip this step.
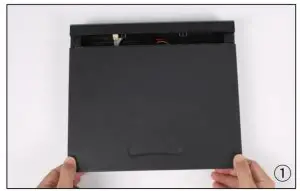
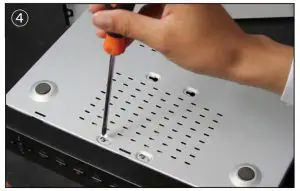
- Unplug your DVR from power, unscrew and remove the top cover.
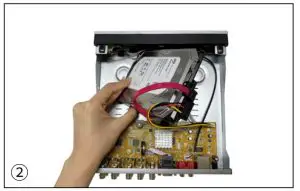
- Connect the SATA power and data cables from the DVR to the corresponding ports on your hard disk as shown.
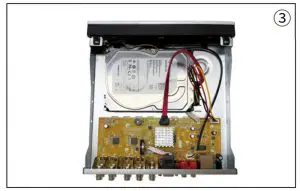
- Place the hard disk into the DVR. Any cable should cross up over the hard disk.
- Holding the hard disk and the DVR, gently turn it over and line up the holes on the hard disk with the holes on the DVR. Using a Phillips screwdriver, screw the provided screws into the holes. Assemble the cover
Note:
After installing a hard disk, you need to first format the Hard Disk before recording. Right click the mouse > go to Main Menu > Disk Management > Select the Hard Disk > Click Format > Apply
Video Record
Right click mouse > Go to Main Menu > Setup > Record You shall see the record settings for all channels. Change the record setting according to your preference and apply the changes.
Motion Detection
Set motion Detection,DVR will record only when motion or movement is detected. Right click mouse > Main Menu > Setup > Alarm > Motion > Motion detection.
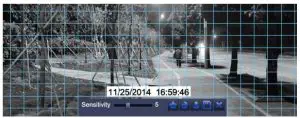
The system starts recording when motion is detected by the camera, and the monitoring picture will show at the bottom left corner.
Select Camera. Tick the Channel you want to record on motion detection. Area: It is allowed to set sensitivity area of camera viewing range.
 Click STAR to make the whole viewing range as sensitivity
 Click Trash Box to remove sensitivity area
 Click to save setting
 Click to exit
As Color and luminance is important for sensitivity, so it’s necessary to adjust its value at specific conditions. The default value is 6 while value range is from 1 to 8.
Right click mouse to show or hide control menu at screen bottom. Test the setting by moving something or some one walk through grid area within camera view range. If DVR detects movement within grid area, a red hunanoid figure would be presented in the screen. The grid shall not cover flag, trees or some other flying objects in the wind to avoid false alerts.
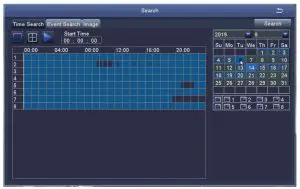
Scheduled Record
Set Time scheduled record, you may configure each channel to record at specific times based on time of day. Right click the mouse > go to Main Menu >Setup > Schedule
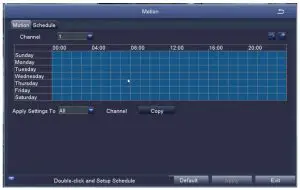
 Using the pencil tool to highlight the individual hours for specific days.
 Using the adjacent eraser tool removes the highlighting in a block.
Settings can be copied and applied to any or all of the channels and to any other day.
2 Blocks of time to be recorded can also be set up by double clicking on a field adjacent to a day. Multiple schedules can be created and saved with start and stop times down to the minute. These can then be applied to multiple days and cameras.
Video Playback
Get into system Main Menu > Search, system presents as following: Search the video you want via time or Event, then play it.
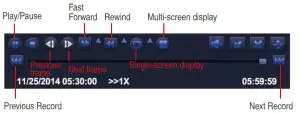
Previous Record: Move to last recorded event
Next Record: Move to next recorded event
Fast Forward: video can be played at different speed, from 1/4 times to 16 times.
Rewind: Video play can be rewinded at 1 time, 8 times, 16 times and 32 times.
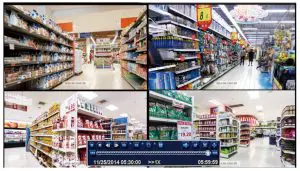
Screen Display Mode: Both single-screen and multi-screen are available. You can choose how many channels you want to playback one time.Channel without records presents blank screen.
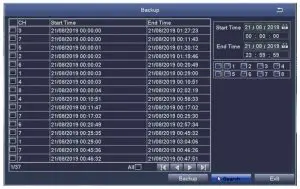
Video Backup
- Plug an USB flash disk into your DVR’s USB port
- Right click the mouse > Main Menu > Backup > choose the channel and time period > Search > Choose the video clips you want to backup > Click Backup
PIR Detection (applicable to cameras with PIR features)
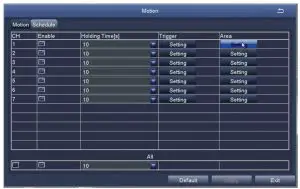
After setting the PIR motion detection mode, the DVR will only start recording when moving objects with temperature about 37 degrees are detected. Right Click > Main Menu > Setup > Alarm > PIR Detection.
When moving objects with temperature about 37 degrees are captured by the camera, the system will start recording and will be displayed in the lower left corner of the screen.
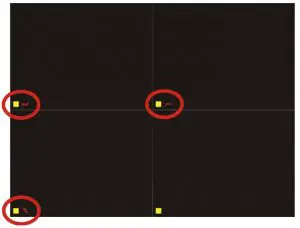
Note: The PIR feature is fully enabled when motion detection mode and PIR detection mode are both turned on. When is displayed in the lower left corner of the screen, it indicates that motion detection and PIR detection are both triggered, which means moving objects with temperature about 37 degrees being captured by the cameras
Note: Figure 1 indicates only motion detection is triggered; figure 2 indicates only PIR detection is triggered; figure 3 indicates motion detection and PIR detection are both triggered at the same time.
Select Camera: Tick the channel you want to set PIR detection mode.
Holding Time: Set recording time length after motion stops.
Trigger: Multi-channels can be set to record when moving objects with temperature are detected by one of cameras. For example, when camera 1 detects motion, camera 2 and camera 3 can be triggered to record as well.
Schedule recording: Set the time period for turning PIR detection mode on and off (same as scheduled recording operation).
Alarm setting: When the device triggers an alarm, you can turn the DVR’s buzzer alarm or email notification settings on and off.
Note: The above operations apply to the situation when both motion detection mode and PIR detection mode are turned on.
App Alarm Settings
There are two types of DVR alarm notification:
When motion detection is triggered, DVR will send the alarm through email or mobile phone notification.
When motion ddetection and PIR detection are both triggered, alarm signal will be displayed in the lower left corner of the screen and DVR will send the alarm through email or mobile phone notification.
App alarm notification settings and effects are shown below:

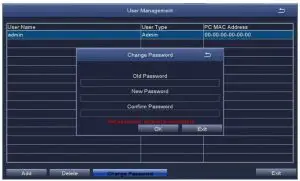
User settings or change password
- In the live viewing screen, right click the mouse, the option shown as below, click Main Menu
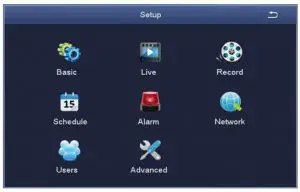
- Click Setup to enter the function menu options.
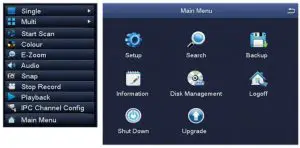
- Click Users to enter the user management interface
- Click Change Password to enter the password setup page.
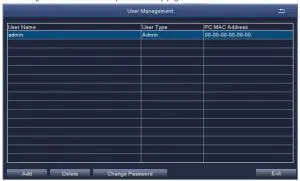
- Set or change the password, please make sure both the input passwords are consistent, and no less than six characters.
Please keep firmly in mind your password!
WARNING
This product contains a coin / button cell battery. If the coin / button cell battery is swallowed, it can cause severe internal burns in just 2 hours and can lead to death.
Keep new and used batteries away from children. If the battery compartment does not close securely, stop using the product and keep it away from children. If you think batteries might have been swallowed or placed inside any part of the body, seek immediate medical attention.
CAUTION:
Risk of explosion if the battery is replaced by an incorrect type.
FAQS
Why can’t I search for devices when adding?
Make sure that the device and the mobile device are on the same LAN, otherwise please enter the device ID manually;
Why can’t my device connect to the network?
Please check Is the device connected to the Internet Is the router working properly Is the router’s DHCP server open
Why can’t I find the video files?
- Please check
- Is the hard drive broken?
- Is the search period valid?
- Whether the equipment system time is correcT.
Is there a metal mesh or thick wall near the camera?
It is recommended to use an extended antenna to bypass obstacles
What’s in the box
4
Surveillance Camera
Do I have to buy an IP or Din DNS to see it in internet? Do I have to ask my internet provider to open any port for my cameras?
Take a look at AiHomeGuard (search keyword AiHomeguard at Amazon), an AI based Surveillance Software running on PC. Record detected objects (person, car …) images and videos on PC disk drive as an NVR, sending alerts without false positive. No cloud service is needed, support ONVIF camera auto discover.
Will mobile hot spot work?
No it will not
Where can I obtain the owners manual for this exact system?
Don’t know , pretty easy to set up , plug and play system.
Will mobile hot spot work?
No it will not
what size hole do you need for the camera wires
2 wires with my camera, and the its split, depending on what you are putting the holes in (how deep) , I was able to get away a 1/4 inch drill as i fed the wires through one at a time.
Does this product need WiFi? Can you operate it without wifi?
Yes
Is the Interface easy to navigate and scroll through footage?
Yes hit search enter times dates
why are you not using the black dvr anymore that has the menu buttons on the front. its much nicer and easier ?
Usually the dvr is placed in an area inaccessible to burglers to maintain a record of events. If they see it they will take it too.
Is there a way to backup the videos through the network without using a direct USB drive?
System no good
Can the DVR be mounted vertically?
Probably a custom mount; but it doesn’t come with anything to mount it vertically.
does system have output circuits for alarm ?
The system does not accommodate external alarms.
how wide is the camera angle?
About 120 degrees. A little narrow for some of the views I wanted, so I bought 2 additional Samsung wide angle cameras, which gave me what I needed. These are great, clear, and sharp… just a bit narrow for some circumstances.