ZOSI Digital Video Recorder User Guide
ZOSI Digital Video Recorder User Guide
Introduction of System
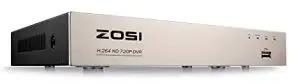
DVR
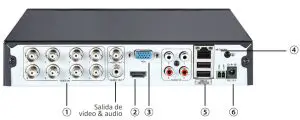
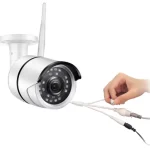
- Camera

- Monitor/Power(HDMI)

- Monitor/Power(VGA)

- Router

- Mouse

- Power Port

- HD lens
- LEDs IR 24pcs, 5mm


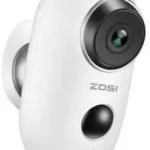
Camera
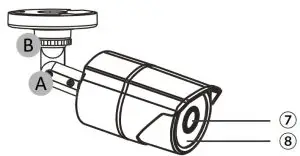
- Adjust to the desired position.
- The neck of the bracket is connected to the mounting base. Rotate the bracket by loosening the radial joint locking ring. Adjust the position to the appropriate position and tighten the locking ring.
Connect the System
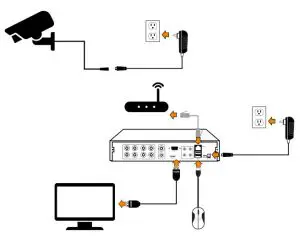
8 channel configuration shown. 4/16 channel will have the respective number of video inputs.
- Connect the Camera to DVR and Plug Camera to power.
- Connect monitor to the DVR with HDMI,VGA,BNC port.
- Connect the DVR to Router with an Ethernet cable.
- Plug the mouse to the USB port.
- Plug DVR to power.
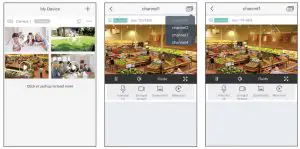
View on Smartphone (Add Device – Video Playback)
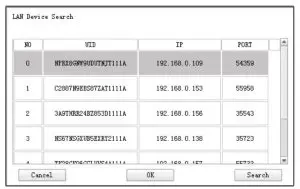
Connect the DVR to the Internet
- How to connect DVR to the LAN?
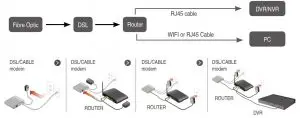
- How to test the network status of the DVR?
- )Right click Mouse > Go to Main Menu > Setup > Network
- Tick ‘Obtain IP address automatically’
- Click ‘Test’, if ‘OK’ is displayed, the network is connected successfully.
Note: Please ensure DHCP in your router is open

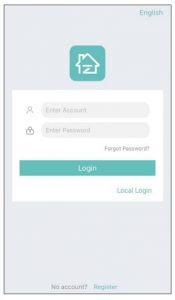
Download App


Run the App
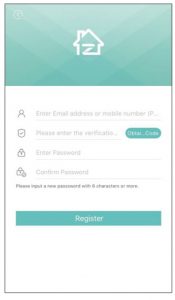
- : Install the free Zosi Smart App.
- Tap Register and input your email box to get validation code, click next to set up password,then save it, registration completed.
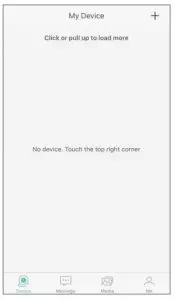
- Login the App,get into the main interface (My Device), click”+”in the upper right corner to add devices.
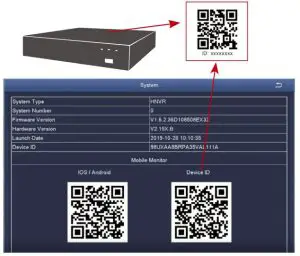
- Enter the device uid by scanning code or hand-typing
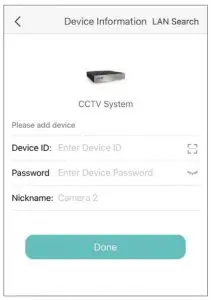
Enter the device password (the password is set by the device, and if the password is blank, it is no need to enter the password.)
Enter the device name; Click Finish to enter the device page and perform device operations (added devices are at the top of the device page). - Then will back to the Device list > Tap the device > Tap “+” to select channel(all selected) > Tap Confirm to start preview


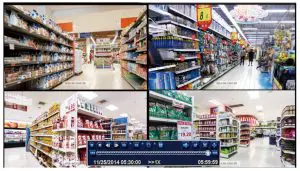
View on PC Client Software
PC client AVSS is applied to DVR/NVR/IPC preview with real-time viewing, device management, remote video playback and more functions.
Login
Install the PC client, double-click the icon AVSS to open, select the language and click Login.
Note: You can log in with the default username and password, or register a new account. The account registered by the mobile app can also be used here
Device Management (Add Devices After Adding the Area)
- Click the Device Management> Add Area.

- Add area: in the blank area of the device list > click the right mouse button > Add area and enter the name of the area.
Note: The name of the area is used to name the monitored area.
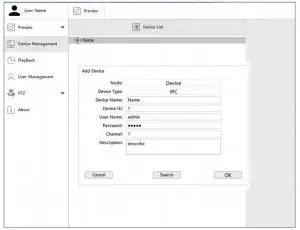
- Add device: Select the area corresponding to the Device List > right click to add device > select Device Type > enter Device Name, Device ID, User Name, Device Password and Channel Number >click OK.
Note:
- Default User name is admin.
- When the computer and device are connected to the same router, you can click “Search” to add the device.
Preview
Click “Preview” > Device List > select corresponding device > click the right mouse button > select “Play All”, “Stop All” in the menu to complete the video preview display and close.
Install a Hard Disk
The system may not include Hard Disk, it’s depending on the kit you selected. This system works with most 3.5” SATA Hard Disk or 2.5” SATA Hard Disk.
Note: if your system has preinstalled hard disk, please skip this step.
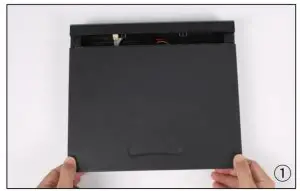
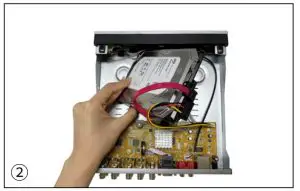
- Unplug your DVR from power, unscrew and remove the top cover.
- Connect the SATA power and data cables from the DVR to the corresponding ports on your hard disk as shown.
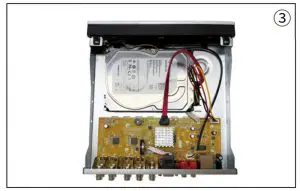
- Place the hard disk into the DVR. Any cable should cross up over the hard disk.
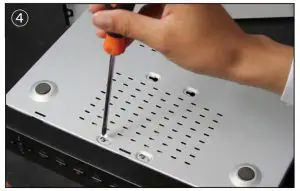
- Holding the hard disk and the DVR, gently turn it over and line up the holes on the hard disk with the holes on the DVR. Using a Phillips screwdriver, screw the provided screws into the holes. Assemble the cover
Note:
After installing a hard disk, you need to first format the Hard Disk before recording. Right click the mouse > go to Main Menu > Disk Management > Select the Hard Disk > Click Format > Apply
Video Record
Right click mouse > Go to Main Menu > Setup > Record You shall see the record settings for all channels. Change the record setting according to your preference and apply the changes.
Motion Detection
Set motion Detection,DVR will record only when motion or movement is detected. Right click mouse > Main Menu > Setup > Alarm > Motion > Motion detection.
The system starts recording when motion is detected by the camera, and the monitoring picture will show at the bottom left corner.
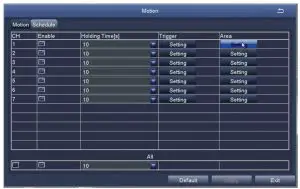
Select Camera. Tick the Channel you want to record on motion detection. Area: It is allowed to set sensitivity area of camera viewing range.
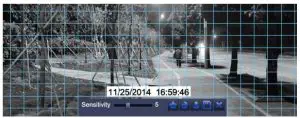


As Color and luminance is important for sensitivity, so it’s necessary to adjust its value at specific conditions. The default value is 6 while value range is from 1 to 8.
Right click mouse to show or hide control menu at screen bottom. Test the setting by moving something or some one walk through grid area within camera view range. If DVR detects movement within grid area, a red hunanoid figure would be presented in the screen. The grid shall not cover flag, trees or some other flying objects in the wind to avoid false alerts.
Scheduled Record
Set Time scheduled record, you may configure each channel to record at specific times based on time of day. Right click the mouse > go to Main Menu >Setup > Schedule
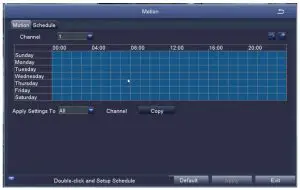


Settings can be copied and applied to any or all of the channels and to any other day.
2 Blocks of time to be recorded can also be set up by double clicking on a field adjacent to a day. Multiple schedules can be created and saved with start and stop times down to the minute. These can then be applied to multiple days and cameras.
Video Playback
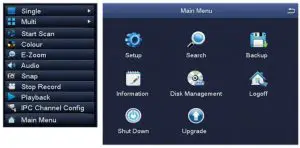
Get into system Main Menu > Search, system presents as following: Search the video you want via time or Event, then play it.
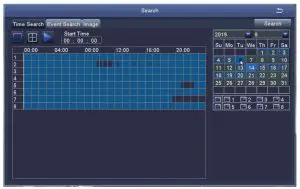
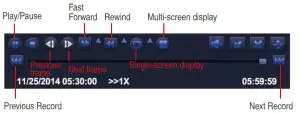
Previous Record: Move to last recorded event
Next Record: Move to next recorded event
Fast Forward: video can be played at different speed, from 1/4 times to 16 times.
Rewind: Video play can be rewinded at 1 time, 8 times, 16 times and 32 times.
Screen Display Mode: Both single-screen and multi-screen are available. You can choose how many channels you want to playback one time.Channel without records presents blank screen.
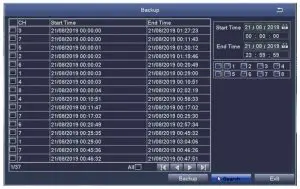
Video Backup
- Plug an USB flash disk into your DVR’s USB port
- Right click the mouse > Main Menu > Backup > choose the channel and time period > Search > Choose the video clips you want to backup > Click Backup
PIR Detection (applicable to cameras with PIR features)
After setting the PIR motion detection mode, the DVR will only start recording when moving objects with temperature about 37 degrees are detected. Right Click > Main Menu > Setup > Alarm > PIR Detection.
When moving objects with temperature about 37 degrees are captured by the camera, the system will start recording and will be displayed in the lower left corner of the screen.
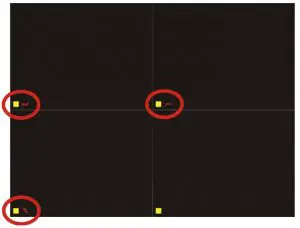
Note: The PIR feature is fully enabled when motion detection mode and PIR detection mode are both turned on. When is displayed in the lower left corner of the screen, it indicates that motion detection and PIR detection are both triggered, which means moving objects with temperature about 37 degrees being captured by the cameras
Note: Figure 1 indicates only motion detection is triggered; figure 2 indicates only PIR detection is triggered; figure 3 indicates motion detection and PIR detection are both triggered at the same time.
Select Camera: Tick the channel you want to set PIR detection mode.
Holding Time: Set recording time length after motion stops.
Trigger: Multi-channels can be set to record when moving objects with temperature are detected by one of cameras. For example, when camera 1 detects motion, camera 2 and camera 3 can be triggered to record as well.
Schedule recording: Set the time period for turning PIR detection mode on and off (same as scheduled recording operation).
Alarm setting: When the device triggers an alarm, you can turn the DVR’s buzzer alarm or email notification settings on and off.
Note: The above operations apply to the situation when both motion detection mode and PIR detection mode are turned on.
App Alarm Settings
There are two types of DVR alarm notification:
When motion detection is triggered, DVR will send the alarm through email or mobile phone notification.
When motion ddetection and PIR detection are both triggered, alarm signal will be displayed in the lower left corner of the screen and DVR will send the alarm through email or mobile phone notification.
App alarm notification settings and effects are shown below:

User settings or change password
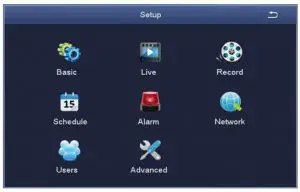
- In the live viewing screen, right click the mouse, the option shown as below, click Main Menu
- Click Setup to enter the function menu options.
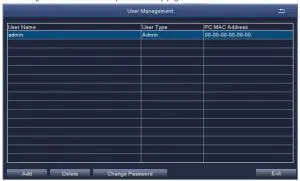
- Click Users to enter the user management interface
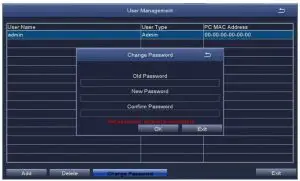
- Click Change Password to enter the password setup page.
- Set or change the password, please make sure both the input passwords are consistent, and no less than six characters.
Please keep firmly in mind your password!
WARNING
This product contains a coin / button cell battery. If the coin / button cell battery is swallowed, it can cause severe internal burns in just 2 hours and can lead to death.
Keep new and used batteries away from children. If the battery compartment does not close securely, stop using the product and keep it away from children. If you think batteries might have been swallowed or placed inside any part of the body, seek immediate medical attention.
CAUTION:
Risk of explosion if the battery is replaced by an incorrect type.
FAQS
Why can’t I search for devices when adding?
Make sure that the device and the mobile device are on the same LAN, otherwise please enter the device ID manually;
Why can’t my device connect to the network?
Please check Is the device connected to the Internet Is the router working properly Is the router’s DHCP server open
Why can’t I find the video files?
- Please check
- Is the hard drive broken?
- Is the search period valid?
- Whether the equipment system time is correcT.
Is there a metal mesh or thick wall near the camera?
It is recommended to use an extended antenna to bypass obstacles
What’s in the box
4
Surveillance Camera
Do I have to buy an IP or Din DNS to see it in internet? Do I have to ask my internet provider to open any port for my cameras?
Take a look at AiHomeGuard (search keyword AiHomeguard at Amazon), an AI based Surveillance Software running on PC. Record detected objects (person, car …) images and videos on PC disk drive as an NVR, sending alerts without false positive. No cloud service is needed, support ONVIF camera auto discover.
Will mobile hot spot work?
No it will not
Where can I obtain the owners manual for this exact system?
Don’t know , pretty easy to set up , plug and play system.
Will mobile hot spot work?
No it will not
what size hole do you need for the camera wires
2 wires with my camera, and the its split, depending on what you are putting the holes in (how deep) , I was able to get away a 1/4 inch drill as i fed the wires through one at a time.
Does this product need WiFi? Can you operate it without wifi?
Yes
Is the Interface easy to navigate and scroll through footage?
Yes hit search enter times dates
why are you not using the black dvr anymore that has the menu buttons on the front. its much nicer and easier ?
Usually the dvr is placed in an area inaccessible to burglers to maintain a record of events. If they see it they will take it too.
Is there a way to backup the videos through the network without using a direct USB drive?
System no good
Can the DVR be mounted vertically?
Probably a custom mount; but it doesn’t come with anything to mount it vertically.
does system have output circuits for alarm ?
The system does not accommodate external alarms.
how wide is the camera angle?
About 120 degrees. A little narrow for some of the views I wanted, so I bought 2 additional Samsung wide angle cameras, which gave me what I needed. These are great, clear, and sharp… just a bit narrow for some circumstances.