![]()
ZUMIMALL Battery Powered Camera

ZUMIMALL Battery Powered Camera
BATTERY POWERED CAMERA
- WIRELESS I WiFi I OUTDOOR I SECURITY
Warranty Service
Thank you for your order and your trust. We will keep optimizing the product quality and enhancing your purchase experience as much as we can. Zumimall will provide you an excellent lifetime online service.
If you have any problem using our product, please contact us as soon as possible via the email below. We will provide you with the best possible solution within 24 hours. All your feedback, issues or problems help improve our service and product quality.
Register via link below to get 3 Years Warranty Extension. http://bit.ly/zuReg
Product Service: Distributor:
Web: www.zumimall.com
Online Service
Whats App/Cell: 86 13480866052
FaceBook: fb.me/Zumimall
-
-
What’s intheBox
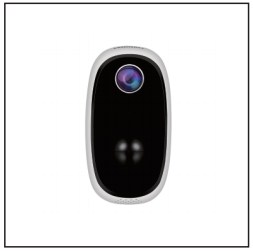
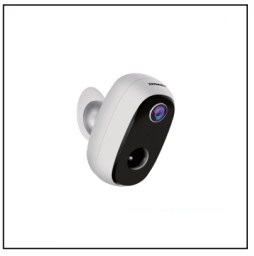
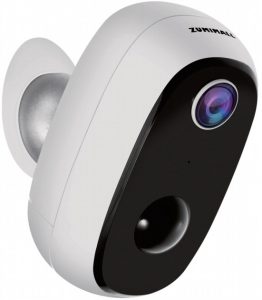
ZUMIMALL Battery Camera*1
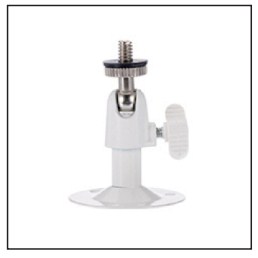
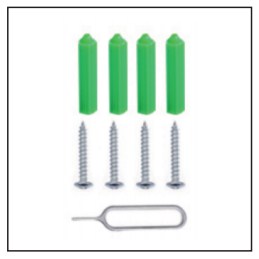
Outdoor Metal Mount*1
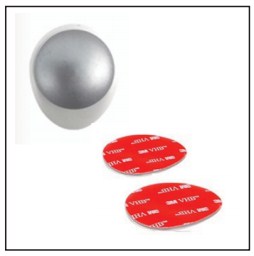
Iron BallWall Mount*1
Double-SidedAdhesive*2
Quick User Guide*
1 Screws Set*1
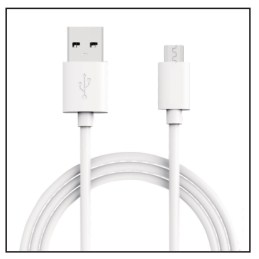
USB Cable*1
-
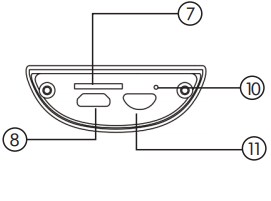
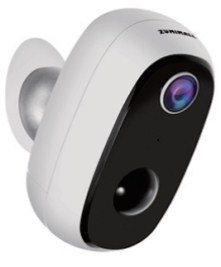
Product Diagram:
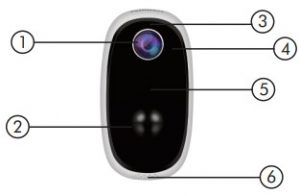
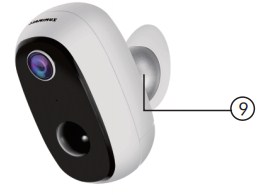
- Camera Lens
- PIR Sensor
- LED Indicator
- IR Lamp
- Microphone
- Speaker
- SD Card Slot
- USB Port
- Iron BallWall Mount
- Reset Hole
- Power Button
PowerButton Keep Pressing for5seconds to power on/power off Reset Button Keep pressing for5seconds to reset and restart Blinking slowly in Red AwaitingWi-Fi Connection,ready for adding devices Blinking fast in Red Wi-Fi Connecting Red spot Network Problem Blue spot Network Problem Blue spot Wi-Fi Connected, camera running normally Blinking slowly in Blue AP Mode
-
Download and Install APP:
Download CloudEdge APP from Google Play TM or APP StoreTM.
Or scan the QR codes as below, with your QR code scanner in your smart phone.
NOTE: Google PlayTM is a trademark of Google Inc.
APP StoreTM is a service mark of Apple Inc.


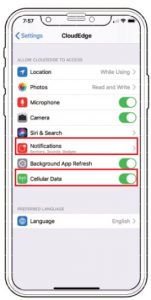
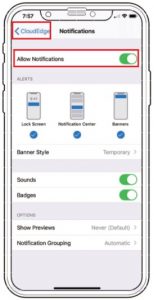
Tips: Please give 2 permissions below when use this APP.- Allow CloudEdge to access mobile cellular data and wireless LAN, or it will be failed to add IP camera.
- Allow CloudEdge to receive pushed messages, or the smart phone will not receive notifications when motion detection or audible alarm is triggered.
-
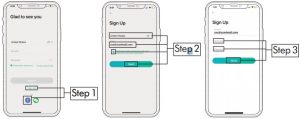
New users need to sign up by e-mail/Facebook. Click “Sign up”, and follow the steps to complete the registration, and then log in.
-
AddCamerato APP:
- Insert Mirco SD card (NOT included) when the camera is off, for saving videos caused by motion detection automatically. (Supports up to128GB)
- Camera only works with 2.4G Wi-Fi,not support 5G.

- Connect Camera to APP
- Tap “+” to add device
- Select Battery Camera
- Tap “Next”
- Reset it and tap “Next”
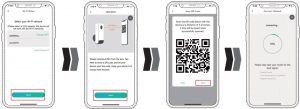
- Input WIFI Password
- Prepare the Scanning
- Scan QR Code
- Finished till 100%
-
Magnetic Ball Holder
- Step : Choose desired location for camera housing installation. Verify mounting structure and surface is capable of supporting the camera. Select a flat, clean, and indoor surface, paste the bracket mount on where you want to install the camera with a double-sided adhesive.
- Step : Leave the fasten bracket for at least 24 hours before you Connect the camera with the bracket.
- Step : Adjust the viewing angle of the camera.
Tips: For your safety, please fasten your camera on a flat, clean, and indoor surface. If the location is undesirable (outdoor, rough, wooden, cement or ceramic tile surfaces), please follow the instruction below.
Outdoor Metal Mount- Step : Fix the bracket to where you want to install the camera with the supplied screw.
- Step : Connect the camera with the Joint Lock connected to the bracket, and secure the Joint Lock to fix.
- Step : Adjust the viewing angle of the camera.
Tips: Secure the Joint Lock tightly to avoid the camera dropping down.
-
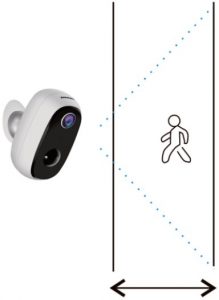
Monitoring Area:
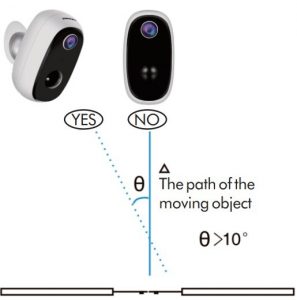
It is not suggested to install the camera vertically towards the moving objects, otherwise it may not detect the motion events or cause delay.
It is suggested to make the angular between PIR and detected objects more than 10 degrees.
It’s not suggested to make
the PIR sensor vertically
towards the moving objects
Entrance
-
Important Notes for Reducing False Alarms:

- Do not install the camera in a position facing strong lights/mirror/window/Swimming Pool.
- Do not place the camera too close to any angel with busy traffic.
- Recommended distance between the camera and motion objects are within10 M (32ft).
- Stay away from the outlets, including air conditioner vents, humidifier outlets, the heat transfer vents of the projectors, etc.
- Keep the camera at least 1 meter away from any wireless devices to avoid interference, such as microwave stove, Wi-Fi routers and etc.
-
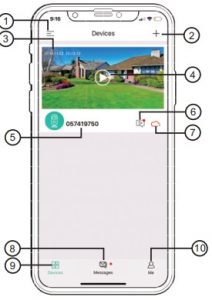
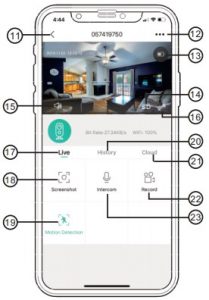
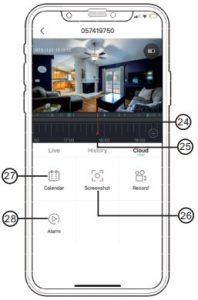
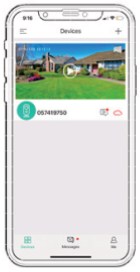
1 Device List 15 Volume On/Off 2 Add a Camera 16 Full Screen 3 Time 17 Preview 4 Live viewbutton 18 Screenshot Button 5 CameraName 19 Body Detection On/Off 6 History Playback 20 Notification History 7 Cloud Storage 21 Cloud Storage 8 Messages 22 Record on to Phone 9 My Device List 23 Two-Way Talk 10 Personal Homepage 24 Zoom 11 Quit live viewing 25 Time Bar 12 Setting Manual 26 History Screenshot 13 Battery Status 27 Alarm recordAlbum 14 HD/SD Switch 28 Date of History Record - CameraSettings:

- Receive Notifactions
- Turn on to Receive
Alarm Message
- Turn on to Receive
- Device Share
- Share Camera to others
- Alarm Setting
- Low/High
- SD Card
- SD Capacity/Format
- Could server
- Activate Cloud Storage
- Basic Function
- Rotate View
- Night Vision
- Speaker Volume
- Power Management
- Device version
- Camera Version
Tips: The person to be shared mustregister his/her own account inAPP.
- Camera Version
- Receive Notifactions
-
PIR Body Detection:
- .Body Detection Alarm Setting
PIR “Body Detection” is default to be on at “High” level. But it is adjustable. Please refer to the pictures as below.
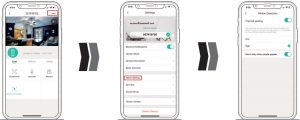
- Tap on “…”
- Select “Alarm Setting”
- Set it up
Sensitivity Detecting Distance (For moving and living objects) Low Up to5 meters (16ft) High Up to10 meters (32ft) Tips: Higher sensitivity offers longer detecting distance, but it would lead to more false alarms. You are advised to adjust to “Low” level when you install the camera outside.
- Alarm Notification
This camera is not designed for7x24 all day recording. It is only triggered when body motion is detected. Here are system’s reactions:- Alarm notifications with sounds from APP.
- Pictures/videos automatically storage in SD Card or Cloud.
- Records/Playback/Delete
- On “MESSAGES” page, click “Alarm Messages”, you can view all the records listed.
- Click the following buttons to playback or delete.
- Message–>
Alarm Message
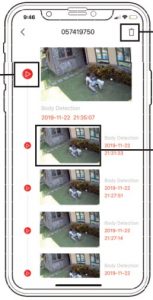
- 1.Click to Delete
History
2.Click to Preview
the Snapshot
- Message–>
- .Body Detection Alarm Setting
-
Click to Playback Alarm Video
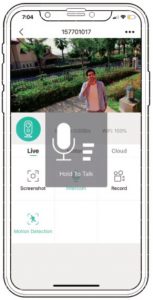
- Step : Activate the audio option.
- Step : Press and hold the intercom button to speak.
- Step : Release the button to listen.
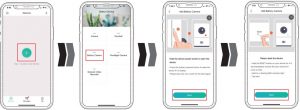
- Battery Management:
- The camera has a built-in 6000 mAh 18650 battery, which can be used for 2-5 months, assuming the camera wakes up15 times per day and plays video for 10 minutes.
Tips: The battery durability depends on how frequently the camera is woke up. The more it wakes up, the faster the battery level is consumed. It is recommended to lower down the “Body Detection” sensitivity or turn it off occasionally. - When the battery level is less than 20%, the APP will send you reminding messages for charging in time.
- Charge the camera with DC 5V1A/2A phone charger, until it is fully charged after 6 hours.
PS: (Adapter Not included)
- The camera has a built-in 6000 mAh 18650 battery, which can be used for 2-5 months, assuming the camera wakes up15 times per day and plays video for 10 minutes.
-
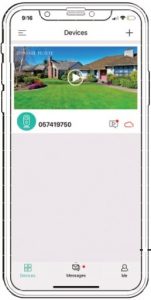
.Multi Device Management:
-
Reset:
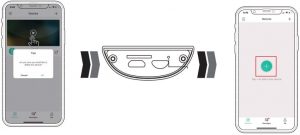
- Reset Hole
- keep pressing to remove device
- Press the reset buttion for 3-5,until hear the ”Boogu”sound
- Reconnect as before……
- Reset Hole
-
Trouble Shooting:
No Description Solution 1 Unable to Connect - Check yourWi-Fi name and password
- Ensure yourWi-Fi is 2.4G.Not support5G
- Ensure your camera and phone close to routerfor set up
2 Reset - Keep pressing the reset button for3~5seconds
- Hear “Boogu
- LED blink slowly in Red
3 Change to aNewNetwork - Remove the camera in CloudEdgeAPP
- Press the reset button to factory setting
- Re-connection
4 Alarm Picturewithout Persons - It takes time for camera towake up, or people move too fast Some objects around36℃move around
5 FrequentAlarm - Camera is triggerfrequently. Suggest to adjust the installation angle Adjust the camera alarm sensitivity to “Low”
6 Why is someone Crossing withoutAlarm - Make sure motion detection is turned on Beyound the range of PIR monitoring area
7 NoAlarm Push - Make sure Notification is turned on from CloudEdge and phone
8 NoAlarm Video - Make sure Micro SD card inserted / Cloud Storage activited
9 Device Offline - Check the camera if power off Make sure network is normal
10 Video Delay - Make sure network is normal
11 Battery Durability - Reduce Motion detection triggered / Two-Way Talk / Live Feed
12 Unable to Charge - Charge at least8-16hourswith a5V1A/2Aphone charger correctly
- LED turns to be red means your camera is charging correctly
- Make sure USB power cable and the phone charger bothworkwell
13 CloudEdgeAPP Flashback - Phone system version is too lowortoo high
14 Unable to RegisterAccount - Make sure to select correct country
15 Unable toAdd Friend - Your account and friend’s account must be in the same country. For example, accounts in Europe andAmerica cannot sharewith each other
-


Please Email us for Better Solution
instead of returning any unqualified product to Amazon
THANK YOU
DOWNLOAD RESOURCES
- ZUMIMALL Battery Powered Camera [pdf] User Guide Battery Powered Camera
- Read more: https://manuals.plus/zumimall/battery-powered-camera-manual#ixzz7d8FZkQuM
FAQ’S
Does Zumimall camera work without WiFi?
This wireless camera has built-in a rechargeable battery, which lasts up to 3-6 months depending on motion-detecting time. The device is required for the 2.4G Wi-Fi connection. 5G Wi-Fi is not supported.
How many Zumimall cameras can you have?
Monitor Multiple Places on One Screen: You can add multiple ZUMIMALL cameras to the app, and watch live stream from up to 4 security cameras on one screen at the same time.
How long does it take to charge Zumimall camera?
Charge the camera with DC 5V1A/2A phone charger, until it is fully charged after 6 hours.
What app does Zumimall camera use?
This outdoor wireless camera is compatible with ZUMIMALL & Cloudedge app.
What does camera offline mean?
Your camera has only just been switched on. The camera may be unable to connect to your network. Your Internet connection may be offline
Is Zumimall camera waterproof?
Security Camera Outdoor Rechargeable Battery ZUMIMALL 1080P Wireless WiFi Cameras for Home Security, Waterproof Camera, IR Night Vision, 2-Way Talk, Motion Detection, Alert, Remote View, Cloud/SD.
What is alarm interval off?
The alarm interval is the minimum amount of time between notifications. This is useful if there is continuous motion. So for example, if the interval is set at 30 seconds, you won’t get more than 1 notification every 30 seconds, even if there is continuous motion.
Do wireless cameras need charging?
Wireless cameras operate on batteries and do not require an electrical power source. Do note that the batteries may have to be replaced several times a year to enable the camera to function optimally and constantly.
Can Zumimall WIFI camera be hacked?
Any device connected to the internet can be hacked, and that includes home security cameras. Wired cameras are less vulnerable than Wi-Fi cameras, and those with local storage are less vulnerable than cameras that store video on a cloud-based server. However, all cameras can be hacked.
How do I connect my Zumimall camera to my TV?
Connect CCTV cameras to the NVR with Ethernet Cat 5/6 cables. Connect the security camera NVR to TV with the HDMI cable. Power the NVR with the power adapter. Turn on the TV, and the live view will be shown on the screen.
Do Zumimall cameras record all the time?
Most home security cameras are motion-activated and will record when they detect motion, as well as send you an alert. Some can record 24/7, which is known as continuous video recording (CVR).
How far can a Zumimall camera see?
Generally speaking, a regular security camera can see in a range between 10 to 70 feet (3-23m) depending on the lens size, resolution, and the type of sensor. But there are other camera types such as PTZ cameras that are able to see at distances over 1,000 feet.