Everbilt 9235951 Frameless Inset Hing Installation Guide
We appreciate the trust and confidence you have placed in Everbilt through the purchase of this hinge. We Strive to continually create quality Product designed to enhance your home. Visit us online to see our full line of products available for your home improvement needs. Thank you for choosing Everbilt!
Safety Information
Please read and understand this manual before installing this product.
CAUTION: Always be cautious when using power tools.
Warranty
Subject to the terms of this warranty, the Manufacturer warrants to the original consumer purchaser that the product will be free from defects in material and workmanship. If the product does not comply with this warranty, the Manufacturer will repair or replace the product or, at the Manufacturer’s option, refund the purchase price. Repair, replacement, or refund of the original purchase price is your sole remedy under this or any other warranty on the product, whether expressed or implied. For additional details and questions, please contact Everbilt Customer Service at 1-800-305-1726.
Pre-Installation
1. PLANNING INSTALLATION
- Ensure all parts listed in the Package Contents section are included and that you have the listed Tools Required on hand. If any part is missing or damaged, contact customer service.
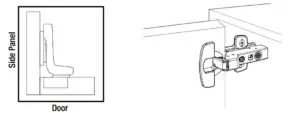
- When planning your installation, ensure the hinge is oriented in its nal position as shown. This hinge is intended for inset applications on frameless furniture with the doors positioned inside the front of the cabinet.
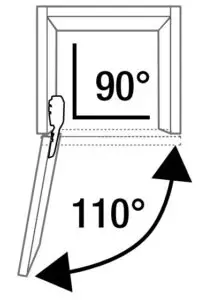
- When installed successfully, these hinges can open to a maximum of 110°.
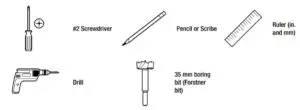
2. TOOLS REQUIRED
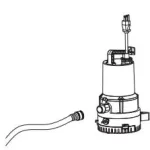
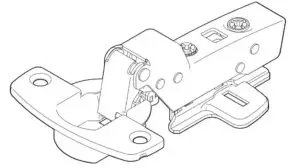
3. PACKAGE CONTENTS

4. RECOMMENDED NUMBER OF HINGES PER DOOR SIZE
Use this diagram to determine how many hinges you will need for your door. If you are hanging a door with a mirror or a door that is wider, you will need additional hinges.

Installation
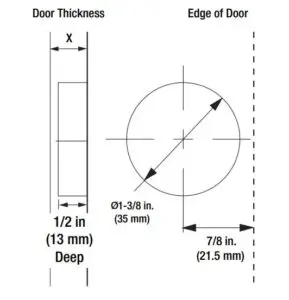
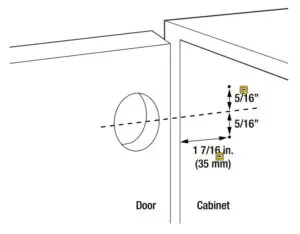
1. Pre-Drilling the installation holes
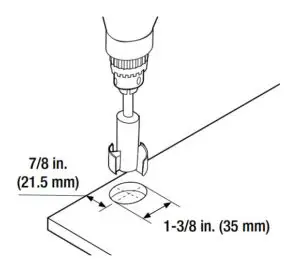
- Use a pencil and ruler to measure and mark the installation locations as this diagram shows.
- Then use a 1-3/8 in. (35 mm) boring bit to drill the door hole 7/8 in. from the edge. Ensure the door hole is a minimum of 1/2 in. (12.8 mm) deep. Do not drill through the door face.
Diagram for Drilling Hinge Cup
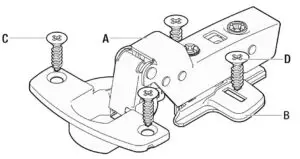
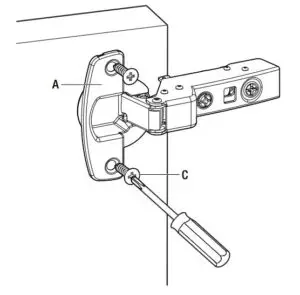
2. Installing the hinges to the door
- Insert each hinge cup (A) into the pre-drilled hole in the door and secure using two 5/8” wood screws (C) for each hinge (A).
3. Installing the mounting plates to the cabinet
- Align the mounting plates (B) to the marked position and fasten
with two screws. (D) - See installation diagram on next page.
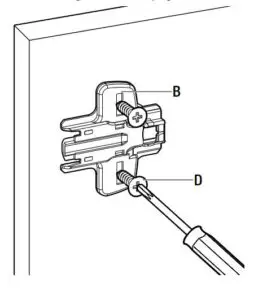
Diagram for mounting plate screw placement
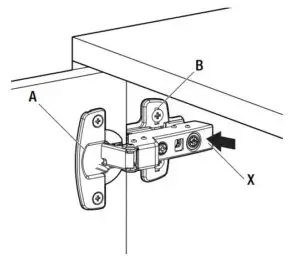
4. Installing the door to the cabinet
- Open the hinges (A) to the fully-extended position.
- Connet the hinge arm (A) to the mounting plates (B) and press the hinge arm (X) down until they snap to the plates.
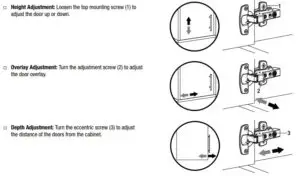
5. Adjusting the door
Questions, problems, missing parts? Before returning to the store, call Everbilt
Customer Service 8 a.m. – 7 p.m., EST, Monday-Friday, 9 a.m. – 6 p.m., EST, Saturday 1-800-305-1726
HOMEDEPOT.COM
For the most up to date instructions – please visit HomeDepot.com.
Retain this manual for future use.